background image

13

English

EN


Note


&

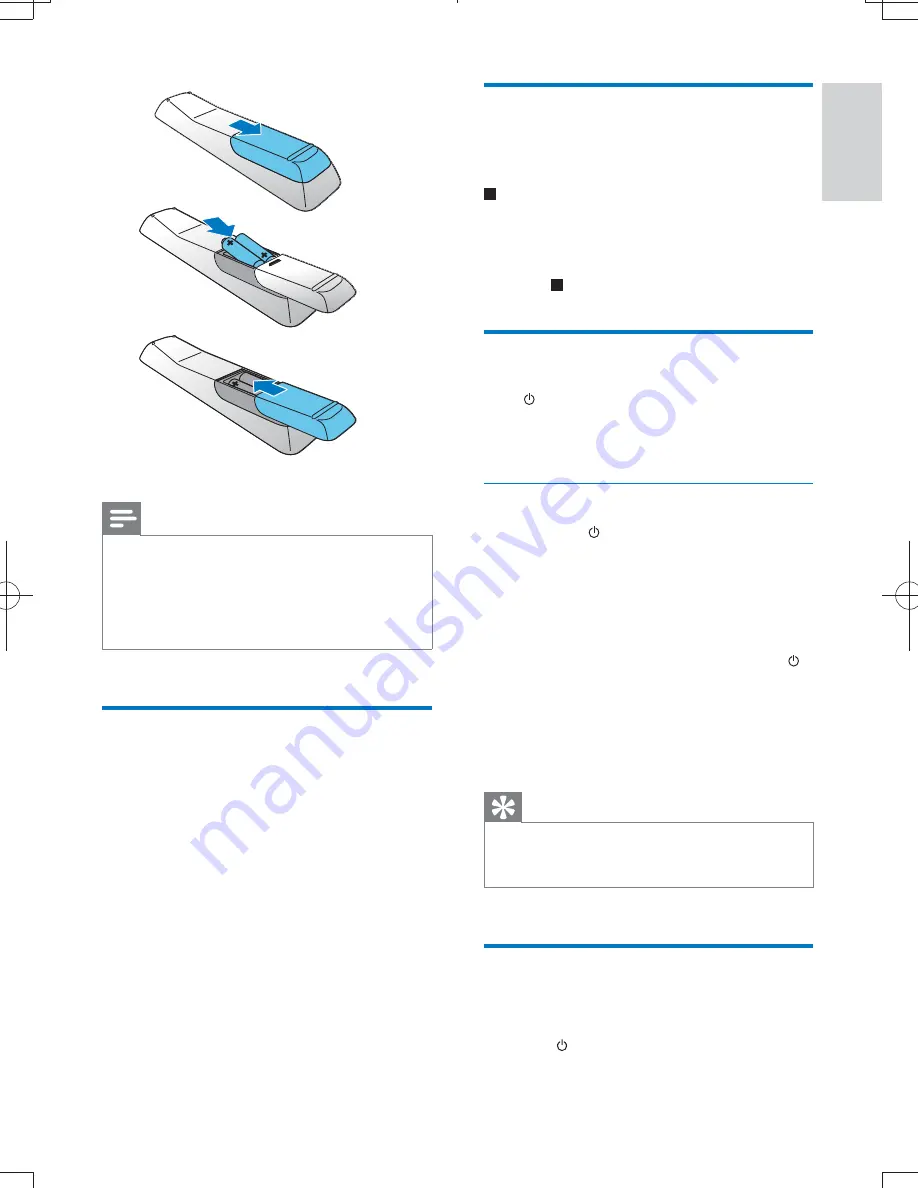
If you are not going to use the remote control for a 
long time, remove the batteries.


&

Do not use old and new or different types of batteries 
in combination. 


&

Batteries contain chemical substances, so they should 
be disposed of properly.

Set clock

In standby mode, press and hold 

CLOCK


for over 3 seconds.


»

[12HR] or [24HR] 

begins to blink.

Press 

+ VOL  -

 repeatedly to select 12/24 

hour format, and then press 

CLOCK

 to 

>


»

The hour digits are displayed and begin 
to blink.

Press 

+ VOL  -

 repeatedly to set hour, and 

then press 

CLOCK

 >


»

The minute digits are displayed and 
begin to blink.

Repeat step 3 to set minute.

a

b

c

Activate demonstration mode

You can see an overview of all features.
 !-# -( *%

 to activate the demonstration mode.


»

A demonstration of major available features 
starts.

& To deactivate the demonstration mode, 

press   again.

Turn on

Press  .


»

The unit switches to the last selected 
source.

Switch to Eco Power standby mode

Press and hold   for over 3 seconds to switch 
the unit to Eco Power standby mode.


»

The backlight on the display panel turns off.


»

The red Eco power indicator turns on

To switch the unit to standby mode:

In Eco Power standby mode, press and hold   
for over 3 seconds.


»

( * -
panel.


»

The red Eco Power indicator turns off.

Tip


&

If the system remains in standby mode for more 
than 90 seconds, it switches to the Eco Power mode 
automatically.

Find the correct viewing 
channel

Press   to turn on the unit.

Press 

DISC

 to switch to disc mode.

MCD780_93_UM_V1.0.indb   13

2012/3/13   11:06:55

Summary of Contents for MCD780

Page 1: ...MCD780 Register your product and get support at www philips com welcome Ⴌ߀ Ҭ 31 User manual 3 ...

Page 2: ...SB or recored discs 15 Play a slideshow 16 Play control 16 Play options 16 Picture view options 17 Play audio from an external device 17 6 Listen to radio 18 Store radio stations automatically 18 Tune to a radio station 18 Program radio stations 19 Tune to a preset radio station 19 7 Adjust sound 19 Adjust volume level 19 Select a sound effect 19 Mute sound 19 8 Adjust settings 20 General setup 20...

Page 3: ...adiators heat registers stoves or produce heat Protect the power cord from being walked on or pinched particularly at plugs convenience receptacles and the point where they exit from the apparatus by the manufacturer Use only with the cart stand tripod manufacturer or sold with the apparatus When a cart is used use caution when moving the cart apparatus combination to avoid injury from tip over Un...

Page 4: ... decibel ranges are offered for those that may have already experienced some hearing loss Sound can be deceiving Over time your hearing comfort level adapts to higher volumes of sound So after prolonged listening what sounds normal can actually be loud and harmful to your hearing To guard against this set your volume to a safe level before your hearing adapts and leave it there To establish a safe...

Page 5: ...od iPhone or USB storage devices View pictures from discs or USB storage devices Listen to FM radio You can enrich sound output with these sound effects Bass treble enhancement _ The unit supports these media disc formats Region code This player can play discs with the following region code DVD region code Countries China What s in the box Check and identify the contents of your package Main unit ...

Page 6: ... next track Search for radio stations Select programmed radio station Adjust time d Start or pause play b c d e f a k j i h g n l m o t p q r s e Stop play Erase a programmed radio station In standby mode activate or deactivate demonstration mode f USB socket g MP3 LINK Jack for an external audio device h Headphone socket i VOLUME Adjust volume Adjust time ...

Page 7: ...kers p LINE OUT Connect audio cables q DOCKING Connect docking device r FM ANTENNA Improve FM reception s AUX IN Connect an external audio device t VIDEO VIDEO OUT Video output jack Overview of the remote control a Turn on the device Switch to standby mode or Eco Power standby mode b DISC RADIO DOCK USB MP3 LINK AUX Select a source c A B track chapter a b d e f k i h m j l u c n o q p r s g v t w ...

Page 8: ... Adjust the time l SUBTITLE Select a subtitle language m PROGRAM Program radio stations n DIM Select different levels of brightness o MODE In DISC USB mode select repeat play or random play In DOCK mode select repeat play only p Open or close the disc compartment q SYSTEM MENU Go to the system menu r RDS INFO Show RDS information not applicable Show the disc information such as title chapter subti...

Page 9: ...ers Note Ensure that the colors of the speaker wires and terminals are matched For optimal sound use the supplied speakers only Connect only speakers with impedance that is the same or higher than the supplied speakers Refer to the 1 E 2 Insert the stripped part of the wire completely Insert the right speaker wires to R left speaker wires to L Insert the red wires to white wires to 3 E Connect FM ...

Page 10: ...picture Option 2 Composite video jack Connect a composite video cable to the VIDEO VIDEO OUT theVIDEO input jack on theTV Tip The video input jack on theTV might be labeled as A V IN VIDEO IN COMPOSITE or BASEBAND Route audio to other devices You can route the audio from this product to other devices the HDMI DIGITAL AV OUT unit the HDMI jack input jack on the device Tip the COAXIAL DIGITAL OUT th...

Page 11: ...l outlet 4 Get started Caution Use of controls or adjustments or performance of procedures other than herein may result in hazardous radiation exposure or other unsafe operation Always follow the instructions in this chapter in If you contact Philips you will be asked for the model and serial number of this apparatus The model number and serial number are on the bottom of the apparatus Write the n...

Page 12: ...a b c Activate demonstration mode You can see an overview of all features to activate the demonstration mode A demonstration of major available features starts To deactivate the demonstration mode press again Turn on Press The unit switches to the last selected source Switch to Eco Power standby mode Press and hold for over 3 seconds to switch the unit to Eco Power standby mode The backlight on th...

Page 13: ...NTSC ForTV with NTSC color system 5 To exit the menu press SYSTEM MENU Change system menu language 1 Press SYSTEM MENU 2 Select General Setup 3 Select OSD language and then press 4 Select a setting and then press OK 5 To exit the menu press SYSTEM MENU 5 Play Note Play a disc Caution Never look at the laser beam inside the unit Risk of product damage Never play discs with accessories such as disc ...

Page 14: ...nly be changed from the disc menu Press DISC MENU to access the menu Select a subtitle language You can select a subtitle language on DVDs or DivX discs During play press SUBTITLE Note For some DVDs the subtitle language can only be changed from the disc menu Press DISC MENU to access the menu Play from USB or recored discs Z Z_ recordable DVD or USB storage device 1 Select a source For a USB stor...

Page 15: ... point The selected section starts to play repeatedly To cancel repeat play press A B again Note The section A and B can be set only within the same track title Search forward backward During play press to select a search speed To resume play at normal speed press Resume video play from last stopped point Note This feature is only available for CD DVD VCD DivX play In stop mode and when the disc h...

Page 16: ...peatedly to select a slide show play mode Rotate picture During play press to rotate a picture Play audio from an external device You also can play music from your iPod iPhone through the DVD Micro Music System with a Note No audio output from the headphone jack in this situation Compatible iPod iPhone The compatible iPod iPhone models depend on external dock component Tip For detailed external do...

Page 17: ...ions automatically If no radio station is stored the unit can store radio stations automatically 1 Press RADIO AUTO INSTALL PRESS PLAY STOP CANCEL press to start automatic installation or press to 2 Press The unit automatically stores radio After all available radio stations are broadcast automatically Tune to a radio station 1 In radio mode press and hold over 3 seconds SEARCHING The radio tunes ...

Page 18: ...verwrite a programmed station store another station in its place Tune to a preset radio station Press or select a preset number that you want 7 Adjust sound Adjust volume level During play press VOL to increase decrease the volume level Select a sound effect Note You cannot use different sound effects at the same time Adjust bass level 1 During play press BASS to enter bass adjustment 2 Press VOL ...

Page 19: ... damage due to prolonged exposure to a static image On Enable the screen saver Off Disable the screen saver Sleep Timer Switches to standby automatically after the preset time 15 mins 30 mins 45 mins 60 mins 90 mins 120 mins select the count down time before the apparatus switches to standby Off disable sleep mode DivX R VOD Code Display the DivX registration code Tip Enter this DivX registration ...

Page 20: ...or 4 3 screenTV wide screen display with black bars on the top and bottom of the screen 16 9 Wide Screen For wide screenTV display ratio 16 9 Picture Settings Standard Original color setting Vivid Vibrant color setting Cool Soft color setting Personal Customizes the color setting Set the level of brightness contrast sharpness tint and color saturation then press OK HDMI Setup When you connect this...

Page 21: ...options Audio Select the preferred audio language for disc play Subtitle Select the preferred subtitle language for disc play Disc Menu Select the preferred disc menu language Note If the language you have set is not available on the disc the disc uses its own default language For some discs the subtitle audio language can only be changed from the disc menu Parental Restricts access to discs that ...

Page 22: ...ness of display panel Press DIM repeatedly to select different levels of brightness for the display panel Set the sleep timer This unit can switch to standby mode automatically after a set period When the unit is turned on press SLEEP TIMER repeatedly to select a preset period in When the sleep timer is activated is displayed To deactivate the sleep timer Press SLEEP TIMER repeatedly until SLEEP O...

Page 23: ... AUX If the CD USB iPod iPhone source is selected but no disc is placed or no USB iPod iPhone connected the unit switches to FM automatically Listen to an audio player You can listen to an external device through this unit 1 Connect an external device For the external device with red white audio output sockets to the AUX IN L R sockets and to the audio output sockets on the external device For the...

Page 24: ...ner FM Tuning Range 87 5 108 MHz Tuning grid 50 KHz Sensitivity Mono 26dB S N Ratio 22 dBf Sensitivity Stereo 46dB S N Ratio 43 dBf Search Selectivity 28 dBf Total Harmonic Distortion 3 Signal to Noise Ratio 50 dB Speakers Speaker Impedance 6 ohm Speaker Driver 4 Full range Sensitivity 82 dB m W General information AC power 220V 50 Hz Operation Power Consumption 30 W Eco Standby Power Consumption ...

Page 25: ...rmats are not supported Files like VMA AAC DLF M3U PLS WAV Non English Album Title name Discs recorded in Joliet format MP3 Pro and MP3 with ID3 tag USB playability information Compatible USB devices Q E Q Q Q E Q Q Supported formats Q Z variable bit rate WMA v9 or earlier Directory nesting up to a maximum of 8 levels Number of albums folders maximum 99 Number of tracks titles maximum 999 ID3 tag ...

Page 26: ...distortion may appear This is not a malfunction Clean the disc A distorted picture may appear during progressive scan setup The aspect ratio of the TV screen cannot be changed even though you have set the TV display format DVD disc The aspect ratio may not be changed for someTV systems No sound or poor sound Adjust the volume Disconnect the headphones Check that the speakers are connected correctl...

Page 27: ...ages cannot be set The disc is not recorded with sound or subtitles in multiple languages The audio or subtitle language setting is prohibited on the disc Q device has exceeded a certain limit This phenomenon is not a malfunction supported USB device not supported The USB device is incompatible with the unit Try another one Timer does not work Set the clock correctly Switch on the timer Clock time...

Page 28: ...s of materials which can be recycled and reused if disassembled by a specialized company Please observe the local regulations regarding the disposal of packaging materials exhausted batteries and old The making of unauthorized copies of copy protected material including computer recordings may be an infringement of copyrights and constitute a criminal offence purposes Manufactured under license fr...

Page 29: ...30 EN This apparatus includes this label Note The type plate is located on the back of the device ...

Page 30: ...ࠋჱෑᄡᆢӌൔႬ ࡵ ߺ ك ഷທྈࠋ ёĶ ሴྔ Ӆ Ⴌ߀ൔ Ⴌ ۂ ሴྔ Ӆ ߺ ࣦߐؗ ᄳӲ ᇛ ಝࠋ ؗ ఇಪപ ґӅᄳӲ ᇛ ෩ ݡ ཏ 7KLV ORJR UHIHUV WR WKH SHULRG HDUV GXULQJ ZKLFK WKH WR LF RU KD DUGRXV VXEVWDQFHV RU HOHPHQWV FRQWDLQHG LQ HOHFWURQLF LQIRUPDWLRQ SURGXFWV ZLOO QRW OHDN RU PXWDWH VR WKDW WKH XVH RI WKHVH VXEVWDQFHV RU HOHPHQWV ZLOO QRW UHVXOW LQ DQ VHYHUH HQYLURQPHQWDO SROOXWLRQ DQ ERGLO LQMXU RU GDPDJH WR DQ DVVHWV Ճሙ 1DPH RI WKH 3DUWV ఙർ...

Page 31: ...Specifications are subject to change without notice 2012 Koninklijke Philips Electronics N V All rights reserved MCD780_93_UM_V1 0 ...

Reviews: