7-4
Direction of Use
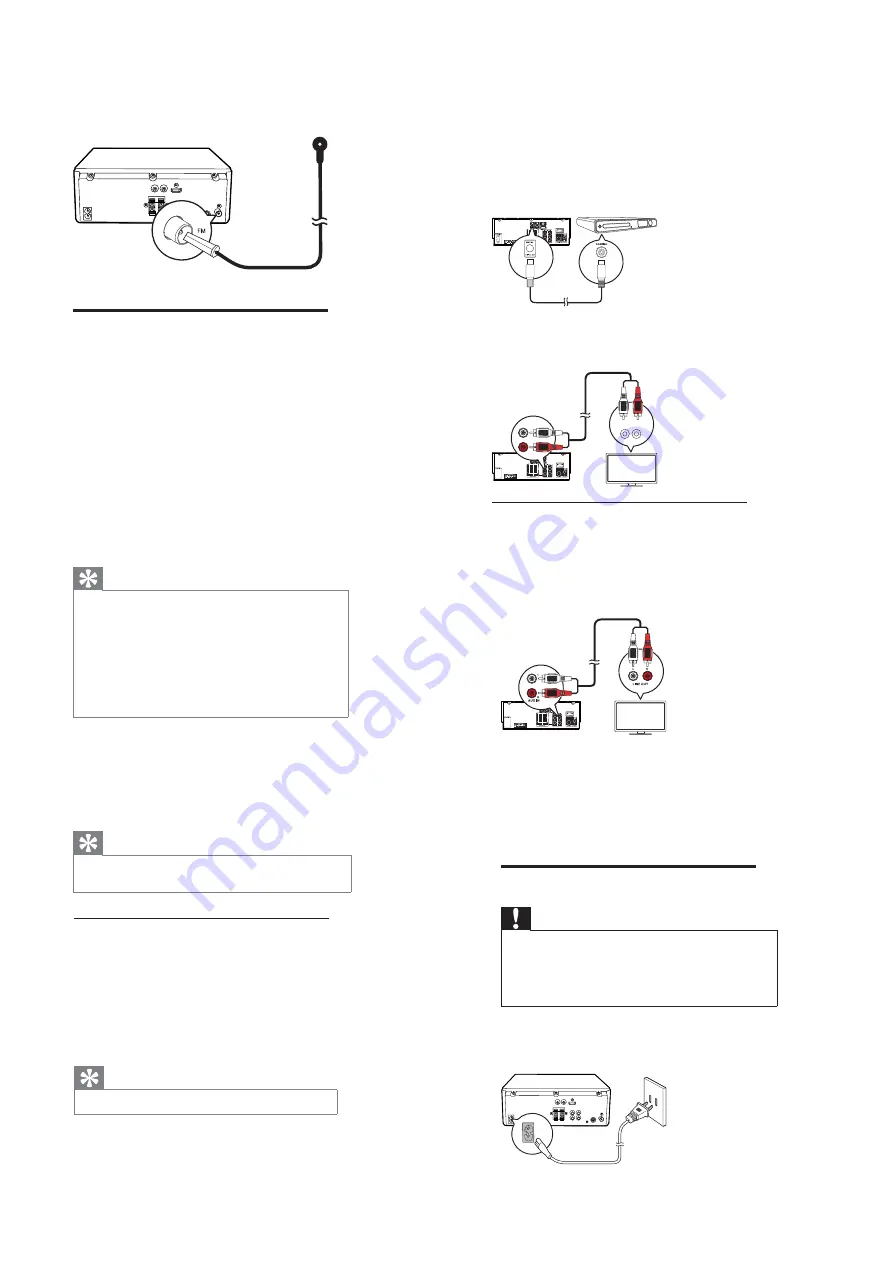
Connect video/audio cables
Select the best video connection that the TV
can support.
•
Option 1: Connect to the HDMI jack (for
an HDMI, DVI or HDCP-compliant
TV).
•
Option 2: Connect to the composite
video jack (for a standard
TV).
Option 1: HDMI jack
Connect an HDMI cable (not supplied)
to:
•
the HDMI (DIGITAL AV OUT) jack on this
product.
•
the HDMI input jack on the TV.
Tip
•
If the TV has a DVI connector only, connect via an
HDMI/DVI adaptor. Connect an audio cable for sound
output.
•
If this product connects to a TV compatible with 1080p
or 1080p/24Hz, Philips recommends HDMI category
2 cable, also known as High Speed HDMI cable, for
optimal video and audio output.
•
This type of connection provides the best picture
quality.
Option 2: Composite video jack
Connect a composite video cable to:
•
the VIDEO (VIDEO OUT) jack on this unit.
•
the VIDEO input jack on the TV.
Tip
•
The video input jack on the TV might be labeled as A/V
IN, VIDEO IN, COMPOSITE or BASEBAND.
Route audio to other devices
You can route the audio from this product to
other devices.
Connect an
HDMI cable
(not supplied)
to:
•
the HDMI (DIGITAL AV OUT) jack on this
unit.
•
the HDMI jack input jack on the device.
Tip
•
The HDMI connection
provides
the best
audio
quality.
Connect a coaxial cable
(not supplied)
to:
•
the COAXIAL (DIGITAL OUT) jack on
this unit.
•
the COAXIAL/DIGITAL input jack on the
device.
Connect the audio cables to:
•
the LINE OUT-L/R jacks on this unit.the
AUDIO input jacks on the device.
Route audio from other devices
Route audio from TV or other devices
Use this product to play audio from the TV or
other device such as a cable box.
Press MP3-LINK/AUX to select the audio
output of your connection.
LINE OUT
L
R
L
LINE IN
R
Connect an external device
You can listen to an audio player through this
unit.
Connect the MP3 link cable to
• the
MP3
LINK jack of this unit
•
the audio output jack (usually headphone
jack) of the external device.
Connect power
Caution
•
Risk of product damage! Ensure that the power supply
voltage corresponds to the voltage printed on the back
or the underside of the unit.
•
Before connecting the AC power cord, ensure you have
completed all other connections.
Connect the AC power cord to:
•
the power socket on the back of the unit.
•
the wall outlet.
Summary of Contents for MCD780/93
Page 30: ...AMP Board Layout Diagram 12 2 12 2 ...
Page 32: ...Display Board Layout Diagram 12 4 12 4 ...
Page 36: ...Power Board Layout Diagram 12 8 12 8 T5AH 250V ...
Page 41: ...Decoder Board Layout Diagram 12 13 12 13 ...
Page 43: ...Revision List Revision List Version 1 0 Initial Release 14 1 ...


