background image

20

English

Controls

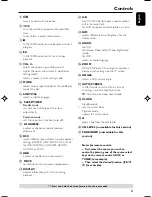
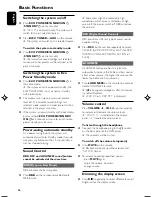
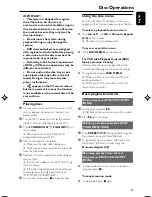
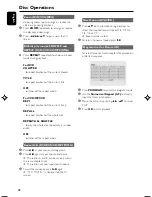
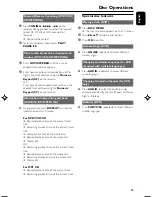
Controls on the system

1

ECO POWER/STANDBY ON 

B

to switch the system on or to Eco power/normal
standby mode.

2

iR sensor

infrared sensor for remote control.

3

PROGRAM

DVD/VCD/CD/MP3-CD/USB: enters the
program menu.

Picture CD: during playback, to select a slide
show mode.

Tuner: programs preset radio stations.

4

Mode Selection

9

............................. In DISC/USB mode, to stop

playback or clear a program.

......................................... for Demo 

(on the system

only)

 to activate/deactivate

the demonstration.

2;

........................... In DISC/USB mode, to start or

interrupt playback.

PRESET

í

/

ë

Disc/USB: skips to the previous/next chapter/

title/track.

Tuner: selects a preset radio station.

TUNING 

22

/

33

Tuner

press to tune to a lower/higher radio frequency
gradually.

press and hold, then release the key to start
automatic search for a radio frequency
downward/upward.
Disc/USB

searches fast backward/forward.

5

Display screen

to view the current status of the system.

6

SOURCE

to select the respective sound source : TUNER,
DISC, USB/CARD or AUX.

7

VOLUME -/+

adjusts the volume upward/downward.

adjusts the hours and minutes in clock/timer
setting mode.

selects a source in timer setting mode.

8

n

 –  to connect a headphone.

9

EJECT

ejects a disc from the disc loader.

0

AUX-IN

connects an external non-USB device.

!

 USB DIRECT

jack for the external USB mass storage device.

@

SLIDE OPEN


4

slides down to expose some buttons and jacks
on the front panel.

Controls on the remote control

1

STANDBY 

y

to switch the system on or to Eco power/normal
standby mode.

2

Numeric Keypad (0-9)

inputs a track/title/chapter number of the disc.

3

PROGRAM

DVD/VCD/CD/MP3-CD/USB: enters the
program menu.

Picture CD: during playback, to select a slide
show mode.

Tuner : programs preset radio stations.

SOURCE

to select the respective sound source : TUNER,
DISC, USB/CARD or AUX.

SYSTEM MENU 

(disc mode only)

to enter or exit the system menu bar.

6

DISC MENU 

(disc mode only)

DVD/VCD: enters or exits the disc contents
menu.

VCD2.0: switches the playback control mode on
or off .

7

2

/

3

Tuner

press to tune to a lower/higher radio frequency
gradually.

press and hold, then release the key to start
automatic search for a radio frequency
downward/upward.
Disc/USB

searches fast backward/forward.

In DISC mode, to select a movement direction in
the disc menu or system menu bar.

8

3

/

4

In DISC mode, to select a movement direction in
the disc menu or system menu bar.

selects different slow playback modes for a VCD/
SVCD/DVD.

* = Press and hold the button for more than three seconds.

pg001-pg025_MCD288-37-Eng-A

2006.3.15, 16:50

20

Summary of Contents for MCD288

Page 1: ...mplifier l utilisation de votre produit Philips Toutefois si vous ne parvenez pas à résoudre votre probléme vous pouvez accéder à notre aide en ligne à l adresse www philips com support ou formez le 1 800 661 6162 Francophone 1 888 PHILIPS 744 5477 English speaking Veillez à avoir votre produit à portée de main et model serial nombre Gracias por escoger Philips Necesita ayuda inmediata Lea primero...

Page 2: ...tes dans le Règlement sur le Brouillage Radioélectrique édicté par le Ministère des Communications du Canada CAUTION Use of controls or adjustments or performance of procedures other than herein may result in hazardous radiation exposure or other unsafe operation ATTENTION L utilisation des commandes ou réglages ou le non respect des procédures ci incluses peuvent se traduire par une exposition da...

Page 3: ...3 ...

Page 4: ...4 ª 6 7 9 º 1 4 5 7 0 2 3 8 8 ...

Page 5: ...5 ...

Page 6: ...6 IMPORTANT SAFETY INSTRUCTIONS Class II equipment symbol This symbol indicates that the unit has a double insulation system Clean only with dry cloth materials ...

Page 7: ... rights owned by Macrovision Corporation and other rights owners Use of this copyright protection technology must be authorized by Macrovision Corporation and is intended for home and other limited viewing uses only unless otherwise authorized by Macrovision Corporation Reserve engineering or disassembly is prohibited DivX DivX Certified and associated logos are trademarks of DivXNetworks Inc and ...

Page 8: ...7679 Latina 7665 Latvian 7686 Letzeburgesch 7666 Limburgan Limburger 7673 Lingala 7678 Lithuanian 7684 Luxembourgish 7666 Macedonian 7775 Malagasy 7771 Magyar 7285 Malayalam 7776 Maltese 7784 Manx 7186 Maori 7773 Marathi 7782 Marshallese 7772 Moldavian 7779 Mongolian 7778 Nauru 7865 Navaho Navajo 7886 Ndebele North 7868 Ndebele South 7882 Ndonga 7871 Nederlands 7876 Nepali 7869 Norsk 7879 Northern...

Page 9: ... Scan feature for Progressive Scan TV only To deactivate Progressive manually Step 4 Setting language preference 25 Basic Functions Switching the system on off 26 Switching the system to Eco Power Standby mode 26 Power saving automatic standby 26 Sound control 26 DBB DSC LOUDNESS Volume control 26 Dimming the display screen 26 Disc Operations Playing discs 27 Using the disc menu 27 Basic playback ...

Page 10: ...UE SATURATION AUDIO SETUP 35 DIGITAL OUT DOWNMIX 3D PROCESSING LPCM NIGHT MODE Radio Reception Tuning to radio stations 36 Programming radio stations 36 Automatic programming 36 Manual programming 36 Tuning to preset radio stations 36 External Sources Using a non USB device 37 Using a USB mass storage device 37 38 Clock Timer Clock setting 39 Timer setting 39 Sleep timer setting 39 Specifications ...

Page 11: ...le to 525 lines Note To fully enjoy the progressive scan feature you need a progressive scan TV Discs for playback Your DVD System will play DigitalVideo Discs DVDs Video CDs VCDs SuperVideo CDs SVCDs DigitalVideo Discs Rewritable DVD RW Compact Discs CDs Picture Kodak JPEG files on CDR W Windows Media Audio WMA DivX R disc on CD R W DivX 3 11 4 x and 5 x Supported MP3 CD format ISO 9660 UDF forma...

Page 12: ...ub cable with one end fixed on the main set Stand Remote Control and two AAA batteries This instruction booklet and a quick start guide Environmental information All unnecessary packaging has been omitted We have tried to make the packaging easy to separate into three materials cardboard box polystyrene foam buffer and polyethylene bags protective foam sheet Your system consists of materials which...

Page 13: ...fication of the product could result in hazardous radiation of EMC or other unsafe operation To avoid overheating of the system a safety circuit has been built in Therefore your system may switch to Standby mode automatically under extreme conditions If this happens let the system cool down before reusing it not available for all versions Note Before installation is finished it is not recommended ...

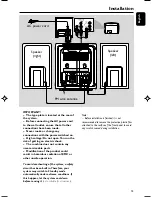
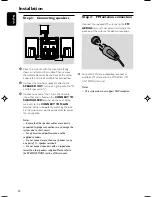
Page 14: ...ct the two front speaker cables to the SPEAKER OUT terminals right speaker to R and left speaker to L 3 Connect one end of the 15 pin D Sub cable the other end is fixed on the CONNECTTO SUBWOOFER terminal on the back of the main set to the CONNECTTO MAIN terminal of the subwoofer by matching the pins Fix the two screws on the connectors to ensure firm connection Notes Ensure that the speaker cable...

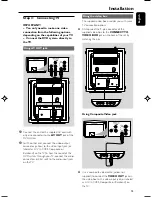
Page 15: ...ck or labeled as A V In CVBS Composite or Baseband on theTV To hear the sound of this DVD system through yourTV connect the audio connectors white red to the audio input jacks on theTV Using the video box The supplied video box provides you with more TV connection options First connect the 9 pin connector of the supplied video box to the CONNECTTO VIDEO BOX jack on the back of the set by matching ...

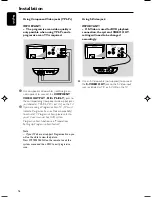
Page 16: ...sive Scan or ProScan capability to activateTV Progressive Scan please refer to yourTV user manual For DVD system Progressive Scan function see Preparations Setting up Progressive Scan feature Note If yourTV does not support Progressive Scan you will not be able to view the picture Press SYSTEM MENU on the remote to exit the system menu and then DISC to exit progressive scan Using S Video jack IMPO...

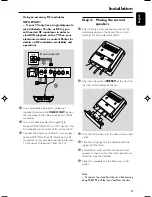
Page 17: ...SS4 pull the stand out from the slots Using an accessory RF modulator IMPORTANT If yourTV only has a singleAntenna In jack labeled as 75 ohm or RF In you will need an RF modulator in order to view DVD playback on theTV See your electronics retailer or contact Philips for details on RF modulator availability and operations 3 2 AUDIO IN R L VIDEO IN TO TV INT IN CH3 CH4 ANT IN RF coaxial cable toTV ...

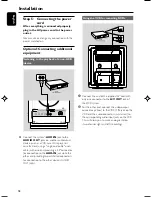
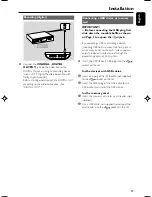
Page 18: ...tep 5 Connecting the power cord After everything is connected properly plug in the AC power cord to the power outlet Never make or change any connection with the power switched on Optional Connecting additional equipment Listening to the playback of a non USB device AUDIO OUT L R VCR for example Connect the system s AUX IN jack to the AUDIO OUT jacks on another audio visual device such as aVCR Las...

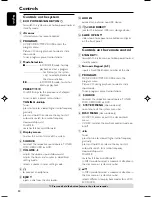
Page 19: ...et for the devices with USB cables 1 Insert one plug of the USB cable not supplied to the socket on the set 2 Insert the other plug of the USB cable to the USB output terminal of the USB device for the memory card 1 Insert the memory card into a card reader not supplied 2 Use a USB cable not supplied to connect the card reader into the socket on the set Recording digital Connect the COAXIAL DIGITA...

Page 20: ... connect a headphone 9 EJECT ejects a disc from the disc loader 0 AUX IN connects an external non USB device USB DIRECT jack for the external USB mass storage device SLIDE OPEN 4 slides down to expose some buttons and jacks on the front panel Controls on the remote control 1 STANDBY y to switch the system on or to Eco power normal standby mode 2 Numeric Keypad 0 9 inputs a track title chapter numb...

Page 21: ...interrupt or resume sound reproduction DISPLAY displays information onTV screen during playback A B forVCD CD USB to repeat a specific section within the same track for DVD to repeat a specific section in a disc DIM selects different levels of brightness for the display screen AUDIO forVCD sets Stereo Mono Left or Mono Right sound mode for DVD selects an audio language ZOOM DVD VCD Picture CD enla...

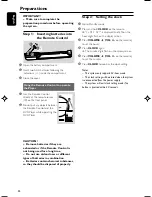
Page 22: ...ote Control is not being used for a long time Do not use old and new or different types of batteries in combination Batteries contain chemical substances so they should be disposed of properly Step 2 Setting the clock 1 Go to Standby mode 2 Press and hold CLOCK on the remote CLOCK SET is displayed briefly Then the hour digits flash on the display screen 3 Press VOLUME VOL on the remote to set the ...

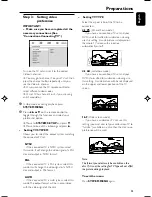
Page 23: ... IMPORTANT Make sure you have completed all the necessary connections See Connections ConnectingTV Turn on theTV set and set it to the correct Video In channel You may go to channel 1 on yourTV set then press the channel button repeatedly until you see theVideo In channel Or you can use theTV remote control to select different video modes Or setTV to channel 3 or 4 if you are using an RF modulator...

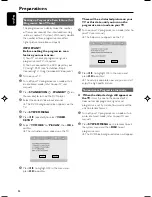
Page 24: ...the TV 5 Press SYSTEM MENU 6 Press 1 2 repeatedly to select VIDEO SETUP 7 Select TV MODE to P SCAN then OK to confirm The instruction menu appears on theTV 8 Press 1 2 to highlight OK in the menu and press OK to confirm There will be a distorted picture on your TV at this state until you turn on the progressive scan mode on yourTV 9 Turn on your TV progressive scan mode refer to yourTV user manual...

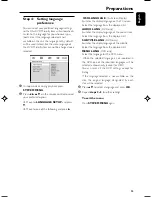
Page 25: ...g If the language selected is not available on the disc the original language designated by each disc will be selected 3 Press 5 4 to select a language and press OK 4 Repeat steps 2 3 for other settings To exit the menu Press SYSTEM MENU again Step 4 Setting language preference You can select your preferred language settings so that this DVD Micro System will automatically switch to the language f...

Page 26: ...d at the same time DBB Dynamic Bass Boost DBB enhances the bass response Press DBB on the remote to enable disable DBB feature Some discs might be recorded in high modulation which causes a distortion at high volume If this occurs switch off DBB or reduce the volume DSC Digital Sound Control DSC provides a different type of preset sound equalizer setting Press DSC on the remote repeatedly to selec...

Page 27: ...yback will start automatically depending on the disc type If a disc menu appears on theTV see Using the Disc Menu If the disc is locked by parental control you must enter your four digit password See SYSTEM SETUP PASSWORD 6 At any time simply press 9 to stop playback Disc Operations Using the disc menu For disc with Table Of Contents a menu may appear on theTV screen once you load the disc To sele...

Page 28: ... repeatedly in random order OFF switches off the repeat mode Repeat A B DVD VCD CD MP3 WMA 1 Press A B at your chosen starting point 2 Press A B again at your chosen end point The section A and B can be set only within the same chapter track The section will now repeat continuously 3 To exit the sequence press A B again A B CANCEL is displayed on the TV screen Slow Motion DVD VCD 1 Press 5 4 on th...

Page 29: ... current track title Remaining playback time of the current track title Total playback time of the whole disc Elapsed playback time of the whole disc Display off OR Remaining playback time of the current track title Elapsed playback time of the whole disc Remaining playback time of the whole disc Display off For MP3 CD Elapsed playback time of the current track Remaining playback time of the curre...

Page 30: ...d onto the disc Playback selection During playback you can Press PRESETí ë to select another track in the current album Press 2 repeatedly to pause resume playback Playing JPEG Picture CD General operation 1 Load a JPEG Picture CD A data disc menu appears on theTV screen and playback starts automatically from the first file 2 Press 2 to move to the folder column on the left of theTV screen then us...

Page 31: ...creen 5 flip the picture vertically 4 flip the picture horizontally 2 rotate the picture anti clockwise 3 rotate the picture clockwise Disc Operations Playing a DivX disc This DVD player supports the DivX movie playback that you download from your computer onto a CD R RW see System Menu Options DIVX R VOD registration code for more information 1 Load a DivX disc Playback will start automatically I...

Page 32: ... SAVER This function is used to turn the screen saver on or off CLOSED CAPTIONS ON In STOP PAUSE or No DISC mode if no actions are performed about 3 minutes the screen saver will be activated OFF Screen saver is disabled CLOSED CAPTIONS Closed captions are data that are hidden in the video signal of some discs Captions are different from subtitles because captions hearing are impaired by showing t...

Page 33: ... displayed enter the default password 0000 and press OK to unlock If is displayed directly proceed with Step 2 and 3 3 Enter your new four digit password using Numeric Keypad 0 9 on the remote 4 Press OK to confirm and the new password takes effect Note The default password 0000 is always active even if the password has been changed RATING Some DVDs may have a parental level assigned to the comple...

Page 34: ...D LANGUAGE AUDIO LANG SUBTITLE LANG and MENU LANG See Preparations Step 4 Setting language preference for details VIDEO SETUP The options included inVIDEO SETUP page are COMPONENT TV MODE BRIGHTNESS CONTRAST HUE and SATURATION COMPONENT Sets the video output according to your video connection This setting is not required if you are using the VIDEO OUT jack yellow to connect the DVD micro system to...

Page 35: ...volume outputs are brought upward to an audible level This feature is only available for movies with Dolby Digital mode BRIGHTNESS Adjusts the brightness level Range 0 12 CONTRAST Adjusts the contrast level Range 0 12 HUE Adjusts the hue level Range 6 6 SATURATION Adjusts the saturation level Range 0 12 AUDIO SETUP The options included in AUDIO SETUP page are DIGITAL OUT DOWNMIX 3D PROCESSING LPCM...

Page 36: ...dio stations in the memory Automatic programming Press PROGRAM for more than three seconds to activate programming All available stations are programmed AUTO is displayed and available stations are programmed in order of waveband Manual programming 1 Tune to your desired station refer to Tuning to radio stations 2 Press PROGRAM to activate programming PROG flashes on the display 3 Press PRESETí ë ...

Page 37: ... USB flash players or memory devices the stored contents are recorded using copyright protection technology Such protected contents will be unplayable on any other devices such as this Hi Fi system Supported formats USB or memory file format FAT12 FAT16 FAT32 sector size 512 bytes MP3 bit rate data rate 32 320 Kbps and variable bit rate WMA v9 or earlier Directory nesting up to a maximum of 8 leve...

Page 38: ...and the file names ofWMA files end with wma For DRM protectedWMA files useWindows Media Player 10 or later for conversion Visit www microsoft com for details aboutWindows Media Player andWM DRM Windows Media Digital Rights Management 1 Check the USB device has been properly connected See Installation Connecting an additional appliance 2 Press SOURCE once or more to select USB or USB CARD on the re...

Page 39: ... set the minutes and SLEEP TIMER to confirm TUN DVD or USB flashes 4 Press VOLUME VOL on the remote to select your desired source 5 Press SLEEP TIMER to complete the setting Display shows To deactivate the timer Press SLEEP TIMER again disappears Sleep timer setting The sleep timer enables the system to switch off by itself after a set period of time 1 Press SLEEP TIMER on the remote control repea...

Page 40: ...s V1 1 support MP3 and WMA files Number of albums folders maximum 99 Number of tracks titles maximum 999 TUNER FM wave range 87 5 108 MHz Sensitivity at 75 Ω mono 26 dB signal to noise ratio 2 8 µV stereo 46 dB signal to noise ratio 61 4 µV Selectivity 15 dB Total harmonic distortion 5 Frequency response 40 5000 Hz 6 dB Signal to noise ratio 58 dBA SPEAKERS Front Speakers Impedance 6 Ω Sensitivity...

Page 41: ...he disc see Maintenance Use a readable disc or correctly recorded format MP3 CD Select the appropriate video input mode on the TV set Check if theTV set is switched on Check the video connection Check if the system is securely connected If the progressive scan feature is activated but the connectedTV does not support progressive signals or the cables are not connected accordingly see Preparations ...

Page 42: ...wer plug from the jack and insert again Multi language sound or subtitle is not recorded on the DVD Changing the language for the sound or subtitle is prohibited on the DVD Make sure the component is connected correctly Press the correct function button for the input source Adjust the volume Disconnect the headphones Check that the speakers are connected correctly Check if the stripped speaker wir...

Page 43: ...e Check the speaker connections and location Point the remote control at the remote control sensor of the unit Reduce the distance to the player Remove any possible obstacles Replace the batteries with new ones Check that the batteries are loaded correctly Set the clock correctly If recording is in progress stop it Power has been interrupted or the power cord has been disconnected Reset the clock ...

Page 44: ...or CD RW can contain about 10 times as much data volume as a regular CD can Multichannel DVD is specified to have all sound tracks constitute one sound field Multichannel refers to a structure of sound tracks having three or more channels Parental control A function of the DVD to limit playback of the disc by the age of the users according to the limitation level in each country The limitation var...

Page 45: ...45 ...

Reviews: