background image

8

Note

The type plate is located on the bottom of the 

apparatus.

Environmental information

All unnecessary packaging has been omitted. 
We have tried to make the packaging easy to 
separate into three materials: cardboard (box), 
polystyrene foam (buffer) and polyethylene 
(bags, protective foam sheet.) 
Your system consists of materials which can 
be recycled and reused if disassembled by 
a specialized company. Please observe the 
local regulations regarding the disposal of 
packaging materials, exhausted batteries and old 
equipment.

The making of unauthorized copies of copy-
protected material, including computer 
programs, fi les, broadcasts and sound 
recordings, may be an infringement of 
copyrights and constitute a criminal offence. 
This equipment should not be used for such 
purposes. 

‘DVD Video’ is a trademark of DVD Format/
Logo Licensing Corporation.

Manufactured under license from Dolby 
Laboratories. Dolby and the double-D symbol 
are trademarks of Dolby Laboratories.

This apparatus includes this label:

EN

Summary of Contents for MCD122

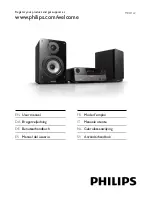
Page 1: ...ur product and get support at www philips com welcome EN User manual DA Brugervejledning DE Benutzerhandbuch ES Manual del usuario FR Mode d emploi IT Manuale utente NL Gebruiksaanwijzing SV Användarhandbok MCD122 ...

Page 2: ...ly 24 Program radio stations manually 24 Tune to a preset radio station 24 Set RDS clock 25 Show RDS information 25 Contents 1 Important 5 Safety 5 Important Safety Instructions 5 Safety Important notes for users in the U K 6 Hearing safety 7 Notice 7 2 Your DVD Micro Theater 9 Introduction 9 What s in the box 9 Overview of the main unit 10 Overview of the remote control 11 3 Connect 13 Place the ...

Page 3: ...r features 27 Activate demonstration mode 27 Adjust brightness of display panel 27 Set the alarm timer 27 Set the sleep timer 27 Connect other devices 27 Listen to an audio player 27 Record to a digital recorder 28 10 Product information 29 Specifications 29 Amplifier 29 Disc 29 Tuner FM 29 Speakers 29 General information 29 Supported disc formats 30 USB playability information 30 RDS program types ...

Page 4: ...en into the apparatus the apparatus has been exposed to rain or moisture does not operate normally or has been dropped n Battery usage CAUTION To prevent battery leakage which may result in bodily injury property damage or damage to the unit Install all batteries correctly and as marked on the unit 1 Important Safety Know these safety symbols This bolt of lightning indicates uninsulated material w...

Page 5: ...nit on other electrical equipment Only use this unit indoors Keep this unit away from water moisture and liquid filled objects Keep this unit away from direct sunlight naked flames or heat Never look into the laser beam inside the unit Do not mix batteries old and new or carbon and alkaline etc Remove batteries when the unit is not used for a long time o Apparatus shall not be exposed to dripping or...

Page 6: ...nes at a high volume can impair your hearing This product can produce sounds in decibel ranges that may cause hearing loss for a normal person even for exposure less than a minute The higher decibel ranges are offered for those that may have already experienced some hearing loss Sound can be deceiving Over time your hearing comfort level adapts to higher volumes of sound So after prolonged listeni...

Page 7: ...any Please observe the local regulations regarding the disposal of packaging materials exhausted batteries and old equipment The making of unauthorized copies of copy protected material including computer programs files broadcasts and sound recordings may be an infringement of copyrights and constitute a criminal offence This equipment should not be used for such purposes DVDVideo is a trademark of...

Page 8: ...enefit from the support that Philips offers register your product at www Philips com welcome Introduction With this unit you can watch video from DVD VCD SVCD or USB devices enjoy audio from discs or USB devices view pictures from discs or USB devices Listen to FM radio You can enrich sound output with these sound effects Digital Sound Control DSC Dynamic Bass Boost DBB Bass treble enhancement The ...

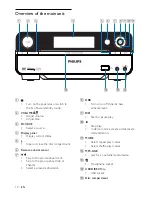
Page 9: ...hone socket n USB DIRECT USB socket o Disc compartment Overview of the main unit a Turn on the apparatus or switch to the Eco Power standby mode b VOLUME Adjust volume Adjust time c SOURCE Select a source d Display panel Display current status e Open or close the disc compartment f Remote control sensor g Skip to the previous next track Skip to the previous next title or chapter Select a preset ra...

Page 10: ...e an enlarged image left right Rotate or invert pictures g SLOW ZOOM For menus navigate up down Rotate or invert pictures SLOW For video select a slow play mode ZOOM For video zoom in out h LOUD DBB Turn on or off automatic loudness adjustment Turn on or off dynamic bass enhancement i VOL Adjust volume Adjust time j MUTE Mute or restore volume k CLOCK Set the clock l SLEEP TIMER Set the sleep time...

Page 11: ... q Stop play r Skip to the previous next track Skip to the previous next title or chapter Select a preset radio station s Start or pause play t DSC Select a preset sound setting u OK Confirm a selection v A B Repeat a specific section within a track disc w SYSTEM MENU Access or exit the system setup menu x MODE DIM Select repeat play modes Select shuffle play modes Select a brightness level for the d...

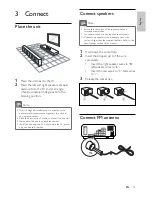
Page 12: ... to L Insert the red wires to black wires to 3 Release the socket flap Connect FM antenna a b c 8 3 Connect Place the unit 1 Place the unit near to theTV 2 Place the left and right speakers at equal distance from theTV and at an angle of approximately 45 degrees from the listening position Note To avoid magnetic interference or unwanted noise never place this apparatus and speakers too close to any...

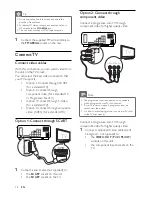
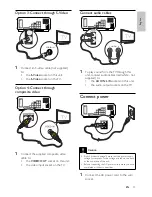
Page 13: ... PUT 8 Tip For optimal reception fully extend and adjust the position of the antenna For better FM stereo reception connect an outdoor FM antenna to the FM AERIAL jack The unit does not support MW radio reception 1 Connect the supplied FM wire antenna to the FM AERIAL socket on the unit Connect TV Connect video cables With this connection you can watch video from the unit on theTV screen You can s...

Page 14: ...e back or the underside of the unit Before connecting the AC power cord ensure you have completed all other connections 1 Connect the AC power cord to the wall socket TV L LINE IN R 8 8 Option 3 Connect through S Video 1 Connect an S video cable not supplied to the S Video socket on this unit the S Video socket on theTV Option 4 Connect through composite video 1 Connect the supplied composite vide...

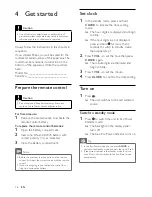
Page 15: ...Get started Caution Use of controls or adjustments or performance of procedures other than herein may result in hazardous radiation exposure or other unsafe operation Always follow the instructions in this chapter in sequence If you contact Philips you will be asked for the model and serial number of this apparatus The model number and serial number are on the bottom of the apparatus Write the num...

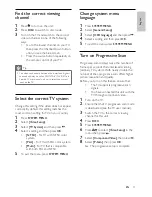
Page 16: ...ss 8 Select P Scan then press OK The progressive setup is complete Find the correct viewing channel 1 Press to turn on the unit 2 Press DISC to switch to disc mode 3 Turn on theTV and switch to the correct video in channel in one of the following ways Go to the lowest channel on yourTV then press the Channel Down button until you see the blue screen Press the source button repeatedly on the remote...

Page 17: ...cs During play press SUBTITLE Tip For some DVDs the language can only be changed from the disc menu Press DISC MENU to access the menu 5 Play Note With some disc file types play may differ Play a disc Caution Never look at the laser beam inside the unit Risk of product damage Never play discs with accessories such as disc stabilizer rings or disc treatment sheets Never put any objects other than di...

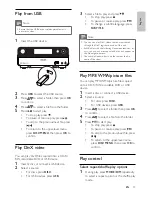
Page 18: ...ss to start play To stop play press To pause or resume play press To skip to the previous next file press To return to the upper level menu press DISC MENU then press OK to confirm Play control Select repeat shuffle play options 1 During play press MODE DIM repeatedly to select a repeat option or the shuffle play mode Play from USB Note Ensure that the USB device contains playable music pictures or vi...

Page 19: ...esume play at normal speed press To resume normal play press MODE DIM repeatedly until no option is displayed Repeat A B DVD VCD CD MP3 WMA 1 During music or video play press A B at the start point 2 Press A B at the end point The selected section starts to play repeatedly To cancel repeat play press A B again Note The section A and B can be set only within the same track title Search forward back...

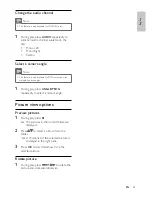
Page 20: ...rded with multiple camera angles 1 During play press ANGLE PROG repeatedly to select a camera angle Picture view options Preview pictures 1 During play press The pictures in the current folder are displayed 2 Press to select a picture from the folder A thumbnail of the selected picture is displayed in the right pane 3 Press OK to start slideshow from the selected picture Rotate picture 1 During pl...

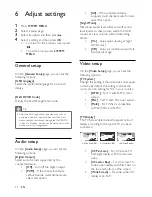
Page 21: ...or 4 3 screenTV wide screen display with black bars on the top and bottom of the screen Wide Screen For wide screenTV display ratio 16 9 4 3 Letter Box LB 4 3 Pan Scan PS 16 9 Wide Screen 6 Adjust settings 1 Press SYSTEM MENU 2 Select a setup page 3 Select an option and then press 4 Select a setting and then press OK To return to the previous menu press To exit the menu press SYSTEM MENU General s...

Page 22: ... of this unit to factory default except for the password and parental settings Picture Setting Customize picture color settings ComponentVideo Set the video output according to the video connection If the composite connection is used this setting is not required S VIDEO If the S Video connection is used select this option RGB If the SCART connection is used select this option Interlaced For ordina...

Page 23: ...on directly 7 Tune to FM radio stations 1 Ensure that you have connected and fully extended the supplied FM antenna 2 Press TUNER 3 Press and hold 4 When the frequency indication starts to change release the button The FM tuner tunes to a station with strong reception automatically 5 Repeat steps 3 4 to tune to more stations To tune to a weak station Press repeatedly until you find optimal receptio...

Page 24: ...l Show RDS information RDS Radio Data System is a service that allows FM stations to show additional information If you tune to a RDS station a RDS icon and the station name are displayed When automatic programming is used RDS stations are programmed first 1 Tune to a RDS station 2 Press DISPLAY RDS repeatedly to scroll through the following information if available Station name Program type such a...

Page 25: ...effect Adjust volume level 1 During play press VOL to increase decrease the volume level Select a sound effect Note You cannot use different sound effects at the same time Select a preset sound effect 1 During play press DSC repeatedly to select Classic Rock Jazz Pop FLAT flat Enhance bass 1 To turn on bass enhancement press LOUD DBB repeatedly during play until the DBB logo is displayed To turn of...

Page 26: ...n mode You can see an overview of all features 1 In standby mode press on the main unit to activate the demonstration mode A demonstration of major available features starts To deactivate the demonstration mode 1 Press on the main unit again Adjust brightness of display panel 1 In standby mode press MODE DIM repeatedly to select different levels of brightness for the display panel Set the alarm ti...

Page 27: ...e MP3 Link AUX source 3 Start play on the audio player Record to a digital recorder You can record audio from this unit to a digital recorder 1 Connect a coaxial cable not supplied to the COAXIAL socket the digital input socket on the digital recorder 2 Play audio to be recorded 3 Begin to record on the digital recorder see the digital recorder user manual 8 EN ...

Page 28: ...W 32ohm USB Direct Version 2 0 Dimensions Main Unit W x H x D Speaker Box W x H x D 220 x 90 x 240mm 140 x 220 x 160 mm Weight With Packing Main Unit Speaker Box 6 kg 1 65 kg 2 x 1 5 kg 10 Product information Note Product information is subject to change without prior notice Specifications Amplifier Rated Output Power 2X20W RMS Frequency Response 20 20000 Hz 3dB Signal to Noise Ratio 67dB Aux Input ...

Page 29: ...s CDs Picture Kodak JPEG files on CDR W DivX R disc on CD R W DivX 3 11 4 x and 5 x WMA Supported MP3 CD formats ISO 9660 Max title album name 12 characters Max title number plus album 255 Max nested directory 8 levels Max album number 32 Max MP3 track number 999 Supported sampling frequencies for MP3 disc 32 kHz 44 1 kHz 48 kHz Supported Bit rates of MP3 disc are 32 64 96 128 192 256 kbps The foll...

Page 30: ...e VARIED Entertainment programs POP M Pop music ROCK M Rock music MOR M Light music LIGHT M Light classical music CLASSICS Classical music OTHER M Special music programs WEATHER Weather FINANCE Finance CHILDREN Children s programs SOCIAL Social Affairs RELIGION Religion PHONE IN Phone In TRAVEL Travel LEISURE Leisure JAZZ Jazz Music COUNTRY Country Music NATION M National Music OLDIES Oldies Music...

Page 31: ...connect the AC power plug and then turn on the system again As a power saving feature the system turns off automatically 15 minutes after disc play reaches the end and no control is operated 11 Troubleshooting Caution Never remove the casing of this unit To keep the warranty valid never try to repair the system yourself If you encounter problems when using this unit check the following points befo...

Page 32: ...s prohibited on the disc Cannot display some files in USB device The number of folders or files in the USB device has exceeded a certain limit This phenomenon is not a malfunction The formats of these files are not supported USB device not supported The USB device is incompatible with the unit Try another one Timer does not work Set the clock correctly Switch on the timer Clock timer setting erased P...

Page 33: ... 2010 Koninklijke Philips Electronics N V All rights reserved Document order number MCD122_12_UM_V3 0 ...

Reviews: