background image

16
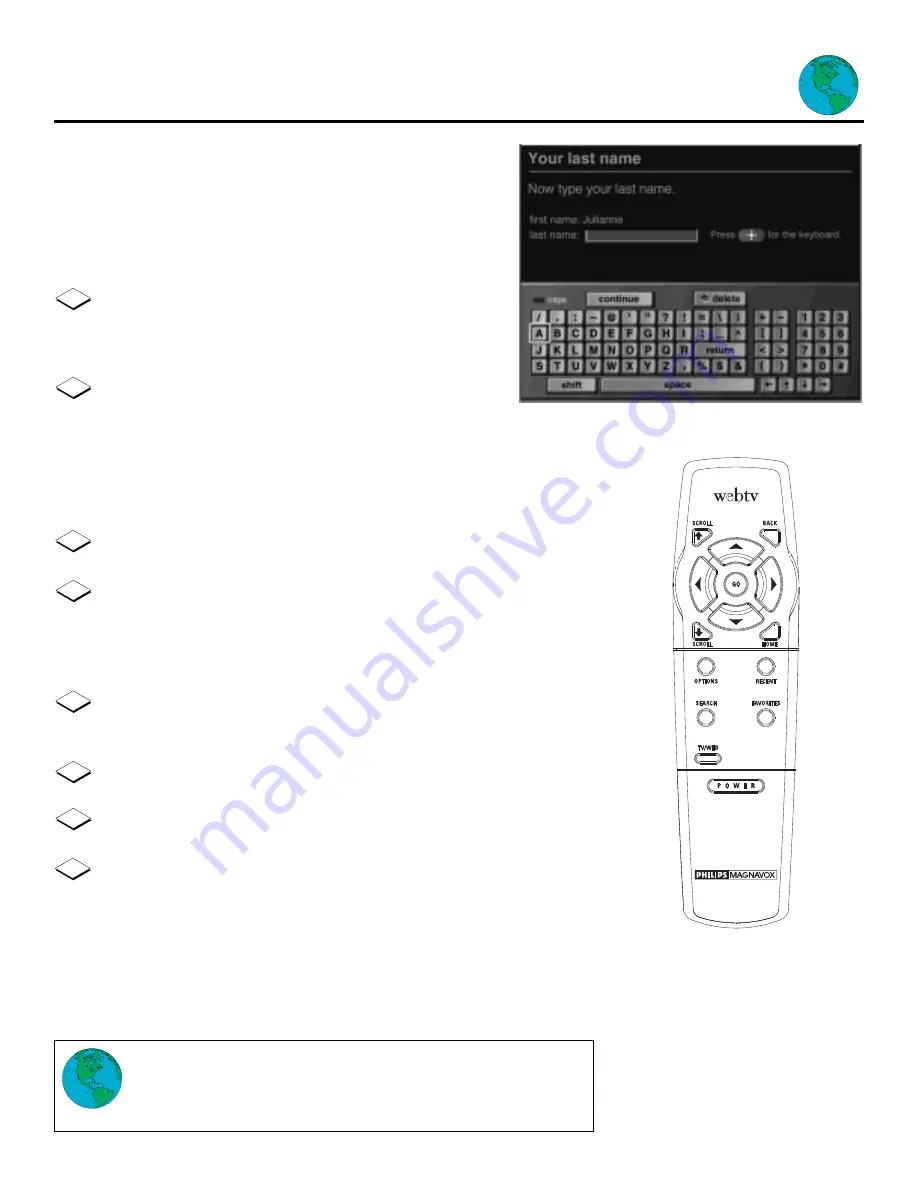
On-Screen Keyboard

The On-Screen Keyboard
Use the on-screen keyboard to type information on your TV
screen. When you request an activity that requires typing, such
as sending an e-mail message, a text box appears on the screen.
A text box contains a vertical yellow line, which indicates
exactly where you can type in the text box. 

◆ 

You can choose whether your keyboard displays letter keys in alpha-

betical order or standard typewriter order (QWERTY). See Setup on
page 30.

◆ 

You can type on-screen only when a text box is displayed.

NOTES

1

2

4

Press the GO button on the remote. The keyboard slides onto
your screen. To remove the on-screen keyboard at any time, press
the BACK button.

Displaying the on-screen keyboard

Move the yellow highlight to a text box using the remote con-
trol Arrow buttons. The highlight becomes a vertical yellow
line inside the box.

1

2

Typing letters, numbers, and punctuation marks using the on-screen
keyboard

Highlight the desired character using the Arrow buttons on the remote control.

Press the GO button on the remote. 

1

2

Typing upper case letters

Highlight SHIFT on the on-screen keyboard using the remote control Arrow
keys.

Press the GO button on the remote. The red light next to “caps” turns on.

Highlight the desired character using the remote control Arrow buttons.

3

Press the GO button on the remote.
To type more than one upper case letter, repeat these steps for each letter.

Summary of Contents for MAT960

Page 1: ...Owner s Manual Important Return your Warranty Registration Card within 10 days See why inside Internet Terminal MAT960 ...

Page 2: ..._____________________________ Know these safetysymbols tThis bolt of lightning indicates uninsulated material within your unit may cause an electrical shock For the safety of everyone in your household please do not remove product covering s The exclamation point calls attention to features for which you should read the enclosed literature closely to prevent operating and maintenance problems WARN...

Page 3: ...be routed so that they are not likely to be walked on or pinched by items placed upon or against them paying particular attention to cords and plugs convenience receptacles and the point where they exit from the appliance 11 Non use Periods The power cord of the appliance should be unplugged from the outlet when left unused for a long period of time 12 Object and Liquid Entry Care should be taken ...

Page 4: ...erating instructions adjust only those controls that are discussed in the owner s manual as improper adjustment of other controls may result in damage often requiring extensive work by a qualified technician to restore the product to normal perfor mance e if the product has been dropped or the cabinet has been damaged f if the product exhibits a distinct change in performance 21 Avoid using a tele...

Page 5: ... an authorized maintenance facility designated by the supplier Any repairs or alterations made by the user to this equipment or any equipment malfunctions may give the telecommunications company cause to request the user to disconnect the equipment Users should ensure for their own protection that the ground connections of the power utility tele phone lines and internal metallic water pipe system ...

Page 6: ...the bottom of this equipment is a label that contains among other information the FCC Registration Number and Ringer Equivalence Number REN for this equipment You must upon request provide this information to your tele phone company The REN is useful to determine the quantity of devices you may connect to your telephone line and still have all of those devices ring when your telephone number is ca...

Page 7: ...t Terminal and learned the basic remote control functions described in the following pages This manual takes you through easy to follow instruc tions so that you can ultimately enjoy the Internet WebTV Features Explore A directory of the most useful and exciting pages on the Internet E mail Electronic messages Exchange messages with members of any Internet service Around Town A catalogue of servic...

Page 8: ... cable yellow Audio cables red and white Telephone splitter T splitter Wireless Keyboard Additional accessories are available See page 40 for details Battery Installation 8 Getting Started 1 Remove the battery compartment cover by pressing in the tab then lifting the cover 2 Insert two batteries as indicated inside the battery compartment 3 Replace the battery compartment cover ...

Page 9: ...nect the Internet Terminal to a TV without Audio Video jacks Infrared sensor Receives the information from the remote control so that you can operate your Internet Terminal from a distance You must point the remote control at the Internet Terminal not the TV POWER indicator Indicates the Internet Terminal power is on CONNECTED indicator This indicator flashes when the Internet Terminal is connecti...

Page 10: ...es list TV WEB Button Switches between WebTV and regular broadcast TV when you are connected to a TV using the RFU adapter POWER Button Turns the Internet Terminal on and connects to WebTV Also disconnects from WebTV and turns off the Internet Terminal 10 Remote Control Areas on a page that can be highlighted are called links because they link you to another page Links can be words pictures icons ...

Page 11: ...ow will turn green when the page is loaded completely WebTV Connection Indicator The connection indicator is green whenever you are connected to the WebTV Network When the indicator is moving it tells you that WebTV is searching the Internet for something you have requested The indicator becomes a straight red line when You receive a telephone call if you have Call Waiting You use the HANG UP opti...

Page 12: ...h the Internet Terminal and your telephone plugged in at the same time Plug the T splitter into the wall telephone jack If you don t have Call Waiting service for your phone line a person trying to call you while you re connected to WebTV gets a busy signal If you have Call Waiting see Select Dialing Options on page 31 If you activate Call Waiting and you receive a telephone call your Internet Ter...

Page 13: ...Internet Terminal to the S VIDEO IN jack on your TV An S VIDEO cable is available from Philips Service Solutions Group or your local dealer See page 40 for details Connect one end of the telephone cable to the Internet Terminal s TEL LINE jack Connect the other end to your home s telephone outlet 2 3 Check that your local AC voltage corresponds to the voltage indicated on the AC adapter 120V befor...

Page 14: ...able to connect the ANTENNA OUT jack on the adapter to the ANTENNA IN jack on the back of your TV You may need to disconnect the antenna cable from your TV to make this connection Connect the anten na cable to the ANTENNA IN jack on the RFU adapter 3 14 Connections cont d Connect one end of the telephone cable to the Internet Terminal s TEL LINE jack Connect the other end to your home s telephone ...

Page 15: ...to the VIDEO OUT jack on the back of the Internet Terminal and to the VIDEO IN jack on the back of your TV Connect one end of the telephone cable to the Internet Terminal s TEL LINE jack Connect the other end to your home s telephone outlet 4 Connect one end of the AC power cord to the Internet Terminal s AC INPUT jack Connect the other end to an AC outlet 5 If connecting through your VCR connect ...

Page 16: ...r screen To remove the on screen keyboard at any time press the BACK button Displaying the on screen keyboard Move the yellow highlight to a text box using the remote con trol Arrow buttons The highlight becomes a vertical yellow line inside the box 1 2 Typing letters numbers and punctuation marks using the on screen keyboard Highlight the desired character using the Arrow buttons on the remote co...

Page 17: ...n press the GO button on the remote Note The yellow line generally moves to the next line when you come to the end of a line in a text box Highlight CONTINUE on the on screen keyboard then press the GO button on the remote 17 On Screen Keyboard cont d Press the GO button on the remote The on screen keyboard appears 3 1 2 Moving to the previous text box on the same page Press the BACK button to hid...

Page 18: ...utton CONTINUE will be highlighted on screen Press the GO button again 5 The LAST NAME box will be highlighted Press the GO button The on screen keyboard will appear Enter your last name When you finish use the Arrow buttons on the remote to highlight CONTINUE or RETURN then press the GO button CONTINUE will be highlighted on screen Press the GO button again Signing up for the WebTV Network is an ...

Page 19: ...se the Arrow buttons to highlight the type of credit card you will use then press the GO button 13 The NUMBER box will be highlighted Press the GO button The on screen keyboard will appear Enter your credit card number You don t have to insert spaces or hyphens for the credit card information When you finish use the Arrow buttons to highlight CONTINUE The EXPIRES box is highlighted Enter your cred...

Page 20: ...TINUE then press the GO button When you complete the last sign up page WebTV displays a page that contains all the information you have entered If you make a mistake press the BACK button until the incorrect page appears Going back deletes the information on the current page Make the correction then continue as instructed NOTES 16 17 1 Highlight the text box that contains the information you wish ...

Page 21: ... to WebTV screen NOTES Exploring the Internet on WebTV This chapter explains how to access various pages on the Internet from the WebTV Home Page Because the Internet is constantly changing the Home Page will also occa sionally change When you see new icons explore WebTV will provide help for using new icons through the INSTRUCTIONS icon 1 Turn on your television 2 Press the POWER button on the re...

Page 22: ...e most exciting and useful pages on the Internet WebTV will continuously update EXPLORE 1 Instructions 1 2 The INSTRUCTIONS area contains help for using the remote control and vari ous WebTV features such as the Home Page areas Highlight the INSTRUCTIONS icon and press the GO button Highlight any topic on the INSTRUCTIONS page and press the GO button on the remote control The instructions for that...

Page 23: ...you to search the Internet for information on both general and specific topics To search for specific information Highlight SEARCH on the Home Page and press the GO button Type a topic in the text box You can enter one word many words or even a question 3 Highlight the SEARCH command and press the GO button A list appears on your screen 2 4 Highlight an item on the list using the Arrow buttons on ...

Page 24: ...t WRITE to open the WRITE A NEW MESSAGE page where you can address create and send e mail messages You can send the same e mail message to more than one address at a time by enter ing more than one address in the TO text box Separate addresses with a comma and a space The STORAGE icon links you to the STORED MAIL page where you can view messages you have saved The SETUP icon allows you to Choose w...

Page 25: ...ar 2 To reply to an e mail message 1 With a message open on your screen highlight REPLY and press the GO but ton The REPLY TO A MESSAGE page appears with the address and subject entered in the appropriate boxes for you Type your reply 2 Highlight SEND and press the GO button A message appears indicating that your e mail is being sent 3 To save or store a message The NAMES icon links to your NAMES ...

Page 26: ...icating that your e mail is being sent 5 1 2 3 To send an e mail message Highlight WRITE and press the GO button The WRITE A NEW MESSAGE page appears Type one or more e mail addresses in the TO text box Separate addresses by a comma and a space if you type more than one address Use the Arrow buttons on the remote control to move to the next text box Type your message Use the Arrow buttons on the r...

Page 27: ...button The NAMES panel appears Highlight the name of the person to whom you want to send a message and press the GO button Repeat to send the same message to more than one person at a time Highlight CONTINUE and press the GO button The highlighted name or names will appear in the TO text box 27 Mail cont d 1 2 3 Add a name to your NAMES page Highlight NAMES on the MAILBOX page and press the GO but...

Page 28: ...ITES list 1 2 Open a page from your FAVORITES list Highlight FAVORITES on the Home Page and press the GO button Your FAVORITES list appears on the screen Highlight a title or an icon on the list and press the GO button The page appears 1 2 3 Delete a page from your FAVORITES list Open your FAVORITES list and highlight EDIT then press the GO button In the EDIT FAVORITES screen highlight the REMOVE ...

Page 29: ...aiting interruptions Display hide ADVANCED OPTIONS HANG UP and RELOAD on the OPTIONS panel See Advanced Options on page 35 Create separate accounts with private MAILBOXES and FAVORITES lists for each member of your household Change your Internet name or password except the primary user You must create and use a password to access a separate account Passwords can contain all numbers or letters and ...

Page 30: ...ton again to remove the check mark Select CONTINUE and then select DONE to return to the SETUP page 1 2 3 4 5 6 Highlight DONE and press the GO button 1 2 3 Customize your keyboard Highlight KEYBOARD and press the GO button Highlight ALPHABETICAL or QWERTY and press the GO button Highlight DONE and press the GO button to return to the SETUP page Change sign up information 1 2 3 Highlight WEBTV USE...

Page 31: ...ll not hear the sounds or music Press the GO button again to remove the check mark 1 2 3 Highlight DIALING OPTIONS and press the GO button A list of options appears CALL WAITING Choose whether your Internet Terminal disconnects from the WebTV Network when a call comes in BASIC Enter a prefix for dialing out choose tone dialing ADVANCED Set a dialing speed ACCESS Enter an access number for WebTV Hi...

Page 32: ...ton on the remote control The OPTIONS panel slides onto the bottom of your screen Highlight an option and press the GO button Each option brings up a different panel The following sections describe the various options and how to use each option s features The WebTV option returns you to the WebTV Home Page The FIND option helps you find a specific word or phrase on the current page it also lets yo...

Page 33: ...o directly to a page by typing in an Internet address Go directly to a page Highlight GO TO on the panel and press the GO button Type the Internet address in the text box For example http webtv net Highlight the GO TO PAGE command and press the GO button The page appears on your screen Display addresses Highlight SHOW CURRENT and press the GO button to display the address of the currently displaye...

Page 34: ...a link to the currently displayed page Send a page by e mail Open the page you want to send then press the OPTIONS button on the remote control Highlight the SEND option and press the GO button In the text box labeled TO type the e mail address of the person to whom you want to send the page Highlight EDIT MESSAGE and press the GO button to add a message Highlight the SEND PAGE command and press t...

Page 35: ...tock quotes Reload a page Open a page then highlight the RELOAD option and press the GO button The HANG UP option allows you to temporarily disconnect from the WebTV Network to make a telephone call then reconnect to the page you were visit ing when you disconnected Use the HANG UP option Highlight the HANG UP option and press the GO button The WebTV connec tion indicator on the title bar turns re...

Page 36: ...minal The keys will have the following functions F1 Power F2 Favorites F3 Search F4 Mail F5 Find F6 Information F7 Go To F8 Save F9 Send F10 Recent F11 Options F12 No function Other keyboard keys operate as follows Insert Edit text Home To go back to the WebTV Home Page Page Up Scroll up in a document Page Down Scroll down in a document End To go back to the previous page Other PC specific keys ha...

Page 37: ... 2 x 8 1 4 Weight 1 3kg 2lbs 14 oz Power requirements AC 120V Power consumption 15W maximum 5W standby Supplied Accessories Remote Control Two AAA Batteries AC Power Cord Phone Cable Video Cable yellow Audio Cables red and white Telephone splitter RJ 11 Y adapter or T splitter Wireless Keyboard Optional Accessories EXT channel 3 4 RFU Adapter S Video Cable Designs and specifications are subject to...

Page 38: ...e may save you a service call TO GET WARRANTY SERVICE Warranty service will be provided by Philips Consumer Electronics Company If you believe you need service for your Internet Terminal contact Philips Service Solutions Group at 1 888 813 7069 A repre sentative will go through a diagnostic checklist with you If it is deter mined that the product needs to be exchanged you will receive a return aut...

Page 39: ... 38 links 10 mail 24 27 mailbox 24 27 mailbox setup 24 message indicator 9 24 messages 24 27 names icon 25 27 on screen keyboard 16 17 options button 10 options panel 32 34 package contents 8 page title 11 personal computer keyboard 36 power button 10 power consumption 37 power indicator 9 power requirements 37 recent button 10 23 reload option 35 remote control 10 reset button 9 rfu jack 9 safety...

Page 40: ...on your television Part number 4835 395 17322 To order these items contact Philips Service Solutions Group at the address listed below The following accessories are packed with your Internet Terminal These accessories are provided to help you use or set up your Internet Terminal If any of these items are not included or if you need to replace an accessory contact Philips Service Solutions Group at...

Reviews: