background image

22

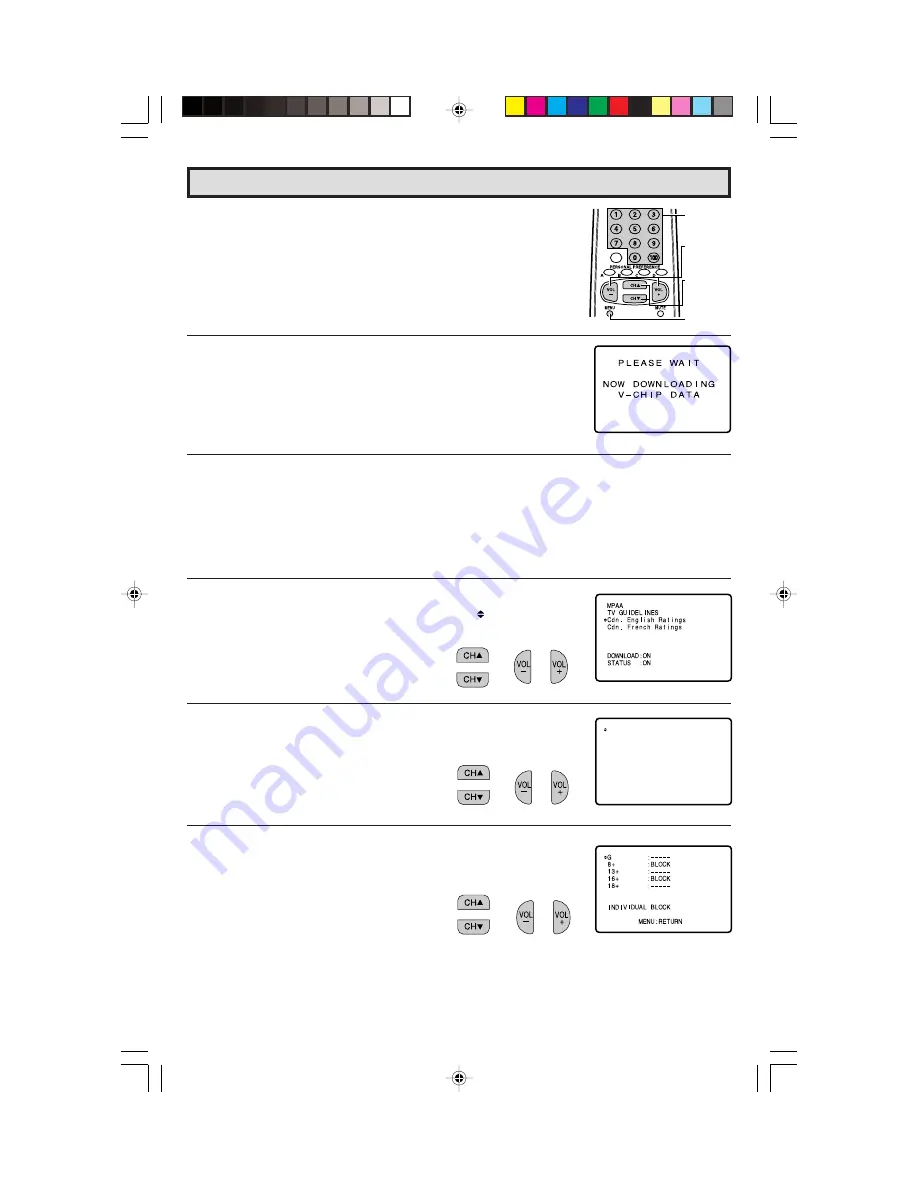
(DOWNLOAD screen)

(After downloading the rating data)

C
C8 +
G
PG

1 4 +
1 8 +

I ND I V

B

: LOCK

: ————

B

: LOCK

: ————

B

: LOCK

: ————

I DUAL BL

MENU : RETURN

OCK

(ENGLISH INDIVIDUAL BLOCK mode)

(FRENCH INDIVIDUAL BLOCK mode)

VOLUME
(+)/(–)

CHANNEL
UP (

8

)/

DOWN (

9

)

REMOTE
KEYPAD

A/CH

MENU

L

DOWNLOAD SmartLock

TM

 V-CHIP DATA

1

If you watch the program with “New Rating System Data”,
DOWNLOAD screen will be displayed.

2

DOWNLOAD screen will disappear, if DOWNLOAD is finished.

NOTE:

• DOWNLOAD would not be started if you don’t watch the program with “New Rating System

Data”.

[3]-B. Additional mode (Example)

1

Repeat steps 1 - 2 of [3] Additional mode.

2

Press 

CH UP (

8

)

 or 

DOWN (

9

)

  to move the “

” mark to “Cdn.

English Ratings”, then press 

VOL (+)

 or 

(–)

.

3

You can select “BLOCK” or “– – – – –” (view) from each RATING
mode by pressing 

CH UP (

8

)

 or 

DOWN (

9

)

  and 

VOL (+)

 or 

(–)

.

4

You can select “BLOCK” or “– – – – –” (view) from each RATING
mode by pressing 

CH UP (

8

)

 or 

DOWN (

9

)

  and 

VOL (+)

 or 

(–)

if you select “Cdn. French Ratings” in step 2.

NOTE:

• In additional mode

Including two types (English mode, French mode), altogether you are able to download four
kinds of mode.

Parent Control (SmartLock

TM

 V-CHIP Operation Continued)

19-25 TP3675C

6/9/00, 9:35 AM

22

Summary of Contents for Magnavox TP 3675C

Page 1: ...Color Television TP3675 ...

Page 2: ...offers which you qualify for as the owner of your model Return your Warranty Registration card today to ensure you receive all the benefits you re entitled to Know these safetysymbols A This bolt of lightning indicates uninsulated material within your unit may cause an electrical shock For the safety of everyone in your household please do not remove the product covering a The exclamation point ca...

Page 3: ... network And most importantly you can count on our uncompromising commitment to your total satisfaction All of this is our way of saying welcome and thanks for investing in a PHILIPS MAGNAVOX product Sincerely Robert Minkhorst President and Chief Executive Officer P S Remember to get the most from your PHILIPS MAGNAVOX product you must return your Warranty Registration Card within 10 days So pleas...

Page 4: ...s 35 Operation of Remote Control 36 39 Before Calling for Service 40 Limited Warranty 41 42 As an ENERGY STAR Partner Philips Magnavox has determined that this product meets the ENERGY STAR guidelines for energy efficiency ENERGY STAR is a U S registered trademark C O N T E N T S Page The energy savings will help reduce the burning of fossil fuels and the related carbon dioxide pollution that cont...

Page 5: ...nic equip ment toys on the top of the cabinet Such items could unsuspectingly fall from the top of the set and cause product damage and or personal injury 7 Wall or Ceiling Mounting The appliance should be mounted to a wall or ceiling only as recommended by the manufacturer 8 Ventilation The appliance should be situated so that its location or position does not interfere with its proper ventilatio...

Page 6: ...l part Unauthorized sub stitutions may result in fire electric shock or other hazards 21 Safety Check Upon completion of any service or repairs to this product ask the service technician to perform safety checks to determine that the product is in proper operating condition 22 Grounding or Polarization Your TV operates on 120V 60Hz and has a polarized alternating current line plug a plug having on...

Page 7: ...slit as indicated by the arrow to remove the back cover Insert two batteries size AA Be sure to match the battery e d terminals with the e d marks inside the compartment NOTE Pull up Battery Cover Before Operating Your Television Antennas The antenna requirements for good color television reception are more important than those for black white television reception For this reason a good quality ou...

Page 8: ...re scrambled a cable TV converter descrambler is generally provided to the subscriber by the cable TV company This converter descrambler is necessary for normal viewing of the scrambled channels Set your TV on channel 3 or 4 Typically one of these channels is used If this is unknown consult your cable TV company For more specific instructions on installing cable TV consult your cable TV company On...

Page 9: ... Switch to external video INPUT 1 mode Press again Switch to external video INPUT 2 mode Press again Switch back to the original TV mode See page 34 ENTER The 100 button functions as an ENTER button when in the VCR mode See page 36 CHANNEL UP DOWN 8 Selects next higher channel 9 Selects next lower channel See pages 27 29 for channel presetting Moves the mark of the MENU screens MUTE Press Mutes so...

Page 10: ... CH No will automatically increase when it appears If you want to stop the AUTO PRESET process once it has started press VOL and it will be canceled If you want to PRESET again please refer to page 26 on AUTO PRESET To cancel AUTO PRESET Press VOL 5 Once AUTO PRESET is completed the lowest channel number memorized will be displayed If AUTO PRESET does not memorize all the channels in your region p...

Page 11: ... 8 or DOWN 9 to select ENGLISH SPANISH ESPAÑOL or FRENCH FRANÇAIS 6 Press MENU to exit Language If you misplaced your Remote Control you can still access most settings via the MAIN MENU screen when you press both CH UP 8 and DOWN 9 on the TV set Some features of your TV set will not be accessible without the Remote Control If you lost your Remote Control contact a Philips Magnavox Authorized Servi...

Page 12: ...ose a RED BLUE or STANDARD COLOR TONE RESET To return all adjustments to factory preset levels Description of Adjustment Items Video Adjust VOLUME CHANNEL UP 8 DOWN 9 MENU PICTURE adjust mode MAIN MENU screen Sleep Timer L You can set the number of minutes for your TV to automatically turn off 1 Press MENU to access MAIN MENU screen 2 Press VOL or to access TIMER SET mode 3 Press VOL or to set a s...

Page 13: ...Press CH UP 8 or DOWN 9 to move the mark to AUDIO SELECT 3 Press VOL or to access AUDIO SELECT mode 4 Press CH UP 8 or DOWN 9 to move the mark to MTS or SPEAKER 5 Press VOL or to change the AUDIO SELECT setting 6 Press MENU to exit Audio Select 5 Press VOL or to adjust the setting 6 Repeat steps 4 5 to adjust other settings 7 Press MENU to exit Video Adjust Continued MAIN MENU screen AUDIO SELECT ...

Page 14: ...e Actual screen indicating ON AIR when receiving STEREO broadcasts Actual channel number ON AIR will appear next to STEREO or SAP when receiving STEREO or SAP broadcasts L You can enjoy Hi Fi stereo sound or SAP broadcasts where available Stereo broadcasts Live television transmission of sports shows concerts etc can be received in dynamic stereo sound SAP broadcasts Television broadcast can be re...

Page 15: ...7 AND UNDER ADMITTED X X Rating is an older rating that is unified with NC 17 but may be encoded on older movie s data Note age base Closed Caption Continued 4 Press CH UP 8 or DOWN 9 to move the mark to either MODE or DATA 5 Press VOL or to change the CLOSED CAPTION setting 6 Press MENU to exit If a broadcast has CLOSED CAPTION and the MUTE button is pressed the set enters CAPTION mode automatica...

Page 16: ...al Audience TV PG Parental Guidance Suggested TV 14 Parents Strongly Cautioned TV MA Mature Audience Only Content Rating can be set Content Rating can not be set not normally broadcast by TV Station TV PARENTAL GUIDELINES Example Example 1 1 Age Based setting Go through all select ratings and select view for AGE This will automatically unblock everything AGE D L S V FV TV Y VIEW TV Y7 BLOCK TV G T...

Page 17: ...se note that the lower age rating TV PG did not change from its previous settings NOTE Content Ratings can be modified but only in the combinations indicated by in the table on page 16 Changing a lower age rating s content setting to BLOCK automatically changes the same higher age rating s content setting to BLOCK regardless of their previous settings Changing a lower rating s AGE setting to BLOCK...

Page 18: ...et No for SmartLockTM V CHIP VIEW TIMER is commonly used If this secret No is set by VIEW TIMER the INPUT SECRET NO will be displayed PARENT CONTROL mode V CHIP select mode MP A A T V GU I DE L I NE S AD OF F DOWN L O S T A T US OF F 5 Press CH UP 8 or DOWN 9 to move the mark to PG then press VOL or to select BLOCK If you set PG to BLOCK PG 13 R NC 17 and X are automatically blocked 6 Repeat press...

Page 19: ...TTING press CH UP 8 or DOWN 9 to move the to the desired rating and then press VOL or to select 5 Press CH UP 8 or DOWN 9 to move the to the desired content and then press VOL or to select either BLOCK or view 6 Press MENU to return to TV GUIDES mode 7 Repeat steps 4 5 until all ratings and their contents are set 8 When done press MENU to exit AGE D L S V FV TV Y VIEW TV Y7 BLOCK TV G TV PG TV 14 ...

Page 20: ...HIP HAS BEEN ACTIVATED will be displayed if you watch the program with Program Rating data the same as you configured NOTE V CHIP HAS BEEN ACTIVATED will not be displayed if STATUS is not configured to ON 2 Press MENU then INPUT SECRET No will be displayed 3 Enter the 4 digit SECRET No using the REMOTE KEYPAD then SmartLockTM V CHIP BLOCK will temporarily be canceled If the wrong SECRET No is chos...

Page 21: ...V CHIP BLOCK screen while V CHIP BLOCK has been activated then INPUT SECRET No will be displayed 2 Press and hold both VOL and CH DOWN 9 on the TV set simultaneously until the message INPUT SECRET No disappears 3 Press MENU two times to exit 3 A Additional mode DOWNLOAD There will be an additional new rating system In that case please set up as follows Subsequently the new rating system will set u...

Page 22: ...if you don t watch the program with New Rating System Data 3 B Additional mode Example 1 Repeat steps 1 2 of 3 Additional mode 2 Press CH UP 8 or DOWN 9 to move the mark to Cdn English Ratings then press VOL or 3 You can select BLOCK or view from each RATING mode by pressing CH UP 8 or DOWN 9 and VOL or 4 You can select BLOCK or view from each RATING mode by pressing CH UP 8 or DOWN 9 and VOL or i...

Page 23: ... ON OFF setting of VIEW TIMER L How to set VIEW TIMER 1 Press MENU to access MAIN MENU screen 2 Press CH UP 8 or DOWN 9 to move the mark to PARENT CONTROL 3 Press VOL or to access PARENT CONTROL mode 4 Press CH UP 8 or DOWN 9 to move the mark to VIEW TIMER 5 Press VOL or to access VIEW TIMER The secret No for SmartLockTM V CHIP VIEW TIMER is commonly used If this secret No is set by SmartLockTM V ...

Page 24: ...MER access screen will be displayed Repeat step 5 6 NOTE When you choose the correct SECRET No the VIEW TIMER access screen is displayed If the wrong SECRET No is chosen SECRET No IS INCORRECT is displayed Input the SECRET No again in this case L To cancel the VIEW TIMER While the TV set is OFF but the VIEW TIMER is set 1 Turn on TV a blue screen message TIME OVER will appear If you do nothing the...

Page 25: ...EWING TIME is completed 1 Press MENU to access MAIN MENU screen 2 Press CH UP 8 or DOWN 9 to move the mark to ENERGY SAVE 3 Press VOL or to access ENERGY SAVE select mode 4 Press VOL or to select ON 5 Press MENU to exit ENERGY SAVE select mode MAIN MENU screen Energy Save L This feature lets you lower the power consumption of your TV set which in turn saves you money and minimizes the impact on th...

Page 26: ... move the mark to CH SETTING 4 Press VOL or to access CH SETTING mode 5 Press VOL or to access AUTO PRESET mode 6 Press VOL The tuner will automatically search for the broadcasting and cable TV channels The CH No will automatically increase when it appears If you want to stop the AUTO PRESET process once it has started press VOL Search will be canceled To cancel AUTO PRESET Press VOL 7 Once AUTO P...

Page 27: ...H SETTING 5 Press VOL or to access CH SETTING mode 6 Press CH UP 8 or DOWN 9 to move the mark to the AIR CABLE then press VOL or to access AIR CABLE mode AUTO PRESET Continued CH SETTING mode SET UP mode MAIN MENU screen CH SETTING mode 8 Press MENU to exit Receivable channels of your TV set are AIR channels VHF 2 through 13 CABLE channels 1 HRC and IRC mode only UHF 14 through 69 2 through 125 ST...

Page 28: ...all available channels in your area and add them into the TV s memory STOP 2 2 Press VOL CH SEARCH will stop at the current channel and will not add any higher channels 2 3 Press MENU to exit L Adding weak or additional channels or erasing unwanted channels from TV memory 1 1 Press MENU to access MAIN MENU screen then press CH UP 8 or DOWN 9 to move the mark to SET UP 1 2 Press VOL or to access SE...

Page 29: ...r REMOTE KEYPAD to select each desired channel to add or erase 2 3 Press VOL to add a channel to the TV s memory or press VOL to erase a channel from the TV s memory 2 4 Press MENU to exit If you press VOL again while in the CH SEARCH mode auto program will start again and the previously memorized channels will be lost or MAIN MENU screen SET UP mode BLUE SCREEN select mode VOL To add channel 12 t...

Page 30: ... DOWN 9 to move the mark to SET UP 3 Press VOL or to access SETUP mode then press CH UP 8 or DOWN 9 to move the mark to PERSONAL PREFERENCE 4 Press VOL or to select PERSONAL PREFERENCE select mode in which you can program four favorite channels in four different categories total of 16 channels 5 Press CH UP 8 or DOWN 9 to move the mark to the desired position 6 Press REMOTE KEYPAD on the Remote to...

Page 31: ... or to access UNIVERSAL PLUS select mode 6 Press CH UP 8 or DOWN 9 to select the CH3 CH4 INPUT 1 INPUT 2 or OFF Set model to the input in which your VCR is connected If done through RF select either channel 3 or 4 to match the setting of the VCR 7 Press MENU to exit VOLUME CHANNEL UP 8 DOWN 9 MENU SET UP mode UNIVERSALPLUSselectmode MAIN MENU screen 8 Press MENU to exit L To select the PERSONAL PR...

Page 32: ...ple Main Picture 22 Inset Picture VIDEO Input L To Select the Input for the Inset Picture Press SELECT Each time you press the button the picture will change as shown below L To Swap the Main and Inset Pictures Press SWAP Press the button to SWAP the pictures again Example PIP SWAP FREEZE POSITION SELECT PIP SWAP FREEZE SELECT POSITION Channel display for Main Picture Channel display for Inset Pic...

Page 33: ...Picture will change to blue screen and message V CHIP Has Been Activated will be displayed Main Picture Channel No displays but Insert Picture will be OFF This message will remain on screen until SmartLock TM V CHIP BLOCK is temporarily canceled or you change the Main Picture to a TV program that is not blocked Smart Window TM PIP is ON and Insert Picture is blocked When the Insert Picture is bloc...

Page 34: ...terminal NOTE Using the Video and Audio Input Jacks L Connecting video equipment for playback of video material When the television is connected to video equipment as shown below the material being played back on the video equipment can be seen on the television screen TV Game VCR Camcorder MONO To S VIDEO OUTPUT When your video equipment has an S VIDEO output terminal VCR AUDIO L R VIDEO Connecti...

Page 35: ...ols STEREO MONO SAP VOLUME and MUTE from either the remote control or directly from the TV set For detailed information on the connection and use of auxiliary equipment refer to the operation manuals of the equipment being used When connecting monaural equipment to the AUDIO INPUT or OUTPUT of this set use an audio connection cord and plug adapter as shown below For optimal sound quality it is rec...

Page 36: ... Remote sends the proper remote signals to operate your accessory This identify step will not have to be repeated until power to the Remote is interrupted due to a battery failure L Using Your Remote Control With a VCR Once you make certain the Remote Control has identified your remote controlled VCR the Remote Control is ready to operate your unit The various VCR function buttons on the Remote Co...

Page 37: ...enter your VCR s two digit remote control code number using REMOTE KEYPAD refer to list The remote control is now ready to send commands to your VCR Some brands have more than one remote code listed due to changes in the remote codes from early to later model years or due to format differences VHS BETA In such cases you may have to try more than one code to find the code your VCR accepts Depending...

Page 38: ... VCR BRAND REMOTE CONTROL CODE NUMBER Akai ________________ Audio Dynamics ______ Broksonic ___________ Canon ______________ Capehart ____________ Craig _______________ Curtis Mathis _________ Daewoo ____________ DBX _______________ Dynatech ___________ Emerson ____________ Fisher ______________ Funai _______________ GE ________________ Goldstar ____________ Hitachi ______________ Instant Replay _...

Page 39: ...s two digit code number using REMOTE KEYPAD refer to list The remote control is now ready to send commands to your converter Some brands have more than one remote code listed due to changes in the remote codes from early to later model years In such cases you may have to try more than one code to find the code your converter accepts Depending on the model year produced brand and type of CATV conve...

Page 40: ...or loose broken connection leads Refer to page 34 Check batteries of Remote Control Press CATV TV Select Switch to TV position Are audio cables connected firmly Check the volume level Is SPEAKER ON See pages 13 14 Change Closed Caption mode to OFF Energy Save mode to OFF Unplug the TV and plug it in again after two minutes PROBLEM No Playback of VCR and Disk Player No Picture or Sound from Externa...

Page 41: ...D Your warranty does not cover labor charges for installation or setup of the product adjustment of customer controls on the product and installation or repair of antenna systems outside of the product product repair and or part replacement because of misuse accident unauthorized repair or other cause not within the control of Philips Consumer Electronics Company reception problems caused by signa...

Page 42: ...rto Rico and U S Virgin Islands all implied warranties including implied warranties of merchantability and fitness for a particular purpose are limited in duration to the duration of this express warranty But because some states do not allow limitations on how long an implied warranty may last this limitation may not apply to you TO GET WARRANTY SERVICE IN CANADA Please contact Philips at 1 800 66...

Page 43: ...43 Notes 43 48 TP3675C 6 9 00 9 37 AM 43 ...

Page 44: ...44 Notes 43 48 TP3675C 6 9 00 9 37 AM 44 ...

Page 45: ...45 Notes 43 48 TP3675C 6 9 00 9 37 AM 45 ...

Page 46: ...46 Notes 43 48 TP3675C 6 9 00 9 37 AM 46 ...

Page 47: ...47 Notes 43 48 TP3675C 6 9 00 9 37 AM 47 ...

Page 48: ...48 Printed in U S A IB8231E001 43 48 TP3675C 6 9 00 9 37 AM 48 ...

Reviews: