background image

16

EN

       Create MP3 

fi

 les

  Use your home theater to convert audio CDs 
into MP3 

fi

 les. 

  What you need

•  

  An audio disc.

•  

 A USB storage device.


    Connect a USB storage device to your 
home theater.

  Play your audio CD (CDDA).

  Press  

CREATE MP3

 . 


»

   A con

fi

 rmation message is displayed.

   Select  

[Yes]

 , and then press  

OK

 .


»

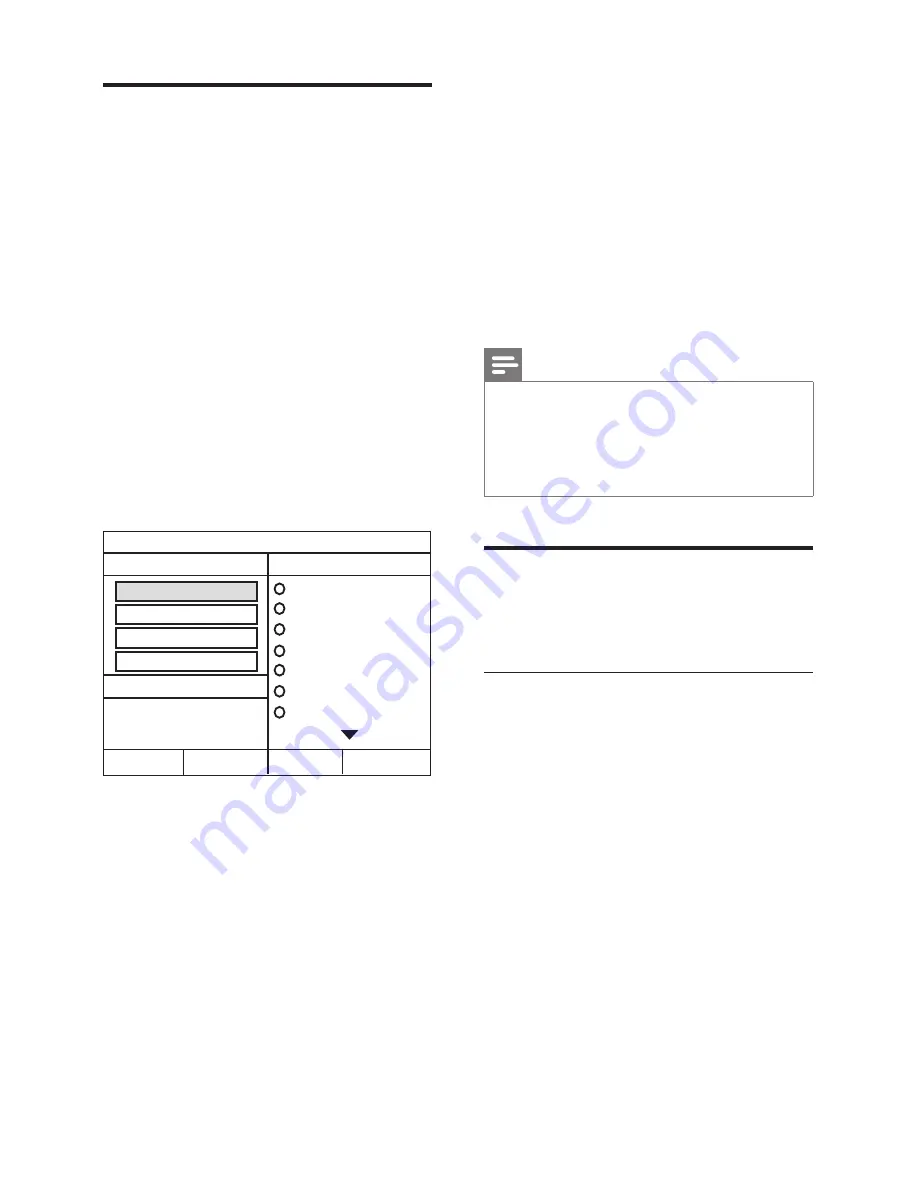
   The create MP3 screen is displayed. 
The right panel contains MP3 settings 
and the left panel shows the audio 
tracks.


   Press the  

Navigation buttons

  and  

OK

  to 

select and change: 
•  


[Speed]

 : Select the write-to-

fi

 le speed.

•  


[Bitrate]

 : Select the conversion quality.

•  


[CRT ID3]

 : Copy the tracks 

information when converting to MP3 

fi

 les. 

•  


[Device]

 : Select the USB storage 

device which you use to store the MP3 

fi

 les.

CREATE MP3

OPTIONS

TRACK

Bitrate         128kbps

SUMMARY

Select Track     0


Start

Exit

Select All

Deselect All

Time                 00:00

Track01          04:14

Track02          04:17

Track03          03:58

Track04          04:51

Track05          03:53

Track06          04:09

Track07          04:38 

Speed         Normal

CRT ID3      Yes

Device         USB1

   Navigate to the right panel, select the 
audio tracks and press  

OK

 .

•  

  To select all tracks, navigate to  

[Select 

All]

 , and then press  

OK

 .

   Select  

[Start]

  and then press  

OK

  to start 

the MP3 conversion. 


»

   A new folder which contains the MP3 

fi

 les is created in the USB storage 

device.

•  

    To exit the menu, select  

[Exit]

 , and 

then press  

OK

 .

Note


 Do not remove the USB and press any buttons when 
the conversion is in progress.


  DTS CDs and copy-protected CDs cannot be 
converted.


  Write-protected or password-protected USB storage 
device cannot be used to store MP3 

fi

 les. 

     Choose sound

  This section helps you choose the ideal sound 
for your video or music.

    Sound mode

  Select prede

fi

 ned sound modes to suit your 

video or music.

    Press  

SOUND

  repeatedly to select a 

sound mode.
•  


MOVIE

 : Enjoy a cinematic audio 

experience, specially enhanced for 
movies.

•  


MUSIC

 : Recreate the original recording 

environment of your music, in the 
studio or at a concert.

•  


ORIGINAL

 : Experience the original 

sound of your movies and music, 
without added sound effects.

•  


NEWS

 : Hear every word with 

optimized speech and clear vocals.

•  


GAMING

 : Enjoy thrilling arcade 

sounds, ideal for action-packed video 
games or loud parties.

Summary of Contents for HTS5533

Page 1: ...HTS5533 HTS5543 HTS5553 Register your product and get support at www philips com welcome ...

Page 2: ......

Page 3: ...ater 12 Discs 12 Data files 13 USB storage devices 14 Audio video and picture options 14 Radio 15 MP3 player 15 Create MP3 files 16 Choose sound 16 5 Change settings 18 Language settings 18 Picture and video settings 18 Audio settings 18 Parental control settings 19 Display settings 19 Energy saving settings 19 Restore default settings 19 6 Update software 20 Check software version 20 Update softw...

Page 4: ...responsibility for improper wall mounting that results in accident injury or damage For speakers with stands use only the supplied stands Secure the stands to the speakers tightly Place the assembled stands on flat level surfaces that can support the combined weight of the speaker and stand Never place the product or any objects on power cords or on other electrical equipment If the product is tra...

Page 5: ...local separate collection system for electrical and electronic products Please act according to your local rules and do not dispose of your old products with your normal household waste Correct disposal of your old product helps to prevent potential negative consequences for the environment and human health Your product contains batteries covered by the European Directive 2006 66 EC which cannot b...

Page 6: ...e theater e Increase or decrease volume f Open Close Open or close the disc compartment or eject the disc g Display panel h Disc compartment Connectors This section includes an overview of the connectors available on your home theater Front connectors a MUSIC iLINK Audio input from an MP3 player b USB Audio video or picture input from a USB storage device Rear connectors a AC MAINS Connect to the ...

Page 7: ...t on the TV or an analog device h DIGITAL IN OPTICAL Connect to an optical audio output on the TV or a digital device i DIGITAL IN COAXIAL Connect to a coaxial audio output on the TV or a digital device Remote control This section includes an overview of the remote control 1 2 3 4 5 6 7 8 20 9 10 11 12 13 14 15 16 17 18 19 21 22 23 24 ...

Page 8: ...umeric buttons Select an item to play l ANGLE Select video scenes recorded in different camera angels m REPEAT PROGRAM Select or turn off repeat mode In radio mode press once to access program mode and press again to store the radio station In radio mode press and hold for three seconds to reinstall the radio stations n REPEAT A B Mark two points within a chapter or track to repeat play or turn of...

Page 9: ...n all the speakers towards the seating position and place them close to your ear level seated Note Surround sound depends on factors such as room shape and size type of wall and ceiling windows and reflective surfaces and speaker acoustics Experiment with the speaker positions to find the optimum setting for you Follow these general guidelines for speakers placement 1 Seating position This is the ...

Page 10: ... on your home theater andTV Option 1 Connect to TV through HDMI ARC Best quality video Your home theater supports HDMI version 1 4 Audio Return Channel ARC If yourTV is HDMI ARC compliant you can hear theTV audio through your home theater by using a single HDMI cable 1 Using a High Speed HDMI cable connect the HDMI OUT ARC connector on your home theater to the HDMI ARC connector on theTV The HDMI ...

Page 11: ...d AV IN COMPOSITE or BASEBAND 2 Connect an audio cable to hear theTV audio through your home theater see Connect audio fromTV and other devices on page 9 TV 3 When you watchTV programs press SOURCE on your home theater repeatedly to select the correct audio input 4 When you watch videos switch yourTV to the correct video input For details see the TV user manual Connect audio from TV and other devi...

Page 12: ...witch theTV to the correct source for your home theater 1 Press SETUP on your home theater remote control 2 Select Audio Setup and then press OK 3 Press the Navigation buttons and OK to select and change SpeakersVolume Set the volume level of each speaker Speakers Delay Set the delay time for speakers which are placed closer to the seating position in order to obtain equal audio transmission from ...

Page 13: ... devices System Audio Control System audio control If system audio control is enabled the audio of the connected device is output through your home theater speakers automatically when you play the device Audio Input Mapping Audio input mapping If system audio control does not work map the connected device to the correct audio input connector on your home theater see Set up the audio on page 11 Not...

Page 14: ... or horizontally OK Confirm an entry or selection Play Pause Start pause or resume play Stop play Skip to the previous or next track chapter or file SUBTITLE Select subtitle language for video DISC Access or exit the disc menu AUDIO SYNC Select an audio language or channel SCREEN FIT Fit the picture format to theTV screen ZOOM Zoom into a video scene or picture REPEAT Select or turn off repeat mod...

Page 15: ...set 1 While playing video press SUBTITLE to select a language 2 For DivX video if the subtitles do not appear correctly continue the following steps to change the character set 3 Press SETUP 4 Select Preference Setup and then press OK 5 Select DivX Subtitle and then select a character set that supports the subtitle Character Set Language Standard English Albanian Danish Dutch Finnish French Gaelic...

Page 16: ...ic part of the disc Track Go To Enter the track time to skip to a specific part of the track Select Track Select a specific track For MP3 1 Press INFO to display the remaining time of the current track 2 Press INFO again to enter track time mode and then press the Numeric buttons to input the track time Video options 1 Press INFO The video options menu is displayed Depending on the video source so...

Page 17: ...y from theTV or other sources of radiation 2 Press RADIO If you have already installed the radio stations the last channel that you listened to is played If you have not installed any radio stations the message AUTO INSTALL PRESS PLAY appears on the display panel press 3 Use the remote control to listen or to change radio stations Button Action Numeric buttons Select a preset radio station Navigat...

Page 18: ...e to the right panel select the audio tracks and press OK To select all tracks navigate to Select All and then press OK 7 Select Start and then press OK to start the MP3 conversion A new folder which contains the MP3 files is created in the USB storage device To exit the menu select Exit and then press OK Note Do not remove the USB and press any buttons when the conversion is in progress DTS CDs a...

Page 19: ...dly to select a surround mode 5CH STEREO Enhanced stereo sound Ideal for party music MULTI CH DOLBY PLII Traditional 5 1 channel for a more relaxing cinematic experience STEREO Two channel stereo sound Ideal for listening to music Note If the audio source is a 2 1 channel multi channel mode will output 5 channel stereo sound ...

Page 20: ...age that is not available on a disc the home theater uses the default language of the disc Picture and video settings 1 Press SETUP 2 Select Video Setup and then press OK TV System Select a video format supported by theTV TV Display Select a picture format to fit theTV screen HDMI Setup Wide Screen Format For 16 9 wide screenTV display setting HDMIVideo Select the resolution of the video signal be...

Page 21: ...play settings 1 Press SETUP 2 Select Preference Setup and then press OK PBC Enable or disable the content menu navigation ofVCD and SVCD discs with Play Back Control feature MP3 JPEG Display Select the content display for MP3 JPEG files Energy saving settings 1 Press SETUP 2 Select General Setup and then press OK Screen Saver Switch the home theater to screen saver mode after 10 minutes of no acti...

Page 22: ...ot use a USB hard drive A computer with Internet access An archive utility that supports the ZIP file format Step 1 Download the latest software 1 Connect a USB flash drive to your computer 2 In your web browser go to www philips com support 3 At the Philips Support website find your product and locate the Software and drivers The software update is available as a zip file 4 Save the zip file in t...

Page 23: ...o mp3 wma Video avi divx mpg mpeg Picture jpg jpeg Amplifier Total output power 1000W RMS 0 5dB 30 THD Frequency response 20 Hz 20 kHz 3 dB Signal to noise ratio 65 dB CCIR A weighted Input sensitivity AUX1 AUX2 1V Music iLink 350 mV Video Signal system PAL NTSC HDMI output 480i 576i 480p 576p 720p 1080i 1080p Audio S PDIF Digital audio input Coaxial IEC 60958 3 Optical TOSLINK Sampling frequency ...

Page 24: ...Dimensions WxHxD 178 x 303 x 343 mm Weight 3 84 kg Speakers Center speaker Speaker impedance 4 ohm Speaker drivers 1 x 76 2 mm 3 woofer Dimensions WxHxD 223 x 101 5 x 93 5 mm Weight 0 6 kg Front Rear speaker Speaker impedance 4 ohm Speaker drivers 1 x 76 2 mm 3 woofer Dimensions WxHxD Speakers 90 x 185 x 105 5 mm Tall speakers 247 x 1091 x 242 mm Weight Speakers 0 54 kg each Tall speakers 2 19 kg ...

Page 25: ...o recovery or change the HDMI video setting Disc does not play high definition video Make sure that the disc contains high definition video Make sure that theTV supports high definition video Use an HDMI cable to connect to theTV Sound No sound from home theater speakers Connect the audio cable from your home theater to yourTV or other devices see Connect audio fromTV and other devices on page 9 S...

Page 26: ...ure that the format of the USB storage device is compatible with the home theater Make sure that the file system on the USB storage device is supported by the home theater No entry or x sign appears on the TV The operation is not possible EasyLink does not work Make sure that the home theater is connected to a Philips brand EasyLinkTV and the EasyLink option is turned on see Set up EasyLink HDMI C...

Page 27: ...oduct is in compliance with the essential requirements and other relevant provisions of Directives 2006 95 EC LowVoltage 2004 108 EC EMC Trademarks Manufactured under license from Dolby Laboratories Dolby Pro Logic and the double D symbol are trademarks of Dolby Laboratories Manufactured under license under U S Patent Nos 5 956 674 5 974 380 6 487 535 other U S and worldwide patents issued pending...

Page 28: ...tain your registration code locate the DivXVOD section in your device setup menu Go to vod divx com for more information on how to complete your registration HDMI and HDMI logo and High Definition Multimedia Interface are trademarks or registered trademarks of HDMI licensing LLC in the United States and other countries CLASS 1 LASER PRODUCT ...

Page 29: ...ectors 4 consumer support 3 control play buttons 12 create MP3 16 D disc menu 18 discs 12 display brightness 19 display menu for MP3 JPEG 19 display menu forVCD SVCD 19 disposal 3 DivX 13 21 DivX subtitles 13 E Easylink HDMI CEC 10 Easylink audio setup 11 Easylink controls 11 H HDMI ARC 8 HDMI video 18 HDMI CEC 10 L language settings 18 lock disc 19 M main unit overview 4 menu language for discs 1...

Page 30: ...kers placement 7 speakers setup 10 specifications 21 subtitle language for discs 18 supported file format 21 supported media formats 21 surround sound 17 synchronize picture and sound 12 system audio control 11 T time search 14 titles 14 trademarks 25 troubleshooting 23 U update software 20 USB storage device 14 V video options 14 video resolution 18 VOD code for DivX 13 W wireless rear audio 8 ...

Page 31: ...Language Code ...

Page 32: ... 2012 Koninklijke Philips Electronics N V All rights reserved sgpjp_1202 12_v1 ...

Reviews: