background image

12

English

Remote Control 

(continued)

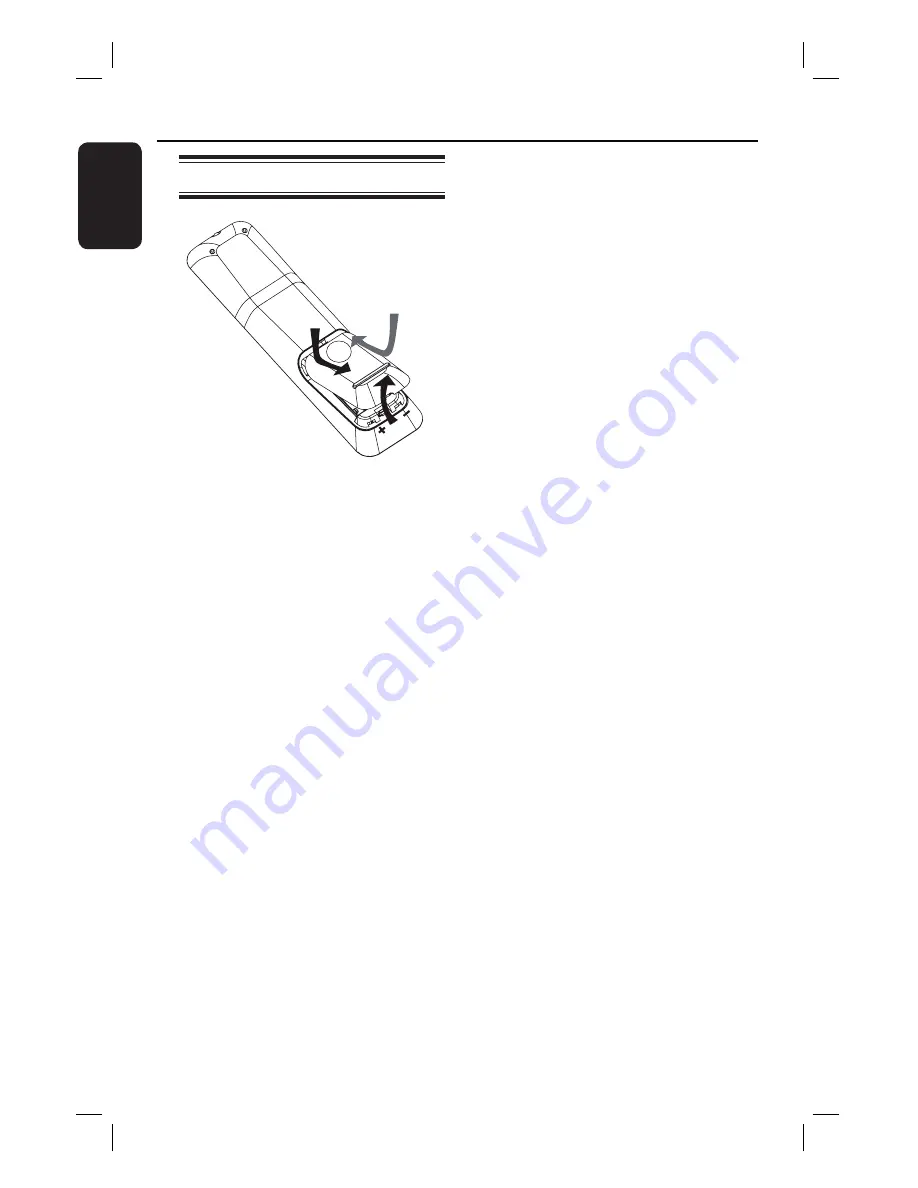
Using the remote control

A

 Push to open the battery compartment.

B

 Insert two batteries type R03 or AAA,

following the indications (

+-

) inside

the compartment.

C

 Close the cover.

D

  Point the remote control directly at the 

remote sensor (iR) on the front panel.

E

 Select the source you wish to control by 

pressing the AUX (MP3 LINK), RADIO, 
DOCK or DISC button on the remote 
control.

F

 Then select the desired function (for 

example 

í

,


ë

). 

CAUTION!
–  Remove batteries if they are 
exhausted or if the remote control 
is not to be used for a long time.
–  Never mix batteries (old and new 
or carbon and alkaline, etc).
– Batteries contain chemical 
substances

, they sho

uld be disposed 

of properly.

1_hts3264D_37_eng4_final810.indd12   12

1_hts3264D_37_eng4_final810.indd12   12

2008-03-13   10:29:37 AM

2008-03-13   10:29:37 AM

Summary of Contents for HTS3264D

Page 1: ... destinées à simplifier l utilisation de votre produit Philips ou formez le 1 800 661 6162 Francophone 1 888 PHILIPS 744 5477 English speaking Veillez à avoir votre produit à portée de main et model serial nombre ARRÊT Gracias por escoger Philips Necesita ayuda inmediata Lea primero la Guía rápida del comienzo o el Manual del usuario en donde encontrará consejos que le ayudarán a disfrutar plename...

Page 2: ...ion for future reference Model No __________________________ Serial No ________________________ Know these safetysymbols This bolt of lightning indicates unin sulated material within your unit may cause an electrical shock For the safety of everyone in your household please do not remove product covering The exclamation point calls atten tion to features for which you should read the enclosed lite...

Page 3: ...long periods of time 14 Refer all servicing to qualified service personnel Servicing is required when the apparatus has been damaged in any way such as power supply cord or plug is damaged liquid has been spilled or objects have fallen into the apparatus the apparatus has been exposed to rain or moisture does not operate normally or has been dropped 15 Battery usage CAUTION To prevent battery leak...

Page 4: ...PLAD BETRAKTA EJ STRÅLEN DANGER Invisible laser radiation when open AVOID DIRECT EXPOSURE TO BEAM or CAUTION Use of controls or adjustments or performance of procedures other than herein may result in hazardous radiation exposure or other unsafe operation ATTENTION L utilisation des commandes ou réglages ou le non respect des procédures ciincluses peuvent se traduire par une exposition dangereuse ...

Page 5: ... interference in a residential installation This equipment generates uses and can radiate radio frequency energy and if not installed and used in accordance with the instructions may cause harmful interference to radio communications However there is no guarantee that interference will not occur in a particular installation If this equipment does cause harmful interference to radio or television r...

Page 6: ...rted 20 24 Finding the correct viewing channel 20 Switching to different play source 20 Setting language preferences 21 22 On screen display OSD language 21 Audio Subtitle and Menu language for DVD playback 21 22 Setting up Progressive Scan feature 23 Setting the speakers channels 24 Disc Playback Disc Operations 25 32 Playable discs 25 Playing a disc 25 Basic playback controls 26 Selecting variou...

Page 7: ...ptions Setup Menu Options 36 43 Accessing the setup menu 36 General Setup 37 Audio Setup 38 Video Setup 39 40 Preferences 41 43 Radio Tuning Radio Operations 44 45 Tuning to radio stations 44 Presetting radio stations 44 Using auto install 44 Using automatic preset 45 Using manual preset 45 Selecting a preset radio station 45 Deleting a preset radio station 45 Others Sound and Volume Controls 46 V...

Page 8: ...shing Never place any object or items that can damage this unit e g liquid filled objects lighted candles Accessories supplied 1 subwoofer 2 front speakers 2 rear speakers 1 center speaker 1 remote control with batteries 1 composite video cable yellow 1 docking station for Apple iPod 1 FM wire antenna Quick Start Guide Cleaning discs To clean a disc use a micro fibre cleaning cloth and wipe the di...

Page 9: ...xt title chapter track DISC press and hold this button for fast forward and backward search RADIO selects a preset radio station Stop Exits an operation DISC stops playback RADIO press and hold this button to erase the current preset radio station Note The following jacks are under the flap at the right corner of the front panel OPEN h USB jack Input for USB flash drive or USB memory card reader i...

Page 10: ...TIONS Enters or exits the system setup menu f u Play Pause DISC starts pauses playback RADIO starts auto radio installation for first time setup g Ç Stop Exits an operation DISC stops playback RADIO press and hold this button to erase the current preset radio station h SOUND MODES Selects a predefined sound effect i AUDIO SYNC Selects an audio language channel Sets the audio output delay times if ...

Page 11: ...es or restores the volume q VOL Adjusts the volume level r SURROUND Selects multi channel surround stereo or party mode s Numeric keypad 0 9 Enters a track title chapter number of the disc Enters a number of a preset radio station t SUBTITLE Selects a DVD subtitle language u REPEAT PROGRAM DISC selects various repeat or shuffle modes turns off repeat or shuffle mode RADIO press this button to star...

Page 12: ...ou wish to control by pressing the AUX MP3 LINK RADIO DOCK or DISC button on the remote control F Then select the desired function for example í ë CAUTION Remove batteries if they are exhausted or if the remote control is not to be used for a long time Never mix batteries old and new or carbon and alkaline etc Batteries contain chemical substances they should be disposed of properly 1_hts3264D_37_...

Page 13: ...the corner of the room Otherwise keep it at least one metre away from the TV Helpful Hints The placement diagram shown here is only a guideline that provides great system performance You may find other placement choices that are more suitable for your room layout that provide the sound experience you enjoy To avoid magnetic interference never position the front speakers too close to your TV The re...

Page 14: ...imum video quality To hear the TV audio through this unit connect AUDIO IN AUX jacks on the unit to the audio output on your TV cables not supplied Then press AUX MP3 LINK until AUX 1 or AUX 2 is displayed on the front panel Option 1 Connecting to theVideo jack Use a composite video cable yellow supplied to connect the CVBS jack on the main unit to the video input jack or labeled as A V In Video I...

Page 15: ...e green not supplied to connect the Y Pb Pr jacks on the main unit to the corresponding component video input jacks or labeled as Y Pb Cb Pr Cr or YUV on the TV It provides better picture quality B If your TV accepts progressive signals proceed to chapter Getting Started Setting up Progressive Scan feature for detailed progressive feature setup Option 2 Basic Connections continued 1_hts3264D_37_en...

Page 16: ...he TV See your electronics retailer or contact Philips for details about RF modulator availability and operations A Use the supplied composite video cable yellow to connect the CVBS jack on the main unit to the video input jack on the RF modulator B Use an RF coaxial cable not supplied to connect ANTENNA OUT or TO TV jack on the RF modulator to the ANTENNA IN jack on the TV Antenna Basic Connectio...

Page 17: ...the colors of the cables and jacks are matched Helpful Hint To prevent unwanted noise never place the speakers too close to the main unit subwoofer AC power adapter TV or any other radiation sources REAR LEFT REAR RIGHT SUBWOOFER FRONT CENTRE FRONT LEFT FRONT RIGHT 1_hts3264D_37_eng4_final810 indd17 17 1_hts3264D_37_eng4_final810 indd17 17 2008 03 13 10 29 39 AM 2008 03 13 10 29 39 AM ...

Page 18: ...m your TV VCR or other radiation source to prevent any unwanted interference Main Unit rear FM antenna Main Unit rear Step 5 Connecting the power cord After everything is connected properly connect the AC power cord into the power outlet The standby LED on the main unit lights up Helpful Hints Refer to the type plate at the rear or bottom of the product for identification and supply ratings Before...

Page 19: ...i channel surround sound capabilities Use an audio cable not supplied to connect the AUDIO IN AUX1 or AUDIO IN AUX2 jacks on the main unit to the AUDIO OUT jacks on the connected device To listen to the audio output from this connection press AUX MP3 LINK repeatedly until AUX 1 or AUX 2 is displayed on the front panel DVD Recorder VCR Cable Satellite Box 1_hts3264D_37_eng4_final810 indd19 19 1_hts...

Page 20: ... 4 Refer to your TVs user manual on how to select the correct input on your TV Getting Started Switching to different play source On the main unit Press the SOURCE button on the main unit repeatedly to select DISC FM AUX1 AUX2 MP3 LINK DOCK DISC Or On the remote control Press AUX MP3 LINK repeatedly to hear the audio output from the external device AUX1 for device connected to AUDIO IN AUX1 jacks ...

Page 21: ...red language settings for DVD playback If the selected language is recorded on the DVD disc this unit automatically plays the disc in that language Otherwise the disc s default language will be used instead A Press Ç twice to stop playback if any then press OPTIONS B Press repeatedly to select Preferences icon and press C Use keys to select one of the options below and press Press OPTIONS to exit ...

Page 22: ...ul Hints During DVD playback you can press the AUDIO SYNC and SUBTITLE on the remote control to change the audio and subtitle languages respectively However this does not change the default settings you have made here For some DVDs the subtitle audio disc menu language can only be changed via the DVD disc menu Getting Started continued 1_hts3264D_37_eng4_final810 indd22 22 1_hts3264D_37_eng4_final...

Page 23: ...he menu and press OK to confirm F Read the notification message on the TV and confirm your action by selecting the OK in the menu and press OK There will be no picture on your TV at this state until you have turned on the progressive scan mode on your TV G Turn on your TV progressive scan mode refer to your TVs user manual A message appears on the TV H Confirm your action by selecting the OK in th...

Page 24: ...y CD Upsampling Audio Sync D Use keys to set the volume level for each speaker 6dB 6dB and press OK to confirm Getting Started continued E Use keys to highlight Speakers Delay and press Press OPTIONS to exit menu Audio Setup Center Rear Left Rear Right Speakers Distance Setup 0ms 0ms 0ms Speakers Volume Speakers Delay CD Upsampling Audio Sync F Use keys to set the delay times 0 ms 15 ms for center...

Page 25: ...disc or at the current time Never put any objects other than discs on the disc tray Doing so may cause the unit to malfunction Playing a disc A Press SOURCE repeatedly until DISC appears on the display panel or press DISC on the remote control B Turn on the TV to the correct viewing channel for this unit The blue DVD background screen appears on the TV C Press ç to open the disc tray D Load a disc...

Page 26: ...dby mode if you do not press any buttons within 15 minutes after a disc has stopped playing Screen saver starts automatically if the disc playback is stopped for about 5 minutes Selecting various repeat shuffle functions The available of the repeat play options and shuffle play mode are vary depending on the disc type While playing a disc press REPEAT PROGRAM on the remote control repeatedly to ch...

Page 27: ...e disc playback information for example title or chapter number audio subtitle language and a number of operations can be done without interrupting disc playback A During playback press INFO A list of available disc information appears on the TV DVD Menu Title Chapter Audio Subtitle 01 01 02 99 2ch Chi Off Bitrate 7 Title Elapsed VCD SVCD Bitrate 8 Total Elapsed Track DiscTime TrackTime Repeat 09 ...

Page 28: ...k language This operation works only on DVDs with multiple sound track languages or VCDs SVCDs with multiple audio channels For DVD Press AUDIO SYNC repeatedly to select the available audio languages For VCD and SVCD Press AUDIO SYNC repeatedly to select the available audio channels provided by the disc STEREO MONO LEFT MONO RIGHT or MIX MONO Setting the delay times for audio playback This feature...

Page 29: ...erent tracks on one screen each time It allows you to have a quick glance at all the tracks on the disc Disc Interval View the whole disc in six thumbnail pictures It divides a disc into six portions at regular intervals and displays them on one screen Track Interval View the content of a single track in six thumbnail pictures It divides a single track into six portions at regular intervals and di...

Page 30: ...inue till the end of the folder During playback Press í ë to playback another file in the current folder Press m M to fast reverse forward search for a track To select another folder from the current disc press repeatedly to highlight Previous folder and press OK to return to the root menu D To stop playback press x Helpful Hints You can set to display or skip the folders when you load a MP3 JPEG ...

Page 31: ...nnot display progressive JPEG Motion JPEG or pictures in formats other than JPEG or sound clips associated with pictures Preview function A During playback press INFO 12 thumbnail pictures will be displayed on the TV B Press í ë to display the other pictures on the previous next page C Use keys to select one of the pictures and press OK to start playback D Press MENU BACK to return to Picture CD m...

Page 32: ...s A Load a DivX disc B Use keys to navigate to the file you want to play C Press OK to start playback During playback If the DivX disc has multilingual subtitles you can press SUBTITLE on the remote control to change the subtitle language If the DivX title has different audio tracks you can press AUDIO SYNC on the remote control to change the audio stream Use m M keys on the remote control to perf...

Page 33: ... support B Adjust the support until it can fit your iPod C Turn the knob clockwise to tighten it Playing from iPod A Connect the docking station supplied to the DOCK jack on this unit B Dock your iPod in the docking station and turn it on C Press DOCK on the remote control D Start playback on your iPod The music will be heard through the speakers During playback you can use the remote control to c...

Page 34: ...ay vary from different card readers D Select the file to play and press u For more playback information see Playing a DivX disc Playing a JPEG photo file slide show or Playing a MP3 WMA disc for details E Before you remove the USB device press Ç to stop playback or press DISC to switch to disc mode Helpful Hints The USB jack does not support the connection of other USB devices except to a USB flas...

Page 35: ... jack on this unit to the headphone output jack on your portable audio player B Press AUX MP3 LINK repeatedly on the remote control until MP3 LINK is displayed C Start playback on your portable audio player The music will be heard through the speakers D To stop playback press the STOP button on the portable audio player Helpful Hint Stop playback on your portable audio player before you switch thi...

Page 36: ... your particular requirements OPTIONS OK A In disc mode press OPTIONS on the remote control The setup menu appears B Use keys to select one of the setup menu options then press General Setup Audio Setup Video Setup Preferences If you are not able to access the Preferences press OPTIONS to exit the menu Then press x twice before you press the OPTIONS again C Use keys to select an option and press D...

Page 37: ...s on screen display Screen Saver The screen saver prevents damage to the TV screen by avoiding exposure to a static image for too long On Switch to TV screen saver mode when playback has been stopped or paused for about 5 minutes Off Disable the screen saver function Sleep The sleep timer enables the unit to switch to standby mode automatically after a preset time 15 30 45 60 mins Select the prese...

Page 38: ... closer to the listener than the front speakers CD Upsampling This feature enables you to convert the music CD to a higher sampling rate using sophisticated digital signal processing for better sound quality Off Turn off CD upsampling 88 2 kHz X2 To convert the sampling rate of the CDs twice as high as the original rate Notes This function is not available if you switches to Multi channel mode If ...

Page 39: ...ou have connected this unit to your TV using the Y Pb Pr See Getting Started Setting up Progressive Scan feature for details Off Turn off the progressive scan mode On Turn on progressive scan mode Read the instructions on the TV and confirm your action by pressing OK on the remote control Picture Setting This unit provides three predefined sets of picture color settings and one personal setting wh...

Page 40: ...cial video signal data It shows sound effects on the screen if your TV supports this feature such as phone ringing and footsteps On Turn on closed caption feature Off Turn off closed caption feature Setup Menu Options continued 1_hts3264D_37_eng4_final810 indd40 40 1_hts3264D_37_eng4_final810 indd40 40 2008 03 13 10 29 45 AM 2008 03 13 10 29 45 AM ...

Page 41: ...try dependent 1 is considered material that is least offensive and 8 is most offensive To disable parental controls and allow all discs to play select 8 Some DVDs are not encoded with a rating though the movie rating may be printed on the disc cover The rating level feature does not prohibit playback of such discs VCD SVCD and CD have no level indication so parental control has no effect on these ...

Page 42: ...d Confirm PWD Change Password OK 2 Use the numeric keypad 0 9 on the remote control to enter your existing six digit password at Old Password Note When doing this for the first time or if you forget your existing password key in 136900 3 Enter the new six digit password at New Password 4 Enter the new six digit password again at Confirm PWD 5 Press OK to confirm and exit the menu DivX Subtitle Sel...

Page 43: ...ck and Parental Press OK to confirm the default reset Version Info This shows you informations about the current version of the software installed in this unit You may require this information for future online firmware upgrade Press OK to display the software version of this unit Setup Menu Options continued 1_hts3264D_37_eng4_final810 indd43 43 1_hts3264D_37_eng4_final810 indd43 43 2008 03 13 10...

Page 44: ...until an optimal reception is found Presetting radio stations You can store up to 40 FM preset radio stations in the memory There are three different ways to program the radio stations Using auto install for first time setup only Using automatic preset Using manual preset Helpful Hints This unit exits presetting mode if no button is pressed within 20 seconds If no stereo signal is detected or less...

Page 45: ... that you want to store the current radio station D Press REPEAT PROGRAM to store Selecting a preset radio station A Press RADIO to select FM band B Press í ë or use the numeric keypad 0 9 to select a preset radio stations The preset number and radio frequency appear on the display panel Deleting a preset radio station A In radio mode press í ë to select a preset radio station B Press and hold x u...

Page 46: ... rear left and rear right speakers Selecting digital sound effects Select a preset digital sound effect that matches your disc s content or that optimizes the sound of the musical style you are playing Press SOUND MODES to select the available sound effect Movies Music Description CONCERT CLASSIC Flat and pure sound mode Ideal for listening to classical music and watching live concert DVDs DRAMA L...

Page 47: ... Menu PBC MP3 JPEG Nav Password Preferences Version Info C Write down the version number then press OPTIONS to exit the menu D Go to www philips com support to check the latest software version available for this unit E If the latest software version is higher than the software version of this unit download it and store onto a CD R or USB flash drive F Insert the CD R or USB flash drive to this un...

Page 48: ...isc tray 2 Press on the remote control 3 Press AUDIO SYNC on the remote control Check the video connection Sometimes a small amount of picture distortion may appear This is not a malfunction The disc is dirty Clean the disc Adjust the volume Check the speaker connections and settings Make sure that the audio cables are connected and press the correct source button for example AUX MP3 LINK to choos...

Page 49: ... DVD disc Depending on the TV it may not be possible to change the aspect ratio The features may not be available on the DVD Changing the language for the sound or subtitle is prohibited on this DVD Press x twice before selecting the system setup menu Depending on the disc availability some menu items cannot be selected Ensure that the DivX file is encoded according to the Home Theater Profile wit...

Page 50: ...ash drive format is not compatible with this unit Drive is formatted with a different file system which is not supported by this unit e g NTFS Large file size or high memory USB flash drive takes longer time to read and display on the TV 1_hts3264D_37_eng4_final810 indd50 50 1_hts3264D_37_eng4_final810 indd50 50 2008 03 13 10 29 47 AM 2008 03 13 10 29 47 AM ...

Page 51: ... kHz 48 kHz 4 Hz 44 kHz 96 kHz PCM IEC 60958 Dolby Digital IEC 60958 IEC 61937 USB Compatibility Hi Speed USB 2 0 Class Support UMS USB Mass Storage Class MTP Media Transfer Protocol MAIN UNIT Power Supply Rating 120 V 60 Hz Power Consumption 100 W Dimensions 360 x 58 x 332 mm w x h x d Weight 2 9 kg FRONT AND REAR SPEAKERS System Full range satellite Impedance 3 Ω Speaker drivers 3 full range spe...

Page 52: ...e DivX code is a patent pending MPEG 4 based video compression technology developed by DivX Networks Inc that can shrink digital video to sizes small enough to be transported over the internet while maintaining high visual quality Dolby Digital A surround sound system developed by Dolby Laboratories containing up to six channels of digital audio front left and right surround left and right center ...

Page 53: ...ing discs to be played only in the region designated This unit will only play discs that have compatible region codes You can find the region code of your unit by looking at the product label Some discs are compatible with more than one region or ALL regions Surround A system for creating realistic three dimensional sound fields full of realism by arranging multiple speakers around the listener Ti...

Page 54: ...ication or non Philips product b to damage caused by service performed by anyone other than Philips or Philips Authorized Service Location c to a product or a part that has been modified without the written permission of Philips or d if any Philips serial number has been removed or defaced or e product accessories or consumables sold AS IS without warranty of any kind by including refurbished Phil...

Page 55: ...55 1_hts3264D_37_eng4_final810 indd55 55 1_hts3264D_37_eng4_final810 indd55 55 2008 03 13 10 29 48 AM 2008 03 13 10 29 48 AM ...

Reviews: