background image

8


EN

Product overview

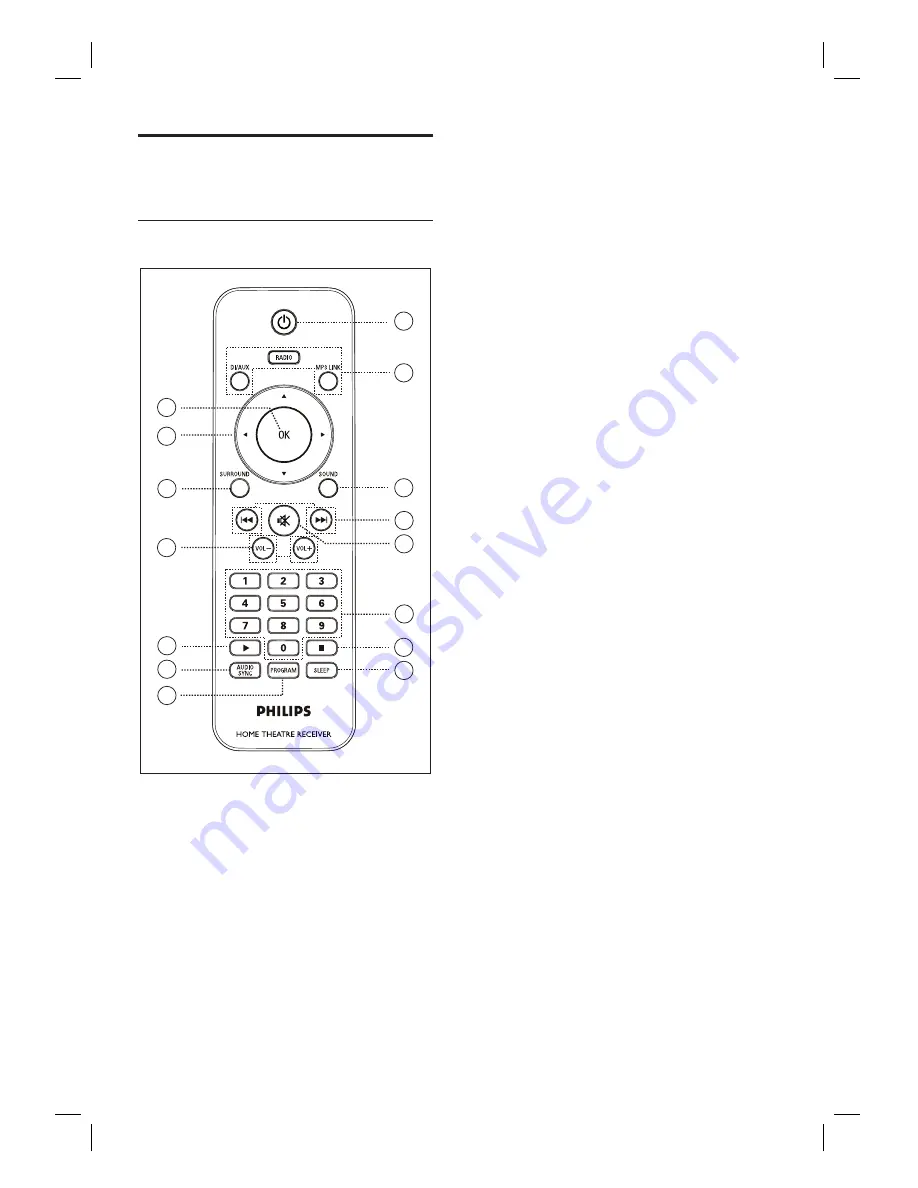
Remote control

15

14

13

10

11

12

9

6

1

2

3

4

5

7

8

a


2

Turn on this unit or turn off to standby 
mode.

b

 Source buttons

RADIO

: switch to FM band.

DI/AUX

: switch to COAX IN1, 

COAX IN2, OPTI IN, AUX1 or AUX2 
that corresponds to the socket you 
used to connect the external device. 

MP3 LINK

: switch to the MP3 device 

that is connected to the MP3 LINK 
socket. 

c

 SOUND

Select a prede

fi

 ned sound effect.

d


>


(Previous/Next)

RADIO

: select a preset radio station.

e


H


(Mute)

Mute or restore the volume.

f

 Numeric buttons

Enter the preset number of a radio 
station.

g


x


(Stop)

RADIO

: erase the current preset radio 

station.

h

 SLEEP

Select a preset timer to turn off this 
unit to standby mode.

i

 OK

Con

fi

 rm an entry or selection.

j

  Cursor buttons (

vV b  B

)

RADIO

:

 press up or down to tune the 

radio frequency.

RADIO

: press left or right to start auto 

search.


1_htr3465_98_eng3_final815.indd   8

1_htr3465_98_eng3_final815.indd   8

2008-04-10   5:32:17 PM

2008-04-10   5:32:17 PM

Summary of Contents for HTR3465

Page 1: ... at www philips com welcome EN Digital AV Receiver System 5 ZH_CN 数字 AV 接收器系统 25 ZH_TW 數位影音接收系統 45 MS_MY Sistem Penerima AV Digital 65 1_htr3465_98_eng3_final815 indd 1 1_htr3465_98_eng3_final815 indd 1 2008 04 10 5 32 11 PM 2008 04 10 5 32 11 PM ...

Page 2: ...go refers to the period 10 years during which the toxic or hazardous substances or elements contained in electronic information products will not leak or mutate so that the use of these substances or elements will not result in any severe environmental pollution any bodily injury or damage to any assets ℸ 䆚ᣛᳳ䰤 Ѩᑈ ˈ Ё ⱘ ᆇ 䋼 ܗ ℷᐌՓ ⱘᴵӊϟϡӮথ さ বˈ Փ 䆹 ѻકϡӮᇍ ๗䗴៤Ϲ䞡 ᶧ ᇍ Ҏ䑿ǃ䋶ѻ䗴៤Ϲ䞡ᤳᆇⱘᳳ䰤DŽ This logo refers to ...

Page 3: ...5 974 380 5 978 762 6 487 535 other U S and worldwide patents issued pending DTS and DTS Digital Surround are registered trademarks and the DTS logos and Symbol are trademarks of DTS Inc 1996 2007 DTS Inc All Rights Reserved ENERGY STAR and the ENERGY STAR mark are registered U S marks 1_htr3465_98_eng3_final815 indd 3 1_htr3465_98_eng3_final815 indd 3 2008 04 10 5 32 16 PM 2008 04 10 5 32 16 PM ...

Page 4: ...4 EN 1_htr3465_98_eng3_final815 indd 4 1_htr3465_98_eng3_final815 indd 4 2008 04 10 5 32 16 PM 2008 04 10 5 32 16 PM ...

Page 5: ...trol 15 Change speakers settings 15 Select a play source 16 5 Play 17 Play from portable media player 17 Play from radio 17 Enjoy music through headphone 19 Use sleep timer to power off 19 6 Adjust sound 20 Control the volume 20 Sync audio output with video play 20 Select surround sound 20 Select a preset sound effect 21 7 Additional information 22 Specifications 22 8 Troubleshooting 23 9 Glossary...

Page 6: ... to direct sunlight naked flames or heat Never place this unit on other electrical equipment Keep away from this unit during lightning storms Never remove the casing of this unit Please leave all maintenance work to qualified personnel Keep this unit away from water moisture and liquid filled objects Caution Remove batteries if they are exhausted or if the remote control is not to be used for a lo...

Page 7: ...player to the MP3 LINK socket to enjoy the music play in superb sound quality Listen to rich uncompressed multi channel surround sound This Digital AV Receiver supports 5 1 channels of uncompressed audio which realises real to life sound and makes you feel that you are really there Sync the audio output with the video play This Digital AV Receiver provides you the feature of delaying the audio out...

Page 8: ...D Select a predefined sound effect d Previous Next RADIO select a preset radio station e H Mute Mute or restore the volume f Numeric buttons Enter the preset number of a radio station g x Stop RADIO erase the current preset radio station h SLEEP Select a preset timer to turn off this unit to standby mode i OK Confirm an entry or selection j Cursor buttons vVb B RADIO press up or down to tune the r...

Page 9: ...stallation only available for first time setup n AUDIO SYNC Access audio sync setting Then press VOL to set the audio delay time o PROGRAM RADIO press this button to start manual radio preset RADIO press and hold this button to start automatic radio preset 1_htr3465_98_eng3_final815 indd 9 1_htr3465_98_eng3_final815 indd 9 2008 04 10 5 32 17 PM 2008 04 10 5 32 17 PM ...

Page 10: ... press to select a preset radio station RADIO press and hold to start auto search f Display panel g SOURCE Select a play media COAX IN1 COAX IN2 OPTI IN AUX1 AUX2 RADIO FM or MP3 LINK h VOLUME Adjust the volume level Note The following sockets are under the flap at the right corner of the main unit OPEN B i MP3 LINK socket To connect portable audio player j PHONES To connect headphone 1 5 4 2 3 7 ...

Page 11: ...nit in an enclosed cabinet Install this unit near the AC outlet where the AC power plug can be easily reached SUBWOOFER FRONT RIGHT FRONT LEFT CENTER REAR LEFT REAR RIGHT 2 1 3 2 2 2 2 1 Place this Digital AV Receiver unit near to the TV 2 Place the speakers system as per the diagram shown above Find the most suitable placement for the speakers based on your room layout and set up to ensure optimu...

Page 12: ...lied to the FM75Ω socket on this unit for some models this cable has been connected Extend the FM antenna and fix its ends to the wall 2 Connect the power cord when all the required connections are done and you are ready to enjoy this Digital AV Receiver Note Before connect to power outlet ensure that the voltage selector at the rear of this unit is set to the local power line voltage 1_htr3465_98...

Page 13: ...onnection press DI AUX repeatedly until AUX1 is displayed on the display panel Connect audio from DVD player cable box recorder game console You can choose to connect to analogue or digital socket depending on the device capabilities Connect to analogue sockets AUX 2 1 Connect an audio cable supplied from the AUDIO IN AUX2 sockets on this unit to the AUDIO OUT sockets on the device Note To listen ...

Page 14: ...onnection press DI AUX repeatedly until OPTI IN is displayed on the display panel Connect portable media player MP3 MP3 LINK 1 Connect a 3 5mm stereo audio cable supplied from the MP3 LINK socket on this unit to the phone socket on your portable media player such as MP3 player Note To listen to the audio output from this connection press MP3 LINK Connect to power outlet Note Before connect to powe...

Page 15: ...st possible surround sound Note Switch the Digital AV Receiver to surround mode before you can change the speakers settings Test and set the speaker volume level 1 Press SURROUND to switch to multi channel surround mode 2 Press PROGRAM to access speaker setting mode 3 Press until TEST TONE is displayed then press PROGRAM Sound output from each speaker for 2 seconds You can hear the volume level se...

Page 16: ... adjust within 5 seconds it resumes normal volume control function Set longer delay time if the centre or rear speakers are closer to the listening position than the front speakers Select a play source On the main unit 1 Press SOURCE button repeatedly to select COAX IN1 COAX IN2 OPTI IN AUX1 AUX2 FM MP3 LINK On the remote control Press RADIO to switch to FM band Press DI AUX repeatedly to listen t...

Page 17: ...o other play media source Play from radio Check if the FM antenna has been connected to this Digital AV Receiver unit If not connect the supplied FM antenna to the FM 75Ω socket and fix its ends to the wall Tips For better FM stereo reception connect an external FM antenna not supplied Position the antenna as far away as possible from your TV VCR or other radiation source to prevent interference F...

Page 18: ...ANTENNA is displayed Search and store radio stations individually 1 Press RADIO 2 Press The radio frequency indication starts to change until a radio station is detected 3 Repeat step 2 until you tune to the radio station you wish to store To finetune the radio frequency press vV 4 Press PROGRAM If no action is carried out within 20 seconds after the above step it exits the preset mode 5 Press or ...

Page 19: ...matically Use sleep timer to power off You can select a preset time when you wish to turn off this unit to standby mode 1 Press SLEEP repeatedly to select a count down time in minutes before this unit switches to standby 60 45 30 15 OFF is displayed To cancel the sleep timer select OFF 1_htr3465_98_eng3_final815 indd 19 1_htr3465_98_eng3_final815 indd 19 2008 04 10 5 32 20 PM 2008 04 10 5 32 20 PM...

Page 20: ...ote If the volume control is not used within 5 seconds it resumes normal volume control function Select surround sound 1 Press SURROUND repeatedly to select a best surround output that available on the disc or most suits the music you play Options Descriptions MULTI CHANNEL Multi channel surround output DTS Digital Theatre Systems Dolby Digital and Dolby Pro Logic II PARTY Ideal for party music It...

Page 21: ...r lounge music and watching dramas ACTION ROCK Enhanced low and high range for great sounding movie effects and atmosphere Great for action movies and rock pop music GAMING SPORTS Moderate mid range and surround effects for clear vocals and the atmosphere of a live sports venue also ideal video gaming NIGHT Dynamically controlled sound mode suitable for watching movies at night or for non intrusiv...

Page 22: ... to noise ratio FM 55 dB Harmonic distortion FM 3 Frequency response FM 180 Hz 10 kHz 6dB Stereo Threshold FM 29 dB Main unit Power supply 110 127 V 220 240 V 50 60 Hz Power consumption 100W Dimensions WxHxD 435 x 58 x 360 mm Weight 3 2 kg Speakers System full range satellite Speaker impedance 6 ohm centre 3 ohm Front Rear Speaker drivers Centre 2x 2 5 woofer 1 x 2 tweeter Front Rear 3 full range ...

Page 23: ...he antenna or connect an external antenna for better reception Place the antenna further away from any equipment that may be causing the interference Warning Risk of electric shock Never remove the casing of this unit To keep the warranty valid never try to repair the system yourself If you encounter problems when using this unit check the following points before requesting service If the problem ...

Page 24: ... be encoded specifically to take full advantage of Pro Logic II playback including separate left and right surround channels Such material is also compatible with conventional Pro Logic decoders DTS Digital Theater Systems This is a surround sound system but it is different from the Dolby Digital The formats were developed by different companies MP3 A file format with a sound data compression syst...

Reviews: