background image

4

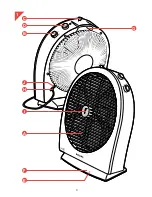
General description 

(fig. 1)

A

Louvre grille (rotating air stream diffuser)

B

Timer knob (rotate)

C

Louvre rotation on/off knob (push)

D

Speed control (rotate) with pilot light

E

Automatic safety switch

F

Stand (3 positions)

G

Hand grip

H

Cord storage

I

Fixing nut holding the Louvre grill

J

Fixing screws holding the air inlet grill

Operation

Getting the fan ready for use
Set the fan to the required position (fig. 2). 

(The stand has three positions.)

- Pull the required length of mains cord out of the

cord storage compartment (fig. 3).

- Insert the mains plug into a wall socket.
- Set the timer knob (B) to the “on” position (fig. 4).

Please note: The appliance cannot switched on,
unless the timer knob has been set to position
“on” or to  any required operation time. See also
section “Timer”.
- Select the required air speed by setting switch

(D) (fig. 5). 
(0 = stop; 1 = low speed; 2 = medium speed; 
3 = maximum speed.)
The pilot light comes on and the fan begins to
work.

Louvre (rotating air flow diffuser) (A)
- For continuously varying the air flow direction

set switch (C) to the “on” position. 
The Louvre air diffuser will start to rotate (fig. 6). 

- For fixed air-flow direction set switch (C) to the

“on” position and let the air diffuser rotate until
the required air-flow direction is obtained. 
Then set switch (C) to “off” position (fig. 7).

Timer (B)
- If you wish the fan to run for a pre-set length of

time (max. 3 hours) and then switch off, set the
timer to the required time by turning knob (B)
clockwise (fig. 8).

Cleaning 

• Always remove the mains plug from the wall

socket before cleaning.

• Clean with a soft dry or damp cloth, if required

with a soapy detergent. Do not use abrasives or
solvents.

- For cleaning the front part of the fan, loosen the

fixing nut (I) which holds the Louvre grille 
(fig. 9). You can use a coin for this purpose.
(Turn anti-clockwise.)
This enables you to remove the Louvre grille
(fig. 10).

- For cleaning the back part of the fan, loosen the

two fixing screws (J) which hold the air inlet
grille (fig. 11). (Turn anti-clockwise.)
This enables you to remove the air inlet grille
(fig. 12).

English

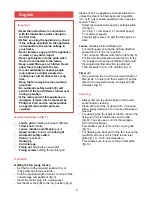
Important

• Read the instructions in conjunction

with the illustrations before using for
the first time.

• Before you plug the appliance in, check

if the voltage specified on the appliance
corresponds to the mains voltage in
your home.

• Never immerse any part of the appliance

in water or any other liquid.

• Never put objects into the grille when

the fan is connected to the mains.

• Keep a watchful eye on children. Never

allow them to play with the fan.

• It is not advisable to expose people

(esp. babies and older people) to a
continuous cold air stream for a long
time.

• Keep the fan away from lace curtains,

plants etc.

• An automatic safety switch (E) will

switch off the fan if lifted or turned over
during operation.

• If the mains cord of this appliance is

damaged, it must only be replaced by
Philips or their service representative,
as special tools and/or parts are
required.

Summary of Contents for HR 3287

Page 1: ...1 HR 3287 ...

Page 2: ... l apparecchio aprite la pagina 3 e la pagina 30 e leggete attentamente le istruzioni per l uso Español Página 11 Desplegar las páginas 3 y 30 al leer las instrucciones de manejo Português Página 13 Durante a leitura do modo de emprêgo desdobre e verifique as pág 3 e 30 Dansk Side 14 Hold side 3 og side 30 opslået mens De læser brugsanvisningen Norsk Side 15 Slå opp på side 3 og side 30 før De les...

Page 3: ...1 A D C H J F E I B G 3 ...

Page 4: ...ax 3 hours and then switch off set the timer to the required time by turning knob B clockwise fig 8 Cleaning Always remove the mains plug from the wall socket before cleaning Clean with a soft dry or damp cloth if required with a soapy detergent Do not use abrasives or solvents For cleaning the front part of the fan loosen the fixing nut I which holds the Louvre grille fig 9 You can use a coin for...

Page 5: ...st be cut from the mains cord the fuse removed and the plug safely discarded to prevent further use The removed plug can be hazardous if inserted into a live mains socket Fitting a different plug This appliance is fitted with a BS 1363 13 Amp plug Should you need to replace the plug connect the wires as follows Brown wire to the Live L terminal of the new plug Blue wire to the Neutral N terminal o...

Page 6: ...g 6 Pour une direction de la ventilation définie mettez le bouton de commande C sur la position on marche et laissez le dispositif de diffusion d air tourner jusqu à obtention de la direction souhaitée Mettez ensuite le bouton de commande C sur la position off arrêt fig 7 Minuterie B Si vous souhaitez que le ventilateur s arrête au tout d un certain temps max 3 heures réglez la minuterie sur le te...

Page 7: ... avant du ventilateur défaites le crochet de fixation I qui tient la grille Louvre fig 9 Vous pouvez utiliser une pièce de monnaie tournez dans le sens anti horaire Ceci permet de retirer la grille Louvre fig 10 Pour nettoyer la partie arrière du ventilateur défaites les 2 vis de fixation J qui tiennent la grille d entrée d air fig 11 tournez dans le sens anti horaire Ceci permet de retirer la gri...

Page 8: ...n im Uhrzeigersinn ein Abb 8 Reinigung Ziehen Sie vor der Reinigung stets den Stecker aus der Steckdose Reinigen Sie das Gerät mit einem weichen trockenen oder angefeuchteten Tuch Sie können dem Wasser ein wenig Spülmittel zusetzen Verwenden Sie keine Scheuer oder Lösungsmittel Um das Vorderteil des Ventilators zu reinigen lockern Sie die Arretierung I die das Louvre Gitter hält Abb 9 durch Drehen...

Page 9: ...van het snoer uit de opbergplaats fig 3 Steek de stekker in het stopcontact Zet de tijdschakelaar B in stand on aan fig 4 N B Het apparaat kan niet worden ingeschakeld tenzij de tijdschakelaar in stand on aan of op een gewenste werktijd is gezet Zie ook het gedeelte Tijdschakelaar Stel de gewenste luchtsnelheid in met behulp van snelheidsschakelaar D fig 5 0 stop 1 lage snelheid 2 gemiddelde snelh...

Page 10: ...anopola B in senso orario fig 8 Pulizia Togliete sempre la spina dalla presa di corrente prima di procedere alle operazioni di pulizia Pulite l apparecchio con un panno morbido asciutto o appena umido aggiungendo del detersivo se necessario Non usate sostanze abrasive o solventi Per pulire la parte frontale del ventilatore allentate il dado di fissaggio I che blocca la griglia Louvre fig 9 A quest...

Page 11: ...coloquen el interruptor C en la posición ON Marcha La rejilla difusora del aire empezará a rodar fig 6 Para una dirección fija del flujo de aire coloquen el interruptor C en la posición ON Marcha y dejen que el difusor de aire gire hasta obtener la requerida dirección del flujo del aire Coloquen entonces el interruptor C en la posición OFF Paro fig 7 Temporizador B Si desean que el ventilador se p...

Page 12: ...l del ventilador aflojen la tuerca de fijación I que retiene la rejilla difusora fig 9 Para ello pueden usar una moneda Giren en sentido antihorario Esto les permitirá sacar la rejilla difusora fig 10 Para limpiar la parte trasera del ventilador aflojen los dos tornillos de fijación J que retienen la rejilla de entrada de aire fig 11 Giren en sentido antihorario Esto les permitirá sacar la rejilla...

Page 13: ... coloque o relógio no tempo pretendido rodando o botão B no sentido dos ponteiros do relógio fig 8 Limpeza Antes de proceder à limpeza desligue sempre o aparelho da corrente Limpe com um pano macio e húmido e se necessário com um pouco de detergente Não utilize abrasivos ou solventes Para limpar a parte frontal do aparelho desaperte a porca de fixação I que prende a grelha Louvre fig 9 Para o efei...

Page 14: ...rt i et vist stykke tid maks 3 timer indstilles timeren på den ønskede tid ved at dreje timerknappen B højre om fig 8 Rengøring Træk altid stikket ud af stikkontakten før rengøring Apparatet rengøres med en blød fugtig klud eventuelt dyppet i lidt sæbeopløsning Anvend aldrig rengørings eller opløsningsmidler Hvis De ønsker at rengøre forsiden af ventilatoren skal De først løsne møtrikken I der hol...

Page 15: ...nsker at viften skal slå seg av etter en viss tid sett timeren på ønsket tid ved å vri knappen B medurs maks 3 timer fig 8 Rengjøring Ta alltid ut nettpluggen før rengjøring Vask med en myk tørr eller fuktig klut Hvis ønskelig tilsettes såpemiddel Bruk ikke etsende oppløsninger For rengjøring av viftens forside løsne festeskruen I som holder sjalusigrillen fig 9 De kan bruke en mynt til dette vri ...

Page 16: ...g Drag alltid först ut stickproppen ur vägguttaget före rengöring Torka fläkten med en väl urvriden fuktig trasa gärna med något rengöringsmedel Använd inte lösningsmedel och inte repande rengöringsmedel t ex skurpulver För rengöring av framsidan lossa muttern I med t ex en mynt fig 9 Vrid moturs Sedan kan jalusigallret tas av fig 10 För rengöring av baksidan lossa de två skruvarna J som håller fa...

Page 17: ... nuppia B myötäpäivään kuva 8 Puhdistus Irrota pistotulppa pistorasiasta aina ennen puhdistusta Puhdista ulkovaippa kuivalla tai tarvittaessa pesuveteen kostutetulla liinalla Älä käytä naarmuttavia tai syövyttäviä aineita Tuulettimen etuosa puhdistetaan avaamalla säleikköä kiinni pitävä mutteri I kuva 9 Käytä apuna kolikkoa Kierrä vastapäivään Tällöin voit irrottaa säleikön kuva 10 Tuulettimen tak...

Page 18: ...ON OFF 7 12 10 2 9 11 3 4 OFF 1H 3H 2H ON 5 1 2 3 0 8 OFF 1H 3H 2H ON 6 ON OFF 18 ...

Page 19: ...19 ...

Page 20: ...4222 000 91723 ...

Reviews: