background image

overload protection

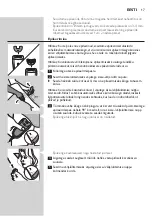
If you press the epilating head too hard onto your skin or when the 

epilating discs of the epilating head get blocked (e.g. by clothes etc.), the 

appliance switches off and the charging light flashes red for 5 seconds.

Turn the epilating discs with your thumb until you can remove whatever is 

blocking the epilating discs. 

Cleaning and maintenance

Never use scouring pads, abrasive cleaning agents or aggressive liquids 

such as petrol or acetone to clean the appliance.
Always keep the appliance and the adapter dry. Never rinse them under 

the tap or immerse them in water.

 If necessary, clean the adapter with the cleaning brush or a dry cloth.

Cleaning the appliance

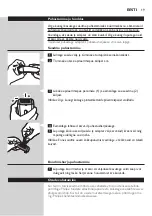
 1 

 Switch off and unplug the appliance.

 2 

 Pull the attachment off the epilating head.

 3 

 Push the epilating head to the right (1) and remove it from the 

appliance (2). 

Note: Never try to detach the epilating discs from the epilating head.

 4 

 Remove loose hairs with the cleaning brush.

 5 

 Rinse all parts (except the appliance and the adapter) under the tap 

and shake excess water off.

Note: Make sure all parts are completely dry before you reassemble the 

appliance. 

Cleaning the exfoliation brush

 1 

 Rinse the exfoliation brush under the tap, if necessary with some 

soap or shower gel, and let it dry before you store it. 

EnglisH

11

Summary of Contents for HP6520

Page 1: ...Register your product and get support at www philips com welcome HP6520 ...

Page 2: ......

Page 3: ...1 ...

Page 4: ......

Page 5: ...HP6520 English 6 Eesti 14 Lietuviškai 22 Slovensky 30 ...

Page 6: ...torage pouch 10 Exfoliation brush 11 Cleaning brush Important Read this user manual carefully before you use the appliance and save it for future reference Danger Keep the appliance and the adapter dry Do not use the appliance near or over a washbasin or bath filled with water Do not use the appliance in the bath or in the shower If you use the appliance in the bathroom do not use an extension cor...

Page 7: ...a reduced immune response or people who suffer from diabetes mellitus haemophilia or immunodeficiency should also consult their doctor first Your skin may become a little red and irritated the first few times you use the epilator This phenomenon is absolutely normal and quickly disappears As you use the appliance more often your skin gets used to epilation skin irritation decreases and regrowth be...

Page 8: ... to 30 minutes 1 Switch off the appliance before you charge it 2 Insert the appliance plug into the socket in the bottom of the appliance 1 and put the adapter in the wall socket 2 The charging light flashes white to indicate that the appliance is charging When the battery is fully charged the charging light lights up white continuously for 20 minutes and then goes out Battery low or empty When th...

Page 9: ...on start epilating with the double wavy massage attachment to minimise the pulling sensation of epilation This attachment is only intended for epilating the legs Note To epilate the underarms or bikini line use the sensitive area cap that reduces the number of active epilating discs 1 Put the attachment on the epilating head 2 Press the on off button once to switch on the appliance The appliance s...

Page 10: ...after epilating After this use it 2 3 times a week Scrub your legs with gentle circular movements starting at the ankles Note When you use the exfoliation brush on dry skin do not use exfoliating creams gels or foams Tip To prevent dry skin in general moisturise your skin daily with your preferred moisturising cream Do not use the exfoliation brush immediately after epilation as this may intensify...

Page 11: ... under the tap or immerse them in water If necessary clean the adapter with the cleaning brush or a dry cloth Cleaning the appliance 1 Switch off and unplug the appliance 2 Pull the attachment off the epilating head 3 Push the epilating head to the right 1 and remove it from the appliance 2 Note Never try to detach the epilating discs from the epilating head 4 Remove loose hairs with the cleaning ...

Page 12: ...tery before you discard and hand in the appliance at an official collection point Dispose of the battery at an official collection point for batteries If you have trouble removing the battery you can also take the appliance to a Philips service centre The staff of this centre will remove the battery for you and will dispose of them in an environmentally safe way Removing the rechargeable battery 1...

Page 13: ...ed the rechargeable battery Guarantee and service If you have a problem need information or replacement parts or if you want to purchase additional parts please visit the Philips website at www philips com support or contact the Philips Consumer Care Centre in your country You find its phone number in the worldwide guarantee leaflet If there is no Consumer Care Centre in your country go to your lo...

Page 14: ...tuli valge koos tühjenenud aku näidikuga punane 7 Väikese pistiku pesa 8 Adapter 9 Vutlar 10 Koorimishari 11 Puhastusharjake Tähtis Enne seadme kasutamist lugege seda kasutusjuhendit hoolikalt ja hoidke see edaspidiseks alles Oht Hoidke seade ja adapter kuivana Ärge hoidke seadet veega täidetud valamu või vanni kohal Ärge kasutage seadet vannis või duši all olles Kui kasutate seadet vannitoas ärge...

Page 15: ...ealt arstiga nõu pidama Peale esimesi epilaatori kasutuskordi võib nahk muutuda kergelt punaseks ja ärritunuks See nähtus on täiesti loomulik ja kaob varsti Epilaatorit sagedamini kasutades harjub nahk epileerimisega nahaärritus väheneb ja karvad mis uuesti kasvavad on õrnemad ja pehmemad Kui nahaärritus ei ole kolme päeva jooksul kadunud soovitame pöörduda arsti poole Hügieenilistel põhjustel pea...

Page 16: ...õi on tühi Kui aku on peaaegu tühi hakkab laadimise märgutuli punaselt vilkuma Kui see juhtub on akul veel piisavalt toidet et mõni minut epileerida Kui aku on täiesti tühi hakkab laadimise märgutuli püsivalt punaselt põlema Epilaatori laadimise kohta vaadake eespool kirjeldatud peatükki Laadimine Seadme kasutamine Enne seadme esmakordset kasutamist puhastage epileerimispea ja laadige seade täis M...

Page 17: ...innitage otsak epileerimispeale 2 Seadme sisselülitamiseks vajutage sisse välja lüliti nupule Seade hakkab tööle kiirusel II mis on epileerimiseks kõige tõhusam kiirus Märkus Kui soovite kasutada kiirust I vajutage sisse väljalülitamise nuppu teist korda Kiirus I sobib kasutamiseks vähese karvakasvuga aladel raskesti ligipääsetavatel aladel ning nendes kohtades kus luud on naha lähedal nt põlved j...

Page 18: ...nne Üldise nahakuivuse vältimiseks niisutage oma nahka igapäevaselt teile meelepärase niisutava kreemiga Ärge kasutage koorimisharja kohe pärast epileerimist kuna see võib suurendada epilaatori tekitatava võimaliku nahaärrituse ohtu Ülekuumenemiskaitse See funktsioon aitab vältida seadme ülekuumenemist Märkus Epilaatori ülekuumenemise ärahoidmiseks ärge vajutage seadet väga tugevasti vastu oma nah...

Page 19: ...s Ärge kunagi katsuge pintsettkettaid epileerimispeast eraldada 4 Eemaldage lahtised karvad puhastusharjakesega 5 Loputage kõiki osasid seade ja adapter välja arvatud kraani all ning raputage üleliigne vesi maha Märkus Enne seadme uuesti kokkupanemist veenduge et kõik osad on täiesti kuivad Koorimisharja puhastamine 1 Loputage koorimisharja kraani all vajadusel kasutage veidi seepi või dušigeeli n...

Page 20: ...dada võite seadme Philipsi hoolduskeskusesse viia kus aku eemaldatakse ja keskkonda kahjustamata utiliseeritakse Akupatarei eemaldamine 1 Ühendage seade adapteri küljest lahti Laske seadmel töötada kuni aku on täiesti tühi 2 Eemaldage epileerimispea ja avage seade kruvikeerajaga 3 Pange kruvikeeraja ots väikesesse noolega märgitud avasse trükkplaadil 1 Vajutage kruvikeerajat allapoole kuni osa trü...

Page 21: ...õi soovite osta lisaosi külastage Philipsi veebisaiti www philips com support või võtke ühendust Philipsi kohaliku klienditeeninduskeskusega Telefoninumbri leiate ülemaailmselt garantii infolehelt Kui teie riigis ei ole klienditeeninduskeskust pöörduge kohaliku Philipsi edasimüüja poole Eesti 21 ...

Page 22: ...spalva 7 Lizdas mažam kištukui 8 Adapteris 9 Laikymo krepšelis 10 Eksfoliavimo šepetėlis 11 Valymo šepetėlis Svarbu Prieš pradėdami naudoti prietaisą atidžiai perskaitykite šį vartotojo vadovą ir saugokite jį nes jo gali prireikti ateityje Pavojus Prietaisą ir adapterį laikykite sausoje vietoje Nenaudokite prietaiso netoli ir virš praustuvės ar vonios pripildytos vandens Nenaudokite prietaiso voni...

Page 23: ...ti su gydytoju Po pirmųjų epiliavimo kartų jūsų oda gali parausti ir truputį sudirgti Šis reiškinys yra normalus ir greitai išnyks Ilgiau naudojantis prietaisu jūsų oda pripras prie epiliavimo jos sudirginimas mažės o išaugantys plaukeliai taps vis plonesni ir švelnesni Odos sudirginimui neišnykus per tris dienas patartina pasikonsultuoti su gydytoju Higienos sumetimais prietaisu ir eksfoliavimo š...

Page 24: ...auna įkrovimo lemputė pradeda mirksėti raudonai Jai pradėjus mirksėti raudonai maitinimo elemente vis dar yra pakankamai energijos kelioms minutėms epiliavimo Kai maitinimo elementas visiškai išsikrauna įkrovimo lemputė nuolat dega raudonai Kad įkrautumėte epiliatorių vykdykite veiksmus nurodytus ankstesniame skyriuje Įkrovimas Prietaiso naudojimas Prieš naudodami pirmą kartą išvalykite epiliavimo...

Page 25: ...ės 2 Prietaisui įjungti vieną kartą paspauskite įjungimo išjungimo mygtuką Prietaisas pradeda veikti II greičiu kuris yra efektyviausias greitis epiliavimui Pastaba Jei norite naudoti I greitį antrą kartą paspauskite įjungimo išjungimo mygtuką I greitis tinkamas mažai plaukuotiems ploteliams sunkiai pasiekiamoms vietoms ir ploteliams kuriuose kaulai yra iš karto po oda pvz keliams ar kulkšnims 3 L...

Page 26: ...kritai nenorite kad oda būtų sausa kiekvieną dieną ją drėkinkite mėgstamu drėkinamuoju kremu Eksfoliavimo šepetėlio nenaudokite iš karto po epiliacijos tai gali dar labiau sudirginti epiliatoriaus sudirgintą odą Apsauga nuo perkaitimo Ši funkcija skirta prietaisui apsaugoti nuo perkaitimo Pastaba norėdami kad epiliatorius neperkaistų per stipriai nespauskite prietaiso prie odos Epiliatorius geriau...

Page 27: ...ite nuimti epiliavimo diskų nuo epiliavimo galvutės 4 Naudodamiesi pridėtu šepetėliu pašalinkite epiliuotus plaukelius 5 Visas dalis išskyrus prietaisą ir adapterį plaukite po vandeniu o į jas patekusį vandenį iškratykite Pastaba Prieš surinkdami prietaisą įsitikinkite kad visos dalys yra visiškai sausos Eksfoliavimo šepetėlio valymas 1 Eksfoliavimo šepetėlį plaukite po čiaupu jei reikia naudodami...

Page 28: ...erijas ir išmes jas neteršdami aplinkos Pakartotinai įkraunamų baterijų išėmimas 1 Atjunkite prietaisą nuo adapterio Leiskite prietaisui veikti tol kol maitinimo elementas visiškai išseks 2 Nuimkite epiliavimo galvutę ir atsuktuvu atidarykite prietaisą 3 Įstatykite atsuktuvą į nedidelę išpjovą spausdintinės elektros grandinės plokštėje pažymėtą rodykle 1 Spauskite atsuktuvą žemyn kol spausdintinės...

Page 29: ...te Philips svetainėje www philips com support arba susisiekite su jūsų šalyje esančiu Philips pagalbos vartotojams centru Jo telefono numerį rasite garantiniame lapelyje kuriame pateikiama informacija apie punktus visame pasaulyje Jei jūsų šalyje nėra pagalbos vartotojams centro kreipkitės į vietinį Philips prekybos atstovą Lietuviškai 29 ...

Page 30: ...m rýchlosť I zapnete dvomi stlačeniami vypnete tromi stlačeniami 6 Kontrolné svetlo nabíjania svieti na bielo s indikátorom takmer vybitej batérie svieti na červeno 7 Konektor pre malú koncovku 8 Adaptér 9 Puzdro na odkladanie 10 Exfoliačná kefka 11 Čistiaca kefka Dôležité Pred použitím zariadenia si pozorne prečítajte tento návod na použitie a uschovajte si ho na použitie v budúcnosti Nebezpečens...

Page 31: ...eho sa nepribližujte k vlasom mihalniciam obočiu oblečeniu nitiam káblom kefám a pod Zariadenie a exfoliačnú kefku nepoužívajte na epiláciu podráždenej pokožky ani na pokožku s kŕčovými žilami vyrážkami fliačikmi materskými znamienkami s chĺpkami alebo ranami bez toho aby ste sa najprv poradili s lekárom Osoby s oslabenou imunitou alebo trpiace na cukrovku hemofíliu prípadne imunitnú nedostatočnos...

Page 32: ...oužívať len vtedy keď nie je pripojené do siete Adaptér je vybavený automatickým voličom napätia ktorý sa automaticky prispôsobí napätiu v sieti v rozsahu 100 až 240V Príprava na použitie Nabíjanie Nabíjanie batérií epilátora trvá približne 1 hodinu Keď sú batérie epilátora úplne nabité bez pripojenia do siete ho možno používať až 30 minút 1 Zariadenie pred nabíjaním vypnite 2 Koncovku napájania p...

Page 33: ...ejšia keď majú chĺpky dĺžku 3 až 4 mm Ak sú chĺpky dlhšie odporúčame aby ste miesta najskôr oholili a po 1 alebo 2 týždňoch epilovali kratšie dorastajúce chĺpky Epilácia Poznámka Ak s epiláciou len začínate začnite epilovať pomocou dvojitého vlnovitého masážneho nástavca minimalizujete tak nepríjemné pocity pri epilácii Tento nástavec je určený len na epiláciu nôh Poznámka Pri epilácii oblasti bik...

Page 34: ... krúživé pohyby dosiahnete tak jemný exfoliačný účinok Tak zabránite vrastaniu chĺpkov a dosiahnete tak hladký jemný a svieži vzhľad pokožky Pokožku čistite exfoliačnou kefkou deň pred epiláciou a dva dni po nej Potom ju používajte 2 až 3 krát týždenne Drhnite nohy jemnými krúživými pohybmi pričom začnite na členkoch Poznámka Keď používate exfoliačnú kefku na suchej pokožke nepoužívajte exfoliačné...

Page 35: ...sky Čistenie a údržba Na čistenie zariadenia nikdy nepoužívajte drsný materiál drsné čistiace prostriedky ani agresívne kvapaliny ako benzín alebo acetón Zariadenie a adaptér vždy udržiavajte v suchu Nikdy ich neoplachujte pod tečúcou vodou ani ich neponárajte do vody Ak treba adaptér očistite kefkou alebo suchou tkaninou Čistenie zariadenia 1 Vypnite zariadenie a odpojte ho zo siete 2 Potiahnutím...

Page 36: ...le kvôli recyklácii ho odovzdajte na mieste oficiálneho zberu Pomôžete tak chrániť životné prostredie Zabudovaná nabíjateľná batéria obsahuje látky ktoré môžu znečistiť životné prostredie Pred likvidáciou zariadenia alebo jeho odovzdaním na mieste oficiálneho zberu batériu vyberte Batériu odovzdajte na mieste oficiálneho zberu pre batérie Ak máte problémy s vybratím batérie zariadenie môžete tiež ...

Page 37: ...úšajte sa zariadenie opäť pripojiť do siete Záruka a servis Ak máte problém potrebujete informácie alebo náhradné diely alebo chcete kúpiť ďalšie diely navštívte webovú lokalitu spoločnosti Philips na adrese www philips com support alebo sa obráťte na Stredisko starostlivosti o zákazníkov spoločnosti Philips voVašej krajine Telefónne číslo strediska nájdete v priloženom celosvetovo platnom záručno...

Page 38: ......

Page 39: ......

Page 40: ......

Page 41: ......

Page 42: ...4203 000 4767 1 ...

Reviews: