background image

HD5720/30

17-23

Remove the coffee beans container, 
the black fi nger saver and the knob.

Turn the white shaft clockwise till it 
stops.  Remove the upper part of the 
grinder by pulling it upwards.

Verify the position of the white 
gasket (has to be as on the picture)

Remove the white plastic ring by 
pulling it.

Turn the white shaft counter-
clockwise till it stops.
Pull to remove it.

Now you can change the setting:
Turn the gear 

clockwise* to

 reduce 

the coarseness (fi ner coffee).
Turn the gear counterclockwise* to 
increase the courserness 

(thicker)

.

Insert the white shaft, making sure 
its larger notch is aligned with the 
one on the grinder.

Insert the white ring making sure 
its notch as well is inserted on the  
correct position.

Turn the shaft CLOCKWISE till it 
stops to insert the upper gear.
Then turn the shaft all the way 
COUNTER CLOCKWISE.

(*) before to change the setting, check and mark the initial position taking as reference the position of the metal ball you see 
through the holes on the white ring.

Change the setting carefully by turning the white ring of one or max two  steps (one or two holes) either way as required.

GRINDER ADJUSTMENTS

1

2

4

5

7

8

9

6

3

Summary of Contents for HD5720/30

Page 1: ...o and TV After the product has been repaired it should function properly and has to meet the safety requirements as officially laid down at this moment TECHNICAL INFORMATION Power rated 1350 W Standby power 3 W switched off Standby power 80 W switched on Voltage 220 240 V 50 60 Hz Colour setting Brushed stainless steel red SAP coding HD5720 30 OPTIONAL accessories Hardness test strip Service code ...

Page 2: ...e steps are carried out all the parts can be reached and if needed dismantled replaced For your safety be sure the plug is disconnected from the mains In below steps the dismantling from the appliance has been written down in a certain sequence Please follow the steps in this order Remove back panel To remove the back panel first remove the 5 screws see picture for positions Slightly lift the back...

Page 3: ...th the or until Display message SET LANGUAGE appear 4 Press the OK button to select this routine 5 Navigate with the or Display message ENGLISH appears 6 Press the OK button 3 seconds to finalize the selection REPAIR INSTRUCTIONS Water mechanical circuit Water Flowmeter Water Pump Coffee Heating element Brewing unit Temperature sensor Discharge Solenoid valve Hot Water Steam Tap Water Tank Steam H...

Page 4: ... Fuse Fuse Grinder Motor M3 Coffee Waste bin M4 Service door Mains Water flow meter F10 F9 F8 F7 F13 F6 F5 F0 L N F1 F2 F3 F4 M Steam Heating element Steam TCO Steam thermostat Discharge electrovalve Pump Pump Thermal protector M Brewing unit Group motor M Red Brown Brown Brown Brown Brown Brown Blue Yellow Green Red Red Red Black Blue Red Red Blue White White White Black Black Green Green Blue Bl...

Page 5: ... brought to the brewing top position until the brewing_unit_up_position M1 micro switch is activated Then water will be pumped through the brewing unit see also message in the display to clean the Coffee system Brewing unit brewing head After this routine the Brewing unit will be sent to the down position and by a mechanical mechanism the Coffee grounds will be wiped off The Brewing unit will be s...

Page 6: ...pliance from mains 2 Press simultaneously MENU and button 3 Connect the appliance to mains 4 If above steps succeeded the display will show the following message TOT COFFEE XXX TOT WATER XXX where XXX is number of cups or Liters 5 Press button to step to the next display message DESCALING XXX WASHING XXX where XXX is number of cycles performed 6 Press button to step to the next display message SW ...

Page 7: ...1000 L Hardness setting 4 Hardness setting 3 Hardness setting 1 Performed cycles decalcifying 3 Performed cycles decalcifying 3 Performed cycles decalcifying 3 Calculation Calculation Calculation 120 45 2 66 round down to 2 700 80 8 75 round down to 8 1000 250 4 2 3 1 3 8 3 5 3 4 3 1 3 Descaled routines performed ok Descaled routines performed Not OK Descaled routines performed ok If the number of...

Page 8: ...Beans 4 Operate Brewing unit upwards motor lift Push the On OFF button MOTOR UP LIMIT SWITCH UP If this function will be performed always be sure the Brewing unit has been installed service door is closed Coffee ground container is in place If the brewing unit_up_position M1 has been activated by the Brewing unit the Display will show message LIMIT SWITCH UP 5 Operate Brewing unit down motor lift ...

Page 9: ...ffee buttons 3 Connect the appliance to mains 4 If above steps succeeded the display will show the following message DISPLAY TEST MODE In the display test mode it is possible to check if the menu buttons are recognized by the software For instance pressing the MENU button the display will show Button 1 if you press the button display will show Button 2 pressed etc If you turn the steam knob fully ...

Page 10: ...and note the highest measured temperature 9 For validation see table below WATERTEMPERATURE MEASUREMENT PROCEDURE 1 Switch appliance on 2 Make sure appliance factory default settings are stored 3 Place a plastic cup under the steam nozzle 4 Fill the water tank with water 5 Press the button and turn the steam knob open 6 During the cup is filled with water measure the temperature 7 Repeat step 5 6 ...

Page 11: ...Magnet glued in top position or use a magnet to mislead the appliance that there is normal water in the tank 6 Open the steam knob for 75 micro switch may not be actuated 7 Push the button pump starts pumping keep the button pressed 30 seconds until there comes no water out the steam pipe anymore 8 Connect 4 5 Bar air pressure to the steam pipe 9 Push the ON OFF button until the display will indic...

Page 12: ...it went down most probably the Hall sensor connections is the problem counting of pulses starts after actuating the brewing unit_down_position M2 so going up direction 3 MESSAGE PLEASE WAIT If a normal motor sound of the brewing unit lift is noticed but the brewing unit doesn t move check the driving belt If a motor sound is noticed and afterwards you hear a hard noise sounding like a blocked moto...

Page 13: ...ESSAGE INSERT BREWING UNIT Place brewing unit Check the function and circuit of micro switch M1 Check if the micro switch mechanical will be activated if the brewing unit is properly placed and the brewing unit is in top position Exchange micro switch M1 4 MESSAGE Flushing After 20 30 seconds GROUND TOO FINE Adjust mill and OPEN STEAM KNOB When water is pumped through the system the flow meter mea...

Page 14: ...r is activated properly by the mechanical action of the brewing unit Check Hall sensor is correct counting detecting position 2 MESSAGE LESS GROUND COFFEE User selected Coffee ground To less ground Coffee has been applied The pre ground Coffee funnel has been blocked The micro switch M1 brewing unit top position has been activated to soon when the brewing unit move upwards or brewing unit position...

Page 15: ... Coffee too finely that no Coffee is coming out the spouts Check if the pump is pumping Check the flow meter and it s circuit is functioning Check fines of the grinder adjust grinder see instruction Grinder adjustments Check if water is present in the water container and the water container has been correctly placed See if water is visible in the area container pump Check if the pre filter not bec...

Page 16: ...rinder adjust grinder see instruction Grinder adjustments 5 The coffee is too strong The coffee is ground too finely Turn the grinding coarseness knob one setting clockwise while the mill is grinding coffee beans Change the coffee strength with the coffee strength button Check fines of the grinder adjust grinder see instruction Grinder adjustments 6 The coffee is too weak The coffee is ground too ...

Page 17: ... the gear counterclockwise to increase the courserness thicker Insert the white shaft making sure its larger notch is aligned with the one on the grinder Insert the white ring making sure its notch as well is inserted on the correct position Turn the shaft CLOCKWISE till it stops to insert the upper gear Then turn the shaft all the way COUNTER CLOCKWISE before to change the setting check and mark ...

Page 18: ...iance or a liquid descaler based on citric acid Never use a descaler with acetic acid as this will damage the appliance Note Be careful not to spill descaler on the metal surfaces of the machine and on surfaces sensitive to acid such as marble limestone and glaze If you spill descaler on these surfaces immediately wipe it off with a cloth to prevent stains Follow further instruction as indicated o...

Page 19: ...it Bush small Bush big NTC sensor O ring Pin Valve Spring Filter Pos Service code Description 46 47 48 49 50 51 52 53 54 55 56 57 58 59 60 61 62 63 64 65 66 67 68 69 70 71 72 73 74 75 76 77 78 79 80 81 82 83 84 85 86 87 88 89 90 4222 459 45198 4222 459 45102 4222 459 45223 4222 459 45101 4222 459 45114 4222 459 45190 4222 459 45173 4222 459 45118 4222 459 45132 4222 459 45188 4222 459 45094 4222 4...

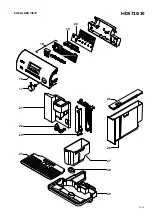
Page 20: ...HD5720 30 20 23 EXPLODEDVIEW 9 10 11 12 13 15 14 1 2 4 3 5 7 8 6 ...

Page 21: ...HD5720 30 21 23 EXPLODEDVIEW 17 16 24 25 19 20 28 29 22 21 23 27 26 18 ...

Page 22: ...HD5720 30 22 23 EXPLODEDVIEW 47 48 49 50 31 45 34 35 36 38 39 37 32 30 31 A A 46 51 42 41 41 43 44 41 40 33 ...

Page 23: ...HD5720 30 23 23 EXPLODEDVIEW 84 48 86 87 89 88 90 78 69 71 60 59 58 55 57 54 14 70 A 56 81 82 83 82 67 63 64 65 66 61 62 B C 72 73 53 80 C 53 53 85 53 52 74 75 76 53 79 77 76 75 77 53 A B 68 ...

Reviews: