SAFTY NOTICE
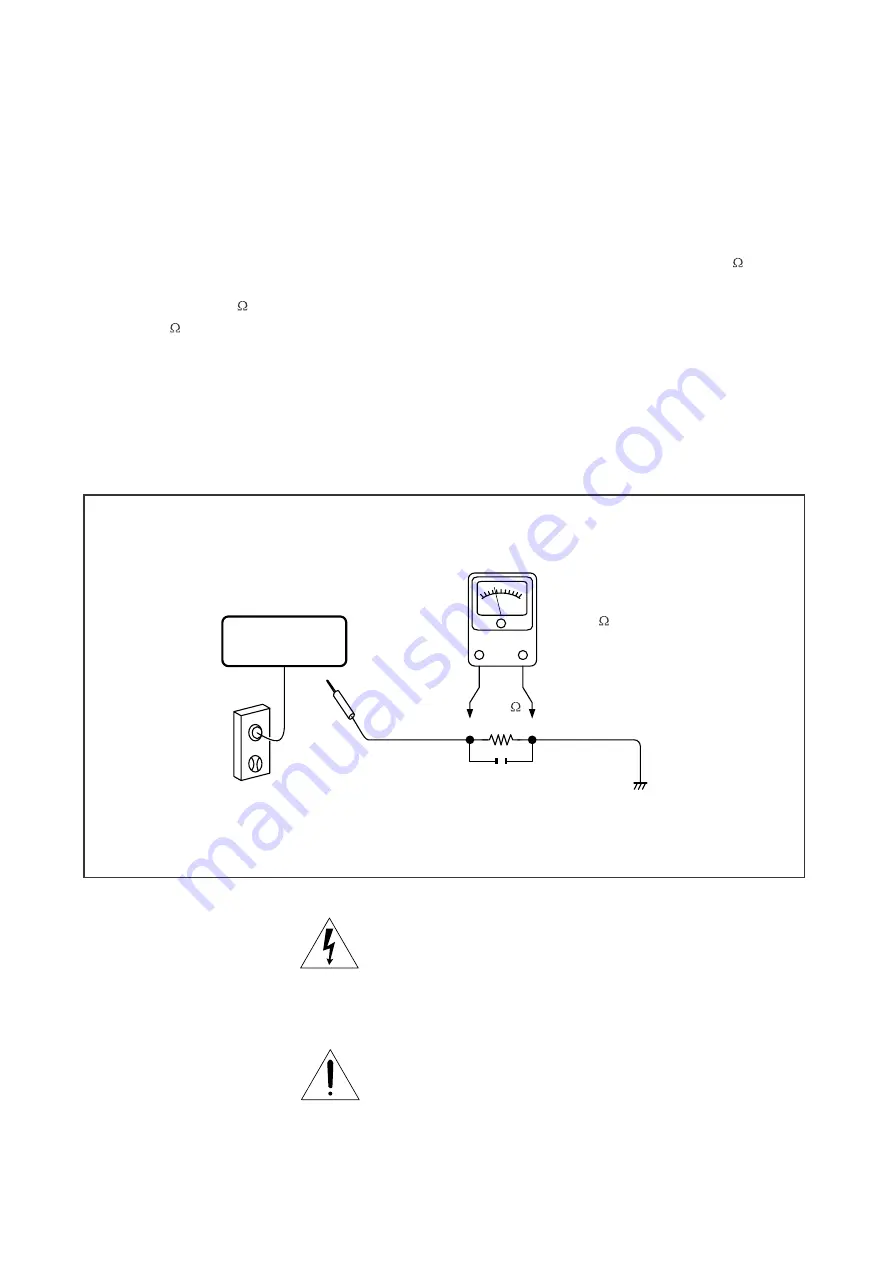
Plug the AC line cord directly into a 120V AC outlet (do
not use an isolation transformer for this check). Use an
AC voltmeter, having 5000 per volt or more sensitivity.
Connect a 1500 10W resistor,paralleled by a 0.15uF
150V AC capacitor between a knomn good earth ground
(water pipe, conduit, etc.) and all exposed metal parts of
cabinet (antennas, handle bracket, metal cabinet
screwheads, metal overlays, control shafts, etc.).
SAFTY PRECAUTIONS
LEAKAGE CURRENT CHECK
Measure the AC voltage across the 1500 resistor.
The test must be conducted with the AC switch on and
then repeated with the AC switch off. The AC voltage
indicated by the meter may not exceed 0.3V.A reading
exceeding 0.3V indicates that a dangerous potential
exists, the fault must be located and corrected.
Repeat the above test with the DVD VIDEO PLAYER
power plug reversed.
NEVER RETURN A DVD VIDEO PLAYER TO THE
CUSTOMER WITHOUT TAKING NECESSARY
CORRECTIVE ACTION.
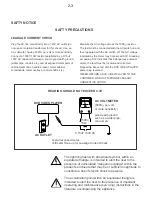
READING SHOULD NOT EXCEED 0.3V
DVD VIDEO PLAYER
AC OUTLET
AC VOLTMETER
Test all exposed metal.
Voltmeter Hook-up for Leakage Current Check
0.15uF 150V AC
1500
10W
(5000 per volt
or more sensitivity)
Good earth ground
such as a water pipe,
conduit, etc.
The lightning flash with arrowhead symbol, within an
equilateral triangle, is intended to alert the user to the
presence of uninsulated "dangerous voltage" within the
product's enclosure that may be of sufficient magnitude to
constitute a risk of electric shock to persons.
The exclamation point within an equilateral triangle is
intended to alert the user to the presence of important
operating and maintenance (servicing) instructions in the
literature accompanying the appliance.
2-3
Summary of Contents for FWT9200 Series
Page 22: ...WIRING DIAGRAM 4 1 4 1 ...
Page 24: ......
Page 25: ...6 2 6 2 PCB LAYOUT MAIN BOARD ...
Page 26: ...7 1 7 1 CIRCUIT DIAGRAM DISPLAY BOARD ...
Page 27: ...PCB LAYOUT DISPLAY BOARD 7 2 7 2 ...
Page 29: ...8 2 8 2 PCB LAYOUT CD BOARD ...
Page 30: ...CIRCUIT DIAGRAM MCU BOARD 9 1 9 1 ...
Page 31: ...PCB LAYOUT MCU BOARD 9 2 9 2 ...
Page 34: ...PCB LAYOUT AMP BOARD 10 3 10 3 ...
Page 35: ...CIRCUIT DIAGRAM TUNER BOARD 11 1 11 1 ...
Page 36: ...PCB LAYOUT TUNER BOARD 11 2 11 2 ...
Page 37: ...12 1 12 1 EXPLODED VIEW ...

