background image

4

English ------------------------------------------------ 6

Português ------------------------------------------ 43

Español --------------------------------------------- 24

English

Po

r

tuguês

Español


pg 001-023_FWM185-55_Eng

2007.5.8, 10:36

4

Summary of Contents for FWM185

Page 1: ...FWM185 Mini Hi Fi System ...

Page 2: ... Fernando La Herradura Huixquilucan Localidad y Tel Edo de México C P 52784 Tel 52 69 90 00 Exportador Philips Electronics HK Ltd País de Origen China Nº de Serie ______________________________ LEA CUIDADOSAMENTE ESTE INSTRUCTIVO ANTES DE USAR SU APARATO AVISO IMPORTANTE Philips Mexicana S A de C V no se hace responsable por daños o desperfectos causados por Maltrato descuido o mal uso presencia d...

Page 3: ...3 0 7 9 6 5 4 2 1 2 7 4 5 3 8 ...

Page 4: ...4 English 6 Português 43 Español 24 English Português Español ...

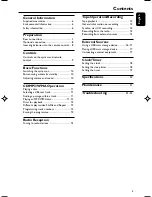
Page 5: ... passage within a track 11 Playing an MP3 WMA disc 11 12 Discs for playback 12 Different play modes Shuffle and Repeat 12 Programming track numbers 12 Erasing the programme 12 Radio Reception Tuning to radio stations 13 Tape Operation Recording Tape playback 14 General information on recording 14 Synchro start CD recording 14 Recording from the radio 15 Recording from external sources 15 External ...

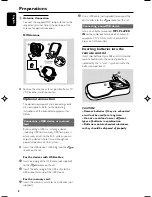
Page 6: ... and 5 cm 2 inches from each side The ventilation should not be impeded by covering the ventilation openings with items such as newspapers table cloths curtains etc Do not expose the system batteries or discs to excessive moisture rain sand or heat sources caused by heating equipment or direct sunlight No naked flame sources such as lighted candles should be placed on the apparatus No objects fill...

Page 7: ...y under extreme conditions If this happens let the system cool down before reusing it not available for all versions B Speakers Connection Front Speakers Connect the speaker wires to the SPEAKERS terminals right speaker to R and left speaker to L red wires to and black wires to of the woofer connection terminals blue wires to and grey wires to of the tweeter connection terminals Fully insert the s...

Page 8: ...es 1 Insert one plug of the USB cable not supplied to the socket on the set 2 Insert the other plug of the USB cable to the USB output terminal of the USB device For the memory card 1 Insert the memory card into a card reader not supplied 2 Use a USB cable not supplied to connect the card reader into the socket on the set Connecting a non USB device Use a cinch cable to connect MP3 PLAYER IN to th...

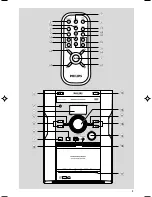
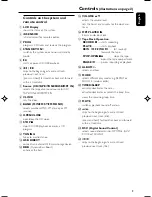
Page 9: ...SB DIRECT connects an external USB mass storage device DBB Dynamic Bass Boost enhances the bass VOLUME 3 4 adjusts the volume level sets the hours and minutes for the clock and timer MP3 PLAYER IN 3 5mm audio input jack Tape Deck Operation RECORD 0 starts recording PLAY 2 starts playback REW à F FWD á fast rewinds forwards the tape STOP OPEN 9 stops the tape opens the tape compartment PAUSEÅ pause...

Page 10: ...tandby 30 minutes after CD playback has ended and no control is operated Adjusting volume and sound 1 Adjust theVOLUME control knob or press VOLUME 3 4 on the remote control to increase or decrease volume Display shows the volume level UOL and a number from 0 40 2 Press DBB to switch bass enhancement on or off Display shows DBB if the DBB is activated 3 Press DSC on the remote control repeatedly t...

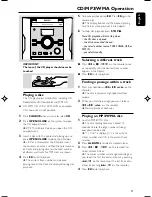
Page 11: ...layback is interrupted 6 To stop disc playback press STOP 9 Note CD playback will also stop when the CD door is opened the disc has reached the end you select another source TAPE TUNER USB or MP3 IN you select standby Selecting a different track Press 1 or 2 í ë on the remote once or repeatedly until the desired track number appears in the display Press 2 to start playback Finding a passage within...

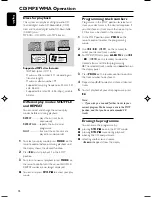
Page 12: ...T modes are no longer displayed You can also press STOP 9 to cancel your play mode Programming track numbers Programme in the STOP position to select and store your disc tracks in the desired sequence If you like store any track more than once Up to 20 tracks can be stored in the memory 1 In the STOP position press PROG on the remote control to enter the programming mode 2 Use 1 2 í ë on the remot...

Page 13: ...e TUNING control knob to tune to a desired radio frequency Note The system is equipped with an external MW antenna and a fixed FM antenna For optimal MW reception adjust the position of the MW loop antenna until the strongest signal is found For optimal FM reception fully extend and adjust the position of the FM antenna until the strongest signal is found Radio Reception ...

Page 14: ...g Recording is permissible insofar as copyright or other rights of third parties are not infringed For recording use only NORMAL IEC type I tapes on which the tabs have not yet been broken This deck is not suited for recording on METAL IEC IV type tapes The best recording level is set automatically Altering theVOLUME or DBB controls will not affect the recording in progress The recording sound qua...

Page 15: ...dio stations 2 Press STOP OPENÇç to open the tape door 3 Insert a suitable tape into the deck and close the tape door 4 Press RECORD 0 to start recording 5 To pause press PAUSE Å Press PAUSE Å again to resume 6 To stop recording press STOP OPENÇç Tape Operation Recording Recording from external sources 1 Connect a USB mass storage device or external equipment see External sources 2 Press SOURCE to...

Page 16: ...ible USB mass storage devices With the Hi Fi system you can use USB flash memory USB 2 0 or USB1 1 USB flash players USB 2 0 or USB1 1 memory cards requires an additional card reader to work with this Hi Fi system Note In some USB flash players or memory devices the stored contents are recorded using copyright protection technology Such protected contents will be unplayable on any other devices su...

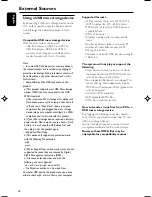
Page 17: ...Media Player andWM DRM Windows Media Digital Rights Management External Sources Playing a USB mass storage device 1 Connect a USB device properly See Optional connection 2 Press SOURCE once or more to select USB NO TRACK appears if no audio file is found in the USB device 3 Play the USB s audio files as you do with the albums tracks on a CD See CD MP3 WMA Operations Notes For compatibility reasons...

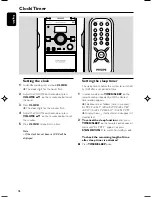
Page 18: ...ss TIMER SLEEP on the remote control once or more until SLPOFF appears or press STANDBY ON y to switch to standby mode To check the remaining length of time after sleep timer is activated Press TIMER SLEEP once Setting the clock 1 In standby mode press and hold CLOCK The clock digits for the hours flash 2 Adjust theVOLUME control knob or press VOLUME 3 4 on the remote control to set the hours 3 Pr...

Page 19: ...e desired source Before setting timer make sure the music source has been prepared CD Load the disc TUNER tune to the desired radio station USB connect a suitable USB mass storage device 3 Adjust theVOLUME control knob or press VOLUME 3 4 on the remote control to set the hours 4 Press TIMER SLEEP again The clock digits for the minutes flash 5 Adjust theVOLUME control knob or press VOLUME 3 4 on th...

Page 20: ... 2 kg Specifications and external appearance are subject to change without notice AMPLIFIER 1 KHz Low channel both channels driven 30 W per channel 8 Ω 10 KHz High channel both channels driven 30 W per channel 8 Ω Total output power 120 W Signal to noise ratio 62 dBA IEC Frequency response 63 16000 Hz 3 dB CD PLAYER Frequency range 63 16000 Hz Signal to noise ratio 65 dBA TUNER FM wave range 87 5 ...

Page 21: ...Cabinet Use a soft cloth slightly moistened with a mild detergent solution Do not use a solution containing alcohol spirits ammonia or abrasives Cleaning Discs When a disc becomes dirty clean it with a cleaning cloth Wipe the disc from the centre out Do not use solvents such as benzene thinner commercially available cleaners or antistatic spray intended for analogue records Cleaning the disc lens ...

Page 22: ...ean the disc see Maintenance Use a finalised CD RW CD R or MP3 CD RADIO RECEPTION Radio reception is poor Increase the distance between the Micro HiFi System and yourTV orVCR TAPE OPERATION RECORDING Recording or playback cannot be made Clean deck parts see Maintenance Use only normal IEC I tape for recording Apply a piece of adhesive tape over the missing tab space GENERAL The system does not rea...

Page 23: ...ce the batteries Point the remote control directly toward IR sensor on the front of the system The timer is not working Set the clock correctly PressTIMER SLEEP in standby mode to switch on the timer If a recording is in progress stop the recording The Clock Timer setting is erased Power has been interrupted or the power cord has been disconnected Reset the clock timer Troubleshooting ...

Page 24: ...62 ...

Page 25: ...63 ...

Page 26: ...64 ...

Page 27: ...65 ...

Page 28: ...66 ...

Page 29: ...TES CLAROS 38 32218925 PARANAGUA 41 34225804 JUAZEIRO 74 36111002 IMPERATRIZ 99 35244969 MURIAE 32 37224334 PATO BRANCO 46 32242786 LAURO DE FREITAS 71 3784021 PEDREIRAS 99 36423142 MUZAMBINHO 35 5712419 PONTA GROSSA 42 32226590 MURITIBA 75 4241908 PRESIDENTE DUTRA 99 36631815 NANUQUE 33 36212165 RIO NEGRO 47 36450251 PAULO AFONSO 75 32811349 SANTA INES 98 36537553 NOVA LIMA 31 35412026 ROLANDIA 4...

Page 30: ...68 ...

Page 31: ...69 ...

Page 32: ...English Español Português Printed in China CLASS 1 LASER PRODUCT FWM185 PDCC LL 0710 Meet Philips at the Internet http www philips com ...

Reviews: