


2-3
9
English
Pr
eparations
FM Antenna
For better FM stereo reception, connect an
outdoor FM antenna to the FM
ANTENNA
ter
minal.
C
Speak
ers Connection
F
ront Speak
ers
Connect the speak
er wires to the SPEAKERS
(FR
ONT) ter
minals,
r
ight speak
er to "
R
" and left
speak
er to "
L
", coloured (mar
ked) wire to "
+
"
and b
lack (unmar
ked) wire to "
-
".
1
Clip the str
ipped por
tion of the speak
er wire as
sho
wn.
Notes:
–
For optimal sound perf
ormance
, use the
supplied speak
er
s.
–
Do not connect mor
e than one speak
er to any
one pair of
+
/
-
speak
er terminals
.
–
Do not connect speak
er
s with an impedance
lo
wer than the speak
er
s supplied.
Please ref
er to
the SPECIFIC
ATIONS section of this manual.
Optional Connections
The optional equipment and connecting cords
are not supplied.
Refer to the oper
ating
instr
uctions of the connected equipment f
o
r
details.
Line Out Connection
Connect this output to an
y analogue audio
equipment f
or pla
yback or recording (CD
recorder
, tape recorder or amplif
ier f
or example).
Use a cinch cab
le to connect the
LINE OUT
ter
minals to the analogue audio in ter
minals of
the equipment.
Connecting other equipment to y
our
system
Connect the audio left and r
ight OUT ter
minals
of a
TV
, VCR,
Laser Disc pla
ye
r, D
VD pla
yer or
CD Recorder to the
A
UX/CDR IN
ter
minals.
Notes:
–
Do not connect equipment to both the LINE
OUT and
A
UX/CDR IN terminals at the same time
.
Otherwise
, noise will be g
ener
ated and malfunction
might occur
.
–
If you are connecting equipment with a mono
output (a single audio out terminal), connect it to
the
A
UX/CDR IN left terminal.
Alternatively
, you
can use a
“single to double”
cinc
h cable (still be
mono sound).
Digital Out Connection
Connect this digital output when recording on
an
y audio equipment with digital input (CD
Recorder
, Digital
Audio
Tape [D
A
T] deck,
Digital
to
Analogue Con
ve
rter and Digital Signal
Processor
, f
or example).
Use a cinch cab
le to
connect the
DIGIT
AL OUT
ter
minal to the
digital input ter
minal of the equipment.
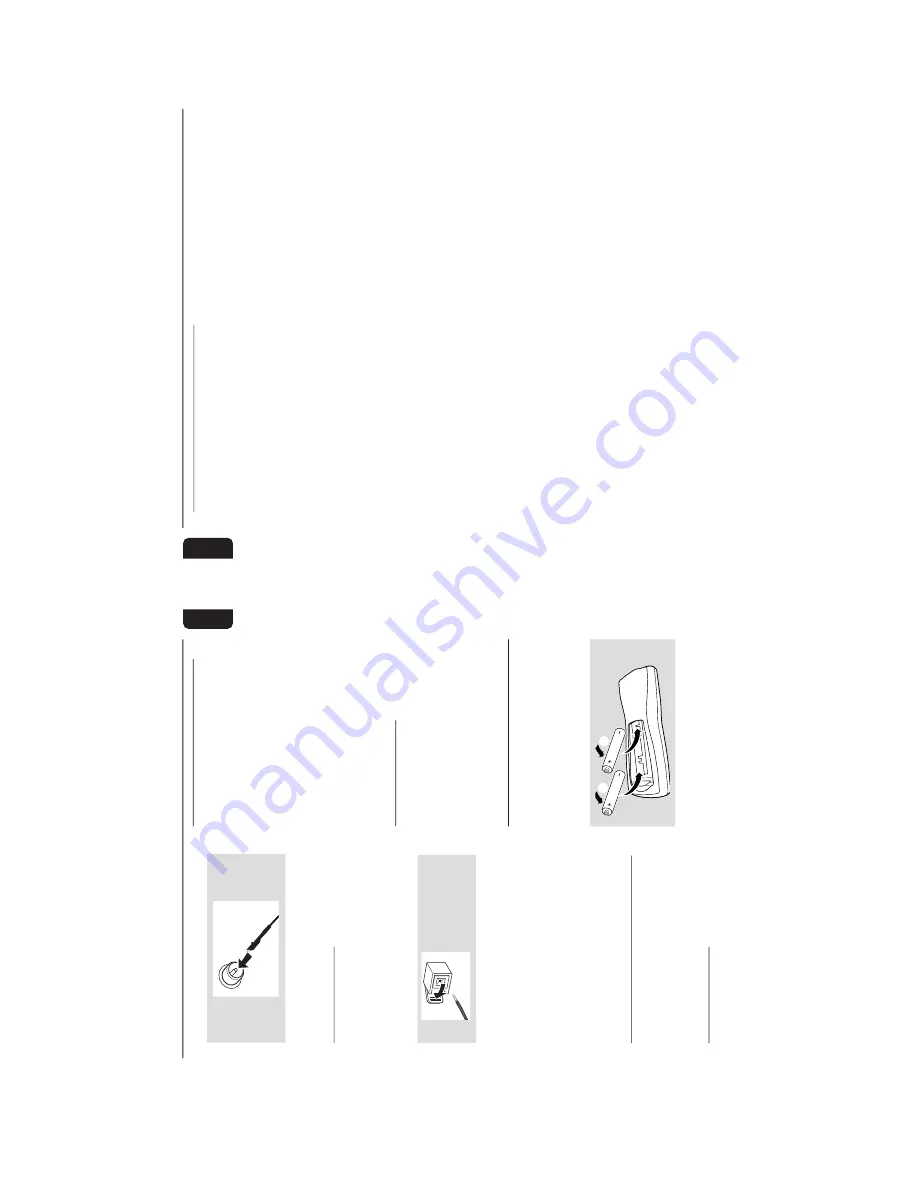
Inser
ting batteries into the
Remote Contr
ol
Inser
t tw
o batter
ies (T
ype R06 or
AA) into the
remote control with the cor
rect polar
ity as
indicated b
y the
+
and
-
symbols inside the
batter
y compar
tment.
1
2
CA
UTION!
–
Remo
ve
batteries if the
y are e
xhausted
or not to be used for a long time
.
–
Do not use old and new or differ
ent
types of batteries in combination.
–
Batteries contain chemical substances
, so
the
y should be disposed off pr
operly
.
10
English
Contr
ols
(main system’
s illustr
ation on page 3)
Contr
ols on the system and
remote contr
ol
1
ECO PO
WER
–
to switch the system on or to Eco P
o
w
e
r
Standb
y mode
.
2
ST
ANDBY ON
yyyyy
–
to switch the system on or to Standb
y mode
.
3
DISPLA
Y SCREEN
–
to view the cur
rent status of the system.
4
D
ISC TRA
Y
5
DISC CHANGE
–
to change disc(s).
6
DISC 1 / DISC 2 / DISC 3 (CD DIRECT)
–
to select a disc tr
ay
f
or pla
yback.
7
OPEN•CLOSE
–
to open or close the disc tr
ay
.
8
INTERA
CTIVE VU
METER
–
to show the
VU (v
olume unit) meter in music or
volume mode depending on the displa
y mode
selected.
9
V
OLUME
–
to increase or decrease the volume
.
0
T
a
pe Deck Operation
A
U
T
O
REPLA
Y (A
UT
O RE.)
–
to select continuous pla
yback in either
A
U
T
O
PLA
Y or ONCE mode only
.
DUBBING
–
to dub a tape
.
REC
–
to star
t recording on tape deck 2.
!
SOUND NA
VIGA
TION
–
to select the desired sound f
eature :
DSC or
VAC
.
@
JOG C
ONTR
OL
–
to select the desired sound eff
ect f
or the
selected sound f
eature
.
DSC
..................
DIGIT
AL,
R
OCK,
POP
, NEW
A
GE,
CLASSIC or ELECTRIC
.
V
A
C
..................
HALL,
CONCER
T,
CINEMA,
DISCO
, ARC
ADE or CYBER.
#
INCREDIBLE SURR
OUND (IS)
–
to activate or deactivate the sur
round sound
eff
ect.
$
wOOx ON•OFF
–
to select enhanced or nor
mal wOOx sound
eff
ect.
wOOx LEVEL
–
to select desired wOOx lev
el :
W
O
O
X
1,
W
O
O
X
2 or
W
O
O
X
3.
%
ç
–
to open the tape deck door
.
^
T
APE DECK 2
&
T
APE DECK 1
*
S
OURCE
– to select the f
ollo
wing:
CD / (CD 1•2•3)
–
to select disc tr
ay
1,
2 or 3.
TUNER / (BAND)
–
to select wa
veband :
FM,
MW or L
W
.
T
APE / (T
APE 1• 2)
–
to select tape deck 1 or 2.
A
UX / (CDR/D
VD)
–
to select a connected exter
nal source :
CDR/D
VD or
A
UX (auxiliar
y) mode
.
(
Mode Selection
PLA
Y P
A
USE
ÉÅ
for CD
.................
to star
t or inter
rupt pla
yback.
for
T
APE
..............
to star
t pla
yback.
for PLUG & PLA
Y…
(on the system only)
to
initiate and star
t plug & pla
y
mode
.
SEARCH• TUNING
11 22
for CD
.................
to search backward/f
orward.
for TUNER
.........
to
tune to a lo
w
er or higher r
adio
frequency
.
for
T
APE
..............
to rewind or fast f
orward.
for CLOCK
.......
(on the system only)
to set the
hour
.
DEMO ST
OP/CLEAR
Ç
for CD
.................
to stop pla
yback or to clear a
progr
amme
.
for
TUNER
........
to stop progr
amming.
.................................
to delete the preset r
adio
station.
for
T
APE
..............
to stop pla
yback or recording.
.................................
to reset tape counter n
umber
.
for DEMO
.........
(on the system only)
to activate/
deactivate the demonstr
ation.
for CLOCK
.......
(on the system only)
to exit clock
setting or cancel timer
.
for PLUG & PLA
Y…
(on the system only)
to exit
plug & pla
y mode
.
PREV / PRESET / NEXT
í
ë
for CD
.................
to skip to the beginning of the
cur
rent,
previous,
or next tr
ack.
for
TUNER
........
to select a preset r
adio station.
for CLOCK
.......
(on the system only)
to set the
min
ute
.
Summary of Contents for FW-C780/22
Page 65: ...COMPONENT LAYOUT 3139 113 3408 pt2 dd wk0050 10 1 2 3 7 9 4 5 6 8 9A 7 9A 7 ...
Page 66: ...CHIP LAYOUT 3139 113 3408 pt2 dd wk0050 9A 8 9A 8 ...
Page 77: ...10 3 Service Position ...
Page 78: ...10 4 Technical Remarks ...
Page 105: ...13 1 13 1 SET MECHANICAL EXPLODED VIEW Exploded_View_3139 119 33860 dd wk0050 ...


