


2-3
PCS 103 451
English
9
Controls on the system and
remote control
1
1
1
1
1
STANDBY ON
–
to switch the system on or to standby
mode.
–
to use for EASY SET.
2
2
2
2
2
DBB (DYNAMIC BASS BOOST)
–
to switch on bass boost to enhance
bass response or to switch off bass
boost.
3
3
3
3
3
DIGITAL SOUND CONTROL PANEL
–
to view the desired DSC display.
4
4
4
4
4
DSC (DIGITAL SOUND CONTROL)
–
to select the desired sound effect :
OPTIMAL, JAZZ, ROCK or TECHNO.
5
5
5
5
5
PROGRAM
for CD ............ to program CD tracks.
for TUNER ..... to program preset radio
stations.
for CLOCK ..... to select 12 or 24 hour
in clock setting mode.
6
6
6
6
6
RECORD
–
to start recording on tape deck 2.
7
7
7
7
7
DUBBING
–
to dub a tape in normal speed.
8
8
8
8
8
DISPLAY SCREEN
–
to view the current setting of the
system.
9
9
9
9
9
CD CAROUSEL TRAY
0
0
0
0
0
DISC CHANGE
–
to change CD(s).
!
!
!
!
!
OPEN•CLOSE
–
to open or close the CD carousel tray.
@
@
@
@
@
DISC 1 / DISC 2 / DISC 3 (CD
DIRECT PLAY)
–
to select a CD tray for playback.
#
#
#
#
#
SOURCE
–
to select the following
:
CD / (CD 1•2•3)
–
to select CD mode. When CD playback
is stopped, press to select disc tray 1,
2 or 3.
TUNER / (BAND)
–
to select Tuner mode. When in tuner
mode, press to select the waveband:
FM, MW or LW.
TAPE / (TAPE 1• 2)
–
to select Tape mode. When tape
playback is stopped, press to select
either tape deck 1 or 2.
AUX / (VIDEO)
–
to select sound from an external
source (e.g. TV, VCR, Laser Disc player,
DVD player or CD Recorder).
$
$
$
$
$
MODE SELECTION
SEARCH
à á
(TUNING
à á
)
for CD ............ to search backward/
forward.
for TUNER ...... to tune to a lower or
higher radio frequency.
for TAPE ........ to rewind or fast
forward a tape.
for CLOCK ..... to set the hour
(on the
system only).
STOP•CLEAR
Ç
for CD ............ to stop CD playback or
to clear a program.
for TUNER ..... to stop programming.
for TAPE ........ to stop playback or
recording
for DEMO ......
(on the system only) to
start or stop
demonstration mode.
PLAY
É
/ PAUSE
Å
for CD ............ to start or interrupt
playback.
for TAPE ........ to start playback.
PREV
í
/ NEXT
ë
(PRESET
4 3
)
for CD ............ to skip to the beginning
of the current, previous,
or next track.
for TUNER ..... to select a preset
station in memory.
for CLOCK ..... to set the minute
(on
the system only).
%
%
%
%
%
VOLUME
–
to increase or decrease the volume.
^
^
^
^
^
n
–
to connect headphones.
&
&
&
&
&
DIM
–
to select different brightness for the
display screen : DIM 1, DIM 2, DIM 3
or DIM OFF.
*
*
*
*
*
CLOCK•TIMER
–
to view the clock, set the clock or set
the timer.
RDS
–
to select RDS data in the following
order: station name, program type and
radio text.
CONTROLS
Notes for remote control:
– First select the source you wish to
control by pressing one of the
source select keys on the remote
control (e.g. CD ,TUNER, etc.).
– Then select the desired function
(
É
,
í
,
ë
, etc.).
NEWS
–
to hear news automatically
(
(
(
(
(
AUTO REPLAY
–
to select playback mode either in
continuous AUTO PLAY or ONCE only.
)
)
)
)
)
TAPE DECK 2
¡
¡
¡
¡
¡
TAPE DECK 1
™
™
™
™
™
REPEAT
–
to repeat a CD track, a disc, or all
available discs.
£
£
£
£
£
MUTE
–
to switch off the sound temporarily.
≤
≤
≤
≤
≤
SHUFFLE
–
to play all the available discs and their
tracks in random order.
∞
∞
∞
∞
∞
SLEEP
–
to switch the system to standby mode
at a selected time.
§
§
§
§
§
B
–
to switch the system to standby mode.
10
English
Important:
Before you operate the system,
complete the preparation procedures.
Demonstration mode
The system has a demonstration mode that
shows the various features offered by the
system.
When the system is switched
on for the first time, the demonstration
mode will start automatically.
Notes:
– During the demonstration, if you press
any source (or standby-on) button, the
system will switch to the respective
mode (or standby).
– When the system is switched to standby
mode, the demonstration will resume 5
seconds later.
To stop the demonstration mode
• Press and hold
Ç
(on the system only)
for
5 seconds
when the system is in
demonstration mode.
™
The demonstration will stop.
™
"
DEMO OFF
" is displayed.
™
The system will switch to standby
mode.
Note:
– Even though the AC power cord is
removed from and reconnected to the
wall socket, the demonstration will
remain off until it is switched on again.
To start the demonstration mode
• Press and hold
Ç
(on the system only)
for
5
seconds
when the system is in
standby mode.
™
The demonstration will begin.
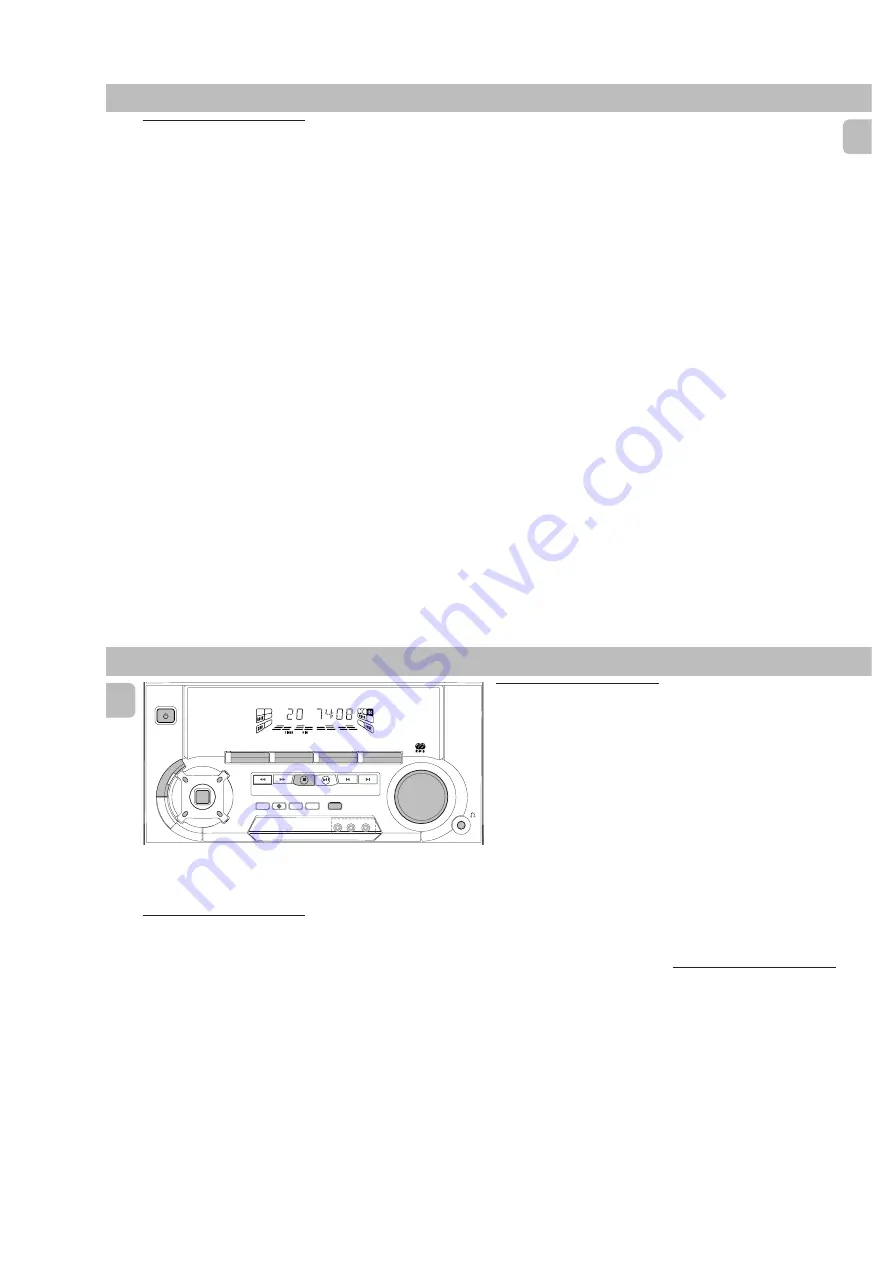
OPERATING THE SYSTEM
DIGITAL
SOUND
CONTROL
STANDBY-ON
VOLUME
FW-
C10
MINI HIFI SYSTEM
C D 1 • 2 • 3
BAND
TAPE 1 • 2
TAPE
CD
TUNER
AUX
PRESET
TUNING
▲
▲
▲
▲
▲ ▲
STOP• CLEAR
SEARCH
PLAY• PAUSE
PREV
NEXT
D
B
B
VIDEO
O
P
TI
M
AL
JA
ZZ
R
O
C
K
TE
C
H
N
O
DSC
PROGRAM
DIM
RECORD DUBBING A.REPLAY
DIGITAL SOUND CONTROL
RDS
NEWS
CLOCK
•
TIMER
Easy Set
EASY SET allows you to store all available
radio stations and RDS stations
automatically.
1
Press and hold
STANDBY ON
(on the
system only) for
5 seconds
; when the
system is in standby or demonstration
mode.
™
“
EASY SET
” will be displayed, and
followed by “
TUNER
” and then
“
AUTO
”.
™
EASY SET will start searching for all
RDS radio stations with sufficient
signal strength and then followed by
radio stations on FM, MW and LW
band respectively. Weak RDS radio
stations may be stored in later
presets.
™
All available RDS and radio stations
with sufficient signal strength will be
stored. Up to 40 presets may be
stored.
2
The system will proceed to set the RDS
time automatically with the stored RDS
preset station.
• If no RDS station is available in the first
preset station, the program will exit
automatically.
™
After a radio station is found, “
EASY
SET
” will be displayed and followed
by “
TIME
”
• When searching RDS time;
™
“
SEARCH RDS TIME
” will be
displayed.
™
When RDS time is read, “
RDS
TIME
” will be displayed. The current
time will be displayed for 2 seconds
and stored automatically.
Notes:
– EASY SET will start with the RDS
station, if there are still presets
available, it will continue to store the
FM, MW and LW bands respectively.
– When EASY SET is used, all previously
stored radio stations will be replaced.
– The last preset radio station or the first
available RDS station will appear on the
display when EASY SET is completed.
– If RDS station does not transmit RDS
time within 90 seconds, the program
will exit automatically and the display
will show “
NO RDS TIME
”.
Switching the system ON
• Press
CD
,
TUNER
,
TAPE
or
AUX
.
You can also switch on the system by
pressing any one of the CD DIRECT PLAY
buttons.


