background image

FC9190/01

2-9

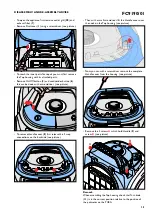
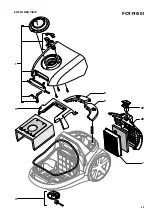
•  To open the appliance, first remove outlet grill (

28

) and 

exhaust filter (

7

).

•  Remove Dustcover (

1

) using a screwdriver  (see picture).

•  To reach the inner parts for repair you must first remove  

the Top housing with its attached parts.

•  Remove On/Off button (

5

) and cordwinder button (

6

), 

this can be done with a screwdriver  (see picture).

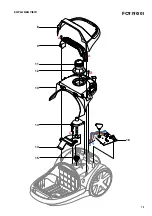
•  To remove Handle cover (

8

) first release the 2 snap 

connections on the backside  (see picture).

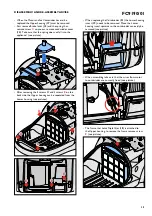
•  Then with a small screwdriver lift the Handle cover over 

the nock on the Top housing  (see picture).

•  Now you can with a screwdriver remove the complete 

Handle cover from the housing  (see picture).

•  Remove the 2 screws 

A

 which hold Handle (

9

) and  

screw 

B

 (see picture).

A

A

B

Remark

When assembling the Top housing check that Turn knob 
(

11

) is in the correct position relative to the position of 

the potmeter on the PCBA.

DISASSEMBLY- AND  RE-ASSEMBLY ADVISE

Summary of Contents for FC9101

Page 1: ...mance Dust capacity 5 l Exhaust filter HEPA 12 with Airseal HEPA AirSeal Motor filter Triple layer Safety This product meets the requirements regarding interference suppression on radio and TV After the product has been repaired it should function properly and has to meet the safety requirements as officially laid down at this moment TECHNICAL INFORMATION Performance Noise level Lc IEC 79 dB Airfl...

Page 2: ... To remove Handle cover 8 first release the 2 snap connections on the backside see picture Then with a small screwdriver lift the Handle cover over the nock on the Top housing see picture Now you can with a screwdriver remove the complete Handle cover from the housing see picture Remove the 2 screws A which hold Handle 9 and screw B see picture A A B Remark When assembling the Top housing check th...

Page 3: ...n the back side the Upper housing can be seperated from the Lower housing see pictures D D D D D E E E When replacing the Cordwinder 21 the Lower housing insert 19 needs to be removed Move the Lower housing insert upwards so the cordwinder can easily be removed see picture When assembling take care that the wires from motor to cordwinder are correctly fixed see picture The frame that holds Triple ...

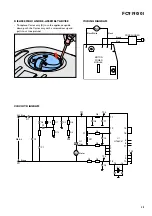
Page 4: ... 12 2 3 4 18 C7 C6 C4 R5 R4 C5 R11 P1 B1 U1 HT46C47 13 14 TP2 TP1 TP5 TP3 DISASSEMBLY AND RE ASSEMBLY ADVISE To replace Caster assy 4 turn the appliance upside down push the Caster assy with a screwdriver up and pull it out see picture WIRING DIAGRAM MOTOR POWER MODULE Brown Blue CORD WINDER Black White Black M CIRCUIT DIAGRAM ...

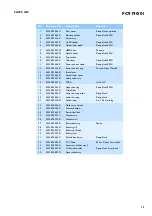
Page 5: ...winder cover Safety valve assy PCBA Printed Silver Metallic Gulo HV 17 18 19 20 21 4322 003 46631 4322 000 39731 4322 003 46621 4322 003 46611 4322 005 33401 Upper housing Triple Filter Lower housing insert Lower housing Cordwinder Deep black 80231 Deep black Deep black 8 m 4 8 mm plug 22 23 24 25 26 4322 009 00691 4322 000 39671 4322 003 46871 4322 000 39711 4322 000 39681 Motor assy Service Sile...

Page 6: ...FC9190 01 6 9 1 5 6 3 4 28 29 7 EXPLODEDVIEW ...

Page 7: ...FC9190 01 7 9 14 15 13 9 11 12 10 8 C B A A 16 X Y EXPLODEDVIEW ...

Page 8: ...FC9190 01 8 9 24 17 18 20 30 25 26 22 23 27 D X Y E E E D F D D D 19 21 EXPLODEDVIEW ...

Page 9: ...FC9190 01 9 9 34 32 33 35 31 EXPLODEDVIEW ...

Reviews: