Philips EasyKey 9000 Series User Manual Download Page 10

16

17

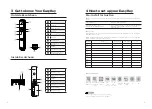
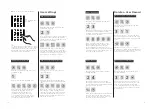
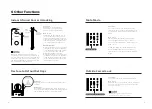
Lock | Auto/Manual Mode

When the door is under auto mode, the latch bolt will be popped 

up after closing the door, and there will be a voice prompt of “Door 

Close”.

When the door is under auto mode, the latch bolt will be popped 

up after closing the door, and there will be a voice prompt of “Door 

Close”.

When the door is under manual mode, the latch bolt won’t pop 

up after closing the door. Only after a successful verification 

among any of the registered identity methods (PIN Code/Key Tag/

Fingerprint), the latch bolt will pop up, and there will be a voice 

prompt of “Door Close”. When it is under manual mode and the door 

is closed, waking up the outside escutcheon and unlock the system 

could directly open the door.

When the door is under manual mode, the latch bolt won’t be 

popped up after closing the door. Click on [CLOSE] and the latch 

bolt will be popped up. After successfully locking the door, the 

system will generate a voice prompt of “Door Close”.
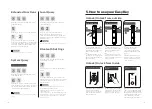
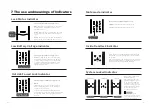
Lock from Outside

Lock from Inside

[A] indicates auto 

mode, after closing 

the door, the latch 

bolt will pop up, and 

the door is lock.

[M] indicates manual 

mode, after closing 

the door, the latch 

bolt will not pop up, 

and the door is open.
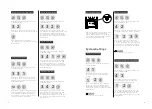
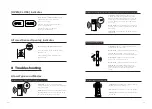
Inside Deadlock

Mechanical Key Opening

When the EasyKey is locked, long-press the 

[CLOSE] button, after the indicator flashes once 

in red, and there will be a voice prompt of “Inside 

deadlock enabled”.


Under inside deadlock mode, all functions of the 
outside escutcheon will be locked. If you try to wake 
up the system manually, the keypad area will display 
the combination of “15937(X)” and there will be a voice 
prompt of “Inside deadlock enabled” reminding you 
that the door has been deadlocked from inside. Under 
deadlock mode, all operations of the outside escutcheon 
are disabled. Master PIN code verification or mechanical 
key opening is required to release the door from deadlock 
mode.

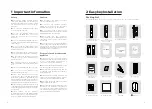
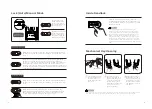
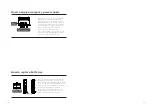
Cut the box and take 

out the mechanical 

keys. Push the cover 

aside and reveal the 

key itself. 

Insert the key into 

the keyhole and keep 

the key and key shell 

vertical to each other. 

Rotate the key shell 

towards the handle for 

90°until it closes to 

the door surface.

Rotate the key shell 

downwards for 180° to 

make it parallel to the 

ground. Then rotate it 

horizontally towards 

the handle to unlock 

the door. 

1

2

3

It is suggested you not to use the mechanical key for daily unlocking. Use the key for emergencies 
only, in case the battery is dead, forget the PIN code, or the system fails to work properly.

Lock | Auto/

Manual switch

Attention

Attention

 Push Button

Summary of Contents for EasyKey 9000 Series

Page 1: ......

Page 2: ...es Unlock Unlock from Outside With a PIN Code With a Fingerprint With a Key Tag Card Unlock from Inside With a Rotatory Knob With a Functional Button With an Infrared Sensor Lock Auto Manual Mode Lock from Outside Lock from Inside Indoor Deadlock Mechanical Key Opening 1 Important Information 02 2 EasyKey Installation 03 3 Get to know your EasyKey 08 4 How to set up your EasyKey 09 Safety Warning ...

Page 3: ...ster PIN code immediately after finishing installing and debugging and keep the mechanical key properly Please replace all the batteries immediately if there is a low battery alarm Please make sure to correctly match the poles when installing the batteries Caution Do not place the battery near fire sources to avoid explosion Do not use any emergency power supply that does not meet the safety requi...

Page 4: ...w Tube X4 Pre install Instruction This product can be installed on 4 types of opening directions left out pull right in push right out pull and left in push Left open Right open Left in push Right in push Indoor Indoor Indoor Indoor Outdoor Outdoor Outdoor Outdoor Left out pull Right out pull 1 Please choose proper installation kit as per the door thickness 2 The default installation kit is applic...

Page 5: ...r the smart lock can be used normally Turn clockwise to install the deco cover install the battery put the battery cover back and after attach the strike the installation of the smart lock is complete To check whether if the rotary knob mechanical keys and all other components could be used normally 8 9 10 Insert the outside escutcheon connection cable and the motor cable into the corresponding so...

Page 6: ...o return to the previous menu 2 The default master PIN code is 12345678 Unlock with any of the registered identify methods Unlock with any two of the registered identify methods among PIN code Key Tag and Fingerprint General Mode Dual Verification Mode Outside Escutcheon 3 6 7 Fingerprint Sensor Keypad Mute Button Outside Forced Lock Button Lock Status Indicator Handle Card Reader Low Battery Volt...

Page 7: ...ing a voice prompt of Succeeded press until you exit master mode Enter 2 to enter into user setting then enter 2 again to add a one time user PIN code 2 2 Enter enter master PIN code and confirm with Place your finger against the sensor After hearing a voice prompt of Take away your finger and enroll again please take away your finger and re place it against the sensor After hearing a voice prompt...

Page 8: ...press until you exit the master mode 3 4 Delete a Key Tag 1 Enter enter master PIN code and confirm with Enter 3 to delete a user record then enter 4 to delete key tag record and then enter 2 to delete all key tag records After hearing a voice prompt of Succeeded press until you exit the master mode 3 4 Delete All Key Tags 2 Enter enter master PIN code and confirm with Choose the language as neede...

Page 9: ...EasyKey APP from App Stores via your phone Enter enter master PIN code and confirm with Extended Functions Attention Enter 6 to get into system query then enter 1 to get into security code query the system will broadcast the product series number automatically 6 Directly input 400 could enter into system query 1 Security Code Query Enter enter master PIN code and confirm with System Query Attentio...

Page 10: ...p and the door is open Inside Deadlock Mechanical Key Opening When the EasyKey is locked long press the CLOSE button after the indicator flashes once in red and there will be a voice prompt of Inside deadlock enabled Under inside deadlock mode all functions of the outside escutcheon will be locked If you try to wake up the system manually the keypad area will display the combination of 15937 X and...

Page 11: ...default settings 6 Other Functions Functions Unlocking from inside will trigger an alarm How to use After the door is successfully locked long press the button for 2 seconds to enter the outside forced lock mode Functions Use only one button to mute the lock by turning off the voice guide Applicable to the scenes where you don t want to disturb your family How to use 1 Mute When the system is awak...

Page 12: ...ced locking when the system wakes up the light will glow in white indicating this function is in use Mute mode indicator Inside Deadlock Indicator System Locked Indicator When the door is under inside deadlocking the digital functions of the outside escutcheon will be locked If the system wakes up manually the keypad will show the combination of 15937 X with a voice prompt of inside deadlocking en...

Page 13: ...ing is off 8 Troubleshooting Inside Unlocking Alarm Under Outside Forced Lock Low Battery Voltage Alarm reminds you of replacing the batteries in time Triggering 1 The door is pried open and the sensor latch bolt pops up Alarm mode Continuously repeated alarms Turning off The alarm can be turned off automatically or by a successful verification Triggering 2 The door is pried open and there is no c...

Page 14: ...it s impossible to open the door from outside please press the RES button and then release it to reboot automatically The lock is powered by four 1 5V alkaline batteries There are two sets of working power stations in the battery cabinet Eight batteries can put in to extend battery life and reduce battery replacement frequency The battery cabinet locates at the bottom end of the inside escutcheon ...

Page 15: ...inklijke Philips N V and are used under license This product has been manufactured by and is sold under the responsibility of Shenzhen Conex Intelligent Technology Co Ltd and Shenzhen Conex Intelligent Technology Co Ltd is the warrantor concerning this product Version 1 0 ...

Reviews: