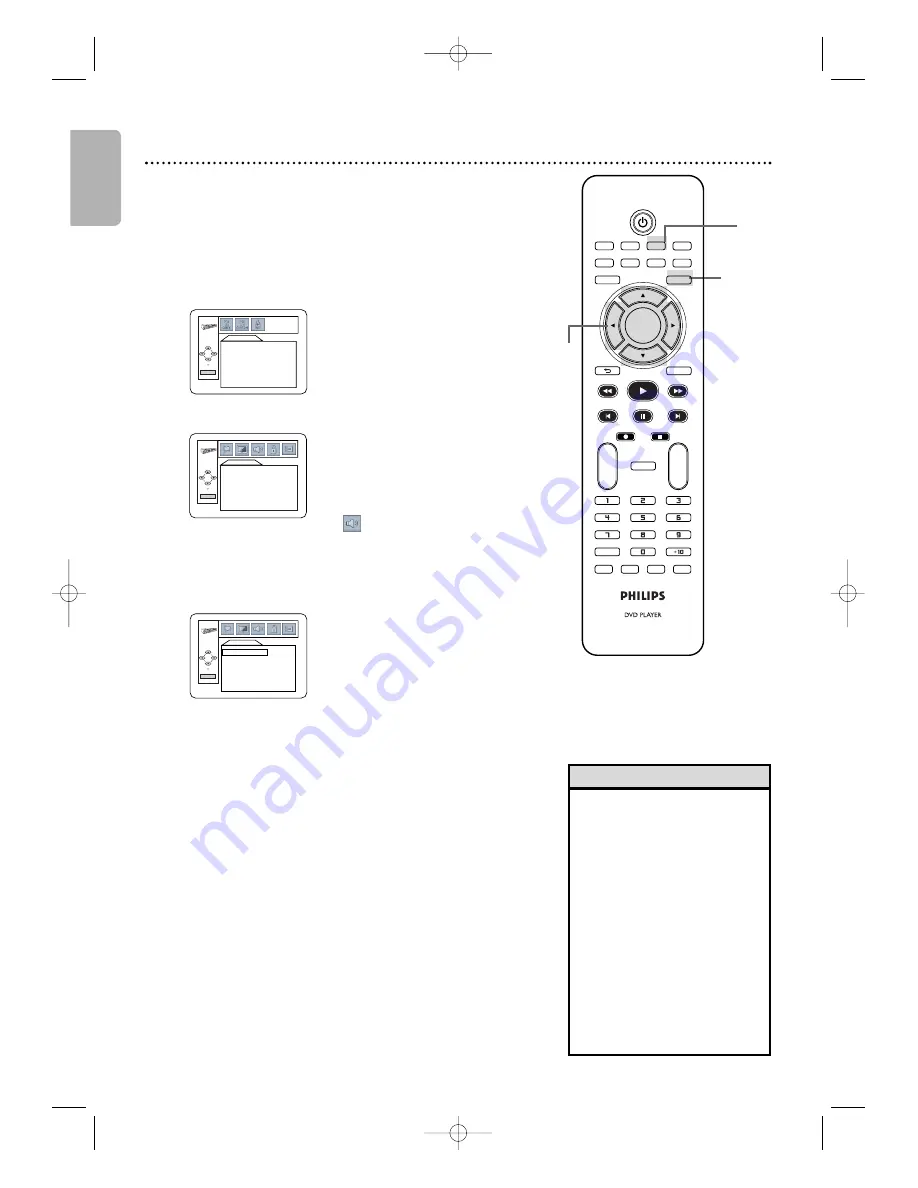
background image

English

2,7

62  Audio

Change Audio settings based on other equipment you
connected to the DVD player or according to your disc
sound features. These setting only affect the Audio from the
DVD player of the DVD/VCR.

1

Press DVD to put the DVD/VCR in DVD mode.

DVD light will appear on the front of the DVD/VCR.

2

While playback is stopped, press DVD/SETUP.

The QUICK SETUP screen will appear.

3

Press 

s

or 

B

to select CUSTOM 

at the top of

the menu,

then press OK.

4

Press 

s

or 

B

to select 

(AUDIO) at the top

of the menu, then press OK.

5

Press 

K

K

or 

L

L

to select DRC, DOWN

SAMPLING, or DOLBY DIGITAL, then follow
step 6 accordingly.

6

If you selected DRC, press OK repeatedly to
turn Dynamic Range Control (DRC) On or
Off.

Choosing ON compresses the range of volume

by suppressing loud sounds and raising low sounds.
DRC is available only on discs recorded in the
Dolby Digital format.
The default setting is ON.

If you selected Down Sampling, press OK
repeatedly to choose ON or OFF.

Choose ON

to down sample the 96 kHz sound source to 48 kHz.
Choose OFF to output the sound source without
any down sampling.
DOWN SAMPLING is available only when the player
is connected to a Stereo using the COAXIAL
DIGITAL AUDIO OUT jack as described on page 

1

4.

The default setting is ON.

If you selected Dolby Digital, press OK
repeatedly to select BITSTREAM or PCM.

Select BITSTREAM if you used the COAXIAL
DIGITAL AUDIO OUT jack to connect the DVD
player to a stereo that is Dolby Digital compatible.

Details are on page 

1

4.

Otherwise, choose PCM.

The default setting is BITSTREAM.

7

Press DVD/SETUP to remove the menu.

AUDIO

DRC

ON

DOWN SAMPLING ON
DOLBY DIGITAL

BITSTREAM

OK

QUICK SETUP

OSD LANGUAGE

ENGLISH

TV ASPECT

4:3 LETTER BOX

PROG. SCAN

OFF

DOLBY DIGITAL

BITSTREAM

OK

LANGUAGE

AUDIO

ORIGINAL

SUBTITLE

OFF

DISC MENU

ENGLISH

OSD LANGUAGE

ENGLISH

DivX SUBTITLE

OFF

OK

• Dolby Digital sound must be

available on the DVD.

• You can adjust DOLBY

DIGITAL in the QUICK
SETUP menu that appears
when you first press
DVD/SETUP.With QUICK
selected, press OK. Press 

L

to

select DOLBY DIGITAL. Press
OK to choose BITSTREAM or
PCM. Press DVD/SETUP to
remove the menu.

• When you play a disc that has

copyright protection,
downsampling will be at 48
kHz, even if you set DOWN
SAMPLING to OFF.

Helpful Hints

TV/VIDEO

VCR

DVD

VCR Plus+

SUBTITLE

AUDIO

ANGLE

ZOOM

DVD

SETUP

MENU

DISC/VCR

DISPLAY

TIMER SET

BACK

PLAY

REW

FFW

PREV

NEXT

PAUSE

REC

STOP

OK

REPEAT

REPEAT

A-B

CH

+

-

CLEAR

REC MODE

SEARCH

MODE

TITLE

1

3-6

E8A21UD_EN2  5/15/06  8:04 PM  Page 62

Summary of Contents for DVP3200V

Page 1: ...es à simplifier l utilisation de votre produit Philips Toutefois si vous ne parvenez pas à résoudre votre probléme vous pouvez accéder à notre aide en ligne à l adresse www philips com usasupport ou formez le 1 800 661 6162 Francophone 1 888 PHILIPS 744 5477 English speaking Veillez à avoir votre produit à portée de main et model serial nombre Gracias por escoger Philips Necesita ayuda inmediata L...

Page 2: ...rical shock For the safety of everyone in your household please do not remove product covering The exclamation point calls attention to features for which you should read the enclosed literature closely to prevent operating and maintenance problems WARNING To reduce the risk of fire or electric shock this apparatus should not be exposed to rain or moisture and objects filled with liquids such as v...

Page 3: ...nce has been exposed to rain or D The appliance does not appear to operate normally or exhibits a marked change in performance or E The appliance has been dropped or the enclosure damaged 17 Tilt Stability All televisions must comply with recommended interna tional global safety standards for tilt and stability properties of its cabi net design Do not compromise these design standards by applying ...

Page 4: ...ff and on the user is encouraged to try to cor rect the interference by one or more of the following measures 1 Reorient or relocate the receiving antenna 2 Increase the separation between the equipment and the receiver 3 Connect the equipment into an outlet on a circuit different from that to which the receiv er is connected 4 Consult the dealer or an experienced radio TV technician for help Copy...

Page 5: ...Playback 36 Tape Counter 36 Time Search Index Search 37 Special Effects Playback 38 Automatic Operation Features 38 AdditionalVCR Features Multi Channel Television Sound Hi Fi Stereo 39 Disc Playback Features Menus Playback Control PBC Function 40 Fast Forward Fast Reverse 41 x1 3 and x0 8 Rapid Play withVoice 41 Title Chapter Time Search 42 Track Search 43 Paused and Step by Step Playback Resume ...

Page 6: ...ve menus If the DVD has a menu access it by pressing DVD then DISC VCR MENU on the remote control Details are on page 40 DVD Player Setup menu Some instructions explain how to use the DVD player s Setup menu to set up features of the DVD player or a DVD Access the DVD player menu by pressing DVD SETUP on the remote control when playback is stopped Even if a feature is set in the DVD player s menu ...

Page 7: ...do not appear on your DVD you cannot play the DVD in this player The number inside the globe refers to a region of the world Region 1 represents the United States Canada upper regions of North America Bermuda the U S Virgin Islands and small regions near Australia A disc encoded in a specific region format can only play on DVD players with the same region code For example if a disc is labeled for ...

Page 8: ...ideo In channel See page 10 If you have a Stereo with a Coaxial Digital Audio In jack this provides the clearest sound for the DVD player Connect the DVD VCR s COAXIAL DIGITAL AUDIO OUT jack to your Stereo for the best sound quality If you use only this audio connection only disc sound noVCR will be available See page 14 If digital audio connections are not possible connect the DVD VCR s red and w...

Page 9: ...DVD VCR s output channel is 3 when you purchase it So set your TV to channel 3 when the DVD VCR is new If you cannot use channel 3 at your TV you can change the DVD VCR s output channel to channel 4 To do so press VCR to put the DVD VCR in VCR mode VCR light will be on the front of the DVD VCR Insert a videotape and press PLAY B to start playback During playback press and hold VCR PLAY B on the fr...

Page 10: ...CR to the Cable Box Satellite Receiver output channel 03 or 04 3 Set the TV to the DVD VCR s output channel 03 or 04 The DVD VCR s output channel is channel 3 as a default To change it from 3 to 4 press and hold PLAY B VCR on the DVD VCR for 3 5 seconds during tape playback For more details see step 4 on page 9 4 Select the channel you want to view record at the Cable Box Satellite Receiver You ma...

Page 11: ...output channel 03 or 04 The DVD VCR s output channel is channel 3 as a default To alternate it between 3 and 4 press and hold PLAY B VCR on the front of the DVD VCR for 3 5 seconds during tape playback For details see step 4 on page 9 Set the TV to the Cable Box Satellite Receiver output channel 03 or 04 2 Press VCR to put the DVD VCR in VCR mode VCR light will appear on the front of the DVD VCR 3...

Page 12: ...le not supplied to the COMPONENT VIDEO OUT jacks on the DVD VCR and to the COMPONENT VIDEO IN jacks on theTV The Component Video In jacks on the TV are usually red blue and green 3c Connect an S Video cable not supplied to the S VIDEO OUT jack on the DVD VCR and to the S VIDEO IN jack on theTV The connections 3b and 3c only supply video picture for the DVD player of the DVD VCR Therefore in order ...

Page 13: ...the DVD player see page 12 You will still need the yellow video cable or RF coaxial cable for VCR features 4 Connect the power cords of the DVD VCR TV and Stereo to a power outlet Turn on the TV and set it to the Video In channel Or simply go to your TV s lowest channel 01 or 02 and continue changing channels downward at the TV until you see VCR or DVD playback on the TV screen To help you find th...

Page 14: ...he TV turn on the DVD VCR Press DVD to put the DVD VCR in DVD mode With no disc in the player a large DVD Video logo will appear on the TV screen when you get the TV on the correctVideo In channel Make sure Progressive Scan PROG SCAN is OFF and P SCAN does not appear on the DVD VCR s display panel Disable Progressive Scan either in the DISPLAY menu or by pressing and holding PLAY B DVD on the fron...

Page 15: ...ng contain materials that can be recycled and reused Specialized companies can recycle your product to increase the amount that needs to be properly disposed Your product uses batteries that should not be thrown away when depleted but should be disposed of as small chemical waste Please find out about the local regulations on disposal of your old product batteries and packaging whenever you replac...

Page 16: ...el Search and the VCR menus and displays will be in English If you try to program channels when there is no antenna or Cable TV signal connected to the ANT IN jack of the DVD VCR programming will stop AUTO SET UP will stop flashing Connect an antenna or Cable TV signal to the DVD VCR s ANT IN jack and press B again Repeat this process if the power fails Helpful Hints Before turning on your DVD VCR...

Page 17: ...nt of the DVD VCR VCR light will appear on the front of the DVD VCR If the tape s record tab has been removed playback will start automatically If the DVD VCR power is already on press VCR to put the DVD VCR in VCR mode if necessary VCR light will appear on the front of the DVD VCR 3 If playback does not start automatically press VCR then press PLAY B 4 Press STOP C to stop playback 5 Press REW h ...

Page 18: ...isc tray you have to press PLAY B to start playback Helpful Hints Before you begin turn on the TV Stereo and other equipment connected to the DVD VCR Make sure the TV and the Stereo if applicable are set to the correct channel Details are on pages 8 14 1 Press y to turn on the DVD VCR 2 Press DVD so DVD light appears on the front of the DVD VCR 3 Press OPEN CLOSE A on the DVD VCR to open the disc ...

Page 19: ... a video cassette here Appears when a repeat function is active Appears when A B Repeat is on Appears when disc playback is paused Appears during Slow Motion Playback DVD Video CD DivX Appears during disc playback Displays the current disc type DVD DVD DivX on DVD VCD Video CD CD Audio CD MP3 Windows MediaTM Audio JPEG DivX on CD Appears when Progressive Scan is active Indicates a tape is in the D...

Page 20: ...n DVD CHANNEL KL Buttons Remote Sensor DIGITAL AUDIO OUT COAXIAL AUDIO OUT DVD L R L R L R S VIDEO OUT COMPONENT VIDEO OUT Y CB PB AUDIO OUT DVD VCR VCR ANT IN ANT OUT VIDEO OUT AUDIO IN VIDEO IN CR PR DVD VCR AUDIO OUT jacks Left white and Right red DVD COMPONENT VIDEO OUT Y CB PB CR PR jacks green blue red DVD AUDIO OUT jacks Left white and Right red AC Power Cord DVD COAXIAL DIGITAL AUDIO OUT j...

Page 21: ...LANGUAGE SELECT AUDIO OUT TV STEREO ON SAP Although your DVD VCR may automatically memorize the channels you receive when you turn it on for the first time you can set up the channels again 1 Press VCR then press DISC VCR MENU so MENU1 appears If the clock has never been set the CLOCK SET menu may appear when you press DISC VCR MENU If so follow the instructions from step 3 on page 22 2 Press K or...

Page 22: ... 2 0 0 6 HOUR MINUTE AM PM CLOCK SET Follow these steps to set the VCR clock Make sure 1 Press VCR then press DISC VCR MENU so MENU1 appears If the clock has never been set the CLOCK SET menu may appear when you press DISC VCR MENU If so follow the instructions from step 3 on this page 2 Press K or L to select CLOCK SET Then press B 3 While the MONTH space is flashing press K or L until the month ...

Page 23: ...AY The displays may include the current time channel and other information 1 Press DISPLAY The COUNT display will appear for 5 seconds After 5 seconds only the real time tape counter will appear This counter shows you the elapsed playing time of the tape from the point at which the counter was set to 0 The counter also will appear on the display panel on the front of the DVD VCR 2 Press DISPLAY ag...

Page 24: ...he recording press PAUSE k once REC will flash To resume recording press REC I or press PAUSE k again REC will reappear 7 To stop recording press STOP C Recording Prevention Video cassettes have record tabs to ensure that recordings are not accidentally erased 1 To prevent recording break off the tab with a screwdriver 2 To allow recording cover the hole with clear tape Other recording options are...

Page 25: ...nnel Details are on page 24 2 Press TV VIDEO once to put the DVD VCR in TV position The VCR light will disappear from the DVD VCR s display panel 3 Use the TV remote control to select the channel you want to watch at the TV 4 To return to the channel being recorded use the TV remote control to return to channel 03 or 04 at the TV Details are on page 9 Or if you connected the DVD VCR to the TV usin...

Page 26: ...ength while an OTR is in progress press REC I repeatedly You cannot pause an OTR If the preset time for a timer recording comes up during an OTR the OTR has priority The timer recording will not take place If the end of the tape is reached during an OTR the VCR will stop recording eject the tape and switch to DVD mode or turn off If one or more Timer recordings are on standby when one OTR ends the...

Page 27: ...O OUT AUDIO IN VIDEO IN CR PR DIGITAL AUDIO OUT COAXIAL AUDIO OUT DVD L R L R L R S VIDEO OUT COMPONENT VIDEO OUT Y CB PB AUDIO OUT DVD VCR VCR ANT IN ANT OUT VIDEO OUT AUDIO IN VIDEO IN CR PR DVD VCR 1 Playing unit DVD VCR 2 Recording unit 1 Audio cable from AUDIO OUT jacks red and white of DVD VCR 1 to AUDIO IN jacks of DVD VCR 2 3 RF coaxial cable from the ANT OUT Antenna Out jack of DVD VCR 2 ...

Page 28: ...B The day of the week will appear You cannot record more than one year in advance 6 To enter the recording s start time press K or L until the hour appears Press B Press K or L until the minute appears Press B Finally press K or L to point to AM or PM AM or PM will flash beside the start time Press B 7 Repeat the procedure in step 6 to set the recording s end time 8 Press K or L until the channel ...

Page 29: ...ore the recording should start Or press TIMER SET only when you know you won t be using the VCR anymore until after the recording When is lit not flashing you cannot put the DVD VCR inVCR mode by pressing VCR or SOURCE You must first press TIMER SET on the remote control or STOP EJECT CA on the front panel to cancel the timer recording temporarily Then you can use theVCR features again When a time...

Page 30: ...speed SP or SLP appears briefly on the screen Details about tape speed are on page 67 3 Press REC I to start recording REC will appear on the display panel 4 Press DVD Press PLAY Bto play the disc 5 To pause the recording press VCR then press PAUSE k once REC will flash To resume recording press REC I or press PAUSE k again REC will reappear 6 To stop recording press VCR then press STOP C DISC TV ...

Page 31: ... area you must program the VCR with your local channel information To fill in the boxes you will need 1 a cable channel list if applicable you can request one from your cable company and 2 a chart that lists VCR Plus channel numbers Guide channels which you can find in your TV guide or the TV listings of your local newspaper NOTE If you are using a Cable Box DBS the User channel must be 3 or 4 the...

Page 32: ... L to select GUIDE CHANNEL SET then press B 5 Press the Number buttons K or L until the Guide channel number you want appears Then press B 32 Setting Up theVCR Plus Programming System Manually cont d Examine the lists on page 31 TV VIDEO VCR DVD VCR Plus SUBTITLE AUDIO ANGLE ZOOM DVD SETUP MENU DISC VCR DISPLAY TIMER SET BACK PLAY REW FFW PREV NEXT PAUSE REC STOP OK REPEAT REPEAT A B CH CLEAR REC ...

Page 33: ... WEEKLY recording Then press B ONCE The VCR will record a TV program on any day you choose up to 12 months away DAILY The VCR will record a program every day from Monday to Friday starting at the same time and record ing for the same length of time WEEKLY The VCR will record a program on the same day at the same time and for the same length of time every week VCR Plus system B ONCE DAILY WEEKLY VC...

Page 34: ...ally 6 Press K or L until your desired tape speed appears Example SP There are cases in which the program information does not match your area If the incorrect information appears select the number you want to change using s Then enter the correct numbers using K or L 7 Press CLEAR 8 Press TIMER SET The DVD VCR will turn off and will appear on the front of the DVD VCR In some cases the DVD VCR wil...

Page 35: ... 04 as the User Channel for all the Guide Channels set the Cable Box DBS to the channel you want to record and leave the Cable Box DBS on for the timer recording Press TIMER SET for the recording Insert a tape in the VCR Leave the Cable Box DBS on if applicable Timer Recording with theVCR Plus Programming System cont d 35 E8A21UD_EN1 5 29 06 3 13 PM Page 35 ...

Page 36: ...int TV VIDEO VCR DVD VCR Plus SUBTITLE AUDIO ANGLE ZOOM DVD SETUP MENU DISC VCR DISPLAY BACK PLAY REW FFW PREV NEXT PAUSE OK Tape Counter You may only set the counter to 0 at one location at a time Setting the counter to zero at a second location will erase the previous 0 setting If you remove the tape the counter will reset to 0 at the point at which you last stopped playback whenever you reinser...

Page 37: ...earch the search will stop and the tape may rewind Details are on page 38 Recordings should be at least 1 minute long in SP speed 2 minutes in LP and 3 minutes in SLP Otherwise the Index Mark will not be available Details on tape recording speeds are on page 67 TIMER SET REPEAT REPEAT A B CH CLEAR REC MODE SEARCH MODE TITLE TV VIDEO VCR DVD VCR Plus SUBTITLE AUDIO ANGLE ZOOM DVD SETUP MENU DISC VC...

Page 38: ...ssary Automatic Playback When you put a tape in the DVD VCR the power will come on If the tape s record tab is missing playback will begin If a timer recording is set and is flashing in the display panel the power will not come on automatically when you insert a tape with the record tab intact If a timer recording is set and is flashing in the display panel the DVD VCR will eject the tape if the r...

Page 39: ...SC VCR MENU to remove the menu You can only receive and record in stereo or second audio programs that are broadcast in stereo or second audio You can only play a tape in Stereo or second audio if it was recorded in stereo or second audio Please see above to determine if the program is in stereo or second audio If SAP is ON but the program is not broadcast in SecondAudio you will hear and record t...

Page 40: ...d select playback features follow these steps 1 Press DVD to put the DVD VCR in DVD mode DVD light will appear on the front of the DVD VCR 2 Press DISC VCR MENU The DVD s main Disc menu will appear 3 Press K L s or B to select an item then press OK Continue this process to set up all the features you want TV VIDEO VCR DVD VCR Plus SUBTITLE AUDIO ANGLE ZOOM DVD SETUP MENU DISC VCR DISPLAY BACK PLAY...

Page 41: ...MENU DISC VCR DISPLAY TIMER SET BACK PLAY REW FFW PREV NEXT PAUSE REC STOP OK REPEAT REPEAT A B CH E 1 Example Playing a DVD in reverse at twice the normal playing speed If you use FFW g or REW h during Dual Playback JPEG playback will be paused Picture quality of DivX files in fast reverse is lower than that in fast forward For some DivX files fast forward fast reverse may not function Helpful Hi...

Page 42: ... time in hours minutes and seconds Within a few seconds play back will start at the specified time Example 1 hour 23 minutes and 30 seconds 1 2 3 3 0 Make sure the time you enter is within the total time of the current title or track If it is not the time space will clear and playback will continue at its current point The total time available in the current track or title will appear in the Time ...

Page 43: ... select the track number Playback will begin at the selected track For a single digit track 1 9 enter 0 first For example to play track 5 press 0 5 You do not have to use the 10 button in search mode C Using NEXT or PREV w w During playback press NEXT to skip the current track and move to the next track The track number will appear briefly on the DVD VCR display panel Or during playback press PREV...

Page 44: ...For some DivX files Resume may not function 44 Paused and Step by Step Playback Resume On Paused and Step by Step Playback 1 Press DVD to put the DVD VCR in DVD mode DVD light will appear on the front of the DVD VCR 2 During disc playback press PAUSE k Playback will pause and the sound will be mute Pressing PAUSE F once during Dual Playback will pause a JPEG file only Pressing PAUSE F one more tim...

Page 45: ...t over OFF will appear briefly on the TV screen 4 Play the disc to the point at which you want repeated playback to end then press REPEAT A B again Within a few seconds the A B section will begin to play repeatedly The segment will play over and over until you cancel the A B Repeat feature 5 To cancel A B Repeat press REPEAT A B OFF will appear on the TV screen Regular playback will resume Example...

Page 46: ...CR will erase all the Markers Press s or B to select a Marker Press CLEAR Press BACK to remove the display Press B to select AC then press OK Press BACK to remove the display Helpful Hints TV VIDEO VCR DVD VCR Plus SUBTITLE AUDIO ANGLE ZOOM DVD SETUP MENU DISC VCR DISPLAY TIMER SET BACK PLAY REW FFW PREV NEXT PAUSE REC STOP OK REPEAT REPEAT A B CH CLEAR REC MODE SEARCH MODE TITLE Example DVD Examp...

Page 47: ...recorded from different angles or perspectives The perspective will not change if the DVD does not contain sequences recorded from different camera angles 1 Press DVD to put the DVD VCR in DVD mode DVD light will appear on the front of the DVD VCR 2 During playback press ANGLE repeatedly to select a different perspective The number of available angles appears at the right of the Angle Display In t...

Page 48: ...reviation Audio language selection cannot be made during Rapid Play with Voice Refer to page 41 For discs with DivX files the screen only displays MP3 MP2 or Dolby Digital audio Other audio sounds will be displayed with Helpful Hints Stereo Sound Mode Adjust Stereo Sound to determine whether you will hear the left channel the right channel or both channels stereo during Video CD or Audio CD playba...

Page 49: ...ill appear beside icon in the upper left corner of the TV screen 2 While the picture is enlarged press K L s or B to move the zoomed image up down left or right The gray box with an inner blue box that shows during Zoomed Playback is the position guide To remove it or show it press OK The position of the blue box inside the gray box indicates the position of the zoomed image within the overall pic...

Page 50: ...e Number buttons or SEARCH to select another track during Program Random Playback Use NEXT or PREV w to select other tracks You cannot combine Random Playback with a program You may play a program or a track within a program repeatedly During Program Playback press REPEAT so ALL all tracks in the program or TRACK appears The entire program or the current track will play over and over You cannot al...

Page 51: ... select a folder and press OK the tracks or files within that folder will appear Press K or L to select the track or file you want to play then press PLAY B or OK PressTITLE to return to the first item in the highest level of folders or files You also can press or B to return to previous or next levels To change theTransition Mode for JPEG playback press MODE repeatedly untilTransition Mode appear...

Page 52: ...r then press PLAY B or OK MP3 and JPEG files in the selected folder will play simultaneously If Windows MediaTM Audio files are in the folder those files will be skipped during Folder Playback OK PLAY DISC NAME FOLDER LIST 001 001 002 003 ALL FOLDER If you press PLAY B directly after you inserted a disc which contains both MP3 and JPEG files and if the DUAL PLAYBACK setting is ON Dual Playback wil...

Page 53: ...en selecting the folders Press B when you want to go to the next level Press s when you want to go back to previous level except for the top level Press TITLE to return to the first item 2 Press STOP C to stop playback Constant bit rate of image between 500 kbps and 1500 kbps is recommended if you make DivX files on a CD R RW DivX Subtitle The subtitle created by the user can be displayed during D...

Page 54: ...e size exceeds 2 GB cannot be played back When using tools or utilities to make up DivX files read their instruction manual beforehand Never use the MPEG4 tools when you make DivX files Otherwise noise or disturbance of the picture and sound may be generated If a large sized DivX file is selected it may take a while to start the playback over 20 seconds sometimes If DivX files written on CDs canno...

Page 55: ... of the current Audio CD remaining playing time of the current Audio CD T Current Repeat setting if active T Track repeat A All tracks repeat A B A B repeat CH 7 49 0 01 46 0 03 27 CH chapter Current chapter number total chapters Elapsed playing time of the current chapter remaining playing time of the current chapter TT 1 2 0 00 00 1 23 45 TT title Current title number total titles Elapsed playin...

Page 56: ...M DVD SETUP MENU DISC VCR DISPLAY TIMER SET BACK PLAY REW FFW PREV NEXT PAUSE REC STOP OK REPEAT REPEAT A B CH CLEAR REC MODE SEARCH MODE TITLE MP3 Windows MediaTM Audio JPEG DivX Displays 1 Press DVD to put the DVD VCR in DVD mode DVD light will appear on the front of the DVD VCR 2 Press DISPLAY repeatedly until the current track or file information appears 2 25 0 01 15 0 28 45 Elapsed playing ti...

Page 57: ...for a PAL DVD Virtual Surround is available only when the player is connected to a Stereo or TV using the red and white AUDIO OUT jacks on the player For Video CDs and Audio CDs you can adjust Virtual Surround only if you set Stereo Sound to STEREO Details are on page 48 The Black Level and theVirtual Surround settings will be saved even if the player is turned off When the Virtual Surround functi...

Page 58: ...WEDISH OK LANGUAGE DISC MENU ENGLISH FRENCH SPANISH GERMAN ITALIAN SWEDISH DUTCH OK LANGUAGE OSD LANGUAGE ENGLISH FRANÇAIS ESPAÑOL OK AUDIO SUBTITLE DISC MENU OSD LANGUAGE DivX SUBTITLE ORIGINAL OFF ENGLISH ENGLISH OFF OK If the DVD s default settings for Audio and Subtitle are the same language the subtitles may not show unless you turn them on Use theAUDIO and SUBTITLE buttons to selectAudio and...

Page 59: ...158 Greenlandic 5758 Guarani 5360 Gujarati 5367 Hausa 5447 Hebrew 5569 Hindi 5455 Hungarian 5467 I K Icelandic 5565 Indonesian 5560 Interlingua 5547 Interlingue 5551 Inupiak 5557 Irish 5347 Italian 5566 Japanese 5647 Javanese 5669 Kannada 5760 Kashmiri 5765 Kazakh 5757 Kinyarwanda 6469 Kirghiz 5771 Kirundi 6460 Korean 5761 Kurdish 5767 L N Laothian 5861 Latin 5847 Latvian 5868 Lettish 5868 Lingala...

Page 60: ...AUDIO ORIGINAL SUBTITLE OFF DISC MENU ENGLISH OSD LANGUAGE ENGLISH DivX SUBTITLE OFF OK 5 Press K or L to select an item then press OK If you selectedTV ASPECT press K or L to select a setting then press OK Choose 4 3 LETTER BOX if you want to see the entire widened picture with black bars at the top and bottom of the screen This looks like the picture you see when watching movies in a theater Thi...

Page 61: ...he Progressive Scan compatibility 1 Follow the steps 1 4 in the Display setup on page 60 2 Press K or L to select PROG SCAN then press OK repeatedly to turn PROG SCAN ON or OFF Choose ON if your TV has Progressive Scan and if the TV is connected to the player s COMPONENT VIDEO OUT jacks Choose OFF otherwise The default setting is OFF Confirm again to use progressive scan If Picture is good Select ...

Page 62: ...nnected to a Stereo using the COAXIAL DIGITAL AUDIO OUT jack as described on page 14 The default setting is ON If you selected Dolby Digital press OK repeatedly to select BITSTREAM or PCM Select BITSTREAM if you used the COAXIAL DIGITAL AUDIO OUT jack to connect the DVD player to a stereo that is Dolby Digital compatible Details are on page 14 Otherwise choose PCM The default setting is BITSTREAM ...

Page 63: ...This protects its identity Press OK and proceed to step 7 5 If you like to change the password press K or L to select PASSWORD CHANGE then press OK 6 Press the Number buttons to enter a 4 digit password The password numbers will appear on the screen Write down the password so you will not forget it Press OK The previous menu will reappear 7 Press DVD SETUP to remove the menu The default password i...

Page 64: ...n screen message will indicate the DVD cannot play Remove the DVD then set PARENTAL LEVEL to ALL Reload the DVD and begin playback Some DVDs may let you enter your 4 digit password to begin playback Follow the on screen messages as prompted You cannot use the default password 4737 to play a DVD Helpful Hints 3 Press sor B to select CUSTOM at the top of the menu then press OK 8 Press DVD SETUP to r...

Page 65: ...icon when multiple camera angles are available during DVD playback Details are on page 47 Choose OFF to disable the Angle icon The default setting is ON If you selected AUTO POWER OFF press OK repeatedly to choose ON or OFF Choose ON if you want the player to turn off when there is no activity at the player or its remote for 30 minutes The default setting is ON OTHERS ANGLE ICON ON AUTO POWER OFF ...

Page 66: ...X VOD file You must first download the file from the internet and play it back on this DVD VCR before you are able to get another code You must follow this step every time you purchase or rent a DivX VOD file from the internet For more information for DivX please visit http www divx com vod 6 Press DVD SETUP to remove the menus When MUSIC is selected the playback speed of the SLIDE SHOW will be se...

Page 67: ... copying If you connected the other video equipment to the AUDIO and VIDEO In jacks on the front of the DVD VCR select L2 If you used the AUDIO and VIDEO IN jacks on the back of the DVD VCR select L1 If you accidentally enter line input mode press CH or CH or the Number buttons to select another channel OTR One Touch Recording a timed recording on the VCR that starts immediately and records for 30...

Page 68: ...channel 3 or 4 the output channel of the DVD VCR Or if you have a Cable Box Satellite Receiver make sure the TV is set to the Cable Box Satellite Receiver output channel usually 03 or 04 Insert a DVD that is playable on this DVD VCR Details are on page 7 Make sure the DVD VCR is in DVD mode Press DVD or SOURCE so DVD light appears on the front of the DVD VCR Check if Progressive Scan is set correc...

Page 69: ...ct the DVD VCR to a TV with the RF coaxial cable or the yellow video cable as described on pages 9 12 Make sure the video cassette has a record tab Details are on page 24 TheVCR will not perform a timer recording Make sure the recording start and stop times are set correctly Details are on pages 28 29 Make sure a tape is in theVCR and the tape has a record tab Details are on page 24 If after progr...

Page 70: ...ly press CH or CH or the Number buttons to select another channel Hi Fi Stereo Sound During playback Hi Fi audio may normally revert to normal audio when you adjust tracking When connecting the DVD VCR to a TV with the red and white audio cable you will only get stereo sound if you connect the DVD VCR AUDIO OUT jacks on the DVD VCR to the AUDIO IN jacks on your TV and if the TV is on its Audio Vid...

Page 71: ...e labels can jam the VCR Caring for the VCR s Video Heads Periodic maintenance is required to maintain your DVD VCR s excellent performance The VCR has an Automatic Head Cleaner However the video heads will require replacement eventually Only an authorized service center should perform this service VCR Video Heads 4 heads Hi Fi Antenna VHF UHF 75 ohm external antenna terminal VHF Output Signal Cha...

Page 72: ...f programs data or other information is not covered under this Limited Warranty This warranty does not apply a to damage caused by accident abuse misuse misapplication or non Philips product b to damage caused by service performed by anyone other than Philips or Philips Authorized Service Location c to a product or a part that has been modified without the written permis sion of Philips or d if an...

Page 73: ...en status displays vcr 23 one touch recording 26 open close A button 18 20 osd language 58 parental 63 64 parental password 63 pause button 20 38 44 49 play button 17 18 20 playing discs 18 playing tapes 17 power cord 20 on light 20 prev button 20 43 program 50 progressive scan 61 quick setup 58 62 random 50 rapid play with voice 41 rear panel 20 record I button 20 24 26 recording basic 24 one cha...

Page 74: ...English 74 Memo E8A21UD_EN2 5 15 06 8 04 PM Page 74 ...

Reviews: