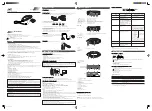
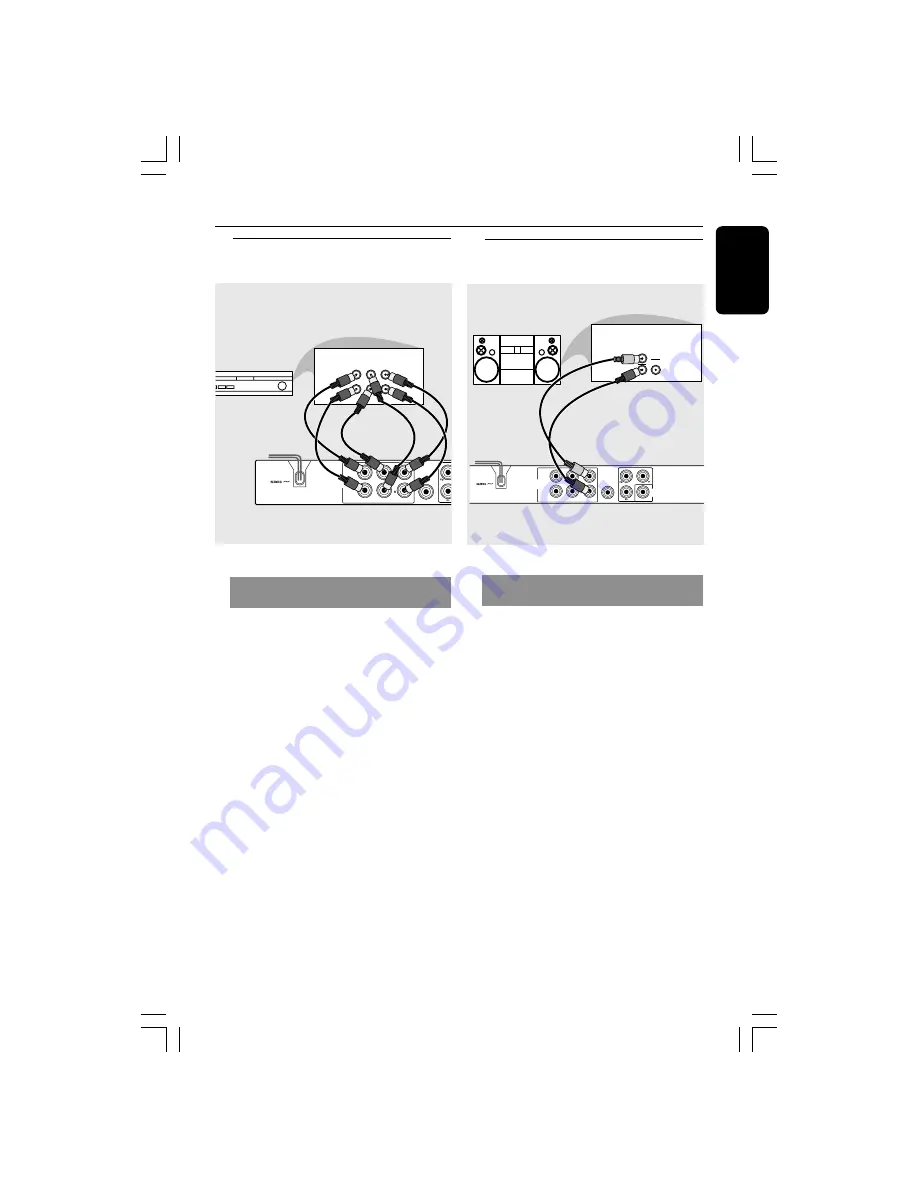
background image

English

11

Connections

Optional: Connecting to a Multi-
channel Receiver

AUDIO 

OUT

DIGITAL

OUT

FRONT

REAR

CENTER

SUB-

WOOFER

MULTICHANNEL AUDIO IN

SUBW.

AV Receiver

REAR

FRONT

CENTER

REAR

FRONT

L

L

R

R

Receiver has a Dolby Digital or DTS
decoder

1

Select one of the video connections
(CVBS VIDEO IN or COMPONENT
VIDEO IN) depending on the options
available on your TV.

2

Connect the Audio Out Left and Right
jack for Front and Rear speakers to the
corresponding input sockets on your
Receiver 

(cable not supplied)

.

3

Connect the Audio Out for Center
speaker and Subwoofer to the
corresponding inputs on your Receiver

(cable not supplied)

.

4

Set the DVD Player’s Analog Output to
‘Multichannel’ to enable playback of DVDs
recorded in Multi-channel.  

(see page 29

“Setting the analogue output”).

Helpful Hint:

If the subwoofer is equipped with its own

amplifier, the Subwoofer connection should
be connected directly to the subwoofer.

Stereo system has Dolby Pro Logic
or Right / Left Audio In jack

1

Select one of the video connections
(CVBS VIDEO IN or COMPONENT
VIDEO IN) depending on the options
available on your TV.

2

Use the audio cables (white/red) to
connect [FRONT (L/R)] jacks of the DVD
Player to the corresponding AUDIO IN
jacks on the stereo system 

(cable

supplied)

.

AUDIO 

OUT

DIGITAL

OUT

CVBS

VIDEO

OUT

FRONT

REAR

CENTER

SUB-

WOOFER

AUDIO 

IN

STEREO

DIGITAL

Optional: Connecting to an
Audio System

01-41 DVP3000K_93_RC2

26/09/05, 9:53 AM

11

Summary of Contents for DVP3000K

Page 1: ...Need help fast Read your User s Manual first for quick tips that make using your Philips product more enjoyable If you have read your instructions and still need assistance you may access our online help at www philips com support 01 41 DVP3000K_93_RC2 26 09 05 9 52 AM 1 ...

Page 2: ...ene foam buffer and polyethylene bags protective foam sheet Your DVD player consists of materials which can be recycled and reused if disassembled by a specialised company Please observe the local regulations regarding the disposal of packaging materials exhausted batteries and old equipment Important Note Due to the numerous versions of new CD Audio copy protection or enhanced CD Audio protection...

Page 3: ...3 E n g l i s h Index English 6 42 01 41 DVP3000K_93_RC2 26 09 05 9 52 AM 3 ...

Page 4: ...method claims of certain U S patents and other intellectual property rights owned by Macrovision Corporation and other rights owners Use of this copyright protection technology must be authorized by Macrovision Corporation and is intended for home and other limited viewing uses only unless otherwise authorized by Macrovision Corporation Reverse engineering or disassembly is prohibited Due to the i...

Page 5: ...atina 7665 Latvian 7686 Letzeburgesch 7666 Limburgan Limburger 7673 Lingala 7678 Lithuanian 7684 Luxembourgish 7666 Macedonian 7775 Malagasy 7771 Magyar 7285 Malayalam 7776 Maltese 7784 Manx 7186 Maori 7773 Marathi 7782 Marshallese 7772 Moldavian 7779 Mongolian 7778 Nauru 7865 Navaho Navajo 7886 Ndebele North 7868 Ndebele South 7882 Ndonga 7871 Nederlands 7876 Nepali 7869 Norsk 7879 Northern Sami ...

Page 6: ...17 Selecting the colour system that corresponds to your TV 17 Step 3 Setting language preference 18 Setting the OSD Language 18 Setting the Audio Subtitle and Disc menu language 18 Disc Operations Playable Discs 19 Region Codes 19 Playing discs 19 Basic playback controls 20 Selecting various repeat shuffle functions 20 Repeat play mode 20 Repeating a section within a chapter track 20 Operations fo...

Page 7: ... 30 Night Mode turning on off 31 Video Setup Menu 31 33 TV Type 31 Setting the TV Display 32 Progressive turning on off 32 Picture Setting 33 Preference Page 34 36 Audio Subtitle Disc Menu 34 Restricting playback by Parental Control 34 35 PBC 35 MP3 JPEG Menu turning on off 35 Changing the Password 36 Restoring to original settings 36 Sound andVolume Controls Setting the speakers channels 37 Troub...

Page 8: ...ates Do not block the vents Do not operate the DVD Player in an enclosed cabinet allow about 10 cm 4 inch of free space all around the player for adequate ventilation 10 cm 4 inches 10 cm 4 inches 10 cm 4 inches PHILIPS Care of the cabinet Use a soft cloth slightly moistened with a mild detergent solution Do not use a solution containing alcohol spirits ammonia or abrasives Finding a suitable loca...

Page 9: ...RONT L R jacks of the DVD Player to the corresponding AUDIO IN jacks on theTV cable supplied AUDIO OUT DIGITAL OUT CVBS VIDEO OUT FRONT REAR CENTER SUB WOOFER AUDIO IN V Pr Cr U Pb Cb Y S VIDEO IN VIDEO IN COMPONENT VIDEO IN AUDIO OUT V Pr Cr U Pb Cb Y S VIDEO IN VIDEO IN COMPONENT VIDEO IN 2 1 IMPORTANT The progressive scan video quality is only possible when usingY Pb Pr and a progressive scanTV...

Page 10: ...nput jack on the RF modulator 2 Use the RF coaxial cable not supplied to connect the RF modulator to your TV s RF jack DIGITAL OUT CVBS VIDEO OUT FRONT AUDIO IN R L VIDEO IN TO TV INT IN CH3 CH4 2 1 RF coaxial cable to TV Back of RF Modulator example only Antenna or CableTV signal AUDIO OUT DIGITAL OUT FRONT REAR CENTER SUB WOOFER AC MAINS AUDIO OUT V Pr Cr U Pb Cb Y S VIDEO IN VIDEO IN COMPONENT ...

Page 11: ...eiver cable not supplied 4 Set the DVD Player s Analog Output to Multichannel to enable playback of DVDs recorded in Multi channel see page 29 Setting the analogue output Helpful Hint If the subwoofer is equipped with its own amplifier the Subwoofer connection should be connected directly to the subwoofer Stereo system has Dolby Pro Logic or Right Left Audio In jack 1 Select one of the video conne...

Page 12: ...ng Digital Audio In jack on your Receiver cable not supplied 3 Set the DVD Player s Digital Output to PCM ONLY or ALL depending on the capabilities of your Receiver see page 29 Digital Output Helpful Hint If the audio format of the Digital Output does not match the capabilities of your receiver the receiver will produce a strong distorted sound or no sound at all AUDIO OUT DIGITAL OUT CVBS VIDEO O...

Page 13: ...pter or track STANDBY ON B To switch the DVD Player to Standby mode or ON Disc tray OPEN CLOSE Open Close the disc tray ON LED LED lights up when the power is on PLAY LED LED lights up during playback LEVEL Microphone volume control MIC For connecting microphone CVBS VIDEO Out Connect to CVBSVideo input of aTV YPbPr Component Video Out Connect toYPbPr input of aTV Mains AC Power Cord Connect to a ...

Page 14: ...des REPEAT A B Repeats playback a specific section on a disc PREVIEW To preview the content of a track or whole disc MUTE Disables or enables sound output POWER B To switch the DVD player to standby mode or ON 0 9 numerical key pad Selects numbered items in a menu DISPLAY Displays information onTV screen during playback SYSTEM MENU Access or exit DVD Player s system menu T To select next chapter o...

Page 15: ...e disposed properly Step 2 Setting up theTV IMPORTANT Make sure you have completed all the necessary connections See pages 9 10 ConnectingTV 1 Turn on the TV and set to the correct video in channel You should see the DVD background screen on the TV 2 Usually these channels are between the lowest and highest channels and may be called FRONT A V IN orVIDEO See your TV manual for more details Or you ...

Page 16: ... to select VIDEO SETUP PAGE Set Interlace TV Mode Video Setup Page TV Type TV Display Progressive On Picture Setting Off 7 Select PROGRESSIVE to ON then OK to confirm The instruction menu appears on the TV 1 ENSURE YOUR TV HAS PROGRESSIVE SCAN 2 CONNECT USING YPBPR GBR VIDEO CABLE 3 IF THERE IS DISTORTED PICTURE Cancel OK ACTIVATING PROGRESSIVE SCAN WAIT 15 SECONDS FOR AUTO RECOVERY 8 Press 1 to h...

Page 17: ... the video signal of the disc 5 Select an item and press OK Helpful Hints Before changing the currentTV Standard setting ensure that yourTV supports the selectedTVType system If there is no proper picture on yourTV wait for 15 seconds for auto recovery CHANGING PAL TO NTSC 1 ENSURE THAT YOUR TV SUPPORTS NTSC STANDARD 2 IF THERE IS DISTORTED PICTURE DISPLAYED ON THE TV WAIT 15 SECONDS FOR AUTO RECO...

Page 18: ...s and disc menu languages If the language selected is not available on the disc the disc s default language will be used instead Set Preference To English Audio English Subtitle Chinese Disc Menu French Parental Spanish PBC Portuguese Mp3 Jpeg Nav Polish Password Italian Preference Page 1 Press STOP twice then press SYSTEM MENU 2 Press 2 repeatedly to select PREFERENCE PAGE 3 Press 3 4 to highligh...

Page 19: ...ints It may not be possible to play CD R RW or DVD R RW in all cases due to the type of disc or condition of the recording If you are having trouble playing a certain disc remove the disc and try a different one Improper formatted disc will not play on this DVD Player TIPS The operating features described here might not be possible for certain discs Always refer to the instructions supplied with t...

Page 20: ...re might not be possible for certain discs Always refer to the instructions supplied with the discs Selecting various repeat shuffle functions Repeat play mode While playing a disc press REPEAT continuously to choose a Play Mode CHAPTER DVD to repeat playback of the current chapter TRACK TITLE CD SVCD VCD DVD to repeat playback of the current track CD SVCD VCD title DVD ALL to repeat playback of a...

Page 21: ... Bitrate 61 Title Remain 0 48 59 Title 01 01 Chapter 09 12 Audio 2CH Chinese Subtitle Off Menu Bitrate 71 Total Elapsed 0 01 32 Track 01 01 Disc Time 0 48 53 Track Time 0 48 53 Repeat Off 2 Press 3 4 to view the information and press OK to access 3 Press 2 or OK to select an option 4 Use the numeric keypad 0 9 to input the number time or press 3 4 to make the selection then press OK to confirm Pla...

Page 22: ...BTITLE repeatedly to select different subtitle languages SpecialVCD SVCD Features Playback Control PBC ForVCD with Playback Control PBC feature version 2 0 only Press DISC MENU to toggle between PBC ON and PBC OFF If you select PBC ON the disc menu if available will appear on theTV Use the S T or the numeric keypad 0 9 to select a play option During playback pressing RETURN TITLE will return to th...

Page 23: ... picture of each segment will appear on the screen A B C D E F example for 6 thumbnail pictures display Disc Operations TIPS The operating features described here might not be possible for certain discs Always refer to the instructions supplied with the discs DVD example Video CD example 3 Press 3 4 1 2 to select a track and input your selected track number using the numeric keypad 0 9 then press ...

Page 24: ...e being played repeatedly REPEAT FOLDER all files in one folder being played repeatedly SHUFFLE all files in the current folder being played at random order Press Åto pause playback Helpful Hints It may not be possible to play certain MP3 JPEG disc due to the configuration and characteristics of the disc or condition of the recording It is normal to experience an occasional skip while listening to...

Page 25: ...ect Various scan effect appears on the top left hand corner on the TV screen Special picture disc features IMPORTANT You have to turn on your TV and set to the correctVideo In channel See page 15 Setting the TV Load a Picture disc Kodak Picture CD JPEG For Kodak disc the slide show will begin For JPEG disc the picture menu appears on the TV screen Press PLAY B to start the slide show playback Prev...

Page 26: ...to prevent howling Key setting This function allows you to adjust the key tone level to match with your vocal Press KEY and use 1 2 to adjust the pitch to adopt your voice Vocal You can fade out the original vocal from a karaoke disc Press VOCAL repeatedly to choose different audio modes Helpful Hint This function and on screen display depends on the availability of the disc Mode Press MODE repeat...

Page 27: ...it password The default password is 136 900 see page 36 Changing the password UNLOCK Select this to unlock the disc and allow future playback 2 Press 3 4 to select a setting then press OK to confirm your selection Programming disc tracks not for Picture CD MP3 You can play the contents of the disc in the order you want by programming the tracks to be played Up to 20 tracks can be stored 1 In GENER...

Page 28: ...The screen saver will help to prevent your TV display device from becoming damaged 1 In GENERAL SETUP PAGE press 3 4 to highlight SCREEN SAVER then press 2 ON Select this if you wish to turn off the TV screen when disc playback is stopped or paused for more than 15 minutes OFF Select this to disable the screen saver function 2 Press 3 4 to select a setting then press OK to confirm your selection S...

Page 29: ...al Output and LPCM Output 1 In AUDIO SETUP PAGE press 3 4 to highlight DIGITAL AUDIO SETUP then press 2 2 Press the 3 4 keys to highlight an option 3 Enter its submenu by pressing 2 4 Press 3 4 to select a setting then press OK to confirm your selection Digital Output Set the Digital output according to your optional audio equipment connection All If you have connected your DIGITAL AUDIO OUT to a ...

Page 30: ...g These preset Sound Modes adjust the frequency bands of the audio to enhance your favourite music Off Digital Rock Classic and Jazz Speaker Setup This menu contains setup options for your audio output which makes the speaker setup system reproduce high quality surround sound For details see page 37 CD Upsampling This feature allows you to convert your music CD to a higher sampling rate using soph...

Page 31: ...r details see page 17 Night Mode turning on off In this mode the high volume outputs are softened and low volume outputs are brought upward to an audible level It is useful for watching your favourite action movie without disturbing others at night 1 In AUDIO SETUP PAGE press 3 4 to highlight NIGHT MODE then press 2 ON Select this to level out the volume This feature is only available for movies w...

Page 32: ...ons shown on the TV to confirm the selection if any If a distorted picture appears on the TV screen wait for 15 seconds for auto recovery Setting theTV Display Set the aspect ratio of the DVD Player according to theTV you have connected The format you select must be available on the disc If it is not the setting for TV display will not affect the picture during playback 1 In VIDEO SETUP PAGE press...

Page 33: ...e value will enhance the colour in your picture or vice versa Choose zero 0 to balance the colour 5 Press 1 2 to adjust the setting that best suit your personal preference 6 Repeat steps 4 5 for adjusting other colour features 7 Press OK to confirm Picture Setting This DVD Player provides three predefined sets of picture colour settings and one personal setting which you can define yourself 1 In V...

Page 34: ... be recorded on the DVD For details see page 17 Restricting playback by Parental Control Some DVDs may have a parental level assigned to the complete disc or to certain scenes on the disc This feature lets you set a playback limitation level The rating levels are from 1 to 8 and are country dependent You can prohibit the playing of certain discs that are not suitable for your children or have cert...

Page 35: ...ve no level indication so parental control function has no effect on these type of discs This applies to most illegal DVD discs Some DVDs are not encoded with a rating though the movie rating may be printed on the Disc cover The rating level feature does not work for such Discs Restricting playback by Parental Control cont d MP3 JPEG Menu turning on off MP3 JPEG Navigator can be set only if the di...

Page 36: ...aults Changing the Password The same password is used for both Parental Control and Disc Lock Enter your six digit password when prompted on the screen The default password is 136 900 1 In PREFERENCE PAGE press 3 4 to highlight PASSWORD Old Password New Password Confirm PWD OK 2 Use the numeric keypad 0 9 to enter your old six digit password When doing this for the first time key in 136 900 If you...

Page 37: ...SPEAKER REAR SPEAKERS OFF when no speaker is connected LARGE when connected speakers can produce low frequency signals below 120Hz SMALL when connected speakers cannot produce low frequency signals below 120Hz SUBWOOFER ON when a subwoofer is connected OFF when no subwoofer is connected SPEAKERVOLUME Volume level setting for individual speakers 6dB 6dB Front Left Front Right Center Subwoofer Rear ...

Page 38: ... set up or deactivate the progressive scan feature as below 1 Turn off yourTV progressive scan mode or turn on to interlaced mode 2 Press OPEN CLOSE to open the disc tray 3 Press numeric keypad 1 on the remote control for few seconds Distorted picture Sometimes a small amount of picture distortion may appear depending on the disc being played back This is not a malfunction Completely distorted pic...

Page 39: ...e insert the batteries with their polarities signs as indicated Buttons do not work To completely reset the player unplug the AC cord from the AC outlet for 5 10 seconds Player does not respond to some Operations may not be permitted by the disc operating commands during playback Refer to the instructions of the disc jacket DVD Player cannot read Use a commonly available cleaning CD DVD to CDs DVD...

Page 40: ...1 channel sound on 2 speakers Specifications AUDIO PERFORMANCE DA Converter 24 bit 192 kHz DVD fs 96 kHz 4Hz 44kHz fs 48 kHz 4Hz 22kHz SVCD fs 48 kHz 4Hz 22kHz fs 44 1kHz 4Hz 20kHz CD VCD fs 44 1kHz 4Hz 20kHz Signal Noise 1kHz 95 dB Dynamic range 1kHz 85 dB Crosstalk 1kHz 90 dB Distortion noise 1kHz 80 dB MPEG MP3 MPEG Audio L3 CONNECTIONS YPbPr Output Cinch 3x Video Output Cinch yellow Audio Outp...

Page 41: ...ty in spite of its high compression ratio MP3 A file format with a sound data compression system MP3 is the abbreviation of Motion Picture Experts Group 1 or MPEG 1 Audio Layer 3 By using MP3 format one CD R or CD RW can contain about 10 times as much data volume as a regular CD can Multichannel DVD is specified to have each sound track constitute one sound field Multichannel refers to a structure...

Reviews: