background image


MUTE

DISPLAY

REPEAT

REPEAT

SUBTITLE

ANGLE

ZOOM

AUDIO

SEARCH

RETURN/TITLE

SYSTEM MENU

DISC MENU

EJECT

NEXT

PREVIOUS

1

2

3

4

5

6

7

8

9

0

A-B

OK

TV Screen  33

You may set the Player to display video in one of three formats:
Letterbox, Pan & Scan, or Wide.The TV SCREEN setting you select must
be available on the DVD. If not, the TV SCREEN setting will not affect the
picture.

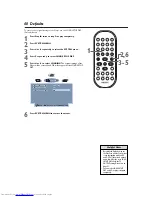
1

Press SYSTEM MENU.

2

Press OK repeatedly to select the DVD SETUP menu.

3

Press

4

repeatedly to select TV SCREEN.

4

Press

1

or

2

to select 4:3 PS, 4:3 LB, or 16:9, then press

OK.

Select 4:3 PS (panscan) if you want both sides of the picture to
be trimmed, or formatted to fit your TV screen.This setting is
possible only if the DVD is recorded in regular, normal, standard,
full-screen, or pan & scan format. Check the DVD case for
details.

Select 4:3 LB (letterbox) if you want to see the picture widened
with black bars at the top and bottom of the screen.This looks
like the picture you see when watching movies in a theater.This
setting is possible only if the DVD contains letterbox material.
The DVD case may say the DVD is in Letterbox or Widescreen
format.

Select 16:9 if you have a widescreen TV.

5

Press SYSTEM MENU to remove the menus.

• Some widescreen TVs may

show only part of the Player’s
Menu.This is not an error of
the Player settings. Adjust the
screen mode on your TV. See
your TV owner’s manual for
details.

Helpful Hint

2-4

AUDIO     ENGLISH

SUBTITLE  


ENGLISH

TV SCREEN  


4:3 PS

ANGLE MARK 


ON

PARENTAL CONTR 

8

PASSWORD  


_ _ _ _

AUDIO   ENGLISH

SUBTITLE 

  ENGLISH

TV SCREEN  


ANGLE MARK 


ON

PARENTAL CONTR 

8

PASSWORD 

  _ 

_

DVD SETUP

DVD SETUP

DVD

SYSTEM MENU : EXIT

: MOVE

: SELECT

1,5

DVD590M_17x  6/11/2003  1:42 PM  Page 33

Summary of Contents for DVD590M

Page 1: ...PRESENTATIVES ARE READY TO HELP YOU WITH ANY QUESTIONS ABOUT YOUR NEW PRODUCT WE CAN GUIDE YOU THROUGH CONNECTIONS FIRST TIME SETUP AND ANY OF THE FEATURES WE WANT YOU TO START ENJOYING YOUR NEW PRODUCT RIGHT AWAY CALL US BEFORE YOU CONSIDER RETURNING THE PRODUCT 1 800 531 0039 OR VISIT US ON THE WEB AT WWW PHILIPS COM DVD590M_17x 6 11 2003 1 42 PM Page 1 ...

Page 2: ...get the most from your PHILIPS product you must return your Warranty Registration Card within 10 days So please mail it to us right now Know these safetysymbols This bolt of lightning indicates uninsulated material within your unit may cause an electrical shock For the safety of everyone in your household please do not remove product covering The exclamation point calls attention to features for w...

Page 3: ...rental Control Password 27 Parental Control Levels 28 MP3 Play 29 JPEG Play Playback Control 30 Picture Controls 32 Player Setup and Features TV Output 31 Picture Controls 32 TV Screen 33 Video Output 34 Scan Mode 35 Digital Output 36 Angle Mark 37 On Screen Display Language 38 Screen Saver 39 Defaults 40 InformationYou May Need Helpful Hints 41 42 Glossary 43 Specifications 44 Limited Warranty 45...

Page 4: ... the interference by one or more of the following measures 1 Reorient or relocate the receiving antenna 2 Increase the separation between the equipment and the receiver 3 Connect the equipment into an outlet on a circuit different from that to which the receiver is connected 4 Consult the dealer or an experienced radio TV technician for help Environmental Information Your system consists of materi...

Page 5: ...e fallen or liquid has been spilled into the appliance or C The appliance has been exposed to rain or D The appliance does not appear to operate normally or exhibits a marked change in performance or E The appliance has been dropped or the enclosure damaged 17 Tilt Stability All televisions must comply with recommended international global safety standards for tilt and stability properties of its ...

Page 6: ... will not be available if the current Disc does not include that feature The Player also refers to the System Menu as the Setup Menu These are the same Available Disc Features Features described in this manual may not be available on every Disc If the feature is not on the Disc you cannot use the Player to make the feature available The will appear in the top left corner of the TV screen if you tr...

Page 7: ...VDs and your TV Set the Player s Color System to NTSC or PAL in TV Output Details are on page 31 If you are having trouble playing a certain Disc remove the Disc and try a different one Improperly formatted Discs will not play on this Player This Player supports only the first session of multi session Discs Helpful Hints Playable Discs This Player will play DigitalVideo Discs DVDs Video Compact Di...

Page 8: ...TV Stereo or other equipment as necessary Note the style of jacks and connectors on the other equipment Determine how to choose different Audio andVideo In channels on your other equipment so you can see and hear the Player s materials on the TV Stereo etc Some equipment may let you choose the channels using a remote control or by adjusting a TV VIDEO AUXILIARY SOURCE switch Disconnect all equipme...

Page 9: ...he TV Reconnect the Antenna or Cable TV signal to the ANTENNA IN jack on your RF modulator 4 Connect an RF coaxial cable not supplied to the RF OUT ANTENNA OUT or TO TV jack on the RF modulator The RF OUT jack may be labelled differently among different brands Refer to the instructions provided with your RF modulator Connect the other end of the same RF coaxial cable to the ANTENNA IN or RF IN jac...

Page 10: ...s remote to turn on the Player Turn on the TV and set the TV to the correct Audio Video In channel Such channels may be called AUX or AUXILIARY IN AUDIO VIDEO or A V IN EXT1 or EXT2 etc These channels often are near channel zero 0 See your TV owner s manual for details Or change channels at the TV until you see the Player s blue background screen on the TV 5 Set TV OUTPUT accordingly Details are o...

Page 11: ... Turn on the TV and set the TV to the correct S Video In channel See your TV owner s manual for details Or change channels at the TV until you see the Player s blue background screen on the TV 5 Set TV OUTPUT accordingly Details are on page 31 Set VIDEO OUT to CVBS S VIDEO Details are on page 34 Hookups cont d 11 Connecting to a TV Only TV has an S Video In Jack On the TV the S Video In jack may b...

Page 12: ... on the Player Connect the AC plug to a power outlet 4 Press y y on the Player or its remote to turn on the Player Turn on the TV and set the TV to the correct Component Video In channel See your TV owner s manual for details Or change channels at the TV until you see the Player s blue background screen on the TV 5 Set TV OUTPUT accordingly Details are on page 31 Set VIDEO OUTPUT toYPbPr Details a...

Page 13: ...nd set it to the correct Video In channel Such channels may be called AUX or AUXILIARY IN AUDIO VIDEO or A V IN EXT1 or EXT2 etc These channels often are near channel zero 0 See your TV owner s manual for details Or change channels at the TV until you see the Player s blue background screen on the TV Turn on the Stereo and set it to the correct Audio In channel or sound source Refer to the Stereo ...

Page 14: ...hannel zero 0 See your TV owner s manual for details Or change channels at the TV until you see the Player s blue background screen on the TV Turn on the Stereo and set it to the correct Digital Audio In channel or sound source Refer to the Stereo s manual 5 Set TV OUTPUT accordingly Details are on page 33 Set DIGITAL OUTPUT accordingly Details are on page 36 You will have Multichannel sound with ...

Page 15: ...y 3 Slowly slide the tray into the remote until you hear it click into place BATTERY CAUTION Risk of fire explosion and burns Do not recharge disassemble heat above 100 C or incinerate The lithium battery may present a fire or chemical burn hazard if mistreated Promptly dispose of used batteries Do not dispose of the battery in a fire Keep the battery away from children Using the Remote Control Wh...

Page 16: ...isc is in the slot From that point the Player will take the Disc and load it automatically Load a single Disc with the label facing LEFT and the shiny side facing RIGHT If a Disc is two sided make sure the label of the side you want to play is facing left when you insert the Disc Do not force a Disc into the Disc Slot If the Player does not immediately accept the Disc take away the Disc Press Ejec...

Page 17: ...p playback Play Pause 5 BF Button Press to start or pause playback NEXT G Button Press to go to the next Chapter Track SYSTEM MENU Button Press to access or remove the Player s System Menu DISPLAY Button Press repeatedly during playback to see the elapsed or remaining playing time of a Chapter Title Track or Disc You may also see the Audio or Subtitle languages or Angles that are available The inf...

Page 18: ... the Player s remote control here not at your TV when using the remote to operate the Player PLAY light This orange light appears during Disc play ON light This orange light appears when the player is on STANDBY light This red light appears when the Player is off Eject Button Press once to stop disc playback Press a second time to eject the disc from the Player Previous Button Press to move to a p...

Page 19: ... on pages 9 10 Do not touch the inner pins of the jacks on the rear panel Electrostatic discharge may damage the unit permanently Caution S VIDEO Out jack Connect an S Video cable not supplied here and to the S Video In jack of a television Details are on page 11 Y Pb Cb Pr Cr Component Video Out jacks Connect component video cables not supplied here and to the ComponentVideo In jacks of a TV Deta...

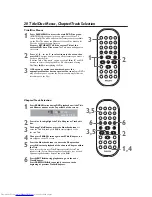
Page 20: ...ters SELECT TITLE T 01 03 C 01 30 20 Title Disc Menus Chapter Track Selection Title Disc Menus 1 Press DISC MENU to access the main DVD Disc menu ROOT MENU may appear in the top right corner of the TV screen briefly The menu will show the features that are available on the Disc The menus are different for every Disc because all Discs do not have the same features Or press RETURN TITLE if the curre...

Page 21: ...e regular speed 2 To resume normal play continue to press 1 or 2 until 2 appears in the top right corner of the TV screen Or press Play Pause 5 BF to resume normal play If the Disc pauses instead press Play Pause 5 BF again Slow Motion 1 During play press 3 to play a DVD or Video CD forward in slow motion Press 3 repeatedly to play the Disc forward at 1 2 1 4 1 8 1 16 or 1 32 of the normal speed Y...

Page 22: ...ht corner of the TV screen 2 To resume normal play press Play Pause 5 BF again Time Search Time Search lets you choose a specific elapsed playing time at which you want to resume Disc play 1 Press SEARCH during play 2 Press the Number buttons to enter the elapsed playing time at which you want to resume playback For a DVD enter the amount of time in hours minutes and seconds The time must be avail...

Page 23: ...ed angle If different angles are not available during the current scene 1 1 may appear in the top right corner of the TV screen when you press ANGLE Or if ANGLE MARK is ON the Angle Mark and the number of available perspeclives appear in the top left corner of the TV screen during play if multiple angles are available Press the Number buttons to select a different angle Angle Mark details are on p...

Page 24: ...TV screen 2 To cancel repeat play press REPEAT again so REPEAT OFF appears briefly in the top right corner of the TV screen Repeat A B You can set the Player to play only a specific portion of a Chapter or Track repeatedly Follow these steps 1 Press Play Pause 5 BF to start Disc play 2 When the Disc reaches the point at which you want repeated playback to begin press REPEAT A B This sets Point A o...

Page 25: ...DVD If the language you select is not on the DVD changing AUDIO in the Player s menu will have no effect 1 Press SYSTEM MENU 2 Press 1 or 2 repeatedly to select the DVD SETUP menu 3 Press 4 repeatedly to select AUDIO 4 Press 1 or 2 to choose ENGLISH FRENCH RUSSIAN JAPANESE GERMAN or CHINESE then press OK The Disc sound will appear in the language if that language is on the DVD Some DVDs will allow...

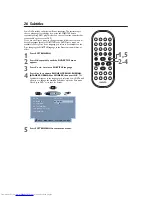
Page 26: ...lable on the Disc changing the SUBTITLE language in the Player s menu will have no effect 1 Press SYSTEM MENU 2 Press OK repeatedly until the DVD SETUP menu appears 3 Press 4 or 3 to select a SUBTITLE language 4 Press 1 or 2 to choose ENGLISH FRENCH RUSSIAN JAPANESE GERMAN or CHINESE then press OK The Subtitles will appear in the language you selected Some DVDs will allow you to change the availab...

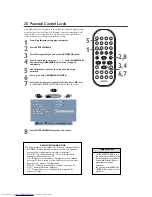
Page 27: ...s 4 repeatedly to select beside PASSWORD You can select PASSWORD only if Disc play is stopped completely 5 Use the Number buttons to enter a four digit password A series of asterisks will show on the screen instead of your password This protects its identity When setting a new password you must enter it twice CHANGE OK will appear briefly beside PASSWORD This indicates the new password is set If y...

Page 28: ...hic sexual material violence or language 7 NC 17 No children under age 17 not recommended viewing for children under age 17 6 R Restricted recommended that parents restrict children under age 17 from viewing or allow children to view only when supervised by a parent or adult guardian 4 PG 13 Material is unsuitable for children under age 13 3 PG Parental Guidance suggested 1 G General Audience reco...

Page 29: ...ums or Folders available will appear on the TV screen It may take the Player several seconds to recognize the Disc 2 When play is stopped press 3 or 4 to select a Track or Folder Press OK to open a Folder or to start playing a Track 3 During play press NEXT G or PREVIOUS H to move to different Tracks 4 Press Stop C C to stop play 5 When play is stopped press 1 or 2 to select the DISPLAY or PLAYMOD...

Page 30: ...to change the settings of DISPLAY or PLAYMODE The following settings are available DISPLAY MP3 AND JPG On screen display shows all the MP3 and JPEG files available on the current Disc MIXED Both JPEG and MP3 folders or files in the Disc will show MP3 ONLY On screen display shows only the MP3 Tracks avail able on the current Disc JPG ONLY On screen display lists only the JPEG files available on the...

Page 31: ...put feature allows you to set the Player to match the Color Systems of your DVDs and your TV 1 Press SYSTEM MENU 2 Press OK repeatedly to select the VIDEO menu 3 Press 4 to select TV OUTPUT 4 Press 1 or 2 to choose NTSC PAL or AUTO then press OK Choose AUTO if your TV is compatible with both NTSC and PAL and you want the Player to automatically select the Color System of the current DVD Choose NTS...

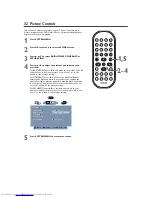
Page 32: ... in the picture Move the dot to the middle for the average setting For CONTRAST press 2 to add more noticeable difference between the black and white in your picture and sharpen the picture Press 1 to blur the distinction between black and white in the picture The picture will not seem as sharp Move the dot to the middle for the average setting For SATURATION press 2 to increase the colours in you...

Page 33: ...l screen or pan scan format Check the DVD case for details Select 4 3 LB letterbox if you want to see the picture widened with black bars at the top and bottom of the screen This looks like the picture you see when watching movies in a theater This setting is possible only if the DVD contains letterbox material The DVD case may say the DVD is in Letterbox or Widescreen format Select 16 9 if you ha...

Page 34: ...jack as described on page 11 Choose CVBS YCbCr if you used a Component Video connection as detailed on page 12 Choose CVBS if you used the Player s yellow VIDEO jack to connect to the TV or RF modulator as shown on pages 9 10 5 Press SYSTEM MENU to remove the menus 2 4 On theTV the ComponentVideo In jacks may be labelledYUV or Pr Cr Pb CbY and may be red blue and green Cb is similar to Pb b refers...

Page 35: ...then press OK 4 Press 4 repeatedly to select SCAN MODE INTERLACED then press 1 or 2 to choose INTERLACE or PROGRESSIVE then press OK Note Choose PROGRESSIVE only if your TV is set up for Progressive Scan video Otherwise you will not have a DVD picture on the TV 5 Press SYSTEM MENU to remove the menus TV OUTPUT NTSC VIDEO OUTPUT CVBS YPbPr BRIGHTNESS CONTRAST SATURATION SCAN MODE INTERLACED TV OUTP...

Page 36: ... 96K or OFF Then press OK Choose BITSTREAM if you connected to a Stereo using the Player s COAXIAL DIGITAL AUDIO OUTPUT jacks This selects the original settings as received by most Stereos If the sound is distorted your Stereo may need to receive audio in an LPCM Pulse Code Modulation format LPCM 48K or LPCM 96K Discs are recorded in a certain sampling rate The higher the sampling rate the better ...

Page 37: ... ON or OFF then press OK If you set ANGLE MARK to ON the Angle Mark will appear when playing a scene that has different perspectives Press ANGLE on the remote to watch the scene from a different viewpoint Details are on page 23 Set ANGLE MARK to OFF if you do not want the Angle Mark to appear on the TV during scenes that have multiple angles available 5 Press SYSTEM MENU to remove the menus 2 4 3 ...

Page 38: ...EM menu 3 Press 4 to select OSD LANGUAGE on screen display language 4 Press 1 or 2 repeatedly to select ENGLISH ESPANOL or FRANÇAIS then press OK 5 Press SYSTEM MENU to remove the menus 2 4 OSD LANGUAGE ENGLISH SCREEN SAVER ON LOAD SETUP DEF OK OSD LANGUAGE SCREEN SAVER ON LOAD SETUP DEF OK DVD SYSTEM SYSTEM SYSTEM MENU EXIT MOVE SELECT 1 5 If you accidentally set OSD LANGUAGE to ESPANOL or FRANÇA...

Page 39: ...dly to select the SYSTEM menu 3 Press 4 repeatedly to select SCREEN SAVER 4 Press 1 or 2 to select ON or OFF then press OK If you choose ON the moving DVD logo will appear after five minutes of not using the Player After 10 minutes of not using the Player it will turn off automatically If you choose OFF the Player still will shut itself off after 10 minutes of no use However the moving DVD logo wi...

Page 40: ...aults may set the Player to a Color System that is not compatible with yourTV and DVDs If the picture is black and white After you reset LOAD SETUP DEF check theTV OUTPUT setting Details are on page 31 You can select LOAD SETUP DEF only if Disc play is stopped completely Helpful Hints OSD LANGUAGE ENGLISH SCREEN SAVER ON LOAD SETUP DEF OK OSD LANGUAGE ENGLISH SCREEN SAVER ON LOAD SETUP DEF DVD SYS...

Page 41: ...ount of picture distortion may appear This is not a malfunction Set TV OUTPUT correctly If your TV uses the NTSC Color System Set TV OUTPUT to NTSC Likewise the DVDs you play must be in the NTSC format Check your DVD label or case for details Details are on page 31 The picture is distorted or the picture is only black and white TVs meet NTSC or PAL Color System standards If the Disc s or Player s ...

Page 42: ...he Player does not respond to the remote control Aim the remote control directly at the IR sensor on the front of the Player Details are on page 18 Remove any obstacles between the Player and the remote control Replace the battery in the remote control Details are on page 15 Stand or sit directly in front of the Player when using the remote Using the remote at an angle to the Player or from the si...

Page 43: ...ital Theater Systems This is a surround sound system but it is different from Dolby Digital The formats were developed by different companies DVD Digital Video Disc Letterbox A TV SCREEN setting 4 3 aspect ratio Displays the video in full width with black bars at the top and bottom of the TV screen This format is similar to seeing a movie in a theater If the Disc does not include a Letterbox forma...

Page 44: ...Analog Stereo Sound Dolby Surround compatible downmix from Dolby Digital multi channel sound AUDIO PERFORMANCE TYPICAL DA Converter 24 bit Signal to Noise 1kHz 90 dB Dynamic range 1kHz 80 dB Crosstalk 1kHz 80 dB Distortion and Noise 1kHz 88 dB MPEG MP3 MPEG Audio L3 DVD fs 96 kHz 4 Hz 44 kHz SVCD VCD Audio CD fs 44 1 kHz 4 Hz 20 kHz DVD SVCD fs 48 kHz 4 Hz 22 kHz REAR CONNECTIONS Y Pb Cb Pr Cr Com...

Page 45: ...s In countries where Philips does not distribute the product the local Philips service organization will attempt to exchange the product although there may be a delay if the appropriate product is not readily available MAKE SURE YOU KEEP Please keep your sales receipt or other document showing proof of date of purchase Attach it to the owner s manual and keep both nearby Also keep the original box...

Page 46: ...s 6 12420 Mercantile Avenue El Paso TX 79928 ATTENTION DVD PLAYER EXCHANGE A replacement will be sent to you via UPS within 48 business hours of Philips receipt of the product When it is necessary for you to ship the product to Philips for exchange you will pay the shipping costs for shipment to Philips Philips will pay the shipping costs when returning a product to you EXCHANGE INSTRUCTIONS EXCHA...

Page 47: ... panscan 33 parental control levels 28 parental control password 27 pbc 30 picture controls 32 play pause button 17 18 playable discs 7 playback control 30 playing a disc 16 previous button 17 18 progressive scan 12 35 rear panel 19 region codes 7 remote control buttons 17 remote sensor 15 18 repeat a b 24 repeat a b button 17 24 repeat button 17 24 repeat playback 24 return title button 17 20 rev...

Page 48: ...l is made of recyclable materials Remember to recycle CLASS 1 LASER PRODUCT IB8443E001 Final version 2 0 Philips Consumer Electronics NORTH AMERICA Knoxville Tennessee 37914 1810 USA DVD590M_17x 6 11 2003 1 42 PM Page 48 ...

Reviews: