background image

English

PREPARATION

17

Preparation

General notes

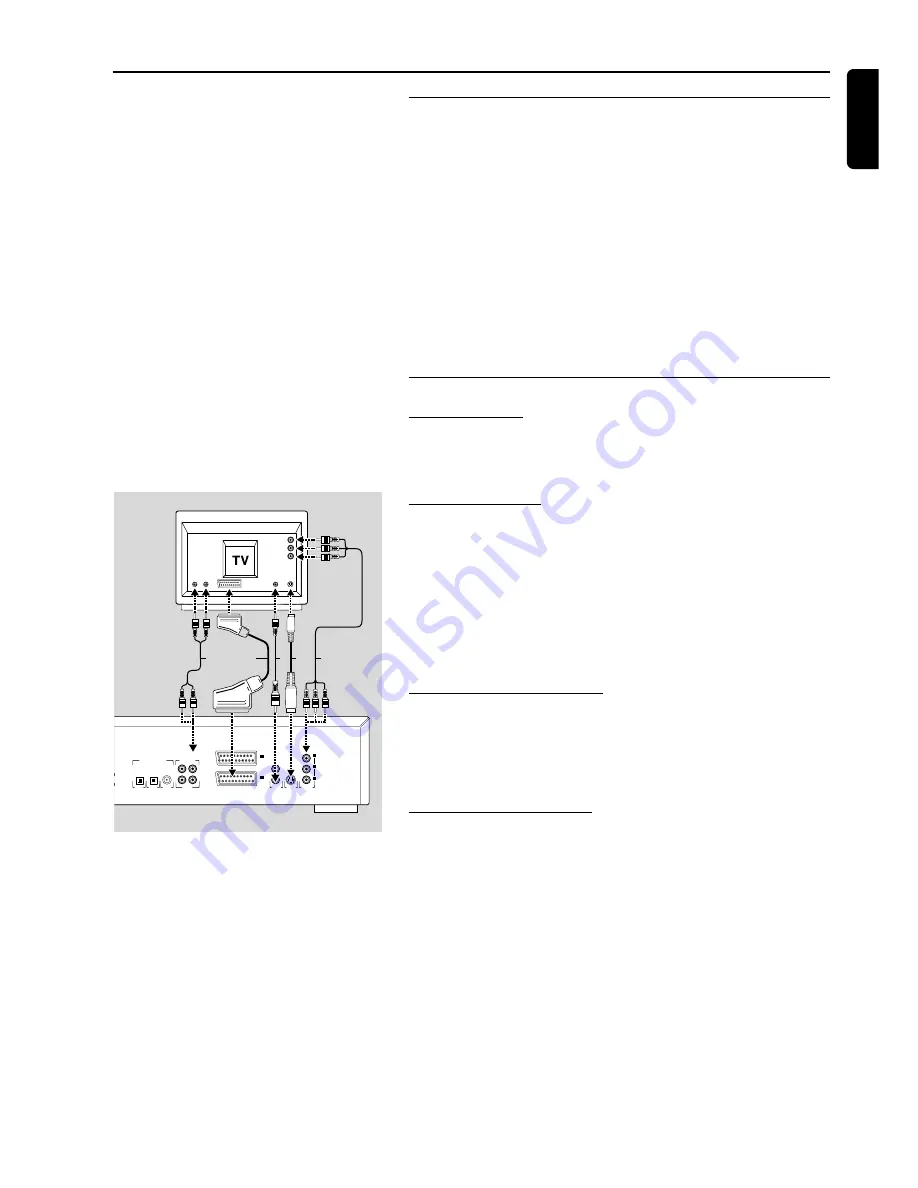
- Depending on your TV and other equipment you wish to connect,
there are various ways you could connect the player. These are shown
in the drawing below.
Please refer to your TV, VCR, Stereo System and any other User
Manual(s) as necessary to make the optimal connections.
- Do not connect your DVD-player via your VCR, because the video
quality could be distorted by the copy-protection system.
- For better sound reproduction you can connect the player audio
outputs to your amplifier, receiver, stereo system or A/V equipment.
For this see ‘Connecting to optional equipment’ on the next page.

Caution:  Do not connect the player’s audio output to the
phono input of your audio system.

Connect to a TV

Euroconnector

Connect the Euroconnector to the corresponding connector on the
TV using the Euroconnector cable 

(1)

supplied. (Europe only)

YUV connections

1

Connect the YUV connections to the corresponding connector on
the TV using the YUV cables 

(2)

supplied. (non Europe)

2

Connect the audio Left and Right output sockets to the
corresponding sockets on the TV using the audio cable 

(5)

supplied.

If your TV is not equipped with a Euroconnector or YUV
connections you can select one of the following alternative
connections:

S-Video (Y/C) connection 

1

Connect the S-Video socket to the corresponding socket on the TV
using an optional S-Video cable 

(3)

.

2

Connect the audio Left and Right output sockets to the
corresponding sockets on the TV using the audio cable 

(5)

supplied.

Video CVBS connection

1

Connect the Video socket to the corresponding socket on the TV
using the video cable 

(4)

supplied.

2

Connect the audio Left and Right output sockets to the
corresponding sockets on the TV using the audio cable 

(5)

supplied.

II

AUX-VCR

I

TV-OUT

STEREO OUT

DIGITAL AUDIO OUT

PCM - MPEG2 - DOLBY DIGITAL - DTS

ANALOG

OUT

COAX

OUT

OPTICAL

OUT

OPTICAL

LEFT

RIGHT

(Y-Cr-Cb)

VIDEO OUT

(CVBS)

VIDEO OUT

(Y/C)

S-VIDEO OUT

Y

C

B

C

R

3

2

4

1

5

Summary of Contents for DVD Video Player

Page 1: ...3 ...

Page 2: ...4 ...

Page 3: ...nglish INDEX 5 English___________________________________________________6 Français ________________________________________________xx Español _________________________________________________xx xxx xxx ...

Page 4: ... Dolby Laboratories Inc All rights reserved This product incorporates copyright protection technology that is protected by method claims of certain U S patents and other intellectual property rights owned by Macrovision Corporation and other rights owners Use of this copyright protection technology must be authorized by Macrovision Corporation and is intended for home and other limited viewing use...

Page 5: ...AL NTSC settings_________________________________________21 General explanation ________________________________________22 Switching on ______________________________________________23 Virgin mode ______________________________________________23 Personal preferences _______________________________________25 Acces control Disk lock DVD and VCD ______________________29 Acces control Parental control...

Page 6: ... and presents them in the best possible way on your multi standard TV screen As the universal video system of the future DVD Video offers optimal pictures on any TV screen Your DVD Video player Your Philips DVD Video player plays digital video discs conforming to the universal DVD Video standard With it you will be able to enjoy full length movies with true cinema picture quality and stereo or mul...

Page 7: ... by the logo Depending on the material on the disc a movie video clips a drama series etc these discs may have one or more tracks and tracks may have one or more indexes as indicated on the disc case To make access easy and convenient your player lets you move between tracks and between indexes Audio CD Audio CDs contain music tracks only You will recognize CDs by their logo You can play them in t...

Page 8: ...uture Placement Place the player on a firm flat surface Keep away from domestic heating equipment and direct sunlight In a cabinet allow about 2 5 cm 1 inch of free space all around the player for adequate ventilation If the DVD Video player cannot read CDs DVDs correctly try using a commonly available cleaning CD DVD to clean the lens before taking the DVD Video player to be repaired Other cleani...

Page 9: ... TRACK TIME F S T VGA DIGITAL NATURAL MOTION Functional overview POWER ON OFF switches the player on off Standby indicator lights up red when the player is in Standby mode VIDEO MODE switches Active Control function on off Display displays the current status of the player DNM switches on off Digital Natural Motion function 9 STOP stops video audio play 2 PLAY starts video audio play PAUSE interrup...

Page 10: ...ction to digital coaxial equipment 2 x digital audio output connectors optical connection to digital optical equipment TV connections YUV YCBCR for connection to a TV with YUV inputs S Video Y C for connection to a TV with S Video Y C inputs Video CVBS for connection to a TV with CVBS video inputs Euroconnector TV OUT for connection to a TV with Euroconnector Euroconnector AUX VCR for connection t...

Page 11: ... A HT ALL A B REPEAT SHUFFLE TOTAL REM TRACK TIME D NA M CHAPTER TRACK TITLE SCAN HT ALL A B REPEAT SHUFFLE TOTAL REM TRACK TIME TRACK TITLE DTS PCM MCH INDE CHAPTER RACK CM MCH 3D SUR SPOTLI TRA M TITLE DTS PCM P VIDEO SACD SVCD SVCD pause active scan active repeat A B active shuffle active repeat Title Chapter Track All active Favourite Track Selection active Digital Natural Motion active remote...

Page 12: ...H step up down trough channels TV only FTS favourite track selection SHUFFLE playback in random order Z Z subtitle subtitle language selector Y Y audio audio language selector DVD POWER B B DISC MENU displays DVD disc menu MENU SYSTEM On screen Display on off v w t u up down left right cursor movement RETURN go back to previous menu step a a ZOOM enlarge video image ANGLE selects DVD camera angle ...

Page 13: ...e Status window icons The status window displays the current status of the player and is displayed together with the first part of the menu bar if activated in the FEATURES menu see Personal Preferences General Disc type Tray status Default screen The default screen is displayed when the player is in STOP mode It may contain a status window see Status Window and a Temporary Feedback Field Giving i...

Page 14: ...ield icons Repeat All Repeat Title Repeat Track Repeat Chapter Shuffle Shuffle Repeat Repeat A to end Repeat A B Angle Disc Lock On Child Safe Resume Action prohibited Digital Natural Motion On Digital Natural Motion Off Active Control On Active Control Off AC AC ...

Page 15: ...y YUV connections 1 Connect the YUV connections to the corresponding connector on the TV using the YUV cables 2 supplied non Europe 2 Connect the audio Left and Right output sockets to the corresponding sockets on the TV using the audio cable 5 supplied If your TV is not equipped with a Euroconnector or YUV connections you can select one of the following alternative connections S Video Y C connect...

Page 16: ...ted by your DVD player MPEG 2 Dolby Digital and DTS Check the receiver manual and the logos on the front of the receiver to find out if your receiver supports one of these formats 1 Connect the player s digital audio output optical 8 or coaxial 7 to the corresponding input on the receiver using an optional digital optical 8 or coaxial 7 audio cable 2 You will need to activate the player s digital ...

Page 17: ... to a TV Connecting the power supply 1 Plug the female end of the power cable supplied into the Power connector on the rear of the player 2 Plug the male end of the cord into an AC outlet Note The player automatically adjusts to the local mains voltage When the player is in the Standby mode it is still consuming some power If you wish to disconnect your player completely from the mains withdraw th...

Page 18: ... brand of television select your brand from the next table Note the first 3 digit code number after the brand name 2 Please press the DNM and RETURN button simultaneously for at least 3 seconds Your remote cotrol is now disabled for all functions 3 Enter the digits of the selected 3 digit code number within 30 seconds In case you press a wrong key or an incorrect number repeat steps 1 2 and 3 4 Th...

Page 19: ...rmat on your screen To change the NTSC PAL setting turn the player OFF Simultaneously press the STOP 9 and DNM buttons while you turn the payer ON After PAL or NTSC appears on the display panel of the player release the STOP 9 and DNM buttons The PAL or NTSC that appears on the display panel is the current setting of the player You can change the current setting by pressing DNM within 5 seconds ...

Page 20: ...the menu bar on the screen The menu bar can be called up by pressing any of the following keys on the remote control MENU SYSTEM T C Angle Audio Language Subtitle Language FTS numeric keys and Zoom When using a short cut key to call up the menu bar it will stay visible for 5 seconds if no other key is pressed The following functions can be operated via the menu bar Setup Personal Preferences Title...

Page 21: ...nd the first option is highlighted Use the w v keys to go through the options in the menu The icon of the selected option will be highlighted Press OK to confirm your selection and to select the next menu Automatic setting When settings can be taken over from your TV or Home Cinema system the message Auto configuring in process will appear Menus for which no settings are available will be displaye...

Page 22: ...lay If not subtitles will revert to the first subtitle language on the disc You can choose from 16 different languages TV Shape If you have a wide screen 16 9 TV select 16 9 If you have a regular 4 3 TV select 4 3 In this case you can also select between Letterbox for a wide screen picture with black bars top and bottom or Pan Scan for a full height picture with the sides trimmed provided this is ...

Page 23: ...ze the position of the picture on your TV by scrolling it to the left or right Colour settings not for CVBS and S video You can select one of four predefined colour settings and one personal colour setting that you can define yourself Personal colour not for CVBS and S video Allows you to fine tune the Contrast Saturation and Brightness of the selected colour setting When Active Control see below ...

Page 24: ...er you switch the player on Sound Digital output Factory setting ALL means that both coaxial and optical outputs are switched on If you are not connecting equipment with a digital input change the setting to OFF If your equipment doesn t include a digital multi channel decoder set the digital output to PCM Pulse Code Modulation Both coaxial and optical outputs are then switched on for PCM only Ana...

Page 25: ...age See Virgin Mode Audio language and Subtitle language can also be adapted via the Menu bar on the screen Feature Access Control Access Control contains the following features Disc Lock When Disc Lock is set to ON a 4 digit code needs to be entered in order to play discs Parental control Allows the conditional presentation of DVD discs containing Parental Control information see Access Control C...

Page 26: ...tant Advice for customers who owns a TV with the Digital Natural Motion feature TV type DNM setting DVD1010 Digital Natural Motion DNM feature seting TV without DNM option The DNM feature can be OFF or ON Customers choice TV with DNM option DNM switched OFF The DNM feature can be OFF or ON Customers choice TV with DNM option DNM switched ON We advice to switch OFF the DNM feature of the DVD1010 Di...

Page 27: ...ys If you select Play Once the disc can be played as long as it is in the player and the player is in the ON position If you select Play Always the disc will become child safe authorized and can always be played even if the Disc Lock is set to ON Notes The player memory maintains a list of 80 authorized child safe disc titles A disc will be placed in the list when Play Always is selected in the ch...

Page 28: ...a rating for the player all scenes with the same rating or lower will be played Higher rated scenes will not be played unless an alternative is available on the disc The alternative must have the same rating or a lower one If no suitable alternative is found play will stop and the 4 digit code has to be entered 6 Press OK or t to confirm and press t again to exit the menu Country 1 In Stop mode se...

Page 29: ...ched on or off briefly press the DNM button on the remote control or front panel of the DVD player DNM ON or DNM OFF will then be displayed on screen for 5 seconds To change the DNM status of your player keep the DNM button pressed for 1 5 seconds Alternatively press the button again before the display disappears from the screen Note The Digital Natural Motion feature of your player is available o...

Page 30: ...screen press 2 again Note Since it is usual for DVD movies to be released at different times in different regions of the world all players have region codes and discs can have an optional region code If you load a disc of a different region code to your player you will see the region code notice on the screen The disc will not play and should be unloaded Playing a video CD Playing a disc After ins...

Page 31: ... Press O briefly during play to return to the beginning of the current chapter index Press O briefly twice to step back to the previous chapter index To go directly to any chapter or index then enter the chapter or index number using the numerical keys 0 9 Note If the number has more than one digit press the keys in rapid succession Slow Motion Select f Slow motion in the menu bar Use the w keys t...

Page 32: ...epeat track disc To repeat the currently playing track press REPEAT REPEAT TRACK appears on the player display To repeat the entire disc press REPEAT a second time REPEAT ALL appears on the display To exit Repeat mode press REPEAT a third time Repeat A B To repeat or loop a sequence in a title Press REPEAT A B at your chosen starting point A appears on the screen Press REPEAT A B again at your cho...

Page 33: ...me an item has been entered the next item will be highlighted Press OK to confirm the start time The time edit box will disappear and play starts from the selected time position Zoom The Zoom function allows you to enlarge the video image and to pan through the enlarged image Select a Zoom in the menu bar Press w v to activate the ZOOM function and select the required zoom factor 1 33 or 2 or 4 Th...

Page 34: ...rked and the highlight moves to the first available chapter number for this title Use u and t to select the required chapter DVD index VCD number Press OK to confirm the selection The title chapter selection will be added to the list of selections Press v or MENU SYSTEM to exit the Video FTS menu Erasing a title track from a FTS Video Program In Stop mode select c in the menu bar Use w to select P...

Page 35: ...mera Angle If the disc contains sequences recorded from different camera angles the angle icon appears showing the number of available angles and the angle being shown You can then change the camera angle if you wish Use the w v keys to select the required angle in the angle icon To go to any angle directly enter the angle number using the numerical keys 0 9 After a small delay play changes to the...

Page 36: ...ayback starts automatically If the TV is on the Audio CD screen appears During play the current track number and its elapsed playing time will be shown on the screen and the player display Playback will stop at the end of the disc To stop play at any other time press 9 The number of tracks and the total playing time will be shown on the screen and the player display Pause Press during play To retu...

Page 37: ...acks is changed To return to normal play press SHUFFLE again Repeat track disc To repeat the currently playing track press REPEAT REPEAT TRACK appears on the display To repeat the entire disc press REPEAT a second time REPEAT ALL appears on the display To exit Repeat mode press REPEAT a third time Repeat A B To repeat or loop a sequence Press REPEAT A B at your chosen starting point A appears on t...

Page 38: ... will be added to the list of selected tracks The number of tracks and the playing time of the program will be shown on the audio screen and the player display When your FTS program is complete press 2 to start play the FTS program will be automatically memorized Press FTS or use the t u keys to set FTS to ON or OFF Erasing a track from an FTS program 1 Go to Stop mode 2 Use w to go to the list of...

Page 39: ...the correct video input of the TV is selected and connected Distorted picture Check the disc for fingerprints and clean with a soft cloth wiping from centre to edge Sometimes a small amount of picture distortion may appear This is not a malfunction Completely distorted picture with player menu The NTSC PAL switch may be in the wrong status Press the STOP 9 and DNM buttons simultaneously and keep t...

Page 40: ...witch the player OFF with the ON OFF button 2 Press the OPEN CLOSE and button simultaneously and keep them pressed while you turn the player ON On the display the message BUSY appears together with a counter that counts down as the test is running reaching zero by the end of the test After a few minutes the message on the local display changes from BUSY to ERROR or to PASS If the message ERROR app...

Page 41: ...English NOTES 43 Notes ...

Reviews: