background image

30

English

Playing a JPEG image fi le 
(slide show) 

Before you start ... 

Turn on your TV to the correct Video In 
channel.  See the section on ‘Finding the 
correct viewing channel’.  

  Insert a Picture disc (Kodak Picture CD, 

JPEG). 

 For a Kodak disc, the slide show will 

begin automatically.

 For a JPEG disc, the picture menu will 

appear on the TV.  Press  

PLAY 

X

 (or 

u

) to start the slide-show playback.

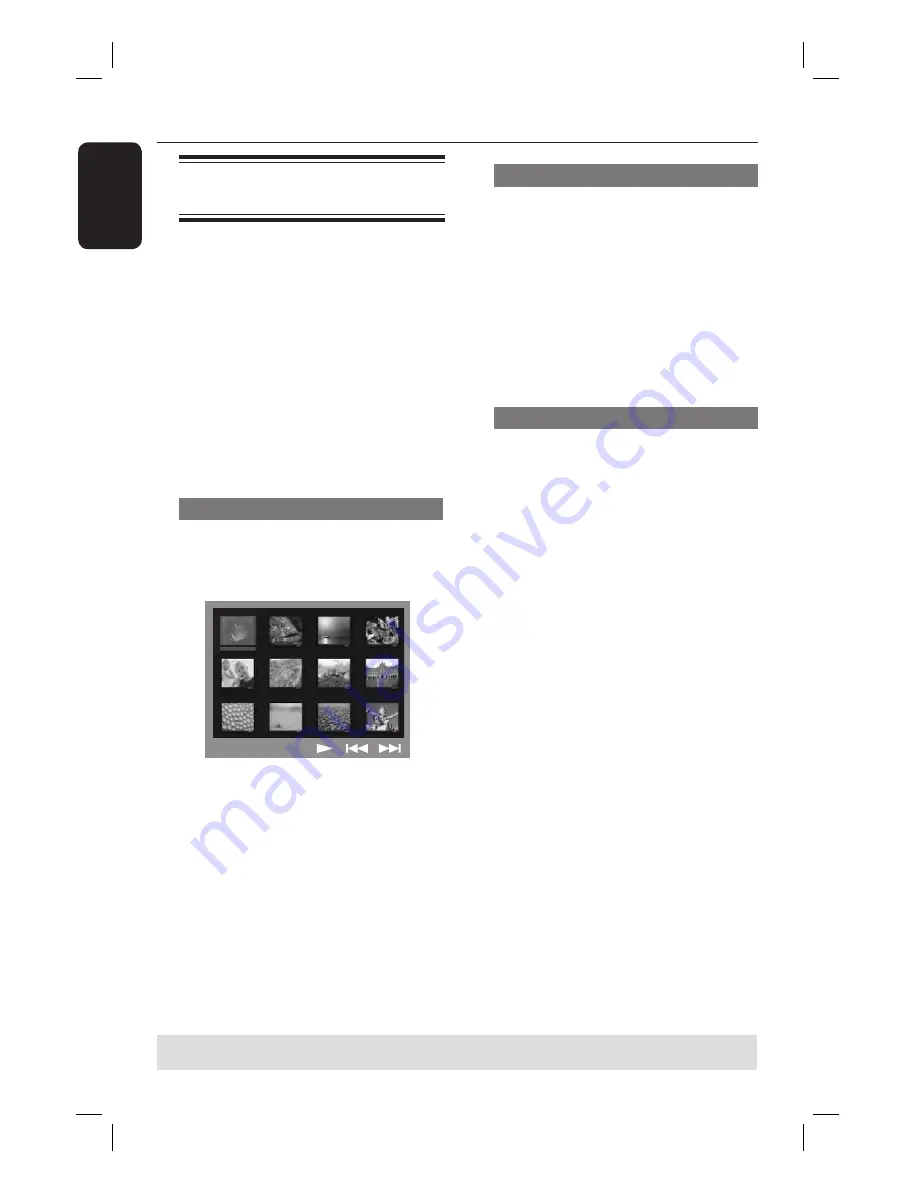
Preview function 

A

 During playback, press 

Ç

.

 12 thumbnail pictures will be displayed 

on the TV.  

B

 Press 

.

>

 to display the other 

pictures on the previous/next page.

C

 Use 

WXST

 keys to highlight one of the 

pictures and press 

OK

 to start playback.

D

 Press 

DISC MENU

 to return to Picture 

CD menu.

Zoom picture 

A

 During playback, press 

ZOOM


repeatedly to select a different zoom 
factor.

B

 Use 

WXST

 keys to pan through the 

zoomed image.

Helpful Hint:
–  This feature is not applicable for DivX 
disc.

Rotating/fl ipping the picture

  During playback, use 

WXST

 keys to 

rotate/fl ip the picture on the TV.

S

 : fl ip the picture vertically

T

 : fl ip the picture horizontally

W

 : rotate the picture anti-clockwise

X

 : rotate the picture clockwise

Supported fi le format:

–  The fi le extension has to be ‘*.JPG’ 
and not ‘*.JPEG’.
–  It can only display DCF-standard still 
pictures or JPEG pictures e.g. TIFF.  It 
cannot play back moving pictures, Motion 
JPEG, Progressive JPEG and other 
formats, or pictures in formats other 
than JPEG, or pictures associated with 
sound.
–  It may require longer time for the 
DVD system to display the disc content 
on the TV due to the large number of 
songs/pictures compiled into one disc.

Disc Operations 

(continued)

TIPS: 

Some discs cannot be played on this player due to the confi guration and characteristics of the 
disc, or due to the condition of recording and authoring software that was used.

Summary of Contents for DivX Ultra HTS3320

Page 1: ...English DVD HOMETHEATRE SYSTEM HTS3320 User Manual 6 Руководство пользователя 50 ...

Page 2: ...duct is designed and manufactured with high quality materials and components which can be recycled and reused When this crossed out wheeled bin symbol is attached to a product it means the product is covered by the European Directive 2002 96 EC Please inform yourself about the local separate collection system for electrical and electronic products Please act according to your local rules and do no...

Page 3: ...trademarks of Dolby Laboratories DivX Ultra Certified products DivX DivX Ultra Certified and associated logos are trademarks of DivX Inc and are used under license Windows Media and the Windows logo are trademarks or registered trademarks of Microsoft Corporation in the United States and or other countries ...

Page 4: ...4 Language Code ...

Page 5: ...English 5 Русский Index English 6 Русский 50 ...

Page 6: ... Optional Connections 17 Connecting audio from TV 17 Connecting audio from an analogue audio video device 17 Basic Setup Getting Started 18 23 Step 1 Turning on the DVD system 18 Turning off to Eco Power standby mode 18 Step 2 Finding the correct viewing channel 18 Step 3 Setting language preferences 19 On screen display OSD language 19 Audio Subtitle and Menu language for DVD playback 19 20 Step ...

Page 7: ...es simultaneously 31 Playing a DivX disc 31 Playing a Karaoke disc 32 Microphone setting 32 Setup Options DVD Setup Menu Options 33 39 Accessing the DVD setup menu 33 General Setup Page 34 Audio Setup Page 35 Video Setup Page 36 37 Preference Setup Page 38 39 Radio Tuning Tuner Operations 40 41 Tuning to radio stations 40 Presetting radio stations 40 Using auto install 40 Using automatic preset 41...

Page 8: ...s of danger on the apparatus e g liquid filled objects lighted candles Accessories supplied 1 passive subwoofer 2 front speakers with speaker stands 2 rear speakers with speaker stands 1 centre speaker 1 remote control with batteries 1 composite video cable yellow 1 FM wire antenna 1 MW loop antenna Quick Start Guide Cleaning discs Some problems occur frozen picture sound disruptions picture disto...

Page 9: ...an operation DISC stops playback TUNER hold down this button to erase the current preset radio station DISC selects a track or hold down this button to search backward forward TUNER selects a preset radio station f SOURCE Selects the relevant active source mode DISC TUNER FM MW TV or AUX g VOL Adjusts the volume level h MIC LEVEL Activates microphone level mode and use the VOLUME control to set th...

Page 10: ... or an audio channel CD e SETUP Enters or exits the system setup menu f DISPLAY Displays the current status or disc information g PLAY É DISC starts playback h STOP Ç Exits an operation DISC stops playback DISC hold down this button to open and close the disc tray TUNER hold down this button to erase the current preset radio station i TV VOL Adjusts TV volume Philips TV only j Numeric Keypad 0 9 E...

Page 11: ... TITLE For DVD go back to the previous menu For VCD version 2 0 only In stop mode turn on off playback control PBC mode During playback display the disc title menu or return to the main menu s DISC hold down this button for fast forward and backward search TV selects previous next channel Philips TV only TUNER selects a preset radio station t PAUSE Å DISC pauses playback u VOL Adjusts the volume l...

Page 12: ...the remote sensor iR on the front panel E Select the source you wish to control by pressing the DISC TUNER TV or AUX DI button on the remote control F Then select the desired function for example CAUTION Remove batteries if they are exhausted or if the remote control is not to be used for a long time Do not mix batteries old and new or carbon and alkaline etc Batteries contain chemical substances ...

Page 13: ...l facing each other D Place the subwoofer at the corner of the room Keep at least one metre away from the TV Helpful Hints The placement diagram shown here is only a guideline that will provide great system performance You may find other placement choices that are more suitable for your room layout and provide the sound experience you enjoy To avoid magnetic interference do not position the front ...

Page 14: ...e plugs and sockets are matched Helpful Hint To prevent unwanted noise do not place the speakers too close to the DVD system AC power adapter TV or any other radiation sources TIPS Before making or changing any connections make sure that all the devices are disconnected from the power outlet Basic Connections continued FRONT LEFT FRONT RIGHT REAR RIGHT REAR LEFT CENTER SUBWOOFER ...

Page 15: ... Connecting to a Progressive ScanTV or component video input The progressive scan video quality is only available when using Y Pb Pr connection and a progressive scan TV is required It provides superior picture quality when watching DVD movies A Follow option 1 to make the basic video connection B Use the component video cables red blue green not supplied to connect the Y PB PR sockets on the DVD ...

Page 16: ...as far away as possible from your TV VCR or other radiation source to prevent any unwanted interference Step 5 Connecting the power cord After everything is connected properly plug the AC power cord into the power outlet The Eco Power LED on the DVD system will light up Never make or change any connections with the power turned on Helpful Hints Refer to the type plate at the rear or bottom of the ...

Page 17: ...the audio output from an analogue audio video device e g VCR Cable Satellite Box or TV to this Home Theatre Audio System in order to enjoy the multi channel surround sound capabilities Use an audio cable red white not supplied to connect the AUX IN sockets on this DVD system to the AUDIO OUT sockets on the connected device To listen to the sound press AUX DI as the sound source that you want to pl...

Page 18: ... sure you have completed all the necessary connections before proceeding A Press SOURCE button until DISC appears on the display panel B Turn on the TV and set it to the correct video in channel You should see the blue DVD background screen on the TV You may go to Channel 1 on your TV then press the Channel Down button on your TV s remote control until you see the Video In channel You may press bu...

Page 19: ...Menu language for DVD playback You can select your preferred language settings for DVD playback If the selected language is recorded on the DVD disc the DVD system will automatically play the disc in that language Otherwise the disc s default language will be used instead A Press Ç twice to stop playback if any then press SETUP B Press X repeatedly to select Preference Page C Use ST keys to highli...

Page 20: ... DVD on this system Before changing the TV system determine the colour system of your TV A In DISC mode press SETUP on the remote control B Press X repeatedly to select Video Setup Page C Press T to highlight TV Type then press X Video Setup Page TV Type TV Display Progressive Picture Setting NTSC PAL Multi PAL Select this if the connected TV has the PAL colour system It will change the video sign...

Page 21: ... Setup Page C Press T to highlight TV Display then press X Video Setup Page TV Type TV Display Progressive Picture Setting 4 3 Pan Scan 4 3 Letter Box 16 9 Wide Screen 4 3 Pan Scan Select this if you have a conventional TV and want both sides of the picture to be trimmed or formatted to fit your TV screen 4 3 Letter Box Select this if you have a conventional TV In this case a wide picture with bla...

Page 22: ...eo Setup Page F Select Progressive On then press OK to confirm Video Setup Page TV Type TV Display Progressive Picture Setting On Off G Read the notification message on the TV and confirm your action by selecting the in the menu and press OK If a blank distorted screen appears wait for 15 seconds for the auto recovery Otherwise select Cancel and press OK to go back to the previous menu There will ...

Page 23: ...B 0dB 0dB 0dB 0dB 0dB Speakers Level Setup D Use W X keys to set the volume level for each speaker 6dB 6dB and press OK to confirm E Use ST keys to highlight Speakers Delay then press X Audio Setup Page Speakers Volume Speakers Delay Night Mode CD Upsampling Center Rear Left Rear Right Speakers Distance Setup 0ms 0ms 0ms F Use W X keys to set the delay times 0 ms 15 ms for centre and rear speakers...

Page 24: ...isc or at the current time Do not put any objects other than discs on the disc tray Doing so may cause the disc player to malfunction Playing a disc A Press SOURCE repeatedly until DISC appears on the display panel or press DISC on the remote control B Turn on the TV to the Video In channel for the DVD system e g EXT 0 AV You should see the blue DVD background screen on the TV C Press OPEN CLOSE ç...

Page 25: ... power saving feature the system will automatically switch to Eco Power standby mode if you do not press any buttons within 30 minutes after a disc has stopped playing Selecting various repeat shuffle functions While playing a disc press REPEAT on the remote control repeatedly to choose a repeat play mode DVD RPT ONE repeat chapter RPT TT repeat title SHUFFLE random play RPT SHF repeat random play...

Page 26: ...ack chapter from the programming menu select the track chapter and press OK D Once complete select Start on the screen and press OK to start playback Playback will start from the selected track under the programmed sequence E To exit the programme menu select Exit in the menu and press OK Other playback features for video discs DVD VCD SVCD Using the Disc Menu Depending on the disc format a menu m...

Page 27: ...he last 10 discs that were recorded without a menu A Load one of the last 10 discs played B While LOADING appears on the display panel press PLAY X or u to start playback from the last stop point To cancel the resume mode Press Ç twice Zooming in This option allows you to enlarge the picture on the TV screen and to pan through the enlarged picture A During playback press ZOOM on the remote control...

Page 28: ... the disc title menu or main menu Preview function VCD SVCD only This function allows you to preview the contents of a VCD SVCD A Press DISC MENU Select DigestType Track Digest Disc Interval Track Interval B Use ST keys to select one of the following options and press OK Track Digest View six different tracks on one screen each time It allows you to have a quick glance at all the tracks on the dis...

Page 29: ...der C Use ST keys to select a track file and press OK to start playback Playback will start from the selected file and continue through to the end of the folder During playback you can Press to playback another track file in the current folder Hold down to fast reverse forward search for a music track To select another folder from the current disc press S to return to the root menu Use ST keys to ...

Page 30: ... pan through the zoomed image Helpful Hint This feature is not applicable for DivX disc Rotating flipping the picture During playback use WXST keys to rotate flip the picture on the TV S flip the picture vertically T flip the picture horizontally W rotate the picture anti clockwise X rotate the picture clockwise Supported file format The file extension has to be JPG and not JPEG It can only displa...

Page 31: ...to a CD R RW DVD R RW disc see General Setup Page DivX R VOD code A Insert a DivX disc B If the DivX movie contains external subtitles the subtitle menu will appear on the TV for your selection In this case pressing SUBTITLE on the remote control will turn the subtitle display on or off C Press PLAY X or u to start playback During playback you can If multilingual subtitles are embedded on the DivX...

Page 32: ...the front panel followed by adjusting the Volume control Microphone setting A Press KARAOKE on the remote control to access Microphone Setup page Mic On Off B In Microphone Setup page use ST keys to select the option for microphone settings and press OK to confirm Mic Use ST keys to turn on or off the karaoke microphone Mic Volume Use ST keys to set the microphone volume level 00 20 Select 00 for ...

Page 33: ...n DISC mode press SETUP on the remote control The setup menu appears B Use W X keys to select one of the setup menu pages and press OK If you are not able to access the Preference Page press SETUP to exit the menu Then press STOP Ç twice before you press the SETUP again C Use S T keys to select a setup option and press X to access D Select the setting you wish to change and press OK to confirm and...

Page 34: ...uage for the DVD system on screen display menu Screen Saver The screen saver prevents damage to the TV screen by avoiding exposure to a static image for too long On Switches to TV screen saver mode when playback has been stopped or paused for more than 15 minutes Off Turns off the screen saver function DivX R VOD code Philips provides you with the DivX VOD Video On Demand registration code that al...

Page 35: ... High volume outputs will be softened and low volume outputs will be enhanced to an audible level This feature is only applicable for DVD video discs with Dolby Digital mode On Turns on night mode Off Turns off night mode feature Selects this to enjoy the surround sound with its full dynamic range CD Upsampling This feature enables you to convert your music CD to a higher sampling rate using sophi...

Page 36: ...or wide screen TV frame ratio 16 9 Progressive Before enabling the progressive scan feature you must ensure that your TV can accept progressive signals a progressive scan TV is required and that you have connected this DVD system to your TV using the Y Pb Pr see Option 2 Connecting to a Progressive Scan TV or component video input On Turns on progressive scan mode Read the instructions on the TV a...

Page 37: ...ght Vibrant colour setting Soft Warm colour setting Personal Selects this to personalise your picture colour setting Use W X keys to adjust to the setting that best suits your personal preference and press OK to confirm For an average setting select 0 Brightness Increase this value to brighten the picture colour or vice versa Contrast Increase this value to sharpen the picture colour or vice versa...

Page 38: ...he disc is recorded with a menu It allows you to select different display menus for easy navigation Without Menu Displays all the files contained in the MP3 Picture disc With Menu Displays the folder menu of the MP3 Picture disc Note This DVD system can only display 650 files folder in the directory Password The password is used for the Disc Lock Enter your six digit password to play a locked disc...

Page 39: ...title Standard Displays a standard list of Roman subtitle fonts provided by this DVD system Others Displays other subtitle fonts Default This feature enables you to reset all the setup menu options and your personal settings to the factory defaults except your password for the Disc Lock Press OK to confirm the default reset DVD Setup Menu Options continued ...

Page 40: ...stations Using auto install for first time setup only Using automatic preset Using manual preset Helpful Hints The system will exit presetting mode if no button is pressed within 20 seconds If no stereo signal is detected or less than 5 five stations are detected during tuner installation PLEASE CHECK ANTENNA appears Using auto install This feature is only applicable for first time radio station p...

Page 41: ...RAM C Use keys to select a preset number that you want to store the current radio station D Press PROGRAM to store Selecting a preset radio station A Press TUNER to select FM or MW band B Use keys to select a preset number or use the numeric keypad on the remote control The waveband preset number followed by the radio frequency will appear on the display panel Deleting a preset radio station A In ...

Page 42: ... mode if the system setup menu is turned on Selecting digital sound effects Select a preset digital sound effect that matches your disc s content or that optimises the sound of the musical style you are playing Press SOUND to select the available sound effect When playing movie discs or in TV mode you can select CONCERT DRAMA ACTION or SCI FI When playing music discs or while in TUNER or AUX DI mo...

Page 43: ... the software to a CD R B Press OPEN CLOSE ç to open the disc tray C Insert the CD R and press OPEN CLOSE ç again The software will start to install on the recorder automatically IMPORTANT Power supply must not be interrupted during upgrade Controlling Philips TV with the remote control This DVD system s remote control enables you to control the basic functions of your Philips brand TV A Press SOU...

Page 44: ...he progressive scan feature wait for 15 seconds for the auto recovery If this happens when you are changing the setting of the TV TYPE wait for 15 seconds for the auto recovery Check the video connection Sometimes a small amount of picture distortion may appear This is not a malfunction Clean the disc Adjust the volume Check the speaker connections and settings Make sure that the audio cables are ...

Page 45: ... leave the system turned on for about an hour The aspect ratio is fixed on the DVD disc Depending on the TV it may not be possible to change the aspect ratio The features may not be available on the DVD Changing the language for the sound or subtitle is prohibited on this DVD Press STOP button twice before selecting the system setup menu Depending on the disc availability some menu items cannot be...

Page 46: ...o front left and right surround left and right centre and subwoofer Dolby Surround Pro Logic II It is an improved matrix decoding technology that provides better spatiality and directionality on Dolby Surround programme material provides a convincing three dimensional sound field on conventional stereo music recordings and is ideally suited to bring the surround experience to automotive sound Whil...

Page 47: ...d the region code of your unit by looking at the product label Some discs are compatible with more than one region or ALL regions Surround A system for creating realistic three dimensional sound fields full of realism by arranging multiple speakers around the listener Title The longest section of a movie or music feature on DVD Each title is assigned a title number enabling you to locate the title...

Page 48: ... System PAL NTSC Video Format 4 3 16 9 Video S N 65 dB Composite Video Output 1 0 Vp p 75Ω Audio DAC 24 Bits 192 kHz Frequency Response 4 Hz 20 kHz 44 1 kHz 4 Hz 22 kHz 48 kHz 4 Hz 44 kHz 96 kHz MAIN UNIT Power Supply Rating 220 240 V 50 Hz Power Consumption 150 W Eco Standby power 1 W Dimensions 435 x 55 x 328 8 mm w x h x d Weight 2 94 kg SPEAKERS FRONT and REAR speakers System 2 way closed box ...

Page 49: ...49 English ...

Reviews: