background image

17

English

EN

 -#%.#

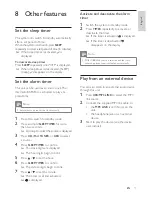
Set the sleep timer

This system can switch to standby automatically 
after a set period of time.
When the system is turned on, press 

SLEEP


repeatedly to select a set period of time (in minutes).


»

When sleep timer is activated,   is 
displayed.

To deactivate sleep timer

Press 

SLEEP

 repeatedly until "OFF" is displayed.


»

 $"?"*‹~JJ_Œ
(sleep)   disappears on the display.

Set the alarm timer

This unit can be used as an alarm clock. The 
disc/radio/USB/iPod is activated to play at a 
preset time. 

Note


+

J?#@

Press   to switch to standby mode.

Press and hold 

SLEEP

/

TIMER

 for more 

than two seconds.


»

A prompt to select the source is displayed.

Press

 CD

iPod

TUNER

, or 

USB

 to select 

a source.

Press 

SLEEP

/

TIMER

$@


»

The clock digits are displayed.


»

The hour digits begin to blink.

Press   /   to set the hour.

Press 

SLEEP

/

TIMER

$@


»

The minute digits begin to blink.

Press   /   to set the minute.


»

The timer is set and activated.


»

 is displayed. 

Activate and deactivate the alarm 
timer

Switch the system to standby mode.

Press 

TIMER

 repeatedly to activate or 

deactivate the timer.


»

If the timer is activated,   is displayed.


»

If the timer is deactivated,   
disappears on the display.

Note


+

If DISC/USB/iPod source is selected and the track 
cannot be played, tuner is activated automatically.

8:.*V#!'

You can also listen to an external audio device 
through this unit.

Press 

USB

/

)8x;_€

 to select the MP3 

link source.

Connect the supplied MP3 link cable to:
+ the 

)8x;_€

 jack (3.5mm) on the 

unit.

+ the headphone jack on an external 

device.

Start to play the device (see the device 
user manual). 

Summary of Contents for DCM850/12

Page 1: ...DCM850 12 Register your product and get support at www philips com welcome Mode d emploi 107 Käyttöopas 127 Manuale utente 147 ...

Page 2: ... 13 Display play information 13 Program tracks 13 5 Adjust sound 14 Adjust volume 14 Select a preset sound effect 14 Select a preset sound effect 14 Mute sound 14 6 Play iPod iPhone iPad 15 Compatible iPod iPhone iPad 15 Listen to the iPod iPhone iPad 15 Charge the iPod iPhone iPad 15 7 Listen to radio 16 Listen to FM radio 16 Reset to factory setting 16 17 Set the sleep timer 17 Set the alarm tim...

Page 3: ...ce problems shock this apparatus should not be exposed to such as vases should not be placed on this apparatus CAUTION To prevent electric shock match wide blade of plug to wide slot fully insert 9 a b c B d F G e Do not install near any heat sources such as radiators heat registers stoves or J O Q f 8 F U plugs convenience receptacles and the V g W O h U U U F U O X U moving the cart apparatus co...

Page 4: ...cibel ranges that may cause hearing loss for a normal person even for exposure less than a minute The higher decibel ranges are offered for those that may have already experienced some hearing loss Sound can be deceiving Over time your hearing comfort level adapts to higher volumes of sound So after prolonged listening what sounds normal can actually be loud and harmful to your hearing To guard ag...

Page 5: ...the local rules on separate collection of batteries because correct disposal helps to prevent G and human health All unnecessary packaging has been omitted We have tried to make the packaging easy to separate into three materials cardboard box polystyrene foam buffer and polyethylene bags protective foam sheet Your system consists of materials which can be recycled and reused if disassembled by a ...

Page 6: ...s iPod iPhone iPad and other external devices or listen to radio stations The music system offers you multiple sound effect settings that enrich sound with Digital Sound Control DSC and Dynamic Bass Boost DBB The system supports the following media formats Note WMA CDs are not supported X G V Check and identify the contents of your package Main unit x 1 Remote control x 1 AAA battery x 2 AC cable ...

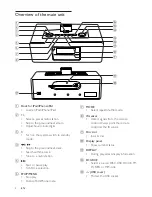
Page 7: ...thin a track Tune to a radio station e Start or pause play f 9 8W _ Stop play Access iPod iPhone menu a b d f g h r s c e p o m k n l i j q g h IR sensor Detect signals from the remote control Always point the remote control at the IR sensor i Disc slot Insert a disc j Display panel Show current status k DISPLAY During play select display information l 9 B Select a source DISC USB DOCK FM J _ m J ...

Page 8: ... antenna Receive FM signal s 8 x _ Audio input jack for an external audio device control a Turn on the unit or switch to standby J _ b Mute or restore volume PRESET ALBUM PROG CLOCK SET SLEEP TIMER DSC DBB FM VOL REPEAT SHUFFLE 3 4 5 6 7 8 9 1 0 2 CD DOCK DISPLAY RDS OK MENU USB MP3 LINK a b c e f g p o d h i j m n k l s r q ...

Page 9: ...ct a track from a disc directly j 8 WBx B 9 Program tracks Program radio stations Set the clock k SLEEP TIMER Set the sleep timer Set the alarm timer l DSC Select a preset sound setting m DBB Turn on or off dynamic bass enhancement n REPEAT SHUFFLE Play a track or all tracks repeatedly Play tracks randomly o MENU Stop play Access the iPod iPhone iPad menu p B Select iPod iPhone iPad source q r PRE...

Page 10: ...nderside of the apparatus Risk of electric shock When you unplug the AC cable always pull the plug from the socket Never pull the cord Before you connect the AC cable ensure that you have completed all other connections Connect the AC cable to the wall outlet Prepare the remote control Caution Risk of explosion Keep batteries away from heat Danger of explosion if battery is incorrectly replaced To...

Page 11: ...ess 8 WBx B 9 Turn on Press The unit switches to the last selected source 9 Press to switch the system to standby mode The backlight on the display panel is reduced The clock if set is displayed on the display panel 4 Play Play disc 1 Press CD to select the disc source 2 Insert a disc into the disc compartment with the printed side facing up Play starts automatically Note WMA CDs are not supported...

Page 12: ...g play press DISPLAY repeatedly to select different play information 9 W options To select repeat play mode 1 During play press repeatedly to select a repeat option Rep one plays the current track continuously Rep all repeats the entire disc programme z 1 During play press repeatedly to SHUF Tracks of the entire disc are played in random order To resume normal play press displayed Tip Q G to stop ...

Page 13: ... program Press once in the stop mode or twice during playback PROG disappears on the display 5 Adjust sound Adjust volume During play press x WZ to increase decrease the volume 9 During play press DSC repeatedly to select POP pop JAZZ jazz CLASSIC classic ROCK rock 9 During play press DBB to turn dynamic bass enhancement on or off If DBB is activated DBB is displayed Mute sound During play press t...

Page 14: ...neration iPhone 4S iPhone 4 iPhone 3GS iPhone 3G iPhone iPad 2 iPad Listen to the iPod iPhone iPad 1 Press the button iPod on your RC 2 Load your iPod iPhone iPad Play the selected track on your iPod iPhone iPad To pause resume the play press To search during play press and hold then release to resume normal play To scroll through the menu press to If no key is pressed for more than 10 seconds aft...

Page 15: ...radiation source For optimal reception fully extend and adjust the position of the antenna 9 Radio Data System RDS is a service that sends additional broadcast information along with FM stations If you listen to a FM station with RDS signal RDS displays Display RDS information 1 Tune to the desired RDS radio station on the FM waveband 2 Press RDS DISPLAY on the remote control repeatedly to switch ...

Page 16: ... source 4 Press SLEEP TIMER The clock digits are displayed The hour digits begin to blink 5 Press to set the hour 6 Press SLEEP TIMER The minute digits begin to blink 7 Press to set the minute The timer is set and activated is displayed Activate and deactivate the alarm timer 1 Switch the system to standby mode 2 Press TIMER repeatedly to activate or deactivate the timer If the timer is activated ...

Page 17: ...ty 82 dB m W AC power Input 100 240V 50 60Hz Operation Power Consumption 30 W USB Direct Version 2 0 1 1 Dimensions Main Unit W x H xD 380 x 165 x 227 mm Weight Main Unit 4 19 kg Maintenance Clean the cabinet Use a soft cloth slightly moistened with a mild detergent solution Do not use a solution containing alcohol spirits ammonia or abrasives Clean discs When a disc becomes dirty clean it with a ...

Page 18: ...on G Maximum album number 255 G V 44 1kHz 48 kHz Supported Bit rates 32 256 kbps variable bit rates RDS program types _J No RDS programme type J News services AFFAIRS Politics and current affairs INFO Special information programs SPORT Sports JQ J J G DRAMA Radio plays and literature J Culture religion and society J J Science JQ J G POP M Pop music ROCK M Rock music MOR M Light music LIGHT M Light...

Page 19: ...e remote control instead of the main unit Reduce the distance between the remote control and the unit Insert the battery with its polarities signs aligned as indicated Replace the batteries Aim the remote control directly at the sensor on the front of the unit No disc detected Insert a disc Check if the disc is inserted with the print side facing inward Wait until the moisture condensation at the ...

Page 20: ...9 Ù F F 8 _ B Ú Ú Ú ...

Reviews: