background image

11

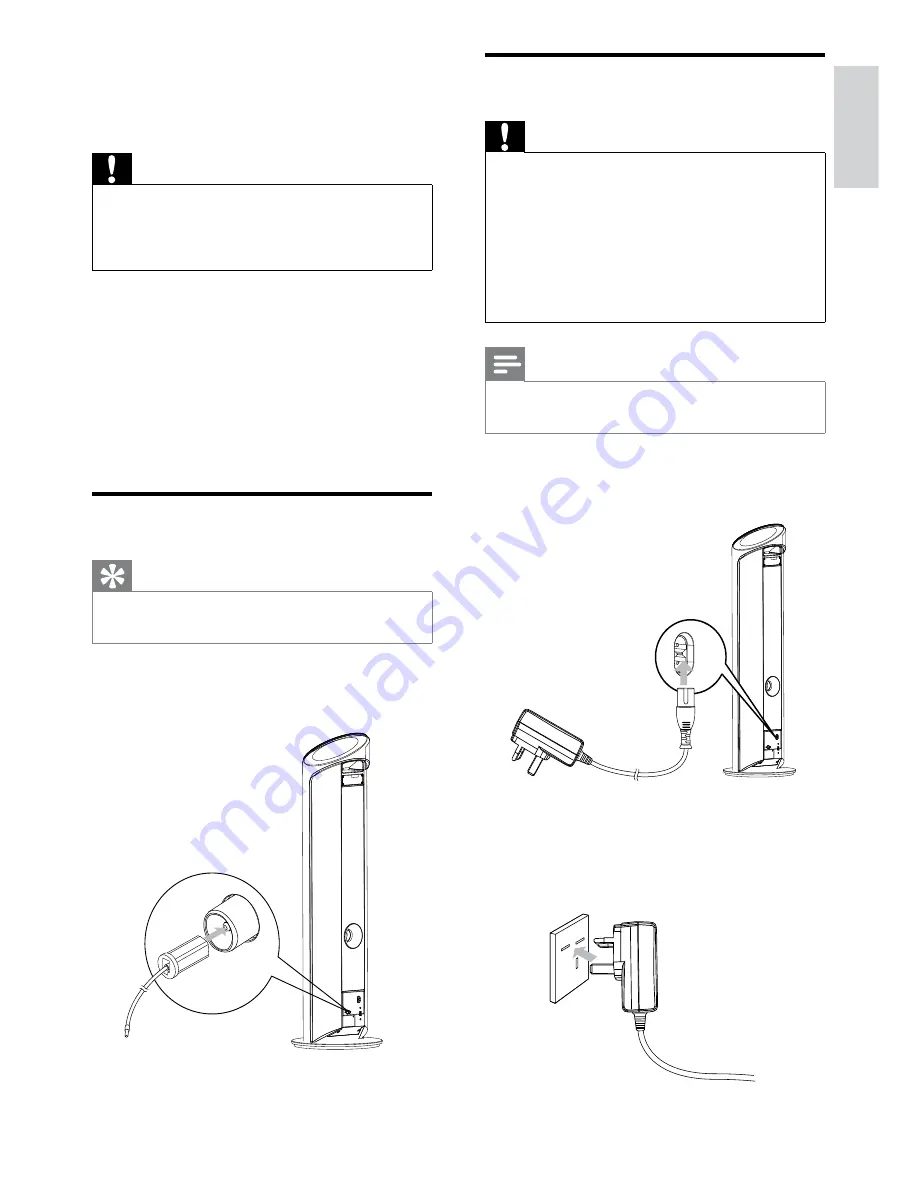
Connect power

Caution

Risk of product damage! Ensure that the 


power supply voltage corresponds to the 
voltage printed on the back or the underside 
of the unit.
Risk of electric shock! When you unplug the 


AC power cord, always pull the plug from the 
socket. Never pull the cord.
Before connecting the AC power cord, ensure 


you have completed all other connections.

Note

The type plate is located on the back of the 


main unit.

1

  Connect the power cord to the 

AC~MAINS

 jack on the main unit.


2

  Connect the power plug to the wall 

outlet.


3 Get 

started

Caution

Use of controls or adjustments or 


performance of procedures other than herein 
may result in hazardous radiation exposure or 
other unsafe operation.

Always follow the instructions in this chapter in 
sequence.
If you contact Philips, you will be asked for the 
model and serial number of this apparatus. The 
model number and serial number are on the 
back of the apparatus. Write the numbers here: 
Model No. __________________________
Serial No. ___________________________

Connect FM antenna

Tip

For optimal reception, fully extend and adjust 


the position of the antenna.

1

  Connect the supplied FM antenna to the 

FM AERIAL

 jack on the main unit.


FM AERIAL

English

EN

Summary of Contents for DCM580

Page 1: ...Register your product and get support at www philips com welcome EN User manual DCM580 ...

Page 2: ...st be disposed off to avoid a possible shock hazard should it be inserted into a 5 Amp socket elsewhere How to connect a plug The wires in the mains lead are coloured with the following code blue neutral N brown live L As these colours may not correspond with the colour markings identifying the terminals in your plug proceed as follows Connect the blue wire to the terminal marked N or coloured bla...

Page 3: ...ram tracks 15 7 Play iPhone iPod 16 Compatible iPod iPhone 16 Load the iPhone iPod 16 Listen to the iPhone iPod 16 Charge the iPhone iPod 16 Remove the iPhone iPod 16 8 Listen to the radio 17 Tune to a radio station 17 Program radio stations automatically 17 Program radio stations manually 17 Select a preset radio station 17 9 Adjust sound 18 Adjust volume 18 Select a preset sound effect 18 Enhanc...

Page 4: ...ed liquid has been spilled or objects have fallen into the apparatus the apparatus has been exposed to rain or moisture does not operate normally or has been dropped n Battery usage CAUTION To prevent battery leakage which may result in bodily injury property damage or damage to the unit 1 Important Safety This bolt of lightning indicates uninsulated material within your unit may cause an electric...

Page 5: ...ed if disassembled by a specialized company Please observe the local regulations regarding the disposal of packaging materials exhausted batteries and old equipment Install all batteries correctly and as marked on the unit Do not mix batteries old and new or carbon and alkaline etc Remove batteries when the unit is not used for a long time Batteries battery pack or batteries installed shall not be...

Page 6: ...that is protected by U S patents and other intellectual property rights of Rovi Corporation Reverse engineering and disassembly are prohibited Trademark notice Windows Media and the Windows logo are trademarks or registered trademarks of Microsoft Corporation in the United States and or other countries EN ...

Page 7: ...e to Philips To fully benefit from the support that Philips offers register your product at www philips com welcome Introduction With this unit you can enjoy audio from audio discs USB devices iPod players iPhone and other external devices or listen to radio stations The unit offers you multiple sound effect settings that enrich sound with Digital Sound Control DSC and Dynamic Bass Boost DBB The un...

Page 8: ... Adjust volume i Turn on the apparatus or switch to standby mode j Dock for iPod iPhone Overview of the main unit a Display panel Show current status b IR sensor c Start or pause play d Jack for a USB mass storage device e Eject the disc f Stop play or erase a program a i j o m n k l d b c e f g h EN ...

Page 9: ... MUTE TUNER MP3LINK MENU EJECT DSC DISPLAY OK LIVINGSOUND DBB TIMER SUB VOL SHUFFLE REPEAT PROG USB CD 8 5 2 7 4 1 0 6 3 9 CLOCK a c n o p t u r s q e d f b g h i j k l m k SOURCE Select a source CD FM TUNER iPod iPhone USB or MP3 LINK l PROG Program tracks Program radio stations Set the clock m PRESET Select a preset radio station Skip to the previous next album n SUB VOLUME Adjust subwoofer volu...

Page 10: ...d iPhone menu Skip to the previous next track Navigate through the iPod iPhone menu Tune to a radio station OK Confirm a selection g MUTE Mute volume h VOL Adjust volume i SUB VOL Adjust subwoofer volume j DISPLAY During play select display information k TIMER Set the alarm timer Activate or deactivate the timer l DBB Turns on or off dynamic bass enhancement m DSC Select a preset sound setting n PR...

Page 11: ... plug to the wall outlet 3 Get started Caution Use of controls or adjustments or performance of procedures other than herein may result in hazardous radiation exposure or other unsafe operation Always follow the instructions in this chapter in sequence If you contact Philips you will be asked for the model and serial number of this apparatus The model number and serial number are on the back of th...

Page 12: ...ht effect Note If no button is pressed over 15 minutes in Standby mode this apparatus goes to Eco Power Standby mode automatically and the backlight on the display turns off Prepare the remote control Caution Risk of explosion Keep batteries away from heat sunshine or fire Never discard batteries in fire For first time use 1 Remove the protective tab to activate the remote control battery To replace ...

Page 13: ... disc compartment with the printed side facing right Play starts automatically To pause resume play press To stop play press For MP3 WMA disc to select an album press To skip to a track file chapter press To fast backward forward press and hold P r i nted S i d e En gl i s h EN ...

Page 14: ... USB device contains playable audio content 1 Connect the USB device into the socket 2 Press USB to select the USB source The total number of tracks is displayed Play starts automatically 3 Press to select a folder 4 Press to select a file EN ...

Page 15: ...play PROG program is displayed To erase the program in the stop position press To review the program in the stop position press and hold PROG CLOCK for more than 2 seconds 6 Play options Skip to a track For CD 1 Press to select another track To select a track directly you can also press a key on the numerical keypad For MP3 disc and USB 1 Press to select an album or folder 2 Press to select select...

Page 16: ...ll the iPhone iPod out of the dock 7 Play iPhone iPod You can enjoy audio from iPhone iPod through this unit Compatible iPod iPhone Apple iPod and iPhone models with a 30 pin dock connector iPod classic iPod touch iPod nano iPod 5th generation video iPhone iPhone 3G Load the iPhone iPod 1 Place the iPhone iPod in the dock Listen to the iPhone iPod 1 Ensure that the iPhone iPod is loaded correctly ...

Page 17: ...o the radio Tune to a radio station Tip For optimal FM reception fully extend and adjust the position of the FM antenna 1 Press TUNER to select the tuner source 2 Press and hold for more than 2 seconds SEARCH search is displayed The radio tunes to a station with strong reception automatically 3 Repeat step 2 to tune to more stations To tune to a weak station press repeatedly until you find optimal ...

Page 18: ...he volume Select a preset sound effect 1 During play press DSC repeatedly to select FLAT flat POP pop JAZZ jazz ROCK rock CLASSIC classic Enhance bass 1 During play press DBB to turn on or off dynamic bass enhancement If DBB is activated DBB is displayed Immerse music over a wider spot 1 During play press LIVING SOUND on the remote control to turn on or off the sound effect If Living Sound is activ...

Page 19: ...standby automatically after a set period of time 1 When the unit is turned on press SLEEP repeatedly to select a set period of time in minutes When sleep timer is activated the display shows SLEEP sleep To deactivate sleep timer 1 Press SLEEP repeatedly until OFF off is displayed When sleep timer is deactivated SLEEP sleep disappears on the display Set the alarm timer This unit can be used as an a...

Page 20: ...sumption 12 W Eco Standby Power Consumption 1 W USB Direct Version 2 0 1 1 Dimensions Main Unit W x H x D 300 x 1022 x 300 mm Weight With Packing Main Unit 18 kg 14 kg 11 Product information Note Product information is subject to change without prior notice Specifications Amplifier Rated Output Power 140W Frequency Response 100 Hz 16 kHz 3 dB Signal to Noise Ratio 70 dB Aux Input 0 5 V RMS 20 kohm D...

Page 21: ...999 ID3 tag v2 0 or later File name in Unicode UTF8 maximum length 128 bytes Unsupported formats Empty albums an empty album is an album that does not contain MP3 WMA files and will not be shown in the display Unsupported file formats are skipped For example Word documents doc or MP3 files with extension dlf are ignored and not played AAC WAV PCM audio files DRM protected WMA files wav m4a m4p mp4 aac ...

Page 22: ... To keep the warranty valid never try to repair the system yourself If you encounter problems when using this apparatus check the following points before requesting service If the problem remains unsolved go to the Philips web site www philips com welcome When you contact Philips ensure that the apparatus is nearby and the model number and serial number are available No power Ensure that the AC po...

Page 23: ... 2010 Koninklijke Philips Electronics N V All rights reserved DCM580_05_UM_V1 0 ...

Reviews: