background image

28

EN

Wait until the moisture condensation at 

the lens has cleared.
Replace or clean the disc.

Use a fi nalized CD or correct format disc.


Cannot display some fi les in USB device

The number of folders or fi les in the USB 

device has exceeded a certain limit. This 
phenomenon is not a malfunction.
The formats of these fi les are not 

supported.

USB device not supported

The USB device is incompatible with the 

DCM250. Try another one.

Poor radio reception

Increase the distance between the 

DCM250 and your TV or VCR.
Fully extend the FM antenna.


Timer does not work

Set the clock correctly.

Switch on the timer.


Clock/timer setting erased

Power has been interrupted or the power 

cord has been disconnected. 
Reset the clock/timer.

12 Troubleshooting

Caution

Never remove the casing of this DCM250. 

To keep the warranty valid, never try to repair 
the system yourself. 
If you encounter problems when using this 
DCM250, check the following points before 
requesting service. If the problem remains 
unsolved, go to the Philips web site (www.
Philips.com/welcome). When you contact 
Philips, ensure that your DCM250 is nearby 
and the model number and serial number are 
available  (see ‘Get started’ on page  13).

No power

Ensure that the AC power plug of the 

DCM250 is connected properly.
Ensure that there is power at the AC 

outlet.
As a power-saving feature, the DCM250 

switches to standby automatically 15 
minutes after disc/USB play reaches the 
end and no control is operated.

No sound or poor sound

Adjust the volume.

Disconnect the headphones.


No response from the DCM250

Disconnect and reconnect the AC power 

plug, then turn on the system again.

Remote control does not work

Before pressing any function button, fi rst 

select the correct source with the remote 
control instead of the main unit.
Reduce the distance between the remote 

control and the DCM250.
Insert the battery with its polarities (+/– 

signs) aligned as indicated.
Replace the battery.

Aim the remote control directly at the 

sensor on the front of the DCM250.

No disc detected

Insert a disc.

Check if the disc is inserted upside down.

Summary of Contents for DCM250

Page 1: ... d astuces destinées à simplifier l utilisation de votre produit Philips Toutefois si vous ne parvenez pas à résoudre votre probléme vous pouvez accéder à notre aide en ligne à l adresse www philips com welcome ou formez le 1 800 661 6162 Francophone 1 888 PHILIPS 744 5477 English speaking Veillez à avoir votre produit à portée de main Gracias por escoger Philips Necesita ayuda inmediata Lea prime...

Page 2: ...2 EN ...

Page 3: ...EN 3 Eng l is h ...

Page 4: ...one 19 Compatible iPod iPhone 19 Load the iPod iPhone 19 Listen to the iPod iPhone 19 Play video from iPod iPhone 19 Charge the iPod iPhone 20 Remove the iPod iPhone 20 8 Listen to the radio 21 Tune to a radio station 21 Program radio stations automatically 21 Program radio stations manually 21 Select a preset radio station 21 Show RDS information 21 9 Adjust sound 23 Adjust volume 23 Select a pre...

Page 5: ...with dry cloth g Do not block any ventilation openings Install in accordance with the manufacturer s instructions h Do not install near any heat sources such as radiators heat registers stoves or other apparatus including amplifiers that produce heat i Do not defeat the safety purpose of the polarized or grounding type plug A polarized plug has two blades with one wider than the other A grounding t...

Page 6: ...e the disconnect device shall remain readily operable Warning Never remove the casing of this DCM250 Never lubricate any part of this DCM250 Never place this DCM250 on other electrical equipment Keep this DCM250 away from direct sunlight naked flames or heat Never look into the laser beam inside the DCM250 Ensure that you always have easy access to the power cord plug or adaptor to disconnect the D...

Page 7: ...003 Français Cet appareil numérique n émet pas de bruits radioélectriques dépassant les limites applicables aux appareils numériques de Classe B prescrites dans le Règlement sur le Brouillage Radioélectrique édicté par le Ministère des Communications du Canada Cet appareil numérique de la classe B est conforme à la norme NMB 003 du Canada Any changes or modifications made to this device that are no...

Page 8: ...8 EN This DCM250 includes this label Windows Media and the Windows logo are trademarks or registered trademarks of Microsoft Corporation in the United States and or other countries ...

Page 9: ...s USB devices iPod players iPhone and other external devices or listen to radio stations The DCM250 offers you multiple sound effect settings that enrich sound with Digital Sound Control DSC and Dynamic Bass Boost DBB The DCM250 supports the following media formats What s in the box Check and identify the contents of your package Main unit Remote control with battery FM antenna AM antenna Video ca...

Page 10: ...IR sensor g ALBUM PRESET Select a preset radio station Skip to the previous next album Adjust time p j i k m n o l a f d e g b c h Skip to the previous next track Search within a track disc USB Tune to a radio station Start or pause play h Disc compartment i AUX Jack for an external audio device j PROG Program tracks Program radio stations Set the clock k DISPLAY During play select display informa...

Page 11: ...ions Set the clock c MENU Access the iPod iPhone menu d REPEAT Select a repeat play mode e Skip to the previous next track Navigate through the iPod iPhone menu f OK Confirm a selection g SLEEP Set the sleep timer h Search within a track disc USB iPod iPhone Tune to a radio station i Numeric keypad Select a track from a disc directly j BAND Select a waveband FM or AM k Source selection keys CD USB ...

Page 12: ... Stop play or erase a program s DISPLAY During play select display information t TIMER Set the alarm timer u DSC Select a preset sound setting v DBB Turns on or off dynamic bass enhancement w RDS Display available RDS Radio Data System information of an FM radio station ...

Page 13: ...50 Write the numbers here Model No __________________________ Serial No ___________________________ Connect FM antenna Tip For optimal reception fully extend and adjust the position of the antenna 1 Connect the supplied FM antenna to the FM aerial jack on the main unit FM aerial Connect AM antenna 1 Assemble the AM loop antenna 2 Connect the AM loop antenna to the AM aerial jack on the rear of the...

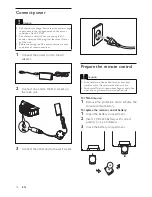
Page 14: ...e AC adaptor 2 Connect one end to the DC socket on the main unit 3 Connect the other end to the wall socket Prepare the remote control Caution Risk of explosion Keep batteries away from heat sunshine or fire Never discard batteries in fire Perchlorate Material special handling may apply See www dtsc ca gov hazardouswaste perchlorate For first time use 1 Remove the protective tab to activate the remot...

Page 15: ...ll the available radio stations are stored the first preset radio station is broadcast automatically Set clock 1 In standby mode press PROG to activate the clock setting mode The 12 hour or 24 hour format is displayed 2 Press to select 12 hour or 24 hour format 3 Press PROG The hour digits are displayed and begin to blink 4 Press to set the hour 5 Press PROG The minute digits are displayed and begi...

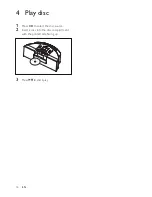
Page 16: ...16 EN 4 Play disc 1 Press CD to select the disc source 2 Insert a disc into the disc compartment with the printed side facing up 3 Press to start play P rinted sid e ...

Page 17: ... contains playable audio content see USB playability information on page 26 1 Connect the USB device into the socket 2 Press USB to select the USB source The total number of tracks is displayed 3 Press to select a folder 4 Press to select a file 5 Press to start play ...

Page 18: ...epeatedly For MP3 WMA and USB and ALB The current album is played repeatedly 2 To return to normal play press REPEAT repeatedly until the repeat mode is no longer displayed Random play 1 Press SHUFFLE is displayed All tracks are played in a random sequence 2 To return to normal play press SHUFFLE again Tip The repeat and shuffle functions cannot be activated at the same time Program tracks You can ...

Page 19: ...ck plate to fit the iPod iPhone securely 6 When the back plate is in the correct position tighten the screw When the DCM250 is connected to power the docked iPod iPhone begins to charge Listen to the iPod iPhone 1 Ensure that the iPod iPhone is loaded correctly 2 Press iPod to select iPod iPhone source The connected iPod iPhone plays automatically To pause resume play press To skip to a track press...

Page 20: ...od to select the iPod iPhone source 4 Press MENU to enter the iPod iPhone menu 5 Press to select a video file 6 Press OK to confirm Charge the iPod iPhone When the DCM250 is connected to power the docked iPod iPhone begins to charge Remove the iPod iPhone 1 Pull the iPod iPhone out of the dock Pb Pr Y ...

Page 21: ...l available stations are programmed in the order of waveband reception strength The first programmed radio station is broadcast automatically Program radio stations manually Note You can program a maximum of 40 preset radio stations 1 Tune to a radio station 2 Press PROG to activate program mode PROG program blinks on the display 3 Press to allocate a number 1 to 40 to this radio station then press...

Page 22: ...dly to scroll through the following information if available Station name Program type such as NEWS news SPORT sport POP M pop music Radio text messages Frequency Note The definitions of RDS program types are available see RDS program types on page 27 ...

Page 23: ...During play press DSC repeatedly to select POP pop JAZZ jazz CLASSIC classic ROCK rock Enhance bass 1 During play press DBB to turn on or off dynamic bass enhancement If DBB is activated DBB is displayed Mute sound 1 During play press MUTE to mute unmute sound Listen through headphone 1 Plug a headphone into the socket on the DCM250 ...

Page 24: ...d TIMER 3 Press CD USB TUNER or iPod to select a source 4 Press TIMER to confirm The hour digits are displayed and begin to blink 5 Press to set the hour 6 Press TIMER to confirm The minute digits are displayed and begin to blink 7 Press to set the minute 8 Press TIMER to confirm The timer is set and activated Activate and deactivate the alarm timer 1 Press TIMER repeatedly to activate or deactivate ...

Page 25: ...eter 12cm 8cm Support Disc CD DA CD R CD RW MP3 CD WMA CD Audio DAC 24Bits 44 1kHz Total Harmonic Distortion 1 Frequency Response 60Hz 16kHz 44 1kHz S N Ratio 65dBA Tuner FM Tuning Range 87 5 108 MHz Tuning grid 50 KHz Sensitivity Mono 26dB S N Ratio Stereo 46dB S N Ratio 22 dBu 45 dBu Search Selectivity 28 dBu Total Harmonic Distortion 3 Signal to Noise Ratio 45 dB AM Tuning Range 530 1700 kHz Sp...

Page 26: ...riable bit rates General information AC power power adaptor Input 100 240V 50 60Hz 1 5A MAX Output 15V 3A Brand name Philips Model No OH 1048A1503000U U Operation Power Consumption 16W Standby Power Consumption 4W Eco Standby Power Consumption 1W USB Direct Version 2 0 1 1 Dimensions Main Unit W x H x D 390 x140 5 x 200 5 mm Weight With Packing Main Unit 4 kg 3 32 kg USB playability information Co...

Page 27: ...and society SCIENCE Science VARIED Entertainment programs POP M Pop music ROCK M Rock music MOR M Light music LIGHT M Light classical music CLASSICS Classical music OTHER M Special music programs WEATHER Weather FINANCE Finance CHILDREN Children s programs SOCIAL Social Affairs RELIGION Religion PHONE IN Phone In TRAVEL Travel LEISURE Leisure JAZZ Jazz Music COUNTRY Country Music NATION M National...

Page 28: ...before requesting service If the problem remains unsolved go to the Philips web site www Philips com welcome When you contact Philips ensure that your DCM250 is nearby and the model number and serial number are available see Get started on page 13 No power Ensure that the AC power plug of the DCM250 is connected properly Ensure that there is power at the AC outlet As a power saving feature the DCM...

Page 29: ...12NC 2009 Koninklijke Philips Electronics N V All rights reserved Document order number ...

Reviews: