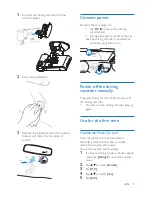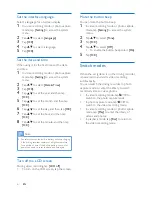
background image

9

EN

5  Capture photos

To capture photos, switch to photo capture 

mode first.

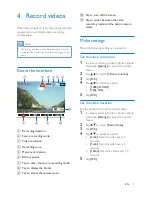
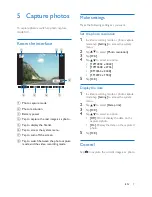
Know the interface


Photo capture mode

Photo resolution

Battery power

Tap to capture the real image as a photo.

Tap to display the file list.

Tap to access the system menu.

Tap to turn off the screen.

Tap to switch between the photo capture 

mode and the video recording mode.

0

୚୽

᝭߳

Еࡉࣞ

a

b c

d

e

f

g

h

Make settings

Make the following settings as you want.

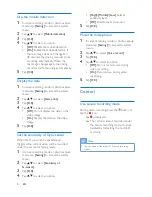
Set the photo resolution

In video recording mode or photo capture 

mode, tap 

[Setting]

 to access the system 

menu.

Tap     to select 

[Photo resolution]

.

Tap 

[OK]

.

Tap     to select an option.

• 

[12M 4032 x 3024]

• 

[10M 3648 x 2736]

• 

[8M 3264 x 2448]

• 

[5M 2592 x 1944]

Tap 

[OK]

.

Display the date

In video recording mode or photo capture 

mode, tap 

[Setting]

 to access the system 

menu.

Tap     to select 

[Date print]

.

Tap 

[OK]

.

Tap     to select an option.

• 

[Off]

: Do not display the date on the 

captured photo.

• 

[On]

: Display the date on the captured 

photo.

Tap 

[OK]

.

Control

Tap   to capture the current image as a photo.

Summary of Contents for CVR600

Page 1: ...www philips com support User manual Always there to help you Register your product and get support at CVR600 Question Contact Philips ...

Page 2: ......

Page 3: ...he first time 5 Switch modes 6 4 Record videos 7 Know the interface 7 Make settings 7 Control 8 5 Capture photos 9 Know the interface 9 Make settings 9 Control 9 6 View videos and photos 10 Access the file list 10 View videos 10 View photos 10 Manage videos and photos 10 7 Use an external display 11 8 Reset the driving recorder 11 Use the reset button 11 Use the menu 11 9 Check the firmware versio...

Page 4: ...osed to excessive heat such as sunshine fire or the like Danger of explosion if battery is incorrectly replaced Replace only with the same or equivalent type For your own safety do not operate the device while driving Do not install the device in the position that blocks the driver s sight or affects the work of the airbags To void accident caused by exhaust of car battery disconnect the car charg...

Page 5: ...cord videos automatically when you are driving Take photos Play back videos photos What s in the box Check and identify the contents of the package www philips com welcome Always there to help you Register your product and get support at Question Contact Philips a Driving recorder b Suction bracket c Car charger d Short user manual e Cushion Overview a Auxiliary DC socket b DC IN Connect to the ca...

Page 6: ... image on the external display i MicroSD card slot Insert a microSD card j LOCK Press to unlock the lens and then the lens can rotate by 300 3 Get started Insert the Micro SD card Note Insert the microSD card with the right direction Otherwise the card slot and the card may be damaged Insert a microSD card into the card slot until you hear a click To remove the microSD card push the card inwards u...

Page 7: ...owered on when the car ignition is on Power off the driving recorder manually Press and hold for 3 seconds to power off the driving recorder To power on the driving recorder press again Use for the first time Format the Micro SD card If the microSD card is not formatted a reminder prompts Follow the on screen instructions to format the card You can format the card manually 1 In video recording mod...

Page 8: ...d of time If the built in battery runs out of power you need to reset the date and time again Turn off the LCD screen During video recording tap LCD off To turn on the LCD screen tap the screen Mute the button beep You can mute the button beep 1 In video recording mode or photo capture mode tap Setting to access the system menu 2 Tap to select Tone 3 Tap OK 4 Tap to select Off To enable the button...

Page 9: ... a b c d e k j i j Tap to turn off the screen k Tap to switch between the video recording mode and the photo capture mode Make settings Make the following settings as you want Set the video resolution 1 In video recording mode or photo capture mode tap Setting to access the system menu 2 Tap to select Video resolution 3 Tap OK 4 Tap to select an option 1080p Full HD 720p HD 5 Tap OK Set the video ...

Page 10: ...tivity of Gyro sensor When the Gyro sensor is enabled and triggered the current video will be recorded under the secure recording mode 1 In video recording mode or photo capture mode tap Setting to access the system menu 2 Tap to select Sensitivity of G sensor 3 Tap OK 4 Tap to select an option High Middle Low Select a sensitivity level Off Disable the Gyro sensor 5 Tap OK Mute the microphone 1 In...

Page 11: ... the following settings as you want Set the photo resolution 1 In video recording mode or photo capture mode tap Setting to access the system menu 2 Tap to select Photo resolution 3 Tap OK 4 Tap to select an option 12M 4032 x 3024 10M 3648 x 2736 8M 3264 x 2448 5M 2592 x 1944 5 Tap OK Display the date 1 In video recording mode or photo capture mode tap Setting to access the system menu 2 Tap to se...

Page 12: ... photos 1 Tap to select a photo from the file list 2 Tap OK to view the photo To return to the file list tap Cancel Manage videos and photos 1 Tap to select a video or photo from the file list 2 Tap OK and then tap Delete to display the following options Delete Current Delete the selected video or photo Protected files can be deleted by formatting the microSD card only Delete all Delete all videos...

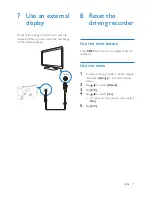
Page 13: ...external display VIDEO 8 Reset the driving recorder Use the reset button Press RESET with the tip of a ballpoint pen or toothpick Use the menu 1 In video recording mode or photo capture mode tap Setting to access the system menu 2 Tap to select Default 3 Tap OK 4 Tap to select Yes To return to the previous menu select No 5 Tap OK ...

Page 14: ...t data only Power supply Car charger Input DC 12 24V Output DC 5 5V LCD screen 3 0 inch touch screen Lens 110 wide angle Video Full HD 1920 x 1080p 30 FPS HD 1280 x 720p 60FPS Video format MOV External memory microSD card class 6 or higher up to 32 GB Microphone Speaker Built in Gyro sensor Built in Storage humidity 20 85 Storage temperature 20 C 70 C Working temperature 20 C 60 C Dimensions Drivi...

Page 15: ...t the end of its life but hand it in at an official collection point or recycling By doing this you help to preserve the environment Environmental information All unnecessary packaging has been omitted We have tried to make the packaging easy to separate into three materials cardboard box polystyrene foam buffer and polyethylene bags protective foam sheet Your system consists of materials which ca...

Page 16: ......

Page 17: ......

Page 18: ...old under the responsibility of WOOX Innovations Shanghai Commercial Company Ltd and WOOX Innovations Shanghai Commercial Company Ltd is the warrantor in relation to this product Philips and the Philips Shield Emblem are registered trademarks of Koninklijke Philips N V and are used under license from Koninklijke Philips N V ...

Reviews: