background image

Lamp

When operation time
reaches the last 100 hours
of the average lamplife, the
message ‘Warning: lamplife
has almost expired’ will be
displayed on the screen,
each time the projector is
switched on. The lamp
indicator lights up orange.

The lamplife remaining can
be checked using the OSD
menu.

1.

Press the Menu.

The menu bar appears
on the screen.

2.

Use Cursor Control to
move the cursor to
Settings.

3.

Use Cursor Control to
select Lamp counter.

The remaining lamplife
hours are displayed in
the action window at the
bottom of the screen.

When the lamplife has
expired,the lamp
indicator lights up red
and the message
‘Warning: lamplife has
expired’ is displayed on
the screen.

Lamp Replacement

Caution!

For cooling purposes the lamp is open. When removing the
lamp do not tilt. If the inner tube is broken glass particles may
fall out.

Be very careful. The lamp and lampholder may still be too hot
to touch.

Keep lamp holder opening to your right. Do not touch lamp or
point lamp holder opening at anyone.

A high-pressure lamp may break if handled improperly.

1.

Press the Stand by On button to switch off the projector.

The standby indicator lights up red.

2.

Wait 5 minutes for the lamp to cool down and the cooling fan
to stop and disconnect the mains lead and all other cables.

3.

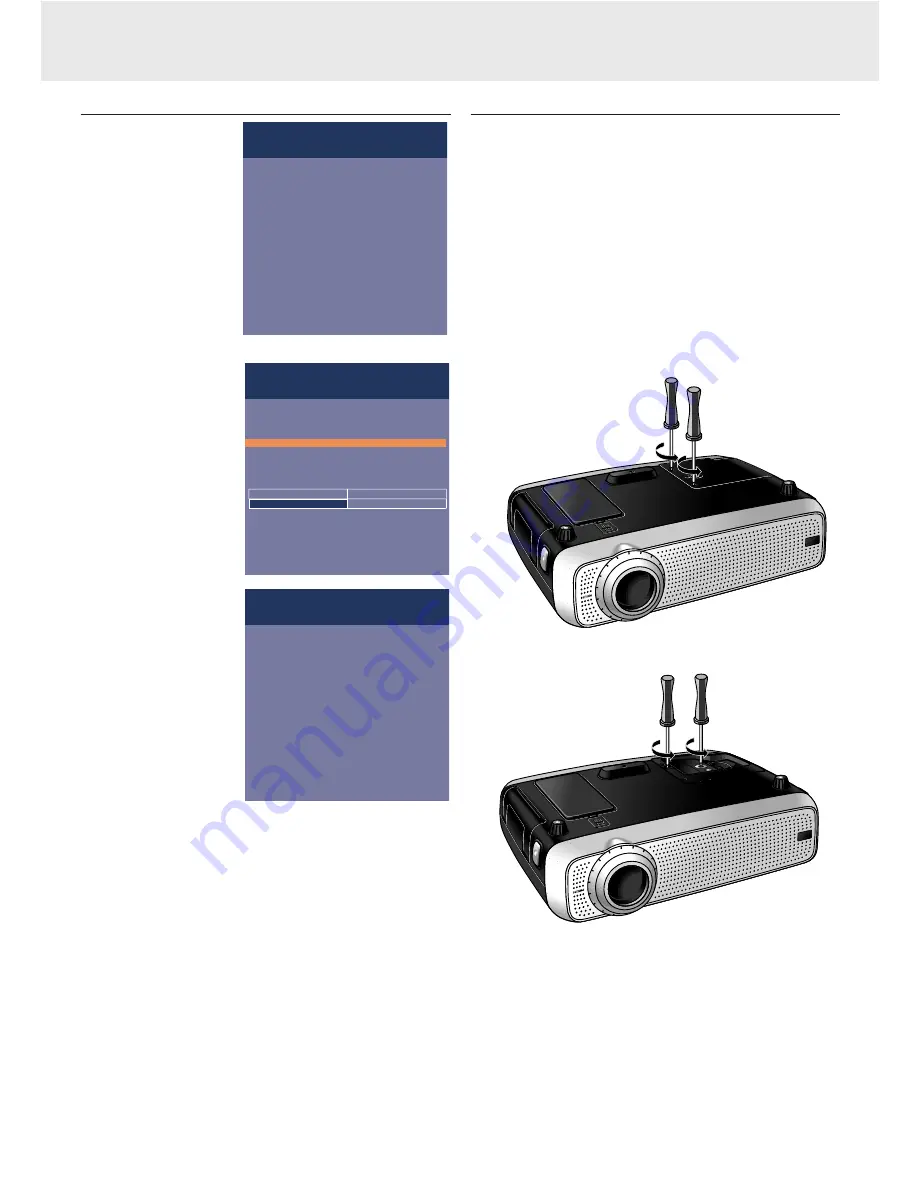
Turn the projector over. 

Never place the projector on the side

where the connections are located!

4.

Unscrew the screws at the bottom of the cover and remove
the cover.

5.

Read the caution and warning labels on the lamp cover.

6.

Unscrew the lamp holder.

FIL

TE

R

FIL

TE

R

LAMP

LAMP

FIL

TE

R

FIL

TE

R

Multimedia projectors

Warning:

Lamplife has expired

It is suggested to change the lamp,

to avoid sudden failure and to improve

overall picture quality.

Display

Language

Keystone correction

Start-up screen

Lamp counter

System information

Factory reset

(more)

Lamp

5 hours

Lamp counter shows the operating hours of the

lamp. It is suggested to reset when a new lamp is

inserted. To reset keep OK key pressed

for 3 seconds.

Picture

Audio

Settings

Projector

2453 hours

Multimedia projectors

Warning:

Lamplife has almost expired

It is suggested to have a spare lamp available.

The lamp type is indicated in the user guide.

9. Maintenance

21

Summary of Contents for cSmart Series

Page 1: ...Philips multimedia projector cSmart Series User guide English Me nu OK AV Mu te Key sto ne Vol um e Sta nd by Lam p RC ...

Page 2: ...o out USB Video audio in Video S Video Data in Data out Audio out USB Video audio in Video S Video Data out Data in a k j b e g h b f Data audio in Data audio in d c fig 1 fig 2 0 Controls and connections VOLUME OK MENU MUTE D ZOOM D FREEZE SOURCE MOUSE Right Left Volume OK Menu Stand by On Mute D Zoom D Freeze Source Mouse Right Left 2 3 1 9 6 5 4 0 7 8 AV MUTE AV MUTE AV Mute fig 3 ...

Page 3: ...1 This device may not cause harmful interference and 2 This device must accept any interference received including interference that may cause undesired operation These limits are designed to provide reasonable protection against harmful interference when the equipment is operated in a commercial environment This equipment generates uses and can radiate radio frequency energy and if not installed ...

Page 4: ...ons only or a 2 pin grounded plug for European versions only The 3 pin 2 pin grounded plug will fit only into a grounding type mains outlet If the plug does not fit use an adapter that is properly grounded or have an electrician install a grounded type outlet Do not attempt to modify this AC plug 13 For added protection of the projector during a lightning storm or when it is left unattended or not...

Page 5: ...anish German Italian Portuguese and Chinese The sensor of the wireless remote control allows you to operate both your computer as well as your projector from almost anywhere in the room The directional shuttle on the projector and on the remote control function as Cursor Control and are used to manipulate the mouse cursor on the connected computer as long as the menu is not active When the menu is...

Page 6: ...in case of fan error 0 Zoomring To adjust the size of the projected image Focus ring To adjust the focus of the projected image Height Level adjusters To adjust the vertical and or horizontal angle of the projector Lens cap To protect the lens when the projector is not in use IR sensor To receive the signals from the remote control On remote control fig 3 1 Stand by On To switch the projector in o...

Page 7: ...system c Video audio in Input socket to connect to the Audio out sockets of a video recorder S VHS PAL NTSC SECAM e Video Input socket to connect to the Video out socket of a video recorder Laser Disc player video camera or TV with AV output socket PAL NTSC SECAM f S Video Input socket to connect to the S Video out socket of a S VHS video recorder a VCR Laser Disc player video camera or TV with AV...

Page 8: ...e wall socket Note The standby indicator lights up red the projector is now in the Power Standby mode 2 Remove the lens cap 3 Press the Stand by button to switch on the projector The Standby indicator lights up green When the projection lamp is on the start up screen appears for several seconds 4 Press the Stand by button again to switch the projector back into the power standby mode The Standby W...

Page 9: ...een switched off and disconnect the mains lead and all other cables 3 Put the lens cap back in place to prevent dust dirt or other contamination from harming or damaging the front of the projector lens when moving the projector Note Never place the projector on the side where the connections are located Transporting the projector The projector contains many glass and precision parts If you need to...

Page 10: ... m LCA5311 00 component HD input cable 5 x RCA to 15p D sub LCA5312 00 SCART RCA adapter SCART to 4 x RCA LCA 9000 20 Easy Pad Programmable VGA MAC adapter available via your support centre as item 4822 263 2120 1 7 Installation 10 CONNECTORS Computer AV product side Projector side Integrated VGA USB Cable CABLE ADAPTER Mini D Sub 15P male Mini D Sub 15P male 3 RCA Audio Video Cable 1 2 Scart RCA ...

Page 11: ...ed Note When connecting the projector to a Macintosh computer use a VGA MAC adaptor optional The adapter is only needed if your computer is equipped with a 2 row 15 pin connector If your computer is equipped with a 3 row connector no adaptor is needed 2 Connect the USB upstream socket b of the projector to the USB downstream port of the computer For this use the VGA USB cable 1 supplied You can no...

Page 12: ...c player video camera or TV to the S Video socket f of the projector For this use the S Video connection cable 4 supplied 2 Connect the Audio out L R sockets of the S VHS video recorder Laser Disc player video camera or TV to the Video audio in socket c of the projector In case your VCR Laser Disc player video camera or TV is equipped with a Scart connector depending on region 1 Connect the Scart ...

Page 13: ...ppropriate outputs of your Component video equipment e g DVD player Settop Box etc Note Connections that are not in use in your particular situation need not be connected Pr Cr V Y Y Y Pb Cb U Red Green Blue Grey Black DVD player Settop Box etc R G B Y S Red Green Blue Grey Black DVD player Settop Box etc R G B H V Red Green Blue Grey Black DVD player Settop Box etc Optional Audio out USB Video S ...

Page 14: ...aking any connections Connect the Data out terminal g of the projector to the external monitor and secure the plugs by tightening the thumb screws For this use the monitor cable supplied with the monitor To obtain the audio signal on the monitor instead of on the projector Connect the Audio in sockets of the monitor to the Audio out socket a of the projector using the audio video connection cable ...

Page 15: ...d when Mute or A V Mute is activated when the Auto image function is set to On These messages will only be displayed when the menu option Feedback is set to On in the Settings menu All messages will be removed automatically after 4 seconds Some examples Data selected as source Video selected as source no input signal S Video selected as source Video selected as source A V muted A V muted On Screen...

Page 16: ...se control for optimal readability of the projected text Data and Video S Video For both data and Video S Video signal input the following adjustments can be made Digital Freeze captures a moving picture still picture Digital Zoom enlarges a part of the picture Magnification adjusts the zoom factor Brightness adjusts brightness of the displayed picture Contrast adjusts the overall contrast intensi...

Page 17: ...m Horizontal size The Horizontal size function is used to size a computer image to make it fit the projected picture When the OSD menu is active and the horizontal size option is selected the level will be indicated graphically on a linear scale slider Shift The Shift function adjusts the computer image in horizontal and vertical direction to centre it on the screen This function is only active wh...

Page 18: ...utes the sound of the projector or an externally connected loudspeaker Audio out switches between fixed Line and variable Regulated volume on the audio output Audio out 1 Select the required input Data Video or S Video 2 Press Menu The menu bar appears on the screen 3 Use Cursor Control to select Audio in the menu bar 4 Use Cursor Control to select the item to be adjusted 5 Use Cursor Control to m...

Page 19: ...ettings to the default factory settings 1 Press Menu The menu bar appears on the screen 2 Use Cursor Control to move the cursor to Settings 3 Select Factory reset by using Cursor Control 4 Press OK for 3 seconds to reset all user settings 5 Select the next item to be adjusted in the sub menu or press Menu to close the On Screen Display Auto Standby This function allows you to switch off Auto Stand...

Page 20: ...r Important Make sure to clean the dust filter regularly 1 Press the Stand by On button to switch off the projector The standby indicator lights up red 2 Wait until the cooling fan has stopped about 3 minutes and disconnect the mains lead and all other cables 3 Turn the projector over Never place the projector on the side where the connections are located 4 Press tab A and lift up the cover 5 Turn...

Page 21: ...high pressure lamp may break if handled improperly 1 Press the Stand by On button to switch off the projector The standby indicator lights up red 2 Wait 5 minutes for the lamp to cool down and the cooling fan to stop and disconnect the mains lead and all other cables 3 Turn the projector over Never place the projector on the side where the connections are located 4 Unscrew the screws at the bottom...

Page 22: ... lamp LCA3115 00 12NC 8670 931 15009 Please dispose of lamp in special chemical disposal bins Resetting the lamplife time 1 Press Menu The menu bar appears on the screen 2 Use cursor control to select Settings in the menu bar 3 Use cursor control to select Lamp counter in the sub menu 4 Press OK for 3 seconds to reset the lamp counter 5 If required select another item you wish to adjust or press M...

Page 23: ...ume is not adjusted properly Adjust volume A V mute is active Cancel A V mute Caution Always reduce check the volume setting of connected amplifiers before switching off A V mute to prevent damage to speakers The projector does not react to commands from the remote control Distance is too great Reduce distance Batteries are exhausted Replace batteries see Inserting the batteries in the remote cont...

Reviews: