background image

9

Adjust input level

To ensure sound quality, adjust input level to 

match it with the car audio’s output voltage.

1

  Check the line output voltage of the 

connected car audio.

2

  Rotate 

INPUT LEVEL

 to select a matched 

voltage: 0.3V to 6V.

Adjust bass boost

To enjoy more bass sound:

1

  Set 

FILTER MODE

 at 

OFF

 or 

LPF

 mode.

2

  Slide 

BASS BOOST

 to 

12dB

 position.

Tip

If 


BASS BOOST

 is set at 

0dB

 position, no extra 

bass will be boosted.

Note

If 


FILTER MODE

 is set at 

HPF

 mode, the bass 

frequency will be filtered.

About the protector 

indicator

The amplifier has a built-in protection circuit to 

protect the transistors and speakers in following 

conditions:

The amplifier is overheated.

• 

A DC current is generated in 

• 

speakers.

The battery voltage is too low or too 

• 

high. Or

The speaker terminals are short 

• 

circuited.

When the 

PROTECTED

 indicator 

lights up in red, the amplifier shuts 

down automatically. In this case 

please:

4  Use your power 

amplifier

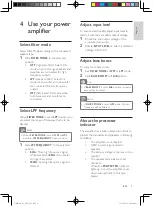
Select filter mode

Select Filter Mode according to the connected 

speaker type.

1

  Slide 

FILTER MODE

 to the selected 

position.

• 

HPF

 (high-pass-filter): Select this 

mode when mid-range speakers and 

tweeters are connected for high 

frequency output. 

• 

LPF

 (low-pass-filter): Select this 

mode when woofer and subwoofer 

are connected for low frequency 

output.

• 

OFF

 (flat): Select this mode when 

both tweeters and woofers are 

connected.

Select LPF frequency

When 

FILTER MODE

 is set at 

LPF

 position, you 

can select the range of frequency that is to be 

filtered.

Note

When 


FILTER MODE

 is set at 

OFF

 or 

HPF


position, 

LPF FREQUENCY

 does not work.

1

  Slide 

LPF FREQUENCY

 to the selected 

position.

• 

80Hz

: More high frequency signal 

is filtered. Select 

80Hz

 if you prefer 

stronger bass effect.

• 

180Hz

: Less high frequency signal is 

filtered. 

English

EN

CMQ205_00_UM_V2.0.indb   9

12/22/2010   9:41:44 AM

Summary of Contents for CMQ205

Page 1: ... your product and get support at www philips com welcome EN User manual 3 ES Manual del usuario 13 PT BR Manual do Usuário 25 RU Руководство пользователя 37 ZH CN 用户手册 51 CMQ205_00_UM_V2 0 indb 1 12 22 2010 9 41 38 AM ...

Page 2: ... Installation 6 Mount the amplifier in car 6 Connect speakers 7 Connect car audio 7 Connect power 7 4 Use your power amplifier 9 Select filter mode 9 Select LPF frequency 9 Adjust input level 9 Adjust bass boost 9 About the protector indicator 9 Replace fuse 10 5 Product information 10 6 Troubleshooting 11 CMQ205_00_UM_V2 0 indb 3 12 22 2010 9 41 38 AM ...

Page 3: ...ir respective owners Philips reserves the right to change products at any time without being obliged to adjust earlier supplies accordingly 1 Important Safety Read and understand all instructions before you use the apparatus If damage is caused by failure to follow instructions the warranty does not apply This unit is designed for negative ground earth 12 V DC operation only Use only the supplied ...

Page 4: ...ECTED Light in green when the amplifier is switched on Light in red when the amplifier is abnormal and protected h SPEAKER OUTPUT Connect to speakers or subwoofers 30A 2 Your car power amplifier Congratulations on your purchase and welcome to Philips To fully benefit from the support that Philips offers register your product at www philips com welcome Introduction With the amplifier you can enjoy ...

Page 5: ...r antenna The supplied mounting screws are 25mm long Make sure that the mounting board is thicker than 25mm 1 Place the unit on the location for installation 2 Mark the positions of the four screw holes 3 Drill the holes with driller of approximately 4mm in diameter 4 Mount the unit with the supplied screws i FUSE 30AX1 j POWER To connect 12V DC power wire ground wire and remote control wire EN CM...

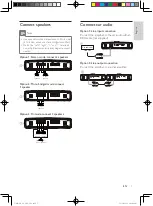
Page 6: ...akers with an impedance of 2 to 8 ohm 4 to 8 ohm when used as a bridged amplifier Match the left right and terminals correctly Revised polarity may degrade sound quality Option 1 Stereo mode connect 2 speakers 4 ohm speaker 4 ohm speaker 30A Option 2 Mono bridged mode connect 1 speaker 4 ohm speaker 30A Option 3 Tri mode connect 3 speakers 30A 4 ohm speaker 8 ohm speaker 4 ohm speaker E n g l i s ...

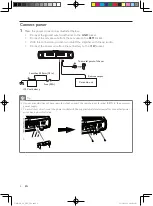
Page 7: ... the power wire from the car battery to the 12V socket Less than 450mm 18 in Fuse 40A 12V car battery Car audio unit Remote output To a metal point of the car 30A Tip If your car audio does not have remote output connect the remote input terminal REM to the accessory power supply To avoid short circuit cover the power socket with the supplied shield and screws after connected power wires See below...

Page 8: ...When the PROTECTED indicator lights up in red the amplifier shuts down automatically In this case please 4 Use your power amplifier Select filter mode Select Filter Mode according to the connected speaker type 1 Slide FILTER MODE to the selected position HPF high pass filter Select this mode when mid range speakers and tweeters are connected for high frequency output LPF low pass filter Select thi...

Page 9: ...m Weight 1 98kg 1 Take out the disc or tape and turn off the car audio 2 Check the cause of the malfunction 3 If the amplifier is overheated let it cool down Replace fuse If there is no power the fuse might be damaged and need to be replaced 1 Pull out the damaged fuse 2 Replace the fuse with the supplied fuse or buy a new fuse that matches the rating of the damaged fuse 30A x 1 If the fuse gets d...

Page 10: ...ector indicator lights up in red The speaker terminals are short circuited Check the speaker connections The sound is too low The input level is not set correctly see Adjust input level The sound is interrupted or stopped suddenly The thermal protector is activated Reduce the volume The ventilation outlet is blocked Remove any obstructions from the outlet Alternate noise is heard The power connect...

Page 11: ...t this toxic or hazardous substance contained in at least one of the homogeneous materials used for this part is above the limit requirement in SJ T11363 2006 X 表示该有毒有害物质至少在该部件的某一均质材料中的含量超出 SJ T11363 2006 标准规定的限量 要求 Environmental Protection Use Period 环保使用期限 This logo refers to the period 10 years during which the toxic or hazardous substances or elements contained in electronic information produc...

Page 12: ... 2010 Koninklijke Philips Electronics N V All rights reserved CMQ205_00_UM_V2 0 CMQ205_00_UM_V2 0 indb 64 12 22 2010 9 42 19 AM ...

Reviews: