background image

22

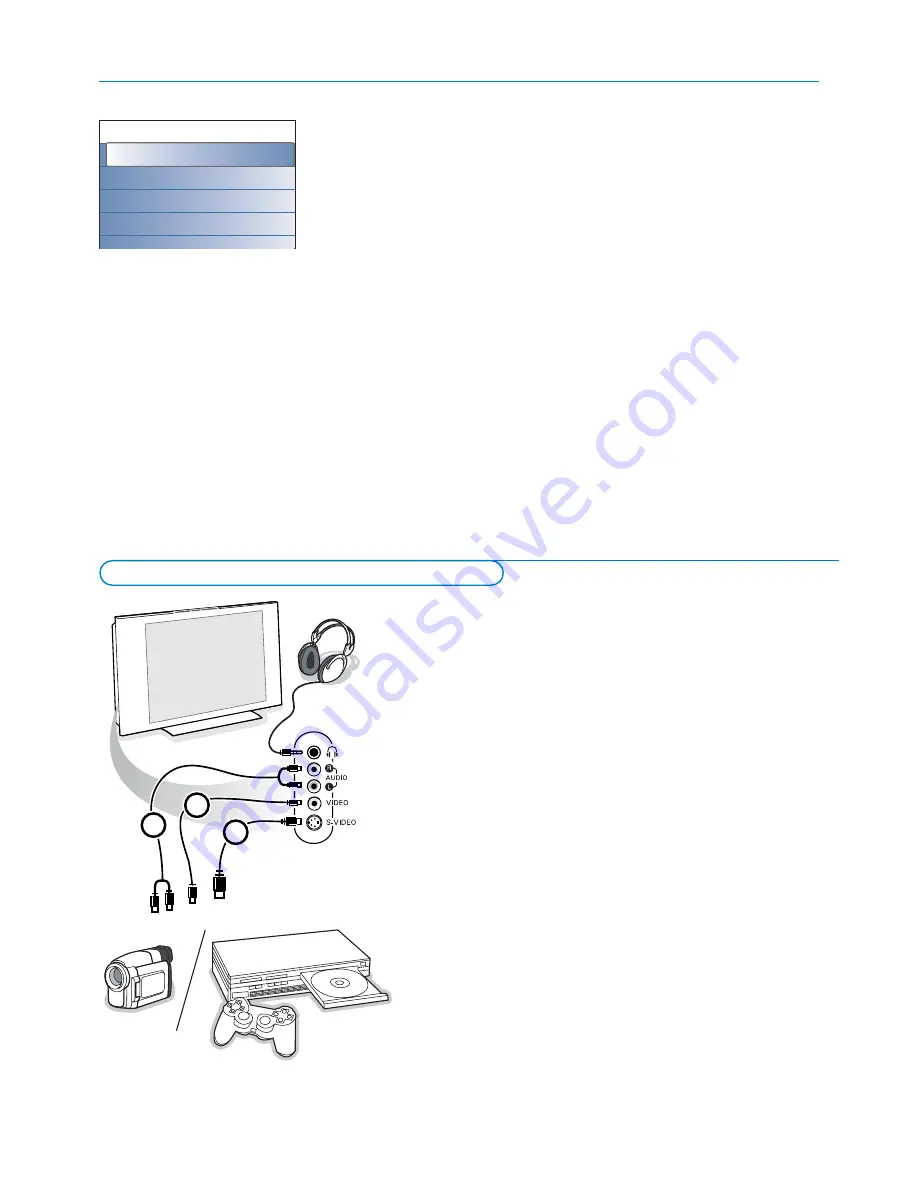
Camera, Camcorder, Game

&

Connect your camera, camcorder or game as shown.

é

Connect to 

VIDEO

2

and 

AUDIO L

3

for mono equipment.

For stereo equipment also connect 

AUDIO R

3

.

S-VHS quality with an S-VHS camcorder is obtained by connecting the S-
VHS cables with the 

S-VIDEO

input 

1

and 

AUDIO

inputs 

3

.

Do not connect cable 

1

and 

2

at the same time. This may cause picture

distortion !

Headphone

&

Insert the plug into the headphone socket 

L

as shown.

é

Press 

¬

on the remote control to switch off the internal loudspeakers of

the TV.

The headphone impedance must be between 8 and 4000 Ohm. The headphone
socket has a 3.5 mm jack.

In the Sound menu select 

Headphone volume

to adjust the headphone

volume.

1

2

3

Equipment to connect to the side connections

Teletext menu

The Teletext menu offers various functions to control teletext.

&

Switch teletext on and press the 

MENU

key to activate the menu.

é

Press the cursor up/down to select the menu items.

Press the cursor right or the 

OK

key to activate.

Press the 

MENU

key to leave the teletext menu.

Reveal

Reveals/conceals hidden information on a page, such as solutions to riddles and
puzzles.

Cycle subpages 

(if subpages are available)

Makes the subpages cycle automatically.
Press the cursor right or the 

OK

key to activate and to deactivate again.

Language

If the displayed characters on screen do not correspond with the characters
used by the teletext broadcaster, you can change the language group here.
Select 

Group 1

or 

Group 2

with the cursor right.

Teletext menu

Reveal

Off

Cycle subpages

Off

Language

Group II

Summary of Contents for Cineos 42PF9830

Page 1: ...rol to work peripheral equipment Code setup 32 To cancel the selected mode 32 Learnable remote control 34 Tips 36 Annex 1 Philips TV software upgrade with portable memory 37 Annex 2 Philips TV Slideshow Format with background music 39 Annex 3 Philips TV Portable Memory and USB 41 R End of life directives Philips is paying a lot of attention to producing environmentally friendly in green focal area...

Page 2: ...ot install the TV in a confined space such as a book case or a similar unit To prevent any unsafe situations no naked flame sources such as lighted candles should be placed in the vicinity Avoid heat direct sunlight and exposure to rain or water The equipment shall not be exposed to dripping or splashing Insert the aerial plug firmly into the aerial socket x at the bottom of the TV For best pictur...

Page 3: ...e control and keep it pressed Then simultaneously press the cursor left right to rotate the swivel in the direction of the command press the the cursor down to bring the swivel in a central position press the cursor up to return the swivel to the last selected position Note After a power drop or a power cord plug out adjust the swivel position with the cursor left right Automatic positioning to ce...

Page 4: ...equipment BROWSE On Off Press to display the Browse menu On or Off See p 6 OK to activate a setting to display the channel list starts playing content in the Multimedia Browser application p 20 MOT SWIVEL key To control the motorised swivel in combination with the cursor keys See p 3 MENU Settings menu on off See p 11 V Volume Press or to adjust the volume Interrupt the sound or restore it Alphanu...

Page 5: ...reen allows you to divide the main screen into two subscreens enabling two TV channels or a TV channel and an external source or a combination of one of them with Teletext see p 21 to be watched simultaneously Note Not all combinations might be possible In such a case a message appears on the screen Press the cursor left right to highlight the PIP window or the left right screen in Dual screen é P...

Page 6: ...ntering text messages on a cellular phone When a letter or number has been entered the cursor automatically advances to the next character position after the specified time out or by pressing the cursor right Also the cursor up down can be used to enter alphanumeric information When finished press the OK key to confirm the entry Move to the left panel MODE ON OFF Ambilight DVD R TV VCR AUX MENU 1 ...

Page 7: ...while adjusting the settings This means that when the highlight is on the right side panel the other menu items hide away When cursor left is pressed again the hidden menu items re appear and the highlight moves to the left panel Press the cursor left to go one menu level up again Press the OK key on the highlighted item to activate and to dismiss the menu Press the MENU key again to exit the Sett...

Page 8: ...en disappears and the progress of autoprogramming is displayed Manual installation Select Manual installation in the Installation menu é Use the cursor right to enter the Manual installation menu Select your country or part of the world where you are now located Press the cursor down to select Channel Enter or select the number where you would like to store the TV channel Press the cursor down to ...

Page 9: ...ition with the cursor right Enter a new character Press the green colour key or the OK key when finished Notes Press the yellow colour key to delete all characters The cursor will be positioned at the beginning Press the blue colour key to delete the character the cursor is positioned Enter a new character with the cursor up down Space numbers and other special characters are located between Z and...

Page 10: ...arting up the TV The memory device must be filled with the appropriate upgrade image and structure which can be found on the www philips com support website How to upload a new software version on your memory device see Annex 1 p 37 Software upgrade Current software info Local upgrades applications Info Settings Installation Language Automatic installation Manual installation Reshuffle rename chan...

Page 11: ...switches to the best surround sound mode when Auto surround is switched On Features preferences Teletext 2 5 Some broadcasters offer the opportunity to see more colours other background colours and nicer pictures in the teletext pages Select Teletext 2 5 in the Features preferences menu é Press the cursor right to select Teletext 2 5 On or Off Select Teletext 2 5 On to take advantage of this featu...

Page 12: ...code in the Features preferences menu with the cursor down é If no PIN code exists yet the menu item is set to Set code Follow the instructions on screen If a PIN code has previously been entered the menu item is set to Change code Follow the instructions on screen All number combinations from 0000 tot 9999 are valid numbers The Features preferences menu reappears with a message confirming that th...

Page 13: ...and the signal is routed appropriately Digital Audio Select Digital Audio In 1 or 2 when the TV expects digital audio for a connected peripheral equipment to come from a Digital audio input Make your selection of the source to which the peripheral equipment with digital audio input has been connected In addition to accepting audio input via Digital Audio In the TV can output encoded Dolby Digital ...

Page 14: ... key to store your selected settings Smart picture Select Smart picture to display a list of predefined picture settings each corresponding with specific factory settings Personal refers to the personal preference settings of picture in the picture menu Note This Philips TV has been set at the factory to look best in bright shop environments which typically use fluorescent lighting As your home wi...

Page 15: ...ated this feature automatically controls green enhancement and blue stretch It makes the colours more vivid Press the cursor right é Select On or Off in order to activate de activate Colour enhancement with the cursor right Hue This compensates for the colour variations in NTSC encoded transmissions Picture format This menu item performs the same as the q key on the remote control See Use of the r...

Page 16: ...Balance This will adjust the output of the right and left speakers to obtain the best stereo reproduction for your listening position Headphone volume This controls the level of sound through the headphones Surround mode This selects the modes for more spatial or surround sound reproduction dependent on the broadcast signals or signals from external inputs received Dual I II This will select per c...

Page 17: ...e forgotten your code See p 12 Select one of the menu items of the Child lock menu Lock to lock all channels and externals Custom lock and press the cursor right Select Lock after to lock all programmes from a certain time onwards Press the cursor right and enter the time with the cursor up down and right Select On with the cursor right to set the lock Channel lock to lock a certain TV channel or ...

Page 18: ...ly and soft which gives you a more immersive yet relaxed viewing Ambience is the rate of brightness and colour change as predefined in the factory Movie will influence the perception of a movie whereas Action mode will influence the dynamic impression Notes The rate of change is limited as not to cause uncomfortable sensations According to the selection made some Ambilight menu items will be downl...

Page 19: ...ion may damage the memory card USB device Do not touch the terminals on the back of the card Always insert a card in the correct direction Failure to do so may result in damage to the card and the unit Do not subject the card to excessive pressure or strong impacts Malfunctions of the unit or card may result in data loss or damage to the card Philips shall not accept any liability for damage or lo...

Page 20: ...Multimedia with the cursor up down The Multimedia browser will allow the user to browse content stored on the inserted USB device or memory card Press the cursor right The 2 panel browser will be shown with the left panel containing the content types Music Picture Video The right panel will display the content that is available of the selected content type Press the cursor up down to select a cont...

Page 21: ...full screen picture Enlarge a Teletext page Press q repeatedly to display the upper teletext part the lower teletext part and then to return to the normal teletext page size When the teletext page is enlarged you can scroll the text line by line using the cursor up down Hold Press the key to stop the pagecounter from seeking when you have entered a wrong pagenumber or when the page is not availabl...

Page 22: ... headphone volume 1 2 3 Equipment to connect to the side connections Teletext menu The Teletext menu offers various functions to control teletext Switch teletext on and press the MENU key to activate the menu é Press the cursor up down to select the menu items Press the cursor right or the OK key to activate Press the MENU key to leave the teletext menu Reveal Reveals conceals hidden information o...

Page 23: ...HV or VIDEO and L R Audio AV2 VIDEO or S VIDEO and L R Audio AV3 YPbPr and Digital Audio DVI analogue and digital and HDMI digital Side VIDEO or S VIDEO and L R Audio It is preferable to connect peripherals with RGB output to AV1 or AV2 as RGB provides a better picture quality DVI HDMI ANTENNA 75 DVI HDMI ANTENNA 75 Connect Peripheral Equipment AV2 MONITOR HDMI DVI DIG AUDIO AV3 AV1 OUT ...

Page 24: ...NTENNA 75 ø x jack Better playback quality can be obtained if you also connect the Video Audio Left and Right only for stereo devices AV cables 3 to the VIDEO AUDIO L and R input jacks of AV1 If your recorder has an S VHS video jack For improved picture quality connect an S video cable with the S VIDEO input instead of connecting the recorder to the VIDEO jack of AV1 S Video does not provide audio...

Page 25: ... AV1 VIDEO or S VIDEO AUDIO L and R 3 and to AV2 VIDEO or S VIDEO AUDIO L and R 5 Notes In case of mono equipment only the left loudspeaker reproduces sound Use a mono to stereo adaptor not supplied for sound reproduction via all internal loudspeakers When using the S VIDEO connector do not connect any device to the AV2 VIDEO or AV1 VIDEO input Recorder and other equipment CABLE RF IN RECORDER OUT...

Page 26: ...input that you are using é Connect the audio cables to the device s AUDIO L and R jacks and to the L and R audio AV1 or AV2 jacks 2 on the TV accordingly to where you connected the S Video cable Notes If necessary you can adjust the picture position to the center of the screen with the cursor keys The labels for the component video sockets may differ depending on the DVD player or the device conne...

Page 27: ...gital MultiChannel Surround receiver Connect a digital MultiChannel Surround receiver to the DIGITAL AUDIO OUT connector at the bottom of the TV DIGITAL AUDIO DIGITAL AUDIO OUT MultiChannel Surround receiver ...

Page 28: ...en with the cursor keys Due to legal requirements it is possible that with certain copy protected PCM audio qualities from a peripheral equipment connected to the HDMI input the Digital audio output signal is muted Your TV supports HDCP High bandwidth Digital Content Protection This is a system for protecting DVD content outputted via DVI from being copied It provides a secure digital link between...

Page 29: ...u may have to use an appropriate adapter DVD Connect the DVI to DVI cable to the DVI connector of your TV 1 Computer PC with a DVI connector connect the DVI to DVI cable to the DVI connector of your TV 1 with a VGA connector connect the VGA cable to a VGA to DVI adapter 4 and connect to the DVI connector of your TV 1 é Connect the audio cable 2 to the DVI AUDIO R right and L left inputs of the TV ...

Page 30: ...device on your TV and the correct input on your recorder Set your recorder to record You record the tuner channel of the TV or selected device Do not switch channels or turn off your TV when you are recording through MONITOR OUT Press the v key and then press this key repeatedly or select Source in the Set up menu see p 13 to select AV1 AV2 AV3 HDMI DVI Side or TV according to where you connected ...

Page 31: ...e and the remote control remains in the mode selected If the LED blinks 4 times after pressing the SELECT key with the OK key for at least 2 seconds the remote control is in Normal mode and the remote control returns to TV mode after 60 seconds Direct selection of a connected peripheral equipment When the remote is in TV Expert mode you may directly select a connected equipment in the following wa...

Page 32: ...the mode LED will stay on for 2 seconds Redo step Now you will try to use the TV remote with the peripheral equipment Press the SELECT key repeatedly to select the desired mode The selected mode LED will stay on for 2 seconds and then begin blinking The blinking means that the remote is in the external mode you have selected Within 60 seconds from the time the blinking starts point the remote towa...

Page 33: ...20 KR 503 Kreiselmeyer 510 Kyostar 501 Lasat 504 507 Lenco 501 Macab 519 Manhattan 502 504 512 Marantz 500 Mascom 504 Maspro 502 512 Mediamarkt 505 Medion 507 513 515 516 Metronic 501 503 504 522 Metz 510 Minerva 510 Mitsubishi 502 510 Morgan s 500 505 Nikko 505 Nokia 502 512 514 Nordmende 501 502 504 519 Novis 511 Octagon 501 503 Okano 505 Orbitech 501 Otto Versand 510 Pace 502 510 512 524 Pallad...

Page 34: ...f the selected source on your TV remote control is blanked during the capture of the signal When the function is copied the LED is lit again Repeat steps to again to copy other functions è To exit the learnable mode Press the key at the side of your TV remote control for about 2 seconds Your remote control will remain the last selected mode Note If a code from the remote control of your external e...

Page 35: ...EDS will light up Press the SELECT key 1x DVD R is lit up 2x SAT is lit up 3x VCR is lit up 4x AUX is lit up 5x DVD R SAT VCR AUX are lit up Press the OK key when one or all mode LEDS are lit The function keys which were learned will be erased or from the selected destination source or from all the external equipment at once All the keys from the TV remote control will have their factory function ...

Page 36: ...atically switch to the Soft setting No sound No sound on any channel Check the volume isn t at minimum Is the sound interrupted with the mute key Good sound but poor Adjust the contrast colour tint and brightness setting colour or no picture Try another smart picture setting No solution found Switch your TV off and then on again once Never attempt to repair a defective TV yourself for your picture...

Page 37: ... supported New software can be obtained from your dealer or can be downloaded from the www philips com support website Go to www philips com support using the web browser on your PC é Follow the procedure to find the information and the software related to your TV Select the latest software upgrade file and download it to your PC Decompress the ZIP file and copy the file autorun upg to the root di...

Page 38: ...are upgrade Switch on your TV with the power key B at the top of the TV At startup the TV will scan the USB portable memory until it finds the update content The TV will automatically go to the upgrade mode After a few seconds it will display the status of the upgrade procedure Warning You are not allowed to remove the USB portable memory during the software upgrade procedure In case of a power dr...

Page 39: ... your portable memory Select the slideshow file and press the OK key to start the slide show To stop a slide show press the key General Rules The slideshow will use plain ASCII XML syntax to allow the creation and editing of the slideshow files using simple tools All references to network content must be based on the global address of the content Content on a Portable Memory PM doesn t have a glob...

Page 40: ...ag The TV application can force the use of one or multiple predefined display times Identifies the slides to show Identifies the URL of the individual slide xml version 1 0 encoding ISO 885h9 1 philips slideshow version 1 0 title Philips AlbumFile title audio Music Nature mp3 audio slide duration 50 slide duration slides slide Images Image01 jpg slide slide Images Image02 jpg slide slide Images Im...

Page 41: ...Portable Memory Issues The following memory cards are supported by the digital media reader CompactFlash Card Type I II CF IBM Microdrive Memory Stick Memory Stick Pro SecureDigital Card SD SmartMedia Card SM MultiMedia Card MMC XD cards are supported through an external XD compatible card reader not supplied with the TV connected to the USB connector The same holds for other future memory cards D...

Page 42: ...23 2003 including all documents referenced by the document The document can be found on the USB standardisation website www usb org Full support of the USB Mass Storage Class Bulk Only Transport bInterfaceProtocol 50h Full support of SubClass Code 05h SFF 8070i spec Full support of SubClass Code 06h SCSI transparent command set For large USB memory devices when you are in the Content Browser it ma...

Reviews: