background image

EN-5

ENGLISH

FRANÇAISE

ESP

AÑOL

Important

2. 

Product information

2.1 

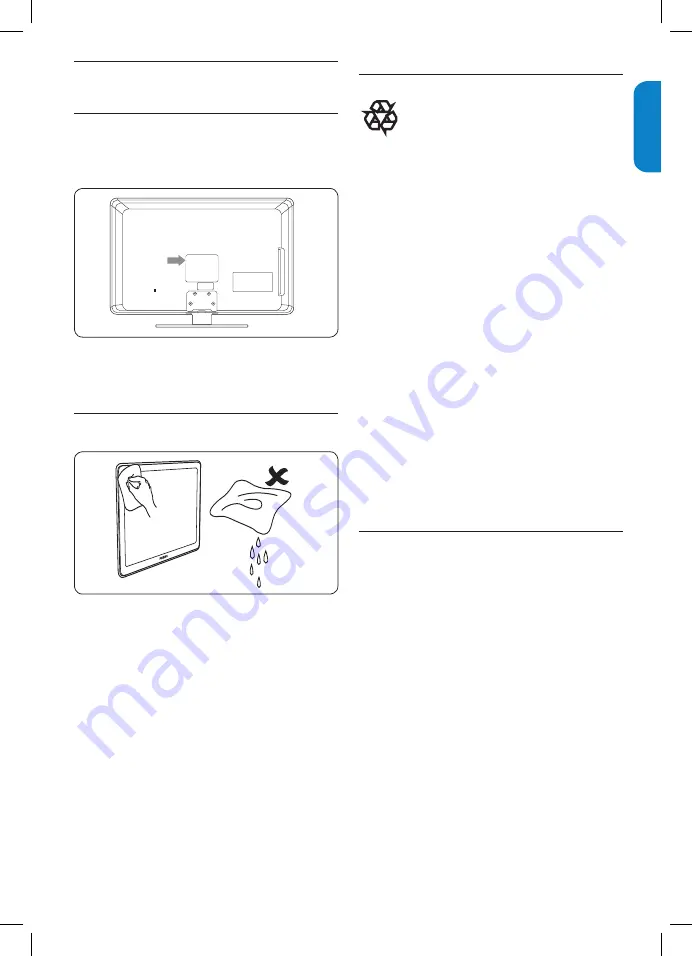
The model and serial number are on the rear of the 

TV and on the packaging.

This TV consumes minimal energy in standby mode 

to minimise environmental impact.  The active power 

consumption is given on the type plate at the rear of 

the TV. 


Screen care

2.2 

Turn off and unplug the AC power cord before 

• 

cleaning the screen.
Clean the screen with a soft, dry cloth.  Do not 

• 

use substances such as household cleaning agents 

as these may damage the screen.
To avoid deformations or color fading, wipe off 

• 

water droplets as soon as possible.
Do not touch, push, rub or strike the screen 

• 

with hard objects as this may damage the screen 

permanently.
Where possible, avoid stationary images that 

• 

remain on-screen for extended periods of time.  

If you must use stationary images, reduce the 

screen contrast and brightness to avoid screen 

damage.

Environmental care

2.3 

End of life directives - Recycling

Philips has paid a lot of attention to 

producing an environmentally friendly product.  

Your new TV contains several materials that can 

be recycled for new uses.  At the end of its life, 

specialized companies can dismantle and recycle this 

set.  This will minimize the amount of materials being 

disposed of.  Please be sure to dispose of this set in 

accordance with all state and local regulations.

Recycling your packaging

The packaging of this product is intended to 

be recycled. Contact your local authorities for 

information on how to recycle the packaging.

Disposing used batteries

The supplied batteries do not contain mercury 

or cadmium. Dispose supplied and all other used 

batteries according to your local regulations.

Power consumption

The TV consumes minimal energy in standby mode 

to minimise environmental impact.  Active power 

consumption is displayed at the back of the TV. 


Regulatory notices

2.4 

WARNING 


B

To reduce the risk of fire or electric shock, this 

apparatus should not be exposed to rain or 

moisture.  Objects filled with liquids, such as 

vases, should not be placed on this apparatus.

Summary of Contents for Cineos 32PFL5403

Page 1: ...Register your product and get support at www philips com welcome EN USER MANUAL ZH 用户手册 32PFL5403 ...

Page 2: ...es should not be placed on this apparatus CAUTION To prevent electric shock match wide blade of plug to wide slot fully insert For Customer Use Enter below the Serial No which is located on the rear of the cabinet Retain this information for future reference Model No _______________________ Serial No _______________________ Congratulations on your purchase and welcome to the family Dear PHILIPS pr...

Page 3: ...by qualified service personnel when A The power supply cord or the plug has been damaged B Objects have fallen or liquid has been spilled into the appliance C The appliance has been exposed to rain D The appliance does not appear to operate normally or exhibits a marked change in performance E The appliance has been dropped or the enclosure damaged Tilt Stability All televisions must comply with r...

Page 4: ...oon as possible Pixel characteristics The LCD panel has a high number of colour pixels Although it has effective pixels of 99 999 or more Black dots or bright points of light red green or blue may appear constantly on the screen This is a structural property of display within common industrial standard and is not a malfunction This does not affect the performance of the product Safety symbols Know...

Page 5: ... off or to standby 10 5 2 Watch TV 10 5 3 Watch channels from a cable receiver box 11 5 4 Watch a DVD 11 6 Use more of your TV 12 6 1 Remote control overview 12 6 2 Use install menu 13 6 3 Use location menu 14 6 4 Change picture and sound settings 14 6 5 Use smart mode 15 6 6 Use advanced picture 15 6 7 Set the clock 17 6 8 Set the sleeptimer 17 6 9 Use auto lock 18 6 10 Use Pixel Plus 19 6 11 Use...

Page 6: ...life directives Recycling Philips has paid a lot of attention to producing an environmentally friendly product Your new TV contains several materials that can be recycled for new uses At the end of its life specialized companies can dismantle and recycle this set This will minimize the amount of materials being disposed of Please be sure to dispose of this set in accordance with all state and loca...

Page 7: ...devices such as a camera or game console You can also connect to the headphone Rear connectors HDMI 2 HDMI 1 CVI 1 CVI 2 AUDIO IN VGA PC IN 75 Ω L AUDIO OUT R SPDIF OUT Cable Use the TV rear connectors to connect to the antenna and permanent devices such as a high definition disc player or DVD player Note D D For more information about connections see Section 7 Connect devices 3 2 Remote control 1...

Page 8: ...lot Your TV is equipped with a Kensington Security Slot at the back of the TV If you connect an anti theft Kensington lock not supplied position the TV within reach of a permanent object that can be attached to the lock 4 2 Wall mount theTV Warning B B Wall mounting of the TV should only be performed by qualified installers Koninklijke Philips Electronics N V Bears no responsibility for improper m...

Page 9: ...o 3 your antenna outlet ensuring that the cable is tightly secured at both ends Firmly pull the stand from the bottom of the 3 TV Place both the stand and bolts in a secure location for future reinstallation Step 3 Connect cables Connect the antenna cable AC power cord and all other devices to the back of the TV as described in the following sections and in Section 7 Connect devices Step 4 Secure ...

Page 10: ...MI 1 CVI 1 CVI 2 AUDIO IN VGA PC IN 75 Ω L AUDIO OUT R SPDIF OUT Cable Receiver Box ANTENNA Cable Receiver Box ANTENNA Connect the AC power cord Warning B B Verify that your voltage corresponds with the voltage printed at the back of theTV Do not insert the AC power cord if the voltage is different To connect the AC power cord AC IN AC IN Locate the power connector at the back of the 1 TV The loca...

Page 11: ...out the remote control Press POWER at the side of the TV to switch the TV off Press POWER again to switch the TV on To switch off Press POWER at the side of the TV 5 2 WatchTV Switch channels Press a number 1 to 9 or press CH on your remote control Press A CH to return to the previously viewed TV channel Note D D You can also switch channels by pressing CHANNEL at the side of the TV Adjust volume ...

Page 12: ...OURCE repeatedly to select the connected cable receiver box and wait a few seconds for the picture to appear Press 2 OK Use the remote control of your cable receiver 3 box to select channels Watch a DVD 5 4 Insert a DVD disc in your player 1 Press 2 Play on the remote control of your player The picture from the player might appear automatically on your screen If the picture does not appear Press 1...

Page 13: ...I Note D D The sound mode selections depend onTV program and broadcast TV channel of that region FORMAT 6 Selects a picture format See Change Picture format section CURSOR BUTTONS 7 Î ï Í Æ To navigate through the menus SMART MODE 8 Selects a picture setting CH 9 Switches to the next or previous channel NUMBER BUTTONS 10 Selects a channel page or setting A CH 11 Returns to the previously viewed ch...

Page 14: ...nels you can select Remember an antenna or cable TV signal must first be connected to your TV Manual store Manual store Activates auto search channel frequency or press number keys to show your desired channel frequency Prog no Use Î or ï to adjust the channel number in the manual store menu Finetune Manually fine tunes analogue channels when reception is poor Store Stores or sets the setting of m...

Page 15: ...l Press 2 ï or Æ to select the Picture menu Press 3 Î or ï to select the one of the picture settings and press Æ to enter the setting Press 4 Î or ï to adjust the setting and press OK to confirm the change Press 5 MENU to exit Main control Picture Brightness Color Sharpness Tint Color temp Picture format Contrast Sound Smart mode Advanced picture Picture Features Install Location Summary of pictur...

Page 16: ...This section describes how to adjust your advanced picture settings Press 1 MENU on the remote control Press 2 Î or ï to select the Advanced picture menu and press Æ to enter it Press 3 Î or ï to select one of the picture settings and press Æ to enter the setting Press 4 MENU to exit Main control Advanced picture Active control Sound Picture Contrast Skin tone NR Features Install Location Advanced...

Page 17: ... the classic 4 3 format to 16 9 16 9 subtitle Display 4 3 pictures using the full surface of the screen leaving the subtitles visible Wide screen Stretches the classic 4 3 format to 16 9 Note D D Any adjustment of brightness color contrast of sharpness will be stored into personal at smart mode section For 720p 1080i 1080p the default picture format will be Wide screen at HD and HDMI modes And the...

Page 18: ...omatic volume leveling Reduces sudden volume changes for example during commercials or when switching from one channel to another Select On or Off Set the clock 6 7 This section describes how to set the time Press 1 MENU on the remote control and select Features Timer Clock Clock Main control I Features Timer Start time Stop time Sleep timer Clock AM 12 00 Press 2 Æ to enter the list Press 3 Î or ...

Page 19: ... program After your personal access code has been set you are ready to select the channels or inputs you want to block out or censor Press 1 MENU on the remote control and select Features Auto lock Lock program Auto lock Change code Clear all Main control Features Lock program Main control Features Timer Access code Demo Source list Auto lock Timer Demo Source list Auto lock Press 2 Æ to enter Use...

Page 20: ... your TV as a PC monitor Caution B B Before you connect your PC set the PC monitor refresh rate to 60Hz Supported 6 11 1 screen resolutions The following screen resolutions are supported in PC mode Resolution Refresh rate 640 x 480 800 x 600 1024 x 768 1280 x 720 1280 x 768 1360 x 768 1280 x 1024 60Hz 60Hz 60Hz 60Hz 60Hz 60Hz 60Hz Tip E E 1360 x 768 is recommended resolution Select yourTV in PC mo...

Page 21: ...nput connectors for DVD players digital receivers game consoles and other high definition devices PC IN 2 VGA Audio connectors for PC CVI 1 CVI 2 3 Component video input Y Pb Pr and Audio L R connectors for DVD digital receiver or game console etc SPDIF OUT 4 Digital audio out AUDIO OUT L R 5 Sound output cinch connectors for home theatre or other audio systems Antenna input 75 6 Ω Side connectors...

Page 22: ...L R input connectors at CVI 1 CVI 2 Component video red gree blue Audio L R red white S video Composite audio video yellow red white Component video red gree blue Audio L R red white S video Composite audio video yellow red white Component video cable Red Green Blue Audio L R cabke Red White S Video Good quality 7 2 3 An analogue connection S Video provides better picture quality than composite vi...

Page 23: ... D D Different types of connectors may be used to connect a device to your TV depending on availability and your needs Connect a cable receiver box with RF In Outputs antennaTV Pb Pr L R Y CVI 2 75 Ω L AUDIO OUT R SPDIF OUT Cable Receiver Box TV CABLE IN TO TV AUDIO OUT L R VIDEO OUT S VIDEO A Cable TV signal B OR Connect a cable receiver box with Audio Video output VIDEO IN S VIDEO L AUDIO R SIDE...

Page 24: ...2 AUDIO IN PC IN VGA CVI 1 Pb Pr L R Y Pb Pr L R Y CVI 2 75 Ω L AUDIO OUT R SPDIF OUT Accessory Device Equipped with Component Video Outputs TV Y Pb Pr L AUDIO R A B Connect DVD player with a HDMI connector HDMI 1 HDMI 2 AUDIO IN PC IN VGA CVI 1 Pb Pr L R Y Pb Pr L R Y CVI 2 75 Ω L AUDIO OUT R SPDIF OUT DVD Player TV A ...

Page 25: ... VGA CVI 1 Pb Pr L R Y Pb Pr L R Y CVI 2 75 Ω L AUDIO OUT R SPDIF OUT Computer TV A B Connect digital home theatre amplifier with a digital audio cable HDMI 1 HDMI 2 AUDIO IN PC IN VGA CVI 1 Pb Pr L R Y Pb Pr L R Y CVI 2 75 Ω L AUDIO OUT R SPDIF OUT TV Digital Home Theatre Amplifier Digital Audio In A ...

Page 26: ...e receiver box directly into the TV allowing for the signal to display on the screen HDTV The generally agreed upon definition of HDTV is approximately twice the vertical and horizontal picture resolution of today s NTSC TV which essentially makes the picture twice as sharp HDTV also has a screen ratio of 16 9 as compared with most of today s TV screens which have a screen ratio of 4 3 HDTV offers...

Page 27: ...from the power socket outlet wait 60 seconds and reconnect the AC power cord The picture is distorted It is stretched out has short fat black bars on the side or top Broadcast video format 1 Press the FORMAT button on the remote control to select the best picture format 2 For some accessory devices the picture format has to be set in the accessory device The picture is mostly red and green or the ...

Page 28: ...t Audio L R support 480i p 576i p 720p 1080i p HDMI 1 HDMI 2 SIDE HDMI Ver 1 3a HDMI support video 480i p 576i p 720p 1080i p AUDIO L R output PC IN VGA PC Audio IN SPDIF OUT Digital audio out supprot PCM Side Connectors Headphone x 1 Composite video input Audio L R S Video WEIGHT DIMENSIONS Product Weight without stand 11 4 kg Product Weight with stand 14 1 kg Product Weight incl packaging 16 8 k...

Page 29: ...4 Contrast 14 L lock program 18 O Overview Connection 20 Remote control 12 TV 6 P PC mode 19 Picture format 16 PIN code 18 Position the TV 7 R Rear connectors 20 Recycling 5 Remote control 6 S Screen resolutions 19 Sharpness 14 Side connectors 20 Sleeptimer 17 Smart mode 15 Switch on the TV 9 T Technical specifications 27 Tint 14 Troubleshooting 26 V Volume 10 W Wall mount 7 Watch TV 10 ...

Reviews: