background image

24

3

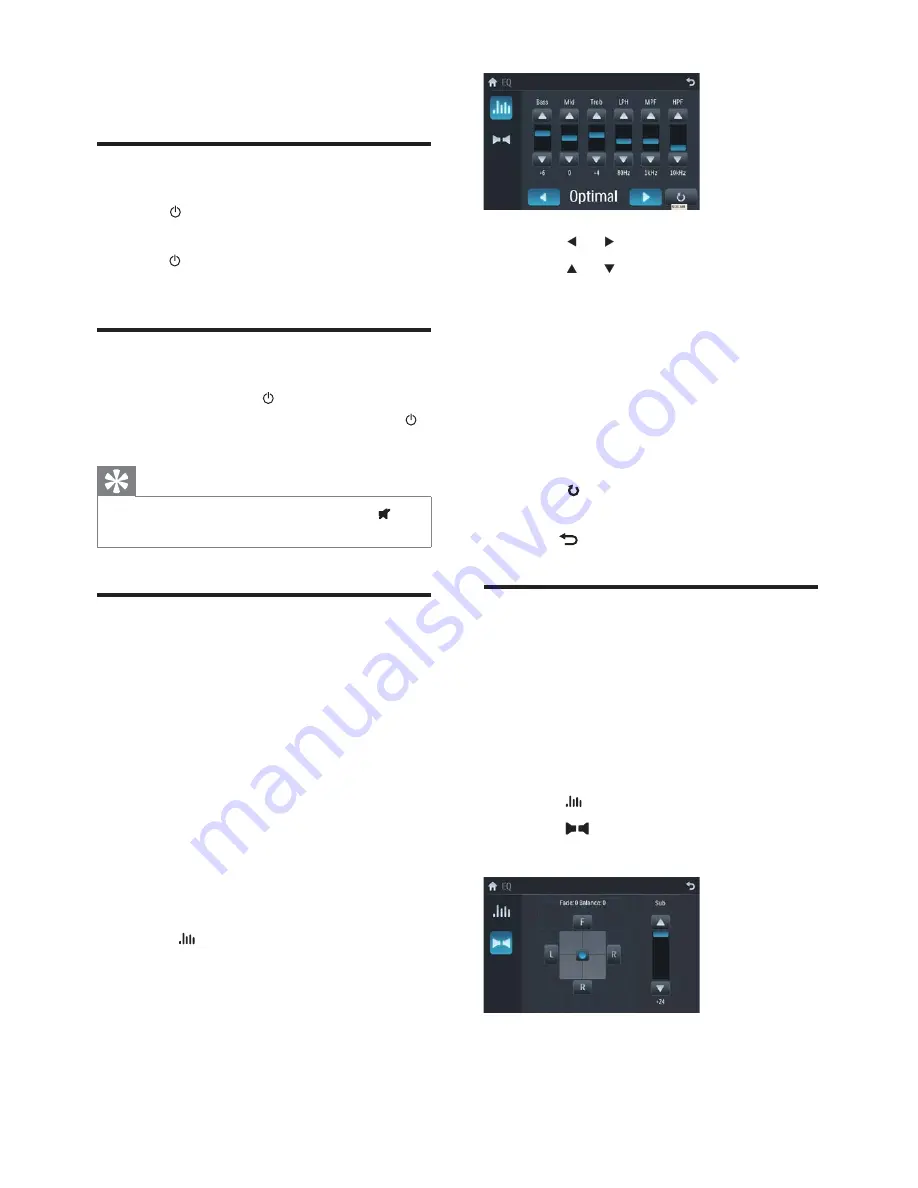
Touch   or   to select an EQ.

4

Touch   or   to adjust below settings:

‡

[Bass]

bass range: -14 to +14.

‡

[Mid]

middle range: -14 to +14.

‡

[Treb]

treble range: -14 to +14. 

‡

[LPH]

ORZSDVVÀOWHUUDQJH

60, 80, 100, 200.

‡

[MPF]

PLGGOHSDVVÀOWHUUDQJH

500, 1K, 1.5K, 2.5K.

‡

[HPF]

KLJKSDVVÀOWHUUDQJH

10K, 12.5K, 15K, 17.5K.

5

Touch   to restore the above settings 
into default settings.

6

Press 

 to exit.

Adjust fader/balance

You can also adjust the front and rear speaker 
balance, the left and right speaker balance, and 
subwoofer settings.

Touch anywhere except for the upper left 

corner to display menu on the screen, if 
necessary.

1

Touch  .

2

Touch 

Below options are displayed:

»

7 Adjust sound

Adjust volume

1

Turn 

/MUTE/VOL

 button clockwise to 

increase volume.

2

Turn 

/MUTE/VOL

 button anti-clockwise 

to reduce volume.

Mute

1

During play, press 

/MUTE/VOL

.

To turn the sound back on, press 

‡

/

MUTE/VOL

 again.

Tip

You can also turn off sound by touching 

‡

 on 

the screen.

Select preset equalizer

You can select preset equalizer:

‡

[User]

‡

[Techno]

‡

[Rock]

‡

[Classic]

‡

[Jazz]

‡

[Optimal]

‡

[Flat]

‡

[Pop]

1

Touch anywhere except for the upper left 
corner to display menu on the screen, if 
necessary. 

2

Touch  .

The current Equalizer setting is 

»

displayed.

EN

Summary of Contents for CID3680/93

Page 1: ...Register your product and get support at www philips com welcome EN User manual ...

Page 2: ...ove the unit 31 Replace fuse 32 10 Product information 33 11 Troubleshooting 35 About Bluetooth device 35 12 Glossary 37 Contents 1 Important 4 Safety 4 Notice 4 Introduction 5 What s in the box 5 Overview of the main unit 6 2 Get started 8 Install the car audio 8 Turn on 11 Adjust screen 12 Set date and time 12 3 Use map 13 Upgrade the map 13 4 Listen to radio 14 Tune to a radio station 14 Store ...

Page 3: ...se of controls or adjustments or performance of procedures other than herein may result in hazardous radiation exposure or other unsafe operation This unit is designed for negative ground earth 12 V DC operation only 7R UHGXFH WKH ULVN RI WUDIÀF DFFLGHQW GR no watch video during driving To ensure safe driving adjust the volume to a safe and comfortable level Improper fuses can cause damage or ÀUH ...

Page 4: ... PRGLÀFDWLRQV PDGH WR WKLV device that are not expressly approved by Philips Consumer Lifestyle may void the user s authority to operate the equipment 2008 Koninklijke Philips Electronics N V All rights reserved 6SHFLÀFDWLRQV DUH VXEMHFW WR FKDQJH ZLWKRXW notice Trademarks are the property of Koninklijke Philips Electronics N V or their respective owners Philips reserves the right to change produc...

Page 5: ...esume play Display the EO setting interface m Skip to the previous next option Skip to the previous next folder Move cursor up down Overview of the main unit a b c d e f g m h i l k j r q p o n a Green Answer phone Dial number Red Terminate call b MENU Return to the home menu c NAVI Enter the GPS navigation system or exit d SRC Select source e SD SDHC MMC card slot f Built in microphone for phone ...

Page 6: ...ontrast color Turn on off the screen display Adjust the display aspect ratio o SEARCH 6HDUFK IRU VSHFLÀF ÀOHV Change waveband p FM AM Switch to the FM AM source q USB socket r AV IN External equipment audio video in socket E ngl i sh EN ...

Page 7: ...nstructions are for a typical installation However if your car has different requirements make the corresponding adjustment If you have any questions regarding installation kits consult your Philips car audio dealer Caution This unit is designed for negative ground earth 12 V DC operation only Always install this unit in the car dashboard Other locations can be dangerous as the rear of the unit he...

Page 8: ...umination switch 4 Black wire A metal surface of the car First connect the black ground earth lead then connect the yellow and red power supply leads 5 Yellow wire The 12V car battery which is live at all times 6 Blue wire The electric antenna control lead or power supply lead of the antenna booster If there is no electric antenna or antenna booster or it is manually operated telescopic antenna it...

Page 9: ...nnect the supplied GPS antenna to your car and the system 1 Connect the supplier GPS antenna to the V VWHP ÀUVW Red White Yellow Red Red White Yellow Black Black Yellow Green Blue White Black Touch controller Rear screen Amplifier Yellow White Brown Red Red EN ...

Page 10: ...d MUTE VOL 2 Stick the other end of the GPS antenna to a metal surface of the car Connect GPS antenna If your car has built in radio antenna connect it to the radio antenna of the system for better radio signal 1 Connect the radio antenna to the car antenna 2 Stick the other end of the GPS antenna to a surface for signal reception Mount in the dashboard Note Check wire connection before you mount ...

Page 11: ...te Tip When date time is set touch ÀUVW DQG WKHQ touch to return to main menu Adjust screen To adjust screen brightness contrast color 1 Press DISP to show the manual 2 Press or to select an item 3 Touch to adjust the value 4 Press DISP WR FRQÀUP To turn on off the screen press and hold DISP Set date and time 1 Touch the upper left corner to display main menu 2 Touch in the middle right side of th...

Page 12: ...the map card slot 5 Turn on the car audio The map upgrades in a few minutes 3 Use map Note You may need to upgrade the map before using it see Upgrade the map section 1 Touch the upper left corner to display home menu 2 Touch Navigation The navigation menu is displayed in a few seconds 3 Refer to the map manual in Chinese to operate the navigation tool Tip You can press NAVI to enter exit the navi...

Page 13: ...istance Only stations with strong signals can be broadcast Local Stations with strong and weak signals can be broadcast 4 Listen to radio Tune to a radio station 1 Touch the upper left corner to display home menu 2 Touch Radio Band and frequency information is displayed 3 Touch on FM or AM to select band FM band options FM1 FM2 FM3 AM band options AM1 AM2 4 ULHÁ WRXFK or to tune to a radio station...

Page 14: ...anually 1 Tune to the station 2 Touch 3 Touch Save 4 Touch one of the channels 01 to 06 to save the select band Store stations automatically You can search for a station with intro search which broadcasts a 10 second preview of each detected radio station 1 Select band 2 Touch 3 Touch Search Auto search starts The six strongest stations of the selected band are saved in preset channels 1 6 automat...

Page 15: ...dio or images stored on the following discs DVD video DVD R DVD RW VCD Audio CD CD R CD RW Note Ensure that the disc contains playable content 1 Insert the disc into the disc slot with label side facing up Play starts automatically To remove the disc press the button When the disc is ejected the unit switches to the previous source if connected Otherwise the unit switches to Radio mode automatical...

Page 16: ...OH YLGHR ÀOH folders 3 Touch a folder then touch or to VHOHFW D ÀOH 4 Touch to start play Remove the USB device 1 Press SRC to switch to another source 2 Remove the USB device Insert SD MMC card Note Ensure that the device contains playable content The unit supports SDHC card 1 Open the SD MMC card cover 2 Insert the SD MMC card into the SD MMC card slot Play starts automatically Remove the SD MMC...

Page 17: ...ancel repeat play RU DXGLR ÀOHV 1 Touch to return to playlist menu 2 Touch to display all available audio folders 3 Touch a folder then touch or to VHOHFW D ÀOH 4 Touch to start play RU SLFWXUH ÀOHV 1 Touch to return to playlist menu 2 Touch to display all available picture folders 3 Touch a folder then touch or to select a picture 4 Touch to view the picture Search within a title folder Search by...

Page 18: ...oke or audio CD 1 Touch anywhere except for the upper left corner to display menu on the screen if necessary 2 Touch to select Repeat play the current track repeatedly Repeat off cancel repeat play RU 03 0 ÀOHV 1 Touch anywhere except for the upper left corner to display menu on the screen if necessary 2 Touch to select Repeat play the current track repeatedly Repeat folder play all the tracks in ...

Page 19: ...re except for the upper left corner to display menu on the screen if necessary 2 Touch to display the 2nd menu 3 Touch repeatedly to select a language The selected language is displayed Rotate pictures 1 When you view pictures touch anywhere except for the upper left corner to display menu on the screen if necessary 2 Touch repeatedly to rotate the picture Zoom You can zoom in pictures for a close...

Page 20: ...evice You can make or receive phone calls with Bluetooth enabled phones through the unit You can also listen to music from a Bluetooth enabled device Pair the Bluetooth enabled devices To connect your Bluetooth device to the unit you need to pair the device to the unit Pairing needs only to be done once You can pair up to eight devices Note The operational range between this unit and a Bluetooth d...

Page 21: ...sic stored on the device 1 Pair the phone with the unit 2 Touch the upper left corner to return to home menu 3 Touch Bluetooth The Bluetooth menu is displayed 4 Start play music via device If your device support AVRCP 1 Touch 2 Touch to start play 5 Touch or to search for phone number from the following list Missed calls Received calls Dialed calls Phone book Sim phone book Local phone book Or tou...

Page 22: ... or off Auto connect function Auto answer to turn on or off Auto answer function Pairing code to set paring code Phone Book Sync to synchronize phone book 1 In Bluetooth menu touch The option menu is displayed 2 Touch on the selected option to change the setting Tip You can also adjust Bluetooth settings in the Settings menu E ngl i sh EN ...

Page 23: ...fer settings Touch anywhere except for the upper left corner to display menu on the screen if necessary 1 Touch 2 Touch Below options are displayed 7 Adjust sound Adjust volume 1 Turn MUTE VOL button clockwise to increase volume 2 Turn MUTE VOL button anti clockwise to reduce volume Mute 1 During play press MUTE VOL To turn the sound back on press MUTE VOL again Tip You can also turn off sound by ...

Page 24: ... fader balance value Fade fader range 24 to 24 F front speaker R rear speaker Balance balance range 24 to 24 L left speaker R right speaker 5 Touch to exit Set Dynamic Bass Boost DBB 1 Touch to toggle between the settings DBB on The icon is illuminated DBB off default The icon is gray E ngl i sh EN ...

Page 25: ...e screen saver automatically 10 seconds after last operation 20s Turn on the screen saver automatically 20 seconds after last operation Auto dimmer On Turn on the screen dim automatically 5 seconds after last operation Off Never turn the screen dim 8 Adjust settings Display system setup menu 1 Touch the upper left corner to display main menu 2 Touch in the middle right side of the screen The secon...

Page 26: ...es loud sound level softer and soft sound level louder so that you can watch the DVD movies at a low volume without disturbing others Off The DRC function is off 3 Press to exit Adjust video settings 1 Touch Video Key color Red Button backlight turns red Blue Button backlight turns blue Beep On Turn on the beep sound Each time you press a button the unit beeps Off Turn off the beep sound Calibrati...

Page 27: ...s Options Description Aspect ratio Full For widescreen display Normal For normal display Video input Auto The correct format is set automatically Select this option if you are not sure which format should be selected NTSC Used in the United States Canada Japan Mexico the Philippines South Korea Taiwan and some other countries PAL Used in China India Singapore the western European countries except ...

Page 28: ...ch DVD rating Adjust language settings 1 Touch Language 2 Touch an option repeatedly to select Language settings Options Description OSD English Select on screen display language ࡩ ᇓ໗ ᐥᦥɻʼ DVD audio English Select DVD audio language Options available are depends on DVD disc ࡩ ᇓ໗ ᐥᦥɻʼ DVD subtitle English Select DVD subtitle language Options available are depends on DVD disc ࡩ ᇓ໗ ᐥᦥɻʼ Off Turn off ...

Page 29: ...table for children G Acceptable for general viewers PG Parental guidance suggested PG 13 Unsuitable for children under age 13 PG R Recommend parents to restrict children under 17 to view R Restricted Recommend parent to guide children under 17 to view NC 17 Unsuitable for children under age 17 Adult Acceptable for adults only Load factory Restore to default settings 3 Press to exit EN ...

Page 30: ... trim plate 9 Others Listen to other devices You can connect an external audio video device to the unit 1 Connect the car audio to the device with the supplied AV cable AV IN 2 Touch the upper left corner to display the main menu 3 Touch AV IN1 4 Operated the connected the device see the instructions manual of the device Tip If you connected the system to other audio device through the REAR OUT L ...

Page 31: ...he fuse may be damaged and need to be replaced 1 Take out the unit from dashboard 2 Check the electric connection 3 Buy a fuse that matches the voltage of the damaged fuse 15A 4 Replace the fuse If the fuse gets damaged immediately after it has been replaced there may be an internal malfunction In such case consult your Philips dealer EN ...

Page 32: ... codecs Receive Transmit SBC Sub Band Codec SBC Sub Band Codec 10 Product information Note Product information is subject to change without prior notice General Power supply 12 V DC 11 V 16 V negative ground Fuse 15 A Suitable speaker impedance 4 8 Maximum power output 50 W x 4 channels Continuous power output 24 W x 4 channels 4 10 T H D Pre Amp output voltage 2 0 V CD play mode 1 kHz 0 dB 10 k l...

Page 33: ...cks titles maximum 999 ID3 tag v2 0 or later File name in Unicode UTF8 maximum length 128 bytes Unsupported formats Empty albums an empty album is an album that does not contain MP3 0 ÀOHV DQG LV QRW EH VKRZQ LQ the display 8QVXSSRUWHG ÀOH IRUPDWV DUH skipped For example Word GRFXPHQWV GRF RU 03 ÀOHV ZLWK extension dlf are ignored and not played 9 3 0 DXGLR ÀOHV 50 SURWHFWHG 0 ÀOHV wav m4a m4p mp4...

Page 34: ... Disconnect that device or all other connected devices and then try again 11 Troubleshooting Warning Never remove the casing of this apparatus To keep the warranty valid never try to repair the system yourself If you encounter problems when using this apparatus check the following points before requesting service If the problem remains unsolved go to the Philips web site www philips com welcome Wh...

Page 35: ...ny obstacle between the mobile phone and the system Some mobile phones may connect and disconnect constantly when you make or end calls This does not indicate any malfunction of the system For some mobile phones the Bluetooth connection may be deactivated automatically as a power saving feature This does not indicate any malfunction of the system EN ...

Page 36: ...at is meant to allow mobile devices to share information and applications without the worry of cables or interface incompatibilities 7KH QDPH UHIHUV WR D 9LNLQJ LQJ ZKR XQLÀHG Denmark Operate at 2 4GHz For more information see www bluetooth com M MMC MultimediaCard A type of memory card with D ÁDVK PHPRU MP3 ÀOH IRUPDW ZLWK D VRXQG GDWD FRPSUHVVLRQ system MP3 is the abbreviation of Motion Picture ...

Page 37: ...WHULDOV IRU WKLV SDUW LV EHORZ WKH OLPLW UHTXLUHPHQW LQ 6 7 Ҹභ ܠ ᄗٟᄗ འራሢ ᅿ ܠ Ө Ⴄঊራӭ ሱ ߅੪Գս 6 7 ҵቻ ىޡ ྭ੪ ႓ d QGLFDWHV WKDW WKLV WR LF RU KD DUGRXV VXEVWDQFH FRQWDLQHG LQ DW OHDVW RQH RI WKH KRPRJHQHRXV PDWHULDOV XVHG IRU WKLV SDUW LV DERYH WKH OLPLW UHTXLUHPHQW LQ 6 7 Ѯ ᄊ ྭ QYLURQPHQWDO 3URWHFWLRQ 8VH 3HULRG ت ኒ ཱԣసሱ߅ᄗ ᄗٟᄗ འራࡩᅏฯᅿሀԪ ᄊ ສ ྑӤࡘ ڡ ඕ ࡩ үĩ ت ኒ ཱԣసᄊࠞ ᄊ تܠ ኒ ཱԣసӤࡘ ॄ ٵ ᆑՐၚሹཌ ࡩ ٵ ഈඈcӯԣᆑՐၚሹ ྭd ...

Page 38: ... 2009 Koninklijke Philips Electronics N V All rights reserved CID3680_93_UM_V1 0 ...

Reviews: