background image

23

2

Touch   or   to highlight a setting.

3

Touch on the option to display/select an 
option.

General 
settings

Options

Description

[Radio 
region]

[USA]

,

[S.Amer-1]

,

[Arabia]

,

[China]

,

[S.Amer-2]

,

[Europe]

,

[Korea]

,

[OIRT]

Select one that 
matches your 
location.

[Radio 
range]

[Local]

Only stations 
with strong 
signals can be 
broadcast.

[Distance]

Stations with 
strong and weak 
signals can be 
broadcast.

[Blackout]

[off]

Never turn on 
the screen saver.

[10s]

Turn on the 
screen saver 
automatically 
10 seconds after 
last operation.

[20s]

Turn on the 
screen saver 
automatically 
20 seconds after 
last operation.

[Dimmer 
Mode]

[Night]

Select this mode 
at night.

[Dusk]

Select this mode 
at dusk.

[Normal]

Set screen 
dimmer to 
normal mode.

[Bright]

Select this 
mode in bright 
environment.

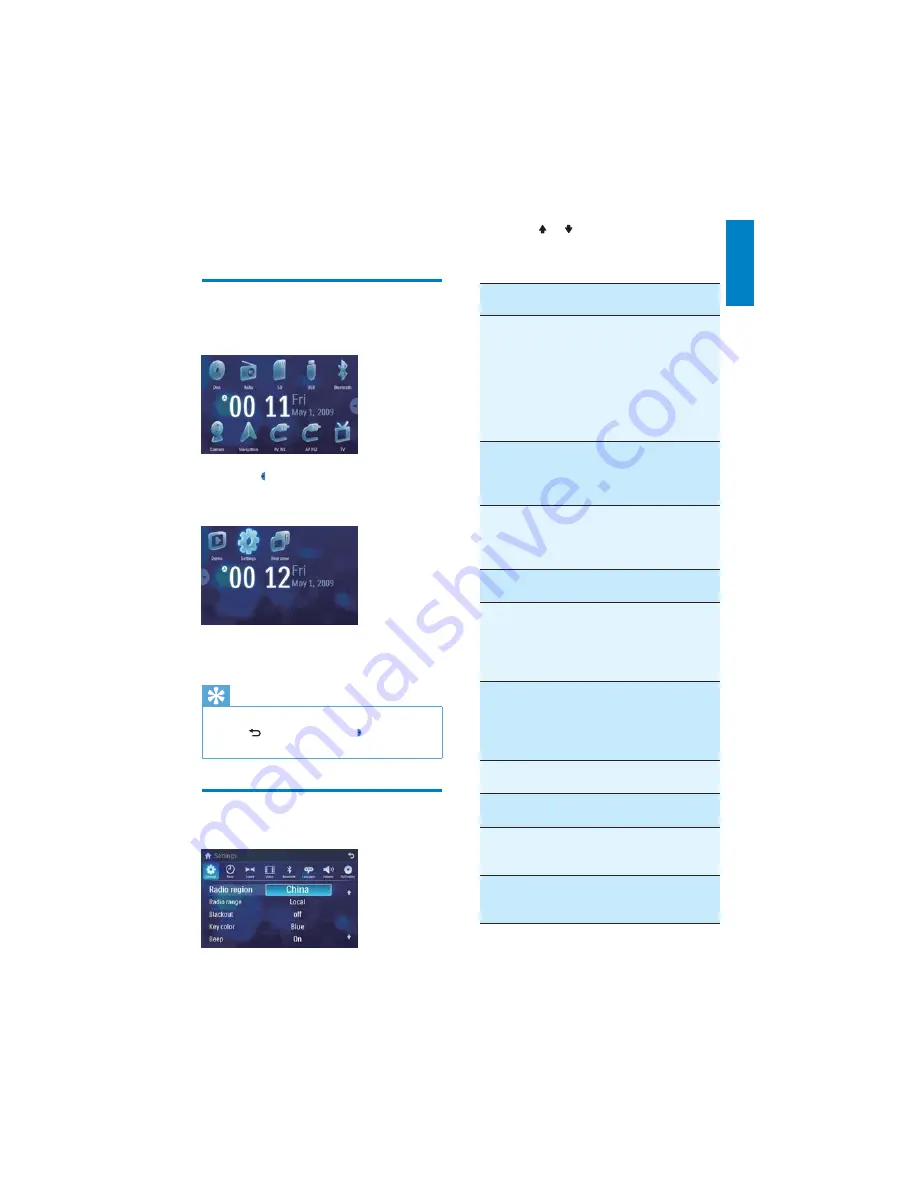
9 Adjust settings

Display system setup menu

1

Touch the upper left corner to display 
main menu.

2

Touch   in the middle right side of the 
screen.

The second main menu is displayed.

»

3

Touch 

[Settings]

.

The settings menu is displayed.

»

Tip

When the setup adjustment is completed, 

‡

touch 

ÀUVWDQGWKHQWRXFK

 to return to 

main menu.

Adjust general settings

1

Touch 

[General]

, if necessary. 

English

EN

Summary of Contents for CID3281

Page 1: ...Register your product and get support at www philips com welcome EN User manual 3 ZH CN Ⴌ߀ Ҭ 35 CID3281 ...

Page 2: ... Select audio mode 18 Select subtitle language 18 Zoom 18 Rotate pictures 18 Select slide show duration 18 7 Play with Bluetooth device 19 Pair the Bluetooth enabled devices 19 Make a call 19 Receive call 20 Listen to music from Bluetooth device 20 Adjust Bluetooth settings 21 8 Adjust sound 21 Adjust volume 21 Mute 21 Select preset equalizer 21 Adjut fader balance 22 Set Dynamic Bass Boost DBB 22...

Page 3: ...ranty does not apply Use of controls or adjustments or performance of procedures other than herein may result in hazardous radiation exposure or other unsafe operation This unit is designed for negative ground earth 12 V DC operation only 7R UHGXFH WKH ULVN RI WUDIÀF DFFLGHQW GR no watch video during driving To ensure safe driving adjust the volume to a safe and comfortable level Improper fuses ca...

Page 4: ...easy to separate into three materials cardboard box polystyrene foam buffer and polyethylene bags protective foam sheet Your system consists of materials which can be recycled and reused if disassembled by a specialized company Please observe the local regulations regarding the disposal of packaging materials exhausted batteries and old equipment Q FKDQJHV RU PRGLÀFDWLRQV PDGH WR WKLV device that ...

Page 5: ...nts of your package a Main unit b Power connector c CDC Control Camera wire d AV out cable e CMMB connector f USB cable g GPS antenna h Side key i Screen cleaning cloth j Printing material include User manual Quick start guide a b c d e g f h j i EN ...

Page 6: ...ove USB device h Map card slot i SD MMC card slot j DISP Adjust screen brightness Turn on off the screen display Overview of the main unit a Disc slot b RESET Reset the unit when it hangs up c Eject disc d Skip to the previous next preset station Skip to the previous next folder Search backward forward for DVD video e DISC Switch to disc playing mode c d f e g o m n l j k b p a i h En gl i sh EN ...

Page 7: ...rear of the unit heats up during use To avoid short circuit before you connect ensure that the ignition is off Ensure that you connect the yellow and red power supply leads after all other leads are connected Ensure that all loose leads are insulated with electrical tape Ensure that the leads do not get caught under screws orin parts that will move e g seat rail Ensure that all ground earth leads ...

Page 8: ...pes to one another Mount in the dashboard Note Check wire connection before you mount the unit into a car If preset radio stations are lost when the ignition key is turned OFF and then back ON reconnect the red leads crosswise to the yellow ones 1 If the car does not have an on board drive or navigation computer disconnect the negative terminal of the car battery If you disconnect the car battery ...

Page 9: ...x Black Yellow AV system AV system AUX AUX Red Red White White Yellow Yellow Optional accessory Optional accessory GPS antenna Radio antenna Rear display Rear display Yellow Yellow Amplifier White White Red Red Brown Note 1 If there is built in CAN connect c to d No need to do the connections as indicated in a e and f 2 If there is not built in CAN you need to i Connect d to b no need to connect c...

Page 10: ...ress DISP To adjust screen brightness 1 Press DISP Brightness bar is displayed 2 Rotate TUNE SELECT to adjust the value If necessary touch in the middle right side of the screen to display the 2nd screen 2 Touch Settings 3 Touch Time The date time setup menu is displayed Set date 1 Touch Date 2 Touch on the displayed date information A submenu is displayed 3 Touch or to set year month and day Set ...

Page 11: ...lot 5 Turn on the car audio The map upgrades in a few minutes 4 Use navigation map Note You may need to upgrade the navigation map before using it see Upgrade the navigation map section 1 Touch the upper left corner to display home menu 2 Touch Navigation The navigation menu is displayed in a few seconds 3 Refer to the user manual of the navigation map to operate the navigation tool Tip You can pr...

Page 12: ... broadcast Store radio stations in memory You can store up to 6 stations in each band Store stations manually 1 Tune to the station 2 Touch 5 Listen to radio Tune to a radio station 1 Touch the upper left corner to display home menu 2 Touch Radio Band and frequency information is displayed 3 Touch on FM or AM to select band FM band options FM1 FM2 FM3 AM band options AM1 AM2 4 ULHÁ WRXFK or to tun...

Page 13: ...ejected the unit switches to the previous source if connected Otherwise the unit switches to Radio mode automatically 3 Touch Save 4 Touch one of the channels 01 to 06 to save the select band Store stations automatically You can search for a station with intro search which broadcasts a 10 second preview of each detected radio station 1 Select band 2 Touch 3 Touch Search Auto search starts The six ...

Page 14: ...ay 2 To pause touch To resume play touch again Connect USB device Note Ensure that the device contains playable content 1 Open the USB door 2 Connect the USB device to the unit with the supplied USB cable Play starts automatically Note To remove the USB device switch to disc UDGLR RU RWKHU VRXUFH ÀUVW Insert USB or SD MMC card Note Ensure that the device contains playable content The unit supports...

Page 15: ...During play you can select different repeat play modes For DVD VCD movie disc 1 Touch anywhere except for the upper left corner to display menu on the screen if necessary Search for a folder RU YLGHR ÀOHV 1 Touch to return to playlist menu 2 Touch WR GLVSOD DOO DYDLODEOH YLGHR ÀOH folders 3 Touch a folder then touch or to select D ÀOH 4 Touch to start play RU DXGLR ÀOHV 1 Touch to return to playli...

Page 16: ...udio language For video discs that contain two or more audio channels 1 During play touch anywhere except for the upper left corner to display menu on the screen if necessary 2 Touch to display the 2nd menu 2 Touch to display the 2nd menu 3 Touch to select Repeat chapter play the current chapter repeatedly Repeat title play all chapters in the title repeatedly Repeat all play the disc repeatedly R...

Page 17: ...audio mode When you playVCDs you can select an audio mode R L Stereo 1 During play touch anywhere except for the upper left corner to display menu on the screen 2 Touch repeatedly until the audio mode is selected Select subtitle language For DVD or DivX discs that contain two or more subtitle languages 1 During play touch anywhere except for the upper left corner to display menu on the screen if n...

Page 18: ...uetooth enabled phones through the unit You can also listen to music from a Bluetooth enabled device Pair the Bluetooth enabled devices To connect your Bluetooth device to the unit you need to pair the device to the unit Pairing needs only to be done once You can pair up to eight devices Note The operational range between this unit and a Bluetooth device is approximately 10 meters 30 feet Before y...

Page 19: ... WKH XQLW WR play music stored on the device 1 Pair the phone with the unit 2 Touch the upper left corner to return to home menu 3 Touch Bluetooth The Bluetooth menu is displayed 4 Start play music via device If your device support AVRCP 1 Touch 2 Touch to start play Missed calls Received calls Dialed calls Phone book Sim phone book Local phone book Or touch to dial number directly then touch to d...

Page 20: ...rner to display menu on the screen if necessary 2 Touch The current Equalizer setting is displayed Adjust Bluetooth settings You can change below Bluetooth settings Bluetooth to turn on or off Bluetooth function Auto connect to turn on or off Auto connect function Auto answer to turn on or off Auto answer function Pairing code to set paring code Phone Book Sync to synchronize phone book 1 In Bluet...

Page 21: ...ge 14 to 14 Mid middle range 14 to 14 Treb treble range 14 to 14 LPH ORZ SDVV ÀOWHU UDQJH 100 200 MPF PLGGOH SDVV ÀOWHU UDQJH 1K 1 5K 2 5K HPF KLJK SDVV ÀOWHU UDQJH 12 5K 15K 17 5K 5 Touch to restore the above settings into default settings 6 Press to exit Adjut fader balance You can also adjust the front and rear speaker balance the left and right speaker balance and subwoofer settings Touch anyw...

Page 22: ...10 seconds after last operation 20s Turn on the screen saver automatically 20 seconds after last operation Dimmer Mode Night Select this mode at night Dusk Select this mode at dusk Normal Set screen dimmer to normal mode Bright Select this mode in bright environment 9 Adjust settings Display system setup menu 1 Touch the upper left corner to display main menu 2 Touch in the middle right side of th...

Page 23: ...rns blue Red Button backlight turns red Beep On Turn on the beep sound Each time you press a button the unit beeps Off Turn off the beep sound WallPaper Blue Turn background color to blue Black Turn background color to black F1 Select the F1 picture as background User Select a picture as wall paper Calibration Start Calibrate the touch screen GPS Setup Start Search for GPS system 4 Press to exit S...

Page 24: ...s displayed normally Mirror When you drive in reverse the rear view is displayed in mirror Parking On Disable video view during drive Off Enable video view during drive DivX registration code View code for DivX registration 3 Press to exit 2 Touch an option repeatedly to select Sound settings Options Description Sub woofer On Turn on the subwoofer Off Turn off the subwoofer Sub woofer ÀOWHU 80Hz 6...

Page 25: ...sh Select DVD menu language Options available are depends on DVD disc ࡩ ᇓ໗ ᐥᦥɻʼ 3 Press to exit Adjust Bluetooth settings 1 Touch Bluetooth 2 Touch an option repeatedly to select Bluetooth settings Options Description Bluetooth On Turn on the Bluetooth function Off Turn off the Bluetooth function Auto connect On If the pre paired device is within the effective range the unit re connects to pre pai...

Page 26: ...to view R Restricted Recommend parent to guide children under 17 to view NC 17 Unsuitable for children under age 17 Adult Acceptable for adults only Load factory Restore to default settings 3 Press to exit Adjust volume settings You can set different volume for different modes 1 Touch Volume The volume setting sub menu is displayed 2 Touch on a source DVD USB SD CMMB Radio Bluetooth AV IN1 AV IN2 ...

Page 27: ...tches the voltage of the damaged fuse 15A 4 Replace the fuse If the fuse gets damaged immediately after it has been replaced there may be an internal malfunction In such case consult your Philips dealer 10 Others Reset When the unit hangs up you can reset it 1 Press RESET with a ball point pen or similar tool Tip When the unit is reset all the settings remain unchanged EN ...

Page 28: ... 480 dots Contrast ratio 600 Brightness 400 cd m2 11 Product information Note Product information is subject to change without prior notice General Power supply 12 V DC 11 V 16 V negative ground Fuse 15 A Suitable speaker impedance 4 8 Maximum power output 50 W x 4 channels Continuous power output 24 W x 4 channels 4 10 T H D Pre Amp output voltage 2 0 V CD play mode 1 kHz 0 dB 10 k load Subwoofer...

Page 29: ...lass 2 Maximum communication range Line of sight approx 8m Frequency band 2 4 GHz band 2 4000 GHz 2 4835 GHz Compatible Bluetooth SURÀOHV DQGV UHH 3URÀOH 3 DQGVHW 3URÀOH 63 Advanced Audio LVWULEXWLRQ 3URÀOH 3 Audio Video Remote RQWURO 3URÀOH 95 3 Supported codecs Receive Transmit SBC Sub Band Codec SBC Sub Band Codec Compatible USB devices 86 ÁDVK PHPRU 86 RU 86 86 ÁDVK SOD HUV 86 RU 86 memory car...

Page 30: ...nabled device Disconnect that device or all other connected devices and then try again 12 Troubleshooting Warning Never remove the casing of this apparatus To keep the warranty valid never try to repair the system yourself If you encounter problems when using this apparatus check the following points before requesting service If the problem remains unsolved go to the Philips web site www philips c...

Page 31: ...n about 10 times more data than a regular CD R Region code A system that allows discs to be played only in the region designated This unit only plays discs that have compatible region codes You FDQ ÀQG WKH UHJLRQ FRGH RI RXU XQLW RQ WKH product label Some discs are compatible with more than one region or ALL regions The paired mobile phone connects and disconnects constantly The Bluetooth receptio...

Page 32: ...WLRQ 7KH 6 VSHFLÀFDWLRQ enables SD cards to reach higher capacities from 4GB to 32GB and growing W WMA Windows Media Audio An audio format owned by Microsoft is a part of Microsoft Windows Media technology Includes Microsoft Digital Rights Management tools Windows Media Video encoding technology and Windows Media Audio encoding technology E ng l i sh EN ...

Page 33: ...LPLW UHTXLUHPHQW LQ 6 7 Ҹභ ܠ ᄗٟᄗ འራሢ ᅿ ܠ Ө Ⴄঊራӭ ሱ ߅੪Գս 6 7 ҵቻ ىޡ ྭ੪ ႓ d QGLFDWHV WKDW WKLV WR LF RU KD DUGRXV VXEVWDQFH FRQWDLQHG LQ DW OHDVW RQH RI WKH KRPRJHQHRXV PDWHULDOV XVHG IRU WKLV SDUW LV DERYH WKH OLPLW UHTXLUHPHQW LQ 6 7 2006 Ѯ ᄊ ྭ QYLURQPHQWDO 3URWHFWLRQ 8VH 3HULRG ت ኒ ཱԣసሱ߅ᄗ ᄗٟᄗ འራࡩᅏฯᅿሀԪ ᄊ ສ ྑӤࡘ ڡ ඕ ࡩ үĩ ت ኒ ཱԣసᄊࠞ ᄊ تܠ ኒ ཱԣసӤࡘ ॄ ٵ ᆑՐၚሹཌ ࡩ ٵ ഈඈcӯԣᆑՐၚሹ ྭd 7KLV ORJR UHIHUV WR WKH SHULRG ...

Page 34: ... 2010 Koninklijke Philips Electronics N V All rights reserved Document order number CID3281_93_UM_V1 0 ...

Reviews: