background image

21

EN

7  Use Bluetooth 

devices

With this system, you can listen to audio from a 

player and make a call through Bluetooth.

Pair a device

Note


Philips does not guarantee the compatibility with all 

Bluetooth devices.


Before pairing a device with this system, read its user 

manual for Bluetooth compatibility.


Make sure that Bluetooth function is enabled on your 

device, and your device is set as visible to all other 

Bluetooth devices.


The operational range between this system and a 

Bluetooth device is approximately 8 meters (24 feet).


Any obstacle between this system and a Bluetooth 

device can reduce the operational range.


Keep away from any other electronic device that may 

cause interference.

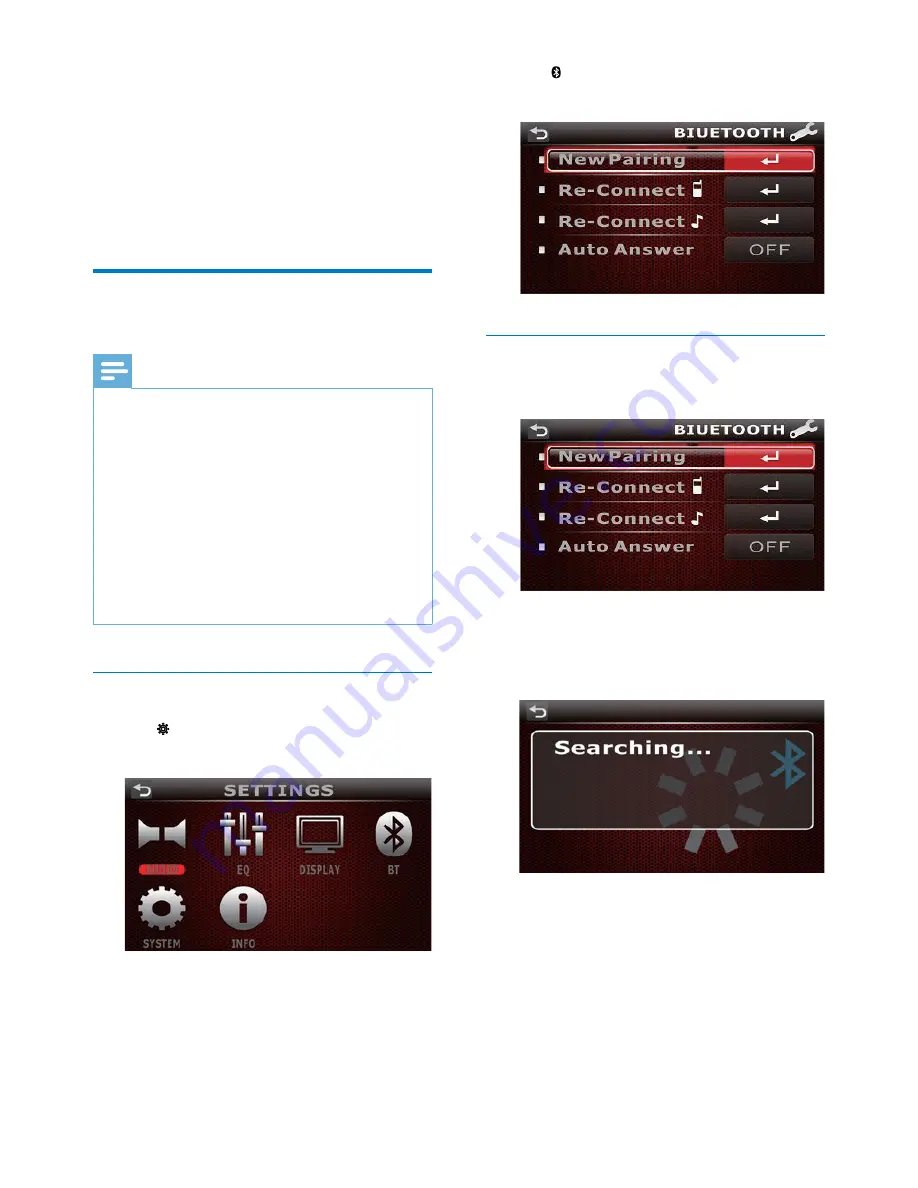
Access the Bluetooth menu

Tap   on the home menu to access the 

[SETTINGS]

 menu.


Tap   on the 

[SETTINGS]

 menu to access 

the 

[BLUETOOTH]

 menu.


Connect a device

Access the 

[BLUETOOTH]

 menu.


Tap 

[New Pairing]

.


»

The product starts searching for other 

Bluetooth devices.


Summary of Contents for CED380

Page 1: ...www philips com welcome User manual Always there to help you Register your product and get support at CED380 Question Contact Philips ...

Page 2: ... 6 Play from hard media 18 Load a disc 18 Connect a USB storage device 18 Insert an SD SDHC card 19 Control play 19 7 Use Bluetooth devices 21 Pair a device 21 Play audio from a connected device 22 Make a call 23 8 Adjust sound 25 Adjust the volume level 25 Mute sound 25 Select a preset sound equalizer 25 Set the sub woofer 25 Enable the MAX Sound effect 25 Enable the DBB sound effect 25 Adjust th...

Page 3: ...ings on the device Never place any objects other than discs into the disc tray slot To avoid exposure to laser radiation do not disassemble the device Risk of damage to the screen Never push rub or strike the screen with any object Never use solvents such as benzene thinner cleaners available commercially or anti static sprays intended for discs Clean the device with soft damp cloth Never use subs...

Page 4: ... RW CD R CD RW USB storage device Compatibility USB 2 0 USB 1 1 Class support MSC Mass Storage Class Maximum capacity 32 GB SD SDHC card Maximum capacity 32 GB Files File system FAT16 FAT32 Maximum number of folders 99 Maximum number of tracks files 999 Maximum level of directory 8 Video formats MPEG1 MPEG2 Picture format jpeg mp3 files Sampling frequencies 32 kHz 44 1 kHz 48 kHz Bitrates 8 320 kb...

Page 5: ...of the package 1 Main unit with a sleeve 2 Carrying case with the front panel included 3 Trim plate 4 ISO male connector X 2 5 Disassembly tool X 2 6 Screw X 4 M5x8mm 7 Hexagon head screw 8 Rubber cushion 9 User manual 10 Remote control a b c d e f g h i j ...

Page 6: ...tate to increase or decrease the volume DIM S UB W E Q a e c b f g h k j i l m n p q o d e Send a call Press to answer an incoming call Press twice to redial the last called number During a call press and hold to mute the speakers and then take the mobile phone for conversation f Return to the home menu g Connect to a USB storage device ...

Page 7: ...recorded files and folders m DIM Adjust the brightness of LCD screen n AV IN Connect to an external audio and video player through a composite AV cable o SD SDHC card slot Insert an SD SDHC card p RESET Reset the product q Disc slot Overview of the remote control a Press to power on the product Press and hold to power off the product Press to mute the speakers or release them from mute status b Tu...

Page 8: ...e brightness of LCD screen l AUDIO Access the menu for sound setting adjustment m EQ Select a preset sound equalizer n DBB Enable or disable the DBB dynamic bass boost sound effect o DVD AUDIO Select an audio language or audio channel p Enable or disable the maximum sound q VOLUME Press to increase or decrease the volume r Return to the previous menu or mode s Display the time and date ...

Page 9: ...point Use only the supplied mounting hardware for a safe and secure installation Improper fuses can cause damage or fire When you need to change the fuse consult a professional When you connect other devices to this system make sure that the rating of the car circuit is higher than the total fuse value of all the connected devices Never connect speaker wires to the metal body or chassis of the car...

Page 10: ...e socket Input socket of a sub woofer 2 REAR LINE OUT L White socket Rear left speaker 3 REAR LINE OUT R Red socket Rear right speaker 4 For ISO male connectors As indicated in step 1 5 FRONT LINE OUT L White connector Front left speaker 6 FRONT LINE OUT R Red connector Front right speaker 7 Radio antenna connector Radio antenna 8 VIDEO IN Yellow connector Video output socket of an external player...

Page 11: ...10 EN a b c d e f g h i j k l m n o ...

Page 12: ... If the car battery is not disconnected to avoid short circuit make sure that bare wires do not touch each other 1 Make sure that the car dashboard opening is within these measurements 2 Remove the two transport screws on the top of the unit 183 mm 53m m 5mm 3 Remove the sleeve from the unit 4 Install the sleeve into the dashboard and bend the tabs outward to fix the sleeve Note If the system is n...

Page 13: ...terminal of the car battery Attach the front panel 1 Insert the chassis on the left side of the front panel to the left notch on the unit and align the chassis on the right side with the right notch 2 Push the front panel towards the unit until it is secured 3 Flip the front panel upwards and then push it towards the unit until you hear a click The product starts boot up automatically ...

Page 14: ... the system detach the front panel Before you detach the front panel make sure that the product is turned off 1 Press to release the front panel 2 Push the right end of the front panel left to disengage it from the right notch on the unit and then pull it outwards to remove it ...

Page 15: ...tsc ca gov hazardouswaste perchlorate 1 Pull out the battery tray 2 Insert one CR2025 battery with correct polarity as indicated 3 Insert the battery tray Turn on Press PHILIPS logo and a progress bar are displayed while boot up To turn off the system press and hold for 3 seconds Use the home menu 1 Press on the front panel to access the home menu 2 Tap an icon to access its interface RADIO Switch...

Page 16: ...1 Tap Date Time 2 Tap the field under YEAR MONTH DAY HOUR MINUTE or AM PM to select a variety 3 Tap to set its value Select an OSD language Tap Language repeatedly to select a language for on screen display Disable the video blocking system Note Risk of car accidents Do not watch video or photo slideshow nor operate this system while driving When the parking brake of your vehicle is not engaged th...

Page 17: ...t a stored radio station tap its sequence number Tap to display the radio menu To tune to a radio station manually tap it repeatedly or tap and hold it until the frequency of target station is displayed To search for the previous or next strong station automatically tap it BAND Tap repeatedly to select a radio band Use the radio menu Manual Store To store a radio station manually 1 Tune to the rad...

Page 18: ...s Local Seek Tap it to change the setting ON Search for radio stations with strong signals only OFF Search for radio stations with either strong signals or weak signals Area Tap it to switch to another radio region LATIN Latin America USA United States EURO Western Europe OIRT OIRT ...

Page 19: ...en to display the playback interface and then tap to start play To remove the disc press to release the front panel and then press Tip If the disc is blocked press and hold until it is ejected Region Code You can play DVD discs marked with the following region code DVD region code Countries Latin America Connect a USB storage device Note Make sure that the USB storage device contains compatible fi...

Page 20: ...he card is disengaged 3 Pull out the SD SDHC card Control play During play tap the screen to display the play interface and then tap the icons on the interface to control play or change settings Start pause or resume play Tap repeatedly to select a speed for rewind or fast forward search Skip to the previous or next title chapter track or file Display the information about the current media Access...

Page 21: ...edly to start or stop the photo slideshow ON display photos as a slideshow or OFF display the current photo as the screen background Goto Skip to a title chapter track or time point 1 Tap Goto to display the interface 2 Tap repeatedly to switch between Enter Title Number Enter Chapter Number Enter Track Number and Enter Time 3 Tap numeric icons to enter the digits To clear the last entry tap X To ...

Page 22: ...r device is set as visible to all other Bluetooth devices The operational range between this system and a Bluetooth device is approximately 8 meters 24 feet Any obstacle between this system and a Bluetooth device can reduce the operational range Keep away from any other electronic device that may cause interference Access the Bluetooth menu 1 Tap on the home menu to access the SETTINGS menu 2 Tap ...

Page 23: ...re connect a device tap its name and then tap in green To remove a device from the list tap its name tap and then tap Yes on the prompt interface Play audio from a connected device If the connected Bluetooth device supports Advanced Audio Distribution Profile A2DP you can listen to tracks that are stored on the device through the system If the device also supports AudioVideo Remote Control Profile...

Page 24: ...nter the phone number To clear the last digit tap C To return to the playback interface tap 4 Tap to send the call To end the call tap To enter numbers during the call tap to display the keypad first To mute the loudspeakers and use your mobile phone for the conversation tap Answer a call Note By default all incoming calls are picked up automatically You can disable the function of automatic answe...

Page 25: ...4 EN Disable the automatic answer 1 Access the BLUETOOTH menu 2 Tap Auto Answer to enable or disable the automatic answer of incoming calls ON Enable the automatic answer OFF Disable the automatic answer ...

Page 26: ...or disable the audio output to the sub woofer Enable the MAX Sound effect Tap on the playback interface highlighted The MAX Sound effect is enabled in gray The MAX Sound effect is disabled Enable the DBB sound effect When DBB Dynamic Bass Boost is enabled low tones are enhanced electronically Tap on the playback interface highlighted DBB sound effect is enabled in gray DBB sound effect is disabled...

Page 27: ...26 EN 4 Tap to display the BASS TREBLE interface 5 Tap to adjust the levels of bass and treble To switch back to the FADER BALANCE interface tap ...

Page 28: ...an external player through the VIDEO IN and AUDIO IN sockets on the rear panel tap AV IN 2 to switch the source instead of AV IN 1 Reset the system If the system hangs up reset it 1 Detach the front panel 2 Press RESET with the tip of a ball point pen or toothpick Calibrate the screen 1 Tap on the home menu to access the SETTINGS menu 2 Tap 3 Tap Calibration 4 Follow the on screen instructions to ...

Page 29: ...cessary information about this product to complete the registration With the registration you can get information about software update and product support at this Web page or via your mailbox that is registered as the account for Club Philips Check the firmware version 1 On the home menu tap to access the SETTINGS menu 2 Tap The current firmware version is displayed Perform the upgrade 1 Check th...

Page 30: ...onic distortion Less than 1 Channel separation 55 dB Video signal format NTSC PAL Video output 1 0 2V Tuner Frequency range FM 87 5 108 0 MHz Frequency range AM MW 522 1620 kHz 9 kHz 530 1710 kHz 10 kHz Usable sensitivity FM 5 uV Usable sensitivity AM MW 50 uV LCD screen Screen size 3 5 inches 16 9 Display resolution 320 x 240 dots Contrast ratio 300 Brightness 350 cd m Bluetooth Communication sys...

Page 31: ...e is upwards The disc is dirty Clean the disc with a clean soft lint free cloth Wipe the disc outwards from the center The disc is defective Try another disc The disc is incompatible Try another disc The recordable disc is not finalized The region code of DVD disc is not supported Use a disc with proper region code No image Parking wire connection is incorrect Check the wiring Image flashes or is ...

Page 32: ...at device or all other connected devices and then try again The paired mobile phone connects and disconnects constantly The Bluetooth reception is poor Move the mobile phone closer to the system or remove any obstacle between the mobile phone and the system Some mobile phones may connect and disconnect constantly when you make or end calls This does not indicate any malfunction of the system For s...

Page 33: ...nvironment and human health Please visit www recycle philips com for additional information on a recycling center in your area Environmental information All unnecessary packaging has been omitted We have tried to make the packaging easy to separate into three materials cardboard box polystyrene foam buffer and polyethylene bags protective foam sheet Your system consists of materials which can be r...

Page 34: ...everse engineering and disassembly are prohibited 2013 Koninklijke Philips Electronics N V Specifications are subject to change without notice Trademarks are the property of Koninklijke Philips Electronics N V or their respective owners Philips reserves the right to change products at any time without being obliged to adjust earlier supplies accordingly EN ...

Page 35: ...Specifications are subject to change without notice 2013 Koninklijke Philips Electronics N V All rights reserved CED380_55_UM_V2 0 ...

Reviews: