background image

24


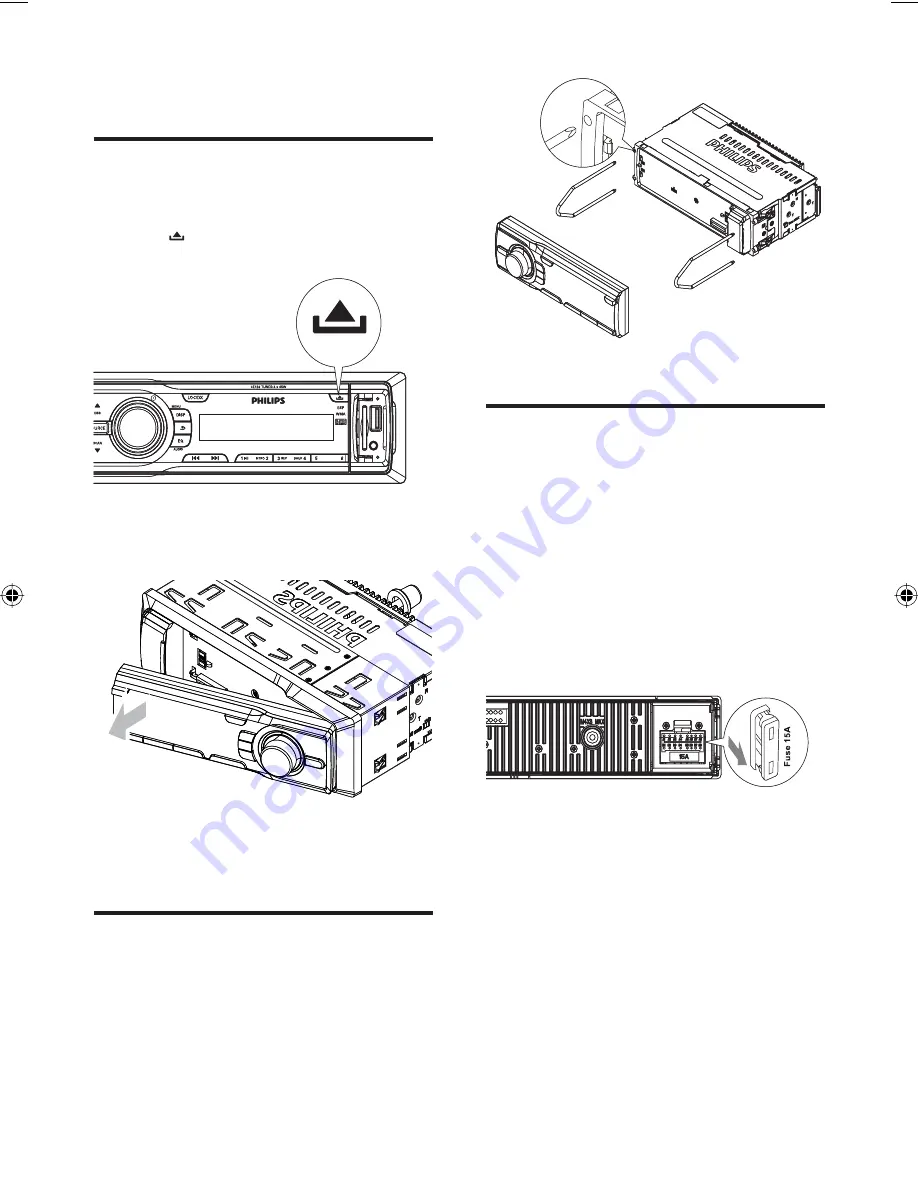
     Replace fuse

  If there is no power, the fuse may broke and 
need to be replaced.

    1

  Detach the front panel and  take out the 

unit.   (see ‘Remove the unit’ on page   24  ) 

    2

   Check the electric connection .

    3

  Buy a fuse that matches the voltage of the 

damaged fuse (15A)

    4

  Replace the fuse.


  If the fuse is broken again after replacement, 
there might have internal malfunction. In such 
case, consult your Philips dealer.

       8 Others

   Detach the front panel

  You can detach the front panel to deter theft.

    1

 Press 

   to release the panel.


    2

  Pull the panel towards you to detach it 

from the chassis.


    3

  Store the panel in the supplied carry case 

to protect it from dirt or damage.

       Remove the unit

  To repair or replace the unit, remove it from 
the dashboard.

    1

  Detach the front panel.

    2

  Remove the unit with the removal keys.

ENG

CE120_IFU_ENG.indd   Sec1:24

CE120_IFU_ENG.indd   Sec1:24

2008-10-10   14:37:32

2008-10-10   14:37:32

Summary of Contents for CE120

Page 1: ...gister your product and get support at ENG User manual 3 CE120 Car Entertainment System Todos os desenhos fotos deste manual apenas ilustrativos Todos los dibujos fotos deste instructivo son ilustrativos ...

Page 2: ......

Page 3: ...n 6 What s in the box 6 Overview of the main unit 7 Overview of the remote control 8 3 Get started 10 Install the car audio 10 Install remote control battery 15 Turn on 15 Set clock 15 4 Listen to radio 16 Tune to a radio station 16 Store radio stations in memory 16 Tune to a preset station 16 5 Play from USB SD MMC device 17 Insert USB device 17 Insert SD MMC card 17 Control play 18 Search for an...

Page 4: ...rect disposal of batteries helps prevent potentially negative consequences on the environment and human health 1 Important Safety Read and understand all instructions before you use your unit If damage is caused by failure to follow instructions the warranty does not apply This unit is designed for negative ground earth 12V DC operation only To ensure safe driving adjust the volume to a safe and c...

Page 5: ...d and reused if disassembled by a specialized company Please observe the local regulations regarding the disposal of packaging materials exhausted batteries and old equipment Any changes or modifications made to this device that are not expressly approved by Philips Consumer Lifestyle may void the user s authority to operate the equipment 2008 Koninklijke Philips Electronics N V All rights reserve...

Page 6: ...stem Congratulations on your purchase and welcome to Philips To fully benefit from the support that Philips offers register your product at www Philips com welcome Introduction With the in car audio system you can enjoy your drive while you listen to FM or AM MW radio Audio from a USB drive Audio from a SD MMC card Audio from external devices What s in the box Check and identify the contents of yo...

Page 7: ...for MP3 WMA track Overview of the main unit a DBB Select radio band Select MP3 WMA folder Turn on or off Dynamic Bass Boost DBB sound b MENU DISP Display radio frequency and clock Display track elapsed time artist album title folder file and clock Access system menu c LOC DX Select radio sensitivity d Return to previous menu Stop searching Disable screen blackout e Display panel f Unlock the front...

Page 8: ...andom play mode Select preset station no 4 k 1 Start play Pause or resume play Select preset station no 1 l INTRO 2 Turn intro play on or off Select preset station no 2 m AUDIO Access audio setting menu q EQ AUDIO Select equalizer EQ setting Access audio setting menu r MUTE Turn the unit on or off Turn mute on or off Adjust volume Confirm selection Select characters inMP3 WMA search mode s SOURCE ...

Page 9: ...tation Skip search for MP3 WMA track Select radio band Select MP3 WMA folder SEL Confirm selection o MENU Access system menu p PWR Turn the unit on or off Mute or unmute volume q Return to previous menu Disable screen blackout Eng l i sh ENG ...

Page 10: ...______________ Serial No ___________________________ Install the car audio These instructions are for a typical installation However if your car has different requirements make the corresponding adjustment If you have any questions regarding installation kits consult your Philips car audio dealer Caution This unit is designed for negative ground earth 12V DC operation only Always install this unit...

Page 11: ...1 Cut off the bigger end of the supplied standard connector 1 2 3 1 2 3 Connect wires ISO connectors Caution Ensure that all loose leads are insulated with electrical tape 1 Pull out the ISO connectors from car dashboard and connect them to the bigger end of the supplied standard connector 2 Connect the other end of the supplied standard connector to the unit 3 Connect the antenna and amplifier as...

Page 12: ...times 4 Orange White illumination switch 5 Red wire The 12V power terminal which is live in the accessory ACC position of the ignition switch If there is no accessory position connect to the 12V car battery terminal that is always live Be sure to connect the black ground earth lead to a metal surface of the car first 6 Green and green black wires Left speaker Rear 7 White and white black wires Lef...

Page 13: ...ocked into place Mount into the dashboard 1 Ensure that car dashboard opening is within these measurements 3 Connect the supplied standard connector to the unit 4 Connect the antenna and amplifier as illustrated if applicable Connector Connect to 1 Antenna Antenna 2 Rear line out right Amplifier line in right 3 Rear line out left Amplifier line in left 1 2 3 1 2 3 Eng l i sh ENG ...

Page 14: ...is not disconnected to avoid short circuit ensure that bare wires do not touch each other 5 Connect the supplied mounting bolt to the unit 6 Place the supplied rubber cushion over the end of the mounting bolt 2 Remove the mounting sleeve with the supplied disassembly tools 3 Install the sleeve into the dashboard and bend the tabs outward to fix the sleeve Skip this step if the unit is not fixed by...

Page 15: ...til the clock is displayed 7 Slide the unit into the dashboard until you hear a click sound 8 Reconnect the negative terminal of the car battery Install remote control battery Caution Risk of explosion Keep batteries away from heat sunshine or fire Never discard batteries in fire Risk of decreased battery life Never mix different brands or types of batteries Risk of product damage When the remote ...

Page 16: ...1 or AM 2 3 Press LOC DX to select radio sensitivity LOCAL local Only station with strong signal can be broadcast DX distance Stations with strong and weak signals can be broadcast 4 Press or to tune to a radio station manually The radio station is broadcast To search for radio station automatically press or for 3 seconds Select stereo mono broadcasting For stations with weak signals to improve th...

Page 17: ...MMC card into the card slot The unit starts playing from the SD MMC card automatically 5 Play from USB SD MMC device Note Ensure that the USB or SD MMC device contains playable music Insert USB device 1 Open the cover marked on the front panel 2 Insert the USB device into the USB socket The unit starts playing from the USB device automatically Eng l i sh ENG ...

Page 18: ...lect REP 1 repeat one track play the current track repeatedly REP FOLD repeat one folder play all tracks in the current folder repeatedly REP ALL repeat all tracks play all tracks repeatedly REP OFF repeat off cancel repeat play Random play You can play the tracks in random order 1 During play press SHUF 4 to select Remove the SD MMC card 1 Press to turn off the unit 2 Press the card until you hea...

Page 19: ...the first 10 seconds of each track have been played play stops INT OFF Cancel intro play and start normal play Listen to other devices You can connect an external sound device to the unit 1 Connect the device to the unit by using a 3 5 mm plug 2 Press SOURCE repeatedly until MP3 LINK is displayed 3 Operate the device refer to the instructions supplied with the device Eng l i sh ENG ...

Page 20: ...ue 4 Press to confirm 6 Adjust sound Adjust volume 1 Turn clockwise anticlockwise to increase decrease volume Mute You can turn off the sound of your audio 1 During play press MUTE To turn the sound back on press MUTE again Toggle Dynamic Bass Boost on off 1 Press DBB for 3 seconds to display the current setting DBB ON The Dynamic Bass Boost DBB function is on DBB OFF The DBB function is off 2 Pre...

Page 21: ... as the start volume see Select start volume on page 21 2 Press MENU DISP for 3 seconds 3 Press DBB or SEARCH repeatedly to until A VOL is displayed 4 Turn to select a value 0 47 5 Press to confirm 7 Adjust system settings Select blackout setting You can set the screen to turn off automatically after the unit is idle for 10 or 20 seconds 1 Press MENU DISP for 3 seconds 2 Turn to select a setting B...

Page 22: ...U DISP for 3 seconds 2 Press DBB or SEARCH repeatedly to until BEEP ON or BEEP OFF is displayed 3 Turn to select a setting BEEP ON Turn on the beep sound BEEP OFF Turn off the beep sound 4 Press to confirm Turn display scroll on off For track information that is longer than the display panel you can select to cut off the remainder of the text or scroll to display the full text Note If any special ...

Page 23: ...s 0 Treble 0 Loudness OFF Balance 0 Fader 0 System settings Source Radio FM1 87 5 Demo Off Blackout Off Key color Blue Clock Current time ESP 10S Local Distance Distance Beep On Stereo Mono Stereo V Last Adj V Last Volume 20 Auto scroll On Eng l i sh ENG ...

Page 24: ...n again after replacement there might have internal malfunction In such case consult your Philips dealer 8 Others Detach the front panel You can detach the front panel to deter theft 1 Press to release the panel 2 Pull the panel towards you to detach it from the chassis 3 Store the panel in the supplied carry case to protect it from dirt or damage Remove the unit To repair or replace the unit remo...

Page 25: ...imum 99 Number of tracks titles maximum 999 ID3 tag v2 0 or later File name in Unicode UTF8 maximum length 128 bytes Unsupported formats Empty albums an empty album is an album that does not contain MP3 WMA files and is not be shown in the display Unsupported file formats are skipped For example Word documents doc or MP3 files with extension dlf are ignored and not played AAC WAV PCM audio files 9...

Page 26: ...26 DRM protected WMA files wav m4a m4p mp4 aac WMA files in Lossless format ENG ...

Page 27: ...e is not on Turn the car engine on Cable is not correctly connected Check connections Fuse is burnt Replace fuse see Replace fuse on page 24 Volume is too low Adjust volume see Adjust volume on page 20 If the above solutions cannot help press the RESET button Noise in broadcasts Signals are too weak Select other stations with stronger signals Check the connection of the car antenna Change broadcas...

Page 28: ...Layer 3 With the MP3 format one CD R or CD RW can contain about 10 times more data than a regular CD S SD Secure Digital A type of memory card with a flash memory W WMA Windows Media Audio An audio format owned by Microsoft is a part of Microsoft Windows Media technology Includes Microsoft Digital Rights Management tools Windows MediaVideo encoding technology and Windows Media Audio encoding techn...

Page 29: ...29 ...

Page 30: ... 2008 Koninklijke Philips Electronics N V All rights reserved ...

Reviews: