background image

7

EN

3 Get 

started

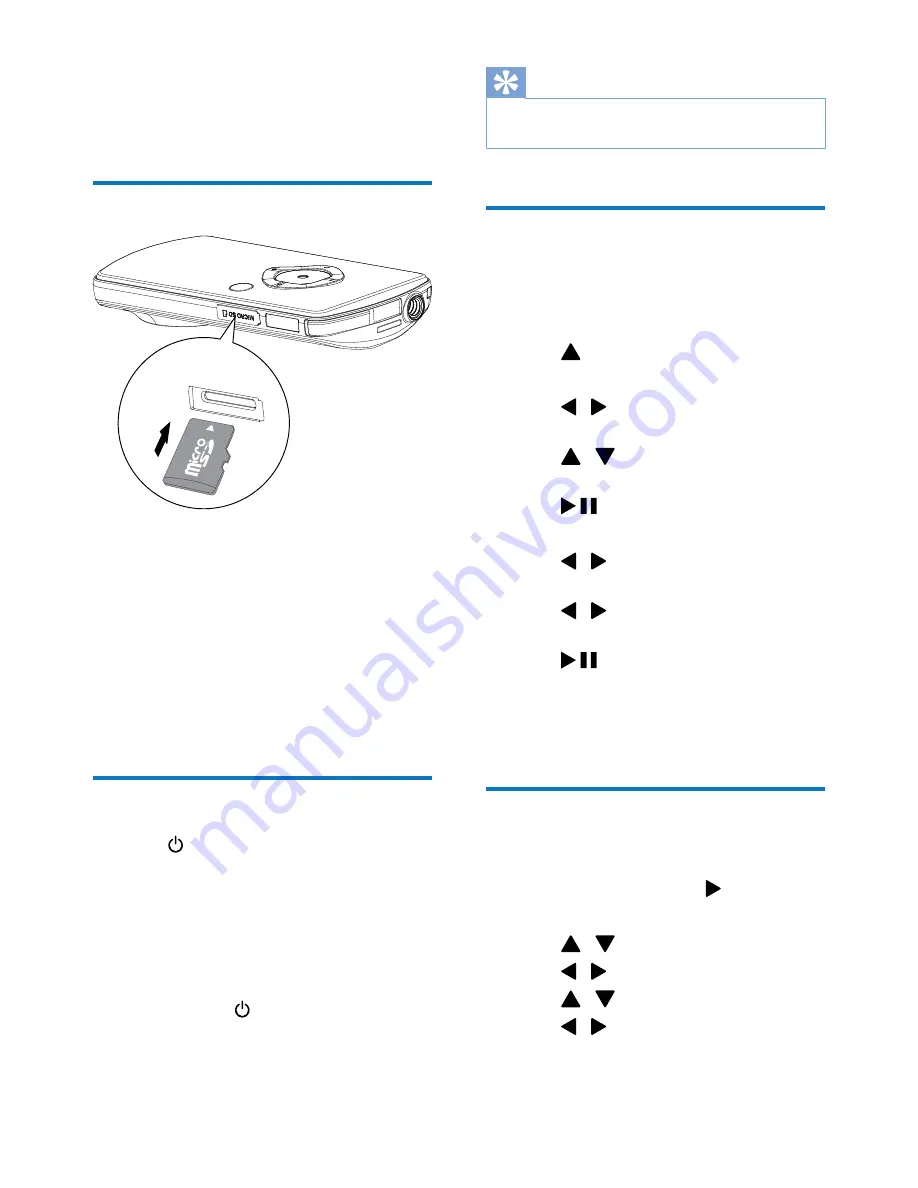
Load the Micro SD card


Flap open the protective cover on the 
Micro SD card socket.

Insert a Micro SD card (not supplied) into 
the socket.
8 Ensure that the the Micro SD card is 

 #

8 Ensure that the metal contact of the 

card faces down.

Close the protective cover securely.

Turn on

8

Press  .


»

%( 
  [[@
 >#


»

$-
mode.

To turn off the camcorder:

8

Press and hold  .


»

The backlight on the display panel 
turns off.

Tip


8

$- ( 
after being idle for 3 minutes.

Set the date and time  
"

\  
(   #

Press 

 to highlight 

[Yes]

.


»

A date setting menu appears.

Press   /  ( 
-#

Press 

 / 

 to change the value of each 

#

Press 

  #


»

A time setting menu appears.

Press   /   to select the hour and minute 
-#

Press   /   to change the value of each 
#

Press 

  #


»

The date and time setting is complete.


»

$ -
mode.

Select a menu display 
language

 - ( .


»

A settings menu appears.

Press 

 / 

 to highlight 

[Language]

.

Press   /   to select a language.

Press 

 / 

 to highlight 

[Resolution]

.

Press   /   <=(
full HD or standard).

Summary of Contents for CAM102

Page 1: ...www philips com welcome User manual Register your product and get support at CAM102 ...

Page 2: ...d 7 Load the Micro SD card 7 Turn on 7 users only 7 Select a menu display language 7 4 Use your camcorder 9 Record video 9 Take pictures 9 Play 9 Options during video play 9 Adjust settings 10 5 Use more of your camcorder 11 View video or pictures onTV 11 Install and use the camcorder software 11 13 7 Frequently asked questions FAQ 14 ...

Page 3: ...sly approved by Philips Consumer Lifestyle may void the user s authority to operate the equipment Notice This digital apparatus does not exceed the Class B limits for radio noise emissions from digital apparatus as set out in the Radio Interference Regulations of the Canadian Department of Communications This Class B digital apparatus and with 21 CFR 1040 10 Operation is subject to the following t...

Page 4: ...3 EN Always bring your product to a professional to Note 8 The safety logo and power rating information are located at the USB arm of the camcorder ...

Page 5: ...res 8 play recorded movies or pictures either directly or on the large screen of a connectedTV 8 upload the recorded movies or pictures to the Internet directly What s in the box Make sure that the following items are packed in the box 8 Camcorder 8 Quick start guide 8 Pouch 8 Hand strap ...

Page 6: ...iew a Built in speaker b Display panel c 8 E G 8 Navigate up down in a menu 8 Change a value in the settings menu 8 a b c d e f g h o n m l k j i p 8 on the display panel d Shutter button 8 start stop video recording 8 mode ...

Page 7: ...K picture video clip 8 settings menu h USB connector i 8 Eject the USB connector j Tripod socket k Hand strap hole l HDMI 8 Connect to aTV through an HDMI cable with a mini HDMI connector m 8 Turn on off the camcorder n Lens o Built in microphone p Mode switch button 8 Switch between picture and video recording modes ...

Page 8: ...and hold The backlight on the display panel turns off Tip 8 after being idle for 3 minutes Set the date and time 1 Press to highlight Yes A date setting menu appears 2 Press 3 Press to change the value of each 4 Press A time setting menu appears 5 Press to select the hour and minute 6 Press to change the value of each 7 Press The date and time setting is complete mode Select a menu display languag...

Page 9: ... USB connector 2 Connect the USB connector to a USB socket on a PC The status indicator on the shutter 3 Wait until the status indicator stops Tip 8 8 battery via the PC You can also charge the camcorder via a USB adaptor not supplied connected to mains power The charge time is about 2 hours ...

Page 10: ...ictures 1 Switch the mode switch button to E of pictures that can be taken are displayed on the display panel 2 Hold the camcorder steadily and aim the lens as needed 3 Press the shutter button down halfway to adjust the focus 4 Press the shutter button down completely to take a picture Picture saved Play 1 to enter play mode The last recorded video clip is played automatically 2 Press to select a...

Page 11: ... Resolution Select a video resolution Volume Change the keypad tone and operation sound Date Set the date Time Set the time Auto power Enable disable automatic Capture sound Turn on off the capture sound Language Select your desired menu language Pre record G record mode TV system Change this setting if the output video does not appear correctly on yourTV Format Clear contents from the micro SD ca...

Page 12: ...rate Microsoft Windows _ 8 z iMovie software to import and edit your pictures videos directly Install the camcorder software 1 2 If the software does not install Setup icon at My Computer Removable Disk 3 installation of the software Install and use the camcorder software 1 Start All Programs ArcSoft MediaImpression HD Edition The main screen of the software is displayed 2 Click an option to selec...

Page 13: ...12 EN 3 Copy any video pictures you want to your designated folder in the PC Mac Tip 8 G camcorder software for PC or iMovie for Mac ...

Page 14: ... E 2X Exposure control Auto Exposure compensation White balance Auto Auto power off 3 minutes Memory 64MB 512Mbit DDR2 z z z Shutter type Electronic Shutter speed G G format Video compression format MP4 H 264 Video resolution _ _ 30fps _ 30fps AAC Battery PC interface Mini USB 2 0 port System support Windows XP Vista z storage only TV out G z HDMI type C Weight 0 06kg Dimensions W x H x D 55 3 x 9...

Page 15: ... is there no AV output when I connect the camcorder to a TV through an HDMI cable Turn on the camcorder and reconnect the HDMI cable How do I charge the camcorder You can charge the camcorder via the USB it to your PC laptop it will automatically charge You can also plug the camcorder via How long do I have to charge the camcorder usage The camcorder charge time when connected to your PC laptop is...

Page 16: ...great with the iMovie that comes with your Mac To transfer z z iMovie and start importing by clicking the camcorder icon Select Use original quality 6 E What is HD camcorder captures videos in high resolution that HDTV programs are broadcast in 720 refers to the display E 6 appearance of the lines in each frame HD 720p gives video quality that is superior to that found in typical mobile phones and...

Page 17: ...e camcorder To are some simple video tips 8 camcorder steady in your hand 8 Don t move too fast when panning i e E will be hard to follow what is captured when you review the video 8 K or even from below You can easily join the different video segments together with the PC software included ...

Page 18: ...tus CAUTION To prevent electric shock match wide blade of plug to wide slot fully insert ATTENTION Pour éviter les choc élec triques introduire la lame la plus large de la fiche dans la borne correspondante de la prise et pousser jusqu au fond Congratulations on your purchase and welcome to the family Dear PHILIPS product owner Thank you for your confidence in PHILIPS You ve selected one of the bes...

Page 19: ...t abuse misuse neglect misapplication or non Philips product b to damage caused by service performed by anyone other than Philips or Philips Authorized Service Location c to a product or a part that has been modified without the written permission of Philips or d if any Philips serial number has been removed or defaced or e product accessories or consumables sold AS IS without warranty of any kind...

Page 20: ...Specifications are subject to change without notice 2011 Koninklijke Philips Electronics N V All rights reserved CAM102_37_UM_V1 0 ...

Reviews: