background image

2

EN

1 Important

Safety


This 'bolt of lightning' indicates uninsulated 

material within the device may cause an 

electrical shock. For the safety of everyone in 

your household, please do not remove the 

covering. 

The 'exclamation mark' calls attention to 

features for which you should read the enclosed 

literature closely to prevent operating and 

maintenance problems. 

WARNING: To reduce the risk of fire or electric 

shock, the device should not be exposed to rain 

or moisture and objects filled with liquids, such 

as vases, should not be placed on the device. 

CAUTION: To prevent electric shock, fully 

insert the plug. (For regions with polarized 

plugs: To prevent electric shock, match wide 

blade to wide slot.) 

Important Safety Instructions

• 

Follow all instructions.

• 

Heed all warnings.

• 

Do not use this device near water.

• 

Clean only with dry cloth.

• 

Do not block any ventilation openings. 

Install in accordance with the 

manufacturer's instructions.

• 

Do not install near any heat sources such 

as radiators, heat registers, stoves, or other 

devices (including amplifiers) that produce 

heat. 

• 

Protect the power cord from being 

walked on or pinched, particularly at plugs, 

convenience receptacles, and the point 

where they exit from the device.

•  Only use attachments/accessories specified 

by the manufacturer.

• 

Use only with the cart, stand, tripod, 

bracket, or table specified by the 

manufacturer or sold with the device. 

When a cart is used, use caution when 

moving the cart/device combination to 

avoid injury from tip-over. 


• 

Unplug this device during lightning storms 

or when unused for long periods of time. 

•  Refer all servicing to qualified service 

personnel. Servicing is required when the 

device has been damaged in any way, such 

as power-supply cord or plug is damaged, 

liquid has been spilled or objects have 

fallen into the device, the device has been 

exposed to rain or moisture, does not 

operate normally, or has been dropped.

• 

Battery usage CAUTION – To prevent 

battery leakage which may result in bodily 

injury, property damage, or damage to the 

unit: 

• 

Install all batteries correctly, + and - as 

marked on the unit. 

• 

Do not mix batteries (old and new or 

carbon and alkaline, etc.).

• 

Batteries (packed or installed) shall not 

be exposed to excessive heat such as 

sunshine, fire or the like.

• 

Remove batteries when the unit is not 

used for a long time.

• 

The device shall not be exposed to 

dripping or splashing. 

• 

Do not place any sources of danger on 

the device (e.g. liquid filled objects, lighted 

candles).

Summary of Contents for BTM2180

Page 1: ...www philips com welcome User manual Always there to help you Register your product and get support at BTM2180 Question Contact Philips ...

Page 2: ......

Page 3: ...m disc 8 Play from USB 8 Control play 8 Skip to a track 8 Program tracks 8 Play from Bluetooth enabled devices 9 5 Listen to the radio 10 Tune to a radio station 10 Store radio stations automatically 10 Store radio stations manually 10 Select a preset radio station 10 6 Other features 11 Set the alarm timer 11 Set the sleep timer 11 Listen to an external device 11 7 Product information 12 Specific...

Page 4: ...ticularly at plugs convenience receptacles and the point where they exit from the device Only use attachments accessories specified by the manufacturer Use only with the cart stand tripod bracket or table specified by the manufacturer or sold with the device When a cart is used use caution when moving the cart device combination to avoid injury from tip over Unplug this device during lightning sto...

Page 5: ...device from the power 2 Your micro system Congratulations on your purchase and welcome to Philips To fully benefit from the support that Philips offers register your product at www philips com welcome Introduction With this unit you can enjoy audio from discs Bluetooth enabled devices USB storage devices or other external devices listen to FM radio stations You can enrich sound output with below s...

Page 6: ...N d Display panel Show current status SOURCE AUDIO IN VOLUME SOURCE AUDIO IN VOLUME CD AUDIO IN PRESET ALBUM MUTE SHUFFLE CLOCK SLEEP TIMER PROG SOUND FM VOL DISPLAY REPEAT SOURCE AUDIO IN VOLUME a b c f d e g k j i h l e Jack for a USB device f AUDIO IN Audio input jack 3 5mm for an external audio device g Disc compartment h Open close the disc compartment i Stop play or erase a program ...

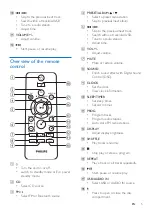
Page 7: ...adio station Skip to previous next album e Skip to the previous next track Search within a track disc USB Tune to a radio station Adjust time f VOL Adjust volume g MUTE Mute or restore volume h SOUND Enrich sound effect with Digital Sound Control DSC i CLOCK Set the clock View clock information j SLEEP TIMER Set sleep timer Set alarm timer k PROG Program tracks Program radio stations Auto store FM...

Page 8: ...nderside of the unit Risk of electric shock When you unplug the AC power cord always pull the plug from the socket Never pull the cord Before you connect the AC power cord ensure that you have completed all other connections ANTENNA FM SPEAKER OUT 8Ω AC MAINS 100 240V 50 60 Hz SPEAKER OUT 8Ω Demonstrate the features In standby mode press and hold for three seconds to demonstrate features of this d...

Page 9: ... exits clock setting mode automatically Tip You can view clock information in power on mode by pressing CLOCK Turn on Press The unit switches to the last selected source Switch to standby mode Press again to switch the unit to standby mode The clock if set is displayed on the panel Switch to ECO standby mode Press and hold for more than two seconds The display panel is dimmed Note The unit switche...

Page 10: ...DIO IN VOLUME USB Control play Select a folder Select an audio file Pause or resume play Stop play REPEAT Play a track or all tracks repeatedly SHUFFLE Play tracks randomly VOL Increase or decrease the volume MUTE Mute or restore sound SOUND Enrich sound effect with DSC balanced clear powerful warm and bright DISPLAY Adjust display brightness Skip to a track For CD Press to select another track Fo...

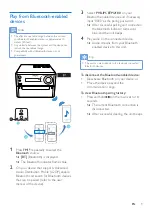
Page 11: ...user manual of the device SOURCE AUDIO IN VOLUME 0000 PIN BTM2180 CD AUDIO IN PRESET ALBUM FM 3 Select PHILIPS BTM2180 on your Bluetooth enabled device and if necessary input 0000 as the paring password After successful pairing and connection the Bluetooth indicator turns solid blue and the unit beeps 4 Play audio on the connected device Audio streams from your Bluetooth enabled device to this uni...

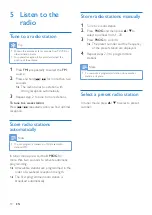
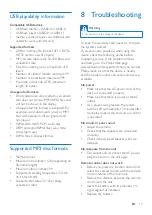
Page 12: ...cally Note You can program a maximum of 20 preset radio stations FM In tuner mode press and hold PROG for more than two seconds to activate automatic programming All available stations are programmed in the order of waveband reception strength The first programmed radio station is broadcast automatically Store radio stations manually 1 Tune to a radio station 2 Press PROG and then press to select ...

Page 13: ...ctivate or deactivate the alarm If timer is activated is displayed Tip If DISC USB source is selected but no disc is placed or no USB connected the system switches to the tuner source automatically Set the sleep timer To set the sleep timer in turn on mode press SLEEP TIMER repeatedly to select a set period of time in minutes When sleep timer is activated is displayed Otherwise disappears Listen t...

Page 14: ...108 MHz TunerTuning Grid 50 kHz Tuner Sensitivity Mono 26dB S N Ratio Stereo 46dB S N Ratio 22 dBf 45 dBf Tuner Search Selectivity 30 dBf Total Harmonic Distortion 3 Signal to Noise Ratio 45 dBA USB USB DirectVersion 2 0 full speed USB 5V Power 500 mA Disc LaserType Semiconductor Disc Diameter 12 cm 8 cm Support Disc CD DA CD R CD RW MP3 CD Audio DAC 24 Bits 44 1 kHz Total Harmonic Distortion 1 1 ...

Page 15: ...t rates 32 256 kbps variable bit rates 8 Troubleshooting Warning Never remove the casing of this device To keep the warranty valid never try to repair the system yourself If you encounter problems when using this device check the following points before requesting service If the problem remains unsolved go to the Philips Web page www philips com support When you contact Philips make sure that the ...

Page 16: ...ice The Bluetooth reception is poor Move the device closer to this unit or remove any obstacle between them Bluetooth cannot be connected with this unit The device does not support the profiles required for this unit The Bluetooth function of the device is not enabled Refer to the user manual of the device to find out how to enable the function This unit is not in pairing mode This unit is already...

Page 17: ...egative consequences on the environment and human health Please visit www recycle philips com for additional information on a recycling center in your area Environmental information All unnecessary packaging has been omitted We have tried to make the packaging easy to separate into three materials cardboard box polystyrene foam buffer and polyethylene bags protective foam sheet Your system consist...

Page 18: ...Specifications are subject to change without notice 2013 Koninklijke Philips Electronics N V All rights reserved BTM2180_85_UM_V1 0 ...

Reviews: