background image

10

EN

Prepare the remote 

control

Caution


Risk of product damage! When the remote 
control is not used for long periods, remove 
the batteries.


Batteries contain chemical substances, so 
they should be disposed of properly.

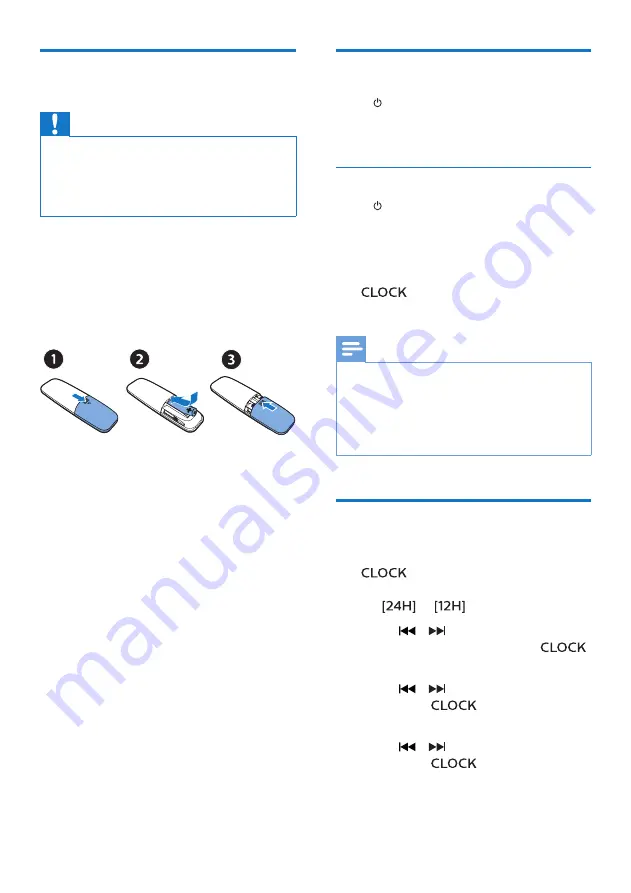
To insert the remote control battery:

Open the battery compartment.

Insert the supplied AAA battery with 
correct polarity (+/-) as indicated.

Close the battery compartment.


Power on

Press  .


»

The product switches to the last 
selected source.

Switch to standby mode

Press   again to switch the product to 
standby with no clock display, or to 
standby with clock display.


»

The red standby indicator lights up.

• 

In standby, you may press and hold 


to toggle clock display on 

or off.

Note


The product switches to standby mode 
after 15 minutes inactive.


To achieve the efficient energy saving 
performance, unplug any external 
electronic device from the USB port when 
the device is not in use.

Set the clock

In power on mode, press and hold 

 for more than 2 seconds to 

enter the clock setting mode.


»

 or 

 is displayed.

Press 

 / 

 to select 

24H

 or 

12H 

hour format, and then press 

.


»

The hour digits begin to blink.

Press 

 / 

 to set the hour, and 

then press 

.


»

The minute digits begin to blink.

Press 

 / 

 to set the minute, and 

then press 

.


»

The clock is set.

Summary of Contents for BTB2670

Page 1: ...Register your product and get support at www philips com support User manual ...

Page 2: ...lay 11 Play from disc 11 Play from USB 11 Control play 12 Skip tracks 12 Program tracks 12 Play from Bluetooth enabled devices 13 5 Listen to the radio 14 Listen to DAB radio 14 Listen to FM radio 15 6 Adjust sound 17 Select a preset sound effect 17 Adjust volume level 17 Mute sound 17 7 Other features 17 Set the alarm timer 17 Set the sleep timer 18 Listen to an external device 18 Charge your dev...

Page 3: ...s Never lubricate any part of this apparatus Never look into the laser beam inside this apparatus Never place this apparatus on other electrical equipment Keep this apparatus away from direct sunlight naked flames or heat Ensure that you always have easy access to the power cord plug or adaptor to disconnect the apparatus from the power Make sure that there is enough free space around the product ...

Page 4: ...4 53 EU You can find the Declaration of Conformity on www philips com support Care of the environment Disposal of your old product and battery Your product is designed and manufactured with high quality materials and components which can be recycled and reused This symbol on a product means that the product is covered by European Directive 2012 19 EU This symbol means that the product contains bat...

Page 5: ...s of copy protected material including computer programs files broadcasts and sound recordings may be an infringement of copyrights and constitute a criminal offence This equipment should not be used for such purposes Care for your product Do not insert any objects other than discs into the disc compartment Do not insert warped or cracked discs into the disc compartment Remove the discs from the d...

Page 6: ...Introduction With this unit you can enjoy audio from discs USB devices Bluetooth devices and other external devices listen to FM and and Digital Audio Broadcasting DAB radio The unit supports these media formats What s in the box Check and identify the contents of your package Main unit Table stand 1 x AC power adapter 1 x radio antenna Remote control with one AAA battery Printed materials ...

Page 7: ... standby e Press to select a source DISC USB FM DAB AUDIO IN BT In Bluetooth mode press and hold for more than 2 seconds to enter pairing mode f Start or pause play g Stop play Erase a program h Eject a disc i Headphone socket j Disc slot k Connect USB storage devices for media play l Skip to previous next track Search within a track disc Tune to a radio station Adjust time Overview of the main un...

Page 8: ...e by the service center only p Connect external audio devices q jack Connect to the supplied power adapter Overview of the remote control 18 17 14 13 15 16 12 11 10 9 2 1 3 4 5 7 8 6 a Switch this product on or to standby b Select CD source c Select FM or DAB source d Skip to the previous next track Search within a track disc USB ...

Page 9: ... clock View clock information In standby press and hold to toggle clock display on or off j Program tracks Program radio stations Auto store radio stations k Mute or restore volume l Select a preset sound effect m volume Adjust volume n Adjust display brightness o Stop play or erase a program Enter or exit DAB menu p Press to start pause or resume play Confirm or select a DAB item q Select USB sou...

Page 10: ...nt this product onto wall Connect the radio antenna Connect the supplied radio antenna to this product before listening to radio Connect power Caution Risk of product damage Ensure that the power supply voltage corresponds to the voltage printed on the back or the underside of the unit Risk of electric shock Before you plug the AC power adaptor make sure that the adaptor plug converter is fixed se...

Page 11: ... standby with no clock display or to standby with clock display The red standby indicator lights up In standby you may press and hold to toggle clock display on or off Note The product switches to standby mode after 15 minutes inactive To achieve the efficient energy saving performance unplug any external electronic device from the USB port when the device is not in use Set the clock 1 In power on...

Page 12: ...ned on in standby power consumption increases 4 Play Play from disc 1 Press to select CD source 2 Insert a disc Play starts automatically If not press BTB2670 Play from USB Note Make sure that the USB device contains playable audio content 1 Insert a USB device into the socket 2 Press to select the USB source Play starts automatically If not press ...

Page 13: ...st display brightness Show playback information Skip tracks For CD Press to select tracks For MP3 disc and USB 1 Press to select an album or a folder 2 Press to select a track or a file Program tracks This function allows you to program 20 tracks in the desired sequence 1 In stop mode press to activate the program mode is displayed 2 For MP3 tracks press to select an album 3 Press to select a trac...

Page 14: ...000 as the paring password If you fail to search for Philips BTB2670 or cannot pair with this product press and hold for more than 2 seconds to enter pairing mode After successful pairing and connection the Bluetooth indicator turns solid blue and the unit beeps twice 4 Play audio on the connected device Audio streams from your Bluetooth enabled device to this product To disconnect the Bluetooth e...

Page 15: ...nd and adjust the position of the antenna Listen to DAB radio Digital Audio Broadcasting DAB is a way of broadcasting radio digitally through a network of transmitters It provides you with more choice better sound quality and more information Store DAB radio stations automatically Note New stations and services are added in DAB broadcast from time to time To make new DAB stations and services avai...

Page 16: ...all available DAB radio stations manual Tune to a DAB station manually prune Remove invalid stations from the station list system Adjust system settings 3 To select an option press 4 If a sub option is available repeat steps 2 3 To exit the menu press again Under system menu reset reset all settings to factory default software version show the software version of this product Display DAB informati...

Page 17: ...o allocate a number from 1 20 to this radio station and then press to confirm 4 Repeat steps 1 3 to program more stations Note To overwrite a programmed station store another station in its place Select a preset FM radio station In FM mode press to select a preset number While listening to FM radio you may press OK to toggle stereo and mono sound Display RDS information RDS Radio Data System is a ...

Page 18: ...m timer is not available in AUDIO IN mode If CD USB source is selected but no disc is placed or no USB device is connected the radio source is selected automatically 1 Make sure that you have set the clock 2 In standby press and hold for more than 2 seconds The hour digits blink 3 Press repeatedly to set the hour and then press to confirm The minute digits blink 4 Press to set the minute and then ...

Page 19: ...mer Press repeatedly until sleep off is displayed When sleep timer is deactivated disappears Listen to an external device You can listen to an external device through this unit with an MP3 link cable 1 Connect an MP3 link cable not supplied between jack 3 5 mm on the product and the headphone jack on an external device 2 Press repeatedly to select AUDIO IN source 3 Start to play the device see the...

Page 20: ... bass port Support disc type CD CD R CD RW MP3 CD 12 cm Bluetooth version V4 1 EDR Bluetooth supported profiles A2DP V1 2 AVRCP V1 4 Bluetooth frequency band Output power 2 402GHz 2 480GHz ISM Band 4dBm Class 2 USB playback Type A USB Direct 2 0 5V 600mA MSC file format FAT 16 32 MP3 32 320 Kbps and Variable bit rate USB charging 2A max Standby 500mA max USB CD source 1A max BT Radio Audio in sour...

Page 21: ... and variable bit rate Directory nesting up to a maximum of 8 levels Number of albums folders maximum 99 Number of tracks titles maximum 999 File name in Unicode UTF8 maximum length 32 bytes Unsupported USB formats Empty albums an empty album is an album that does not contain MP3 WMA files and will not be shown in the display Unsupported file formats are skipped For example word documents doc or M...

Page 22: ...e control does not work Before you press any function button first select the correct source with the remote control instead of the main unit Reduce the distance between the remote control and the unit Insert the battery with its polarities signs aligned as indicated Replace the battery Aim the remote control directly at the sensor on the front of the unit No disc detected Insert a disc Check if t...

Page 23: ...y connected with another Bluetooth enabled device Disconnect that device and then try again The paired mobile device connects and disconnects constantly The Bluetooth reception is poor Move the device closer to this unit or remove any obstacle between them Some mobile phones may connect and disconnect constantly when you make or end calls This does not indicate any malfunction of this unit For som...

Page 24: ...y and is sold under the responsibility of Gibson Innovations Ltd and Gibson Innovations Ltd is the warrantor in relation to this product The Philips trademark and the Philips Shield Emblem are registered trademarks of Koninklijke Philips N V used under license BTB2670_12_UM_V1 0 ...

Reviews: