background image

24

E
N

OSD

OSD

W

W

arning Signal

arning Signal

Additional Information

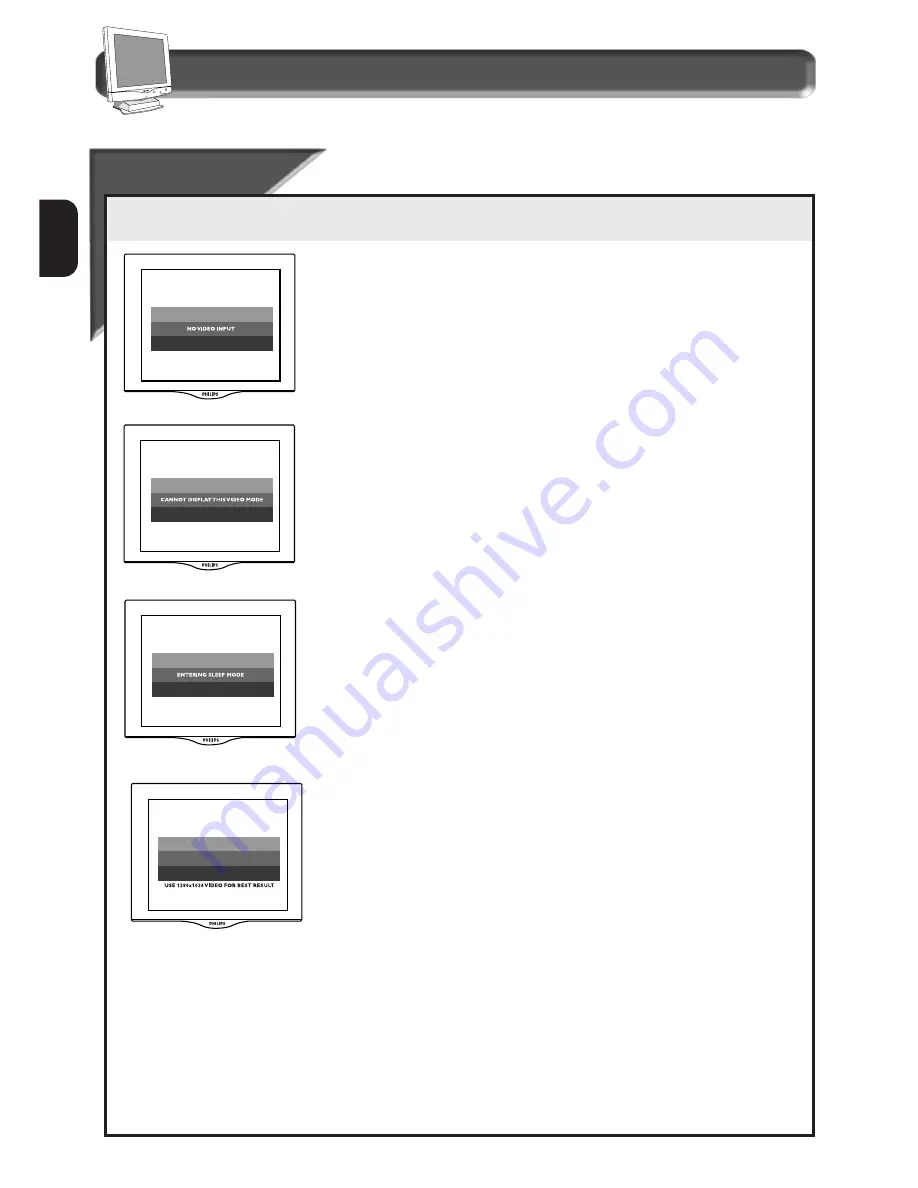
Warning signals display information and alerts about the status of the monitor.

• NO VIDEO INPUT •

This screen is displayed when there is no video signal input. Please

check that the signal cable is properly connected to the Video card or

PC.

• CANNOT DISPLAY THIS VIDEO MODE •

This screen warns when the input from the computer is not a standard

video mode or out of the monitor’s scanning range. Please change the

display mode of the operating software in the computer (i.e.

Windows) to 1280 x 1024 @ 60 Hz for best display

results.

• ENTERING SLEEP MODE •

This screen appears when the monitor is about to enter the sleep

mode. Please press any key on the keyboard or click the mouse to

wake up the monitor and computer.

• USE 1280 X 1024 FOR BEST RESULT •

This message appears  at the bottom of the OSD window when the

video mode input is not the recommended 1280 x 1024. Other modes

may result in some picture distortion. Please adjust the video mode to

1280 x 1024 @ 60 Hz for best display quality. 

Summary of Contents for Brilliance 181AS

Page 1: ...0 K OR 9300 K COLOR TEMPERATURE 18 USER PRESETS 19 FOURTH WINDOW LANGUAGE 20 OSD CONTROLS 20 VIDEO INPUT PRIORITY 21 POWER SAVING 21 ROTARY DEFAULT 22 EXIT OR RESET 23 ADDITIONAL INFORMATION OSD WARNING SIGNAL 24 25 PIN ASSIGNMENT 25 BNC CONNECTOR 25 POWER SAVING ACCEPTABLE RESOLUTION MODE 26 SPECIFICATIONS 26 WHAT TO DO IF SOMETHING ISN T WORKING 27 INDEX 28 GLOSSARY 29 WARRANTY INSIDE COVER FREN...

Page 2: ...e who are seeking advanced design a small footprint high quality picture and ergonomic features in a monitor that takes minimal desk space Its innovative technology delivers outstanding viewing angle and picture quality zero emissions and low energy consumption Features EXCELLENT DISPLAY QUALITY 18 1 inch viewable area display comparable to the viewable screen size of a 19 inch CRT monitor with ev...

Page 3: ...ke care not to mishandle this product by either knocking or dropping during operation or transportation Do not store or use the LCD monitor in locations exposed to high humidity or a dusty environment Also do not allow water or other liquids to spill on or into the LCD monitor Installation Locations Accessories VIDEO 1 2 Correct handling of the monitor 1 When handling the monitor grip the bottom f...

Page 4: ... install or update the driver click on START SETTINGS CONTROL PANEL DISPLAY SETTINGS tab ADVANCED MONITOR tab CHANGE This will start the Update Device Driver Wizard Follow the prompts to install the driver Windows 95 Click on START SETTINGS CONTROL PANEL DISPLAY SETTINGS tab ADVANCED PROPERTIES MONITOR tab CHANGE HAVE DISK Install the CD ROM Connection to PC VIDEO SETTINGS Before connecting your L...

Page 5: ...BNC optional connector Cover the cables with the plastic ring and put it back on the hinge Replace back cover of the monitor Connect the power cord to the monitor Plug power cord into a grounded power outlet Connect the monitor cable to the computer 1 2 3 4 5 6 7 Microphone out red connector Audio in speaker blue connector Follow the steps below to connect your LCD Monitor to PC Blue connector for...

Page 6: ... be ready to take advantage of this advancement in computer development For an IBM compatible Computer 1 Turn off the computer 2 Insert the optional USB Hub to the monitor 3 Connect the USB cable to the monitor s USB Hub and the computer Computer must have USB port 4 Connect USB type mouse or USB type keyboard or both to the monitor s USB Hub 5 Turn on the monitor Then turn on the computer 6 With ...

Page 7: ...ess this button for optimal picture display Clock Phase Vertical position and Horizontal position are adjusted automatically REAR VIEW Kensington Lock Socket A special feature to lock your monitor for anti theft Video 1 2 Allows you to switch between two video inputs D SUB BNC seletion e g Connect D SUB and 5 BNC video cable to the monitor from different PC at the same time Then press Video1 2 but...

Page 8: ...THOUT FIRST READING REMOVING INSTRUCTIONS FOUND IN THE GUIDE BUNDLED WITH THE ACCESSORIES Using the Mute Button To turn the mute On or Off press the mute button For Audio model only Using Rotary Knob for AUDIO Turn rotary knob to adjust audio level NOTE THE ROTARY KNOB IS ALSO USED FOR OSD OPERATION WHEN THE OSD BUTTON IS PRESSED Using the Auto Button Press this button for optimal picture dispaly ...

Page 9: ...of the four windows of the On Screen Display function The first window highlighted after the OSD has been selected By default the select block will be on Brightness It has five features Brightness Contrast Volume Phase Adjustment and Clock Adjustment Details on adjusting these feutures are on pages 13 15 This is the second window highlighted after the OSD has been selected The four features are Ve...

Page 10: ... Speaker sound output PC Front view of monitor REAR VIEW monitor Plug the other end of Microphone connector into the sound input port of your computer To Monitor To PC Plug the blue Audio connector into the sound output port of your computer Plug the other end of Audio connector into the Audio in port of your monitor To PC To Monitor Audio in cable blue or to Earphone jack Note To use the supplied...

Page 11: ...11 E N How to Use the On Screen Display OSD OSD Menu control level structure ...

Page 12: ...dow 7 7 OSD SWITCHES OFF AUTOMATICALLY AFTER 5 SECONDS DEFAULT IS 5 SECONDS WITH OSD CONTROLS you can set the amount of time it takes for the On Screen Display to time out or change the vertical and horizontal position of the OSD on the monitor screen 4 4 Turn the ROTARY knob to select 05 10 25 seconds or OFF 5 5 6 6 OSD control icon Rotary Knob OSD button 8 8 Press the OSD button VIDEO 1 2 VIDEO ...

Page 13: ... Contr Contrast ast To adjust your screen s contrast follow the steps below Contrast is the difference between the brightest and darkest areas on the screen Smart Help After returning to Exit to continue to Volume turn the Rotary Knob clockwise until the VOLUME icon is highlighted Next follow steps 3 5 under VOLUME on the next page to exit completely press the OSD button and choose either SAVE or ...

Page 14: ...creen 4 Turn the ROTARY knob to adjust the volume Turn the ROTARY knob clockwise until the VOLUME icon is highlighted 1 First window Press the OSDbutton to return to EXIT window 5 ST STAR ARTING CL TING CLOCK OCK PHA PHASE A SE Adjustments djustments Due to different video signal input from the video card of PC it is necessary to adjust the CLOCK and PHASE phenomenon for the optimal video display ...

Page 15: ...e PHASE ADJUSTMENT icon is highlighted Next press the OSD button Follow steps 3 5 under PHASE ADJUSTMENT to exit completely press the OSD button and choose either SAVE or Don t SAVE in setting mode then push OSD button to exit OSD See page 23 for other exit options 2 2 Press the OSD button 3 Press the OSD button to bring up PHASE ADJUSTMENT screen 4 Turn the ROTARY knob to adjust the Phase Adjustm...

Page 16: ... does not appear centered Smart Help After returning to Exit to continue to the Horizontal Position turn the ROTARY knob until the HORIZONTAL POSITION icon is highlighted Next follow steps 3 5 under HORIZONTAL POSITION to exit completely press the OSD button and choose either SAVE or Don t SAVE in setting mode then push OSD button to exit OSD See page 23 for other exit options Press the OSD button...

Page 17: ... screen real mode and user s setting Smart Help After returning to Exit to continue to the Expand Mode Optimization turn the ROTARY knob until the EXPAND MODE OPTIMIZATION icon is highlighted Next follow steps 3 5 under EXPAND MODE to exit completely press the OSD button and choose either SAVE or Don t SAVE in setting mode then push OSD button to exit OSD See page 23 for other exit options Press t...

Page 18: ...urn the ROTARY knob until one of the USER PRESET icons is highlighted Next follow steps 3 8 under USER PRESETS on the next page to exit completely press the OSD button and choose either SAVE or Don t SAVE in setting mode then push OSD button to exit OSD See page 23 for other exit options Press the OSD button Press the OSD button to return to the EXIT window 1 2 2 Turn the ROTARY knob until one of ...

Page 19: ...w 1 2 2 Turn the ROTARY knob until one of the USER PRESET icons is highlighted Third window 4 If necessary turn the ROTARY knob until of the USER PRESETS is highlighted Next press the OSD button to confirm the selection First RED will be highlighted Next to adjust the red press the OSD button again Then turn the ROTARY knob to increase or decrease the red 5 When done with red press the OSD button ...

Page 20: ...n to bring up LANGUAGE screen Turn the ROTARY knob until the desired language is selected 3 3 Press the OSD button to bring up OSD CONTROLS screen Press the OSD button to confirm the selection and return to EXIT window 7 7 Press the OSD button to return to EXIT window 5 WITH OSD CONTROLS you can set the amount of time it takes for the On Screen Display to time out or change the vertical and horizo...

Page 21: ...RY DEFAULT on the next page to exit completely press the OSD button and choose either SAVE or Don t SAVE in setting mode then push OSD button to exit OSD See page 23 for other exit options 2 2 Press the OSD button 3 3 Press the OSD button to bring up POWER SAVING screen Turn the ROTARY knob until the POWER SAVING icon is highlighted 1 1 Press the OSD button to return to EXIT window 5 5 3 3 Press t...

Page 22: ...window is highlighted Next follow the instructions for that window to exit completely press the OSD button and choose either SAVE or Don t SAVE in setting mode then push OSD button to exit OSD See page 23 for other exit options 2 2 Press the OSD button 3 3 Turn the ROTARY knob until the ROTARY DEFAULT icon is highlighted 1 1 Press the OSD button to return to EXIT window 5 5 Turn the ROTARY knob to...

Page 23: ...esets How to Use the On Screen Display OSD Turn the ROTARY knob until EXIT is highlighted Next press the OSD button 2 2 Turn the Rotary Knob to select YES to save changes or No to discard changes Then press the OSD button to confirm your choice and exit the OSD 3 3 Turn the Rotary knob to select RESET ALL SETTINGS YES or NO Press the OSD button to EXIT 3 3 When you are at the first level control w...

Page 24: ... out of the monitor s scanning range Please change the display mode of the operating software in the computer i e Windows to 1280 x 1024 60 Hz for best display results ENTERING SLEEP MODE This screen appears when the monitor is about to enter the sleep mode Please press any key on the keyboard or click the mouse to wake up the monitor and computer USE 1280 X 1024 FOR BEST RESULT This message appea...

Page 25: ...ears when you touch the AUTO button It will disappear when the monitor is properly adjusted SECOND VIDEO IS NOT AVAILABLE This screen appears when there is no second video source input Pressing the VIDEO 1 2 BUTTONS on the front of LCD monitor can switch the video input signal between the D sub and BNC connectors This message appears if one of the signals is not available The 5 BNC connectors are ...

Page 26: ...s ution Modes Power Management Definition VESA mode Video H sync V sync Power Power LED used saving color ON Active Yes Yes 60W 0 Green Stand by Blanked No Yes 5 W 88 8 Amber Suspend Blanked Yes No 5 W 88 8 Amber OFF Blanked No No 5 W 88 8 Amber Above power consumptions exclude USB watts This monitor is ENERGY STAR compliant As an ENERGY STAR Partner PHILIPS has determined that this product meets ...

Page 27: ...ng Problems Display position is Push the AUTO button incorrect Adjust the image position using the HORIZONTAL POSITION or VERTICAL POSITION in the SECOND WINDOW See page 16 Image vibrates on the Check that the signal cable is properly connected to the graphics board or PC screen Vertical flicker Push the AUTO button appears Eliminate the vertical bars using the CLOCK ADJUSTMENT in the FIRST WINDOW...

Page 28: ...lug and Play functions BNC connection A bayonet locking connector slim coaxial cables The connection is used in some monitors with high horizontal scanning frequencies It provides optimum shielding between the video input singal lines to give the best possible video performance Color temperature A way of describing the color of a radiating source in terms of the temperature in degrees Kelvin of a ...

Reviews: