background image

User Manual BDH4251V/00

6

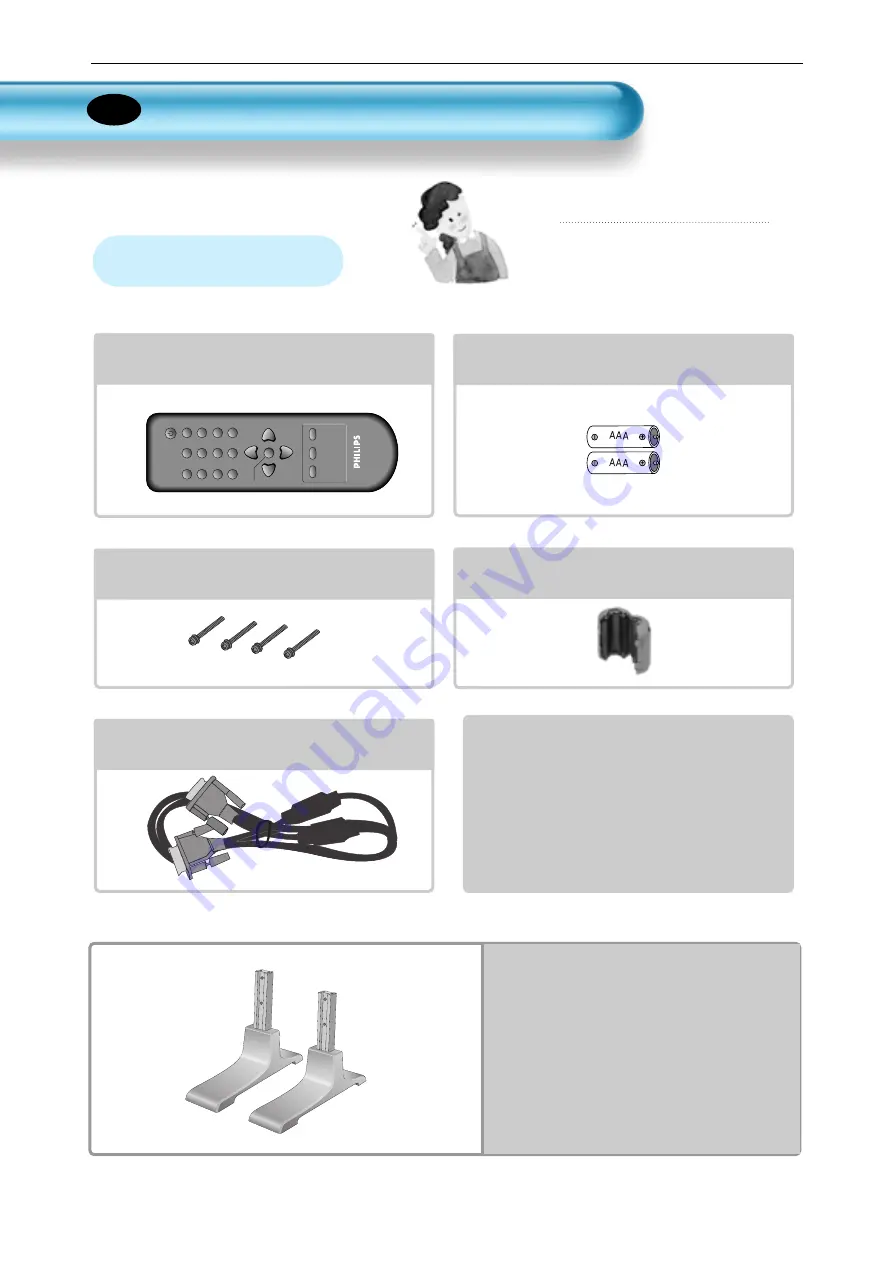
Checking Accessories

Stand Unit

Remote Control

1 UNIT

Note

Check to be sure that the following items
are packed with your Plasma panel.

Supplied Accessories

Batteries 

1 UNIT

P

.MODE

PICTURE FMT

A

V

S.MODE

S.EFFECT

PIXEL

 SHIFT

PIP

POSITION

COLOR TEMP

PIP

 SOURCE

S

W

A

P

RECALL

VOL

VOL

MENU

TIMER

STILL

R-48F01

MUTE

AC Power Cable   2 UNITS

(UK, Continental)

Ferrite Core

1 UNIT

M5 Screws(30mm)             4 UNITS

VGA Cable                           1 UNIT

EN

Summary of Contents for BDH4251V

Page 1: ...TYPE Nr BDH4251V 00 User Manual EN ...

Page 2: ...re Do not place this Montor on an unstable cart stand or table It may cause the product and cart to overturn damaging equipment or causing possible injury Please place the Monitor set in such a way that the main plug can be easily disconnected ROHS DIRECTIVE 2002 95 EC COMPLIANT This environment friendly product does not contain the EU RoHS restricted substances Pb Hg Cd Cr6 PBB and PBDE EN DISPOS...

Page 3: ...or lighted cigarette on the Monitor If these fall into the inside of the Monitor it may cause a fire or explosion Do not disassemble batteries and do not leave around in case children swallow them Heavy metal may contaminate environment and can be harmful or detrimental to human health If children swallow the batteries go to hospital and consult with a doctor Batteries could explode if fitted inco...

Page 4: ...cket It can result in a risk of electric shock Do not install the product where it will be exposed to the direct sunlight and the product should not be near heat sources such as radiators stoves etc It may cause malfunction Do not install the product where there is oil smog moist or dust It may cause malfunction For proper ventilation separate the product from the wall and keep a distance of more ...

Page 5: ...ed consult A qualified service personnel When the Monitor is not cleaned for a long period of time dust in it may cause fire or malfunction When the Monitor is placed on a cart or table the front side of the Monitor should not project outward Unbalance may cause the Monitor to drop resulting in personal injury or equipment malfunction and damage Do not allow a still picture to be displayed for an ...

Page 6: ...wing items are packed with your Plasma panel Supplied Accessories Batteries 1UNIT P MODE PICTURE FMT AV S MODE S EFFECT PIXEL SHIFT PIP POSITION COLOR TEMP PIP SOURCE SWAP RECALL VOL VOL MENU TIMER STILL R 48F01 MUTE AC Power Cable 2 UNITS UK Continental Ferrite Core 1UNIT M5 Screws 30mm 4 UNITS VGA Cable 1 UNIT EN ...

Page 7: ...nd under the plasma display like the picture below DIGITAL AUDIO OPTICAL OUTPUT INPUT PC AUDIO PC AUDIO HDMI COMP ONENT INPUT AV1 AV2 Use the enclosed 4 M5 screws to secure the assembled stand Picture of a properly installed stand and display DIGITAL AUDIO OPTICA L OUTPUT INPUT PC AUDIO PC AUDIO HDMI COMP ONENT INPUT AV1 AV2 M5 Screws ...

Page 8: ...onnecting HDMI 29 Connect with the Dolby Digital AMP APPLICATION MISC 59 Specifications CONTENTS 31 Selecting Picture Mode 47 MENU Background Language 32 Customizing Picture and Child Lock Setting 35 Adjusting Screen 49 MGDI Plus Meta Genuine 38 Watching a Still Image Digital Image 39 Watching Two Pictures 52 Time Setting Simultaneously 54 Image Sticking 41 Selecting Sound Mode Minimisation ISM 42...

Page 9: ... 00 9 Panel Controls Front Panel Rear Panel Items having the same name on the plasma display and the remote control would function in exactly the same way Front Power control sensor Power Stand by Red Stand by Green ON EN ...

Page 10: ...HDMI COMPONENT INPUT AV1 AV2 AUDIO VIDEO 10 Rear DIGITAL AUDIO OPTICAL OUTPUT INPUT PC AUDIO PC AUDIO HDMI COMPONENT INPUT AV1 AV2 MENU MOVE PC INPUT 15 pin D sub HDMI INPUT COMPONENT A V jacks SCART A V INPUT OUTPUT External Speaker Power PC OUTPUT 15 pin D sub PC AUDIO INPUT MENU MOVE ...

Page 11: ...P MODE button S MODE button Power button 13 41 31 43 Press to use a spatial sound effect S EFFECT button 32 AV button 14 Press this button to freeze the picture STILL button Each time you press this button a different input mode appears The sequence is as follows 15Min 30Min 60Min 90Min 120Min OFF After the time is selected it automatically becomes stand by state Timer button 39 RECALL button PIP ...

Page 12: ...the remote control to drop or to become wet Keep it away from hot or moist locations 1 Open the battery compartment on the back of the remote control 2 Install two AAA size batteries not included as shown Make sure the and terminals are oriented correctly 3 Replace the cover User Manual BDH4251V 00 ...

Page 13: ...r Buttons TurnthePDPandthereceiverON 2 Connect a Digital Broadcasting Receiver to the PDP Prepare A V cables Connect the cables from the digital TV Receiver output terminal to the PDP Component input terminal When connecting the cables be sure to match the cable colours 1 DIGITAL AUDIO OPTICAL INPUT PC AUDIO SERVICE PC PC OUT AUDIO HDMI COMPONENT INPUT AV1 AV2 AUDIO VIDEO DIGITAL AUDIO OPTICAL OUT...

Page 14: ...ed producing a sharp picture 3 If the Digital Broadcasting Receiver has PC output terminal or HDMI output terminal connect to PC INPUT or HDMI INPUT at the rear of the panel of the PDP AV Move Select MENU Exit Picture Screen Sound Feature Input AV 1 AV 2 AV 3 Component PC HDMI Select Component by pressing the AV button of the remote control or using the button of the PDP unit When you press the AV...

Page 15: ...andthereceiverON 2 Connect a Cable Broadcasting Receiver to the PDP PreparetheA Vcable Connectthereceiver Output toPDP VideoInput asshownbelow N B If both S Video and Video Audio RCA cables are connected together in AV3 input S Video always takes precedence However the left and right audio leads should be connected for the sound even though you would like to use S Video as AV3 input 1 Video Audio ...

Page 16: ...Select the desired program and function by using the remote control of the Cable BroadcastingReceiver 3 4 NOTES 1 If your local cable company re transmits digital broadcasts you may watch normal broadcasts and digital broadcasts simultaneously For detailed information refer to your local cable company 2 Only AV1 provides Monitor Out function 3 AV1 full scart RGB CVBS 4 AV2 half scart CVBS Move Sel...

Page 17: ...te Broadcasting Receiver to the PDP Prepare the A V cable Connect the receiver Output to PDP Video Input as shown below When connecting to an external AV source be sure to match the colours 1 Satellite Broadcasting Receiver N B If both S Video and Video Audio RCA cables are connected together in AV3 input S Video always takes precedence However the left and right audio leads should be connected fo...

Page 18: ...r 3 4 Move Select MENU Exit Picture Screen Sound Feature Input AV 1 AV 2 AV 3 Component PC HDMI Select AV 1 Scart AV 2 Scart or AV3 S Video by pressing the AV button of the remote control or the in keypad of the PDP unit When you press the AV button you will see the OSD as shown you can move using and select desire input mode with button User Manual BDH4251V 00 ...

Page 19: ...EFFECT PIXELSHIFT PIP POSITION COLOR TEMP PIP SOURCE SWAP RECALL VOL VOL MENU TIMER STILL R 48F01 MUTE Press the Power Buttons TurnthePDPandtheDVDON 2 Connect a DVD Player to the PDP PreparetheAVcable ConnecttheDVD Output tothePDP ComponentorVideoInput asshownbelow WhenconnectingtoanexternalAVsource besuretomatchthecolours 1 Video Component DVD DVD Video Audio S Video Audio Video Audio DVD N B Vid...

Page 20: ...g S Video and Video simultaneously only S Video will be displayed on the screen as it takes precedence 20 Input Select AV Select the Desired Title and Function Select the desired title and function by usingtheremotecontroloftheDVD 3 4 Move Select MENU Exit Picture Screen Sound Feature Input AV 1 AV 2 AV 3 Component PC HDMI Select Component AV1 Scart AV2 Scart or AV3 S Video by pressing the AV butt...

Page 21: ...OLOR TEMP PIP SOURCE SWAP RECALL VOL VOL MENU TIMER STILL R 48F01 MUTE Press the Power Buttons TurnthePDPandtheVCRON 2 Connect a VCR to the PDP Prepare the AV cable Connect the Video Output to PDP Video Input as shown below 1 S Video VCR Video Audio Video Audio DIGITAL AUDIO OPTICAL OUTPUT INPUT PC AUDIO PC AUDIO HDMI COMPONENT INPUT AV1 AV2 MENU MOVE Watching a VCR Image EN ...

Page 22: ...sly the S Video terminal is selected This can be checked by the Recall button of the remote control 22 AV Select the Desired Title and Function Select the desired title and function by using the remote control of the VCR 4 Input Select 3 Move Select MENU Exit Picture Screen Sound Feature Input AV 1 AV 2 AV 3 Component PC HDMI Select AV 1 Scart AV 2 Scart or AV 3 S Video by pressing the AV button o...

Page 23: ... 48F01 MUTE Press the Power Buttons Turn the PDP and the Camcorder Game Console ON 2 Connect a Camcorder Game Console to the PDP Prepare the AV cable Connect the Video Output to the PDP Video Input as shown below When connecting to an external AV source be sure to match the colours 1 Video Audio Game Console Camcorder S Video Video Audio DIGITAL AUDIO OPTICAL OUTPUT INPUT PC AUDIO PC AUDIO HDMI CO...

Page 24: ... connecting via component video refer to Watching a DVD Image on page 19 20 24 AV Select Function Select the function by using the remote control of camcorder or game console 4 Input Select 3 Move Select MENU Exit Picture Screen Sound Feature Input AV 1 AV 2 AV 3 Component PC HDMI Select AV 1 Scart AV 2 Scart or AV 3 by pressing the AV button of the Remote Control or the in keypad of the PDP unit ...

Page 25: ...NT INPUT AV1 AV2 MENU MOVE P MODE PICTURE FMT AV S MODE S EFFECT PIXELSHIFT PIP POSITION COLOR TEMP PIP SOURCE SWAP RECALL VOL VOL MENU TIMER STILL R 48F01 MUTE Connect the PC to the PDP Prepare the PC cable D sub 15pin and the PC audio cable Connect the PC Output to the PDP Input as shown below If using the audio cable for connection put the ferrite core to the middle of the cable for preventing ...

Page 26: ...n order to make fit automatically Also you can adjust the position of the picture with H position and V position functions manually 26 Input Select AV Select PC by pressing the AV button of the remotecontrolorPDPunit When you press the AV button you will see the OSD as shown you can move using and select desire input mode with button N B You cannot select PC if the picture in picture mode is on En...

Page 27: ...e Connect the HDMI Output to the PDP Input as shown below 1 HDMI DIGITAL AUDIO OPTICAL OUTPUT INPUT PC AUDIO PC AUDIO HDMI COMPONENT INPUT AV1 AV2 MENU MOVE Game console DVD Connecting HDMI This product supports resolution of VGA SVGA XGA SXGA Before connecting a PC to the PDP be sure to adjust the resolution of PC This product is supported by Plug and Play only at HDMI This Plasma unit is complia...

Page 28: ...n you will see the OSD as shown you can move using and select desire input mode with button 3 Turn on the PDP and DVD or Game console NOTES HDMI input port receives only digital signal Press the Power Buttons 2 Move Select MENU Exit Picture Screen Sound Feature Input AV 1 AV 2 AV 3 Component PC HDMI User Manual BDH4251V 00 ...

Page 29: ...MPONENT INPUT AV1 AV2 Surround L Surround R R L Center Woofer Dolby Digital AMP I N P U T Optical output AUDIO VIDEO ConnectwiththeDolbyDigitalAMP If you connect the optical output to a Dolby digital AMP you can listen to better sound EN User Manual BDH4251V 00 ...

Page 30: ...A O O O O O O O O O O O O O O O O Depending on graphic card problems like no signal detected or line noises can happen If these problems happen contact the graphic card company for help 640 x 480 720 x 400 800 x 600 1024 x 768 1280 x 1024 Resolution H Freq KHz V Freq Hz Remark HDMI PC PC and HDMI Input Resolution Available in PDP User Manual BDH4251V 00 ...

Page 31: ...ed picture mode the menu on the screen will be disappeared If you want to customise the picture mode refer to the following page 3 1 2 NOTES 1 Normal Dynamic and Cinema modes are factory preset values 2 When adjusting sub menus while you are in Normal Dynamic and Cinema modes the Picture Mode will be automatically converted to User Mode and the adjustments will be made 3 Selecting Initialize in th...

Page 32: ... bythe buttonsinthe Mode 3 Press the MENU Button The MENU shown below will display on the screen 1 2 Move Select MENU Exit On Normal 40 80 8 60 Picture Feature Input Sound Screen Mode Brightness Contrast Sharpness Colour Colour Temp N R Dynamic Move Select MENU Exit On Normal 50 50 8 50 Picture Feature Input Sound Screen Mode Brightness Contrast Sharpness Colour Colour Temp N R User Move Select ME...

Page 33: ...ur Temp N R User 50 While you are in Picture Mode User press the buttons to select a specific adjustment item NOTES 1 While you are in the PC or HDMI input mode you can only adjust brightness contrast and colour temperature 2 When you adjust Brightness Contrast and Colour in DTV mode or adjust Brightness and Contrast in PC and HDMI mode the picture is adjusted finely 3 The Tint control is used whe...

Page 34: ... Screen Mode Brightness Contrast Sharpness Colour Colour Temp N R User 50 Normal COLOR TEMP Normal Warm Cool Pressing the COLOR TEMP button first time will display the current setting for COLOR TEMP Each time you press the button a different color temp appears The sequence used is as follows User Manual BDH4251V 00 ...

Page 35: ... a 4 3 mode for a long time may cause phosphor of the PDP to be burned So avoid displaying a picture in 4 3 screen size for a long time 2 Under Component PC and HDMI inputs only 16 9 and 4 3 are available 3 Auto Displays pictures of original picture size 16 9 16 9 picture formats 14 9 14 9 picture formats 4 3 4 3 picture formats like an analog TV LB Enlarges the screen as to fill the black part ab...

Page 36: ...creen in the menu Press the MENU Button The MENU screen as shown below will appear Press the Button Pressthe buttons to select Screen In case of PC input 1 2 Move Select MENU Exit Mode 16 9 Screen Feature Input Picture Sound Move Select MENU Exit Mode Brightness Contrast Sharpness Colour Colour Temp N R Dynamic On Normal 40 80 8 60 Picture Feature Input Sound Screen VOL VOL MENU User Manual BDH425...

Page 37: ...Picture Sound NOTES 1 Screen Mode is different according to the input modes input Available Screen Mode AV 16 9 4 3 LB 16 9 LBS 16 9 14 9 LB 14 9 LBS 14 9 Auto Component 16 9 4 3 PC HDMI 2 Other Screen adjustments Under PC mode H Position As the value increases the screen moves to the right V Position As the value increases the screen moves up Auto Adjusting automatically the screen to optimum sta...

Page 38: ...mage burn after image lagging 2 In this case such image burn may become less noticeable if moving images are later displayed for a long time 3 However an image burn may become a permanent one damaging the Plasma Display therefore avoid displaying the same images for a long time 4 Use the function ISM while displaying still images for a long period of time to minimize this effect ISM on or off is i...

Page 39: ...ton the sub picture will be cycling in the following order If you would like to move the sub picture to specific position you desire use navigation keys Swap the pictures In order to swap between the main picture and sub picture press the SWAP button 3 1 2 Using Position button P by P PIP Main Sub Main Main Sub Main Sub Sub Sub Sub Main Main Main Screen Adjustment of the Sub picture Alpha Blend of...

Page 40: ...the SOURCE button Pressing the SOURCE button repeatedly will cycle through following order 5 40 P MODE PICTURE FMT AV S MODE S EFFECT PIXELSHIFT PIP POSITION COLOR TEMP PIP SOURCE SWAP RECALL VOL VOL MENU TIMER STILL R 48F01 MUTE PIP SOURCE MAIN AV1 AV2 AV3 AV1 COMP PC HDMI CVBS CVBS CVBS S RGB PIP AV1 CVBS AV2 CVBS AV3 CVBS S AV1 RGB COMP PC HDMI X X X X X X X X X X X X X X X X X X X X X X X X X ...

Page 41: ...ges Modes S MODE Each time you press the button a different sound mode appears The sequence used is as follows Normal Suitable for watching any motion picture Movie Select this mode to simulate being at a movie theatre Music Ideal for listening to music News Allows human voice to be heard more clearly User Allows the user to adjust as desired MENU will Disappear After selecting a desired Sound Mod...

Page 42: ...t MENU Exit Balance Effect AVC Mode Equalizer Off Off Normal 0 Feature Input Picture Screen Sound Move Adjust MENU Exit Off Off Normal Feature Input Picture Screen Sound Balance Effect AVC Mode Equalizer 0 Move Select MENU Exit Mode Brightness Contrast Sharpness Colour Colour Temp N R Dynamic On Normal 40 80 8 60 Picture Feature Input Sound Screen Customising Sound Mode P MODE PICTURE FMT AV S MOD...

Page 43: ... And M Voice is the function that you can hear clearer voice Effect Mode also can be selected by pressing S EFFECT button on the remote controller 4 Move Adjust MENU Exit Off Normal Feature Input Picture Screen Sound Balance Effect AVC Mode Equalizer 0 Off Off BBE M Voice P MODE PICTURE FMT AV S MODE S EFFECT PIXELSHIFT PIP POSITION COLOR TEMP PIP SOURCE SWAP RECALL VOL VOL MENU TIMER STILL R 48F0...

Page 44: ...e to be heard more clearly User Allows the user to adjust as desired NOTES 1 User Mode Used as an equalizer with which the user can adjust the sound frequency as desired 2 If you modify the sound frequency in auto Sound Mode News Movie Music etc it is automatically switched to the User Mode 3 For a realistic sound effect lower than 120Hz frequency sound and greater than 12kHz frequency adjust the ...

Page 45: ... properly fitted 3 Also you can select input using INPUT SELECT button in the keypad of the PDP unit Move Select MENU Exit Picture Screen Sound Feature Input AV 1 AV 2 AV 3 Component PC HDMI Press the Input Signal Selecting Button AV Press the AV button on the remote control or select the desire input signal using Keypad of the PDP unit When you press the AV button you will see the OSD as shown yo...

Page 46: ...d input terminal which is used Indicates the mode and current time AV1 PM 12 00 Displays the video system of input signal Video PAL B G NOTES 1 1920 x 1080 displayed in the INPUT signal is not the resolution of the set but the signal that is sent by the Digital Broadcasting Receiver Press the RECALL button on the remote control then displays basic informations of the current input signal Under thi...

Page 47: ...elect MENU Exit Mode Brightness Contrast Sharpness Colour Colour Temp N R Dynamic On Normal 40 80 8 60 Picture Feature Input Sound Screen Move Adjust MENU Exit Off On Off English Input Picture Screen Sound Feature 10 Background Language Child Lock MGDI plus Auto Power Time Setting ISM Initialize Operation Hours 50 Move Select MENU Exit Background Language Child Lock MGDI plus Auto Power Time Setti...

Page 48: ...s ON the LED of the Plasma unit will be flickering in red 4 5 Move Adjust MENU Exit On Off 50 Input Picture Screen Sound Feature 10 Background Language Child Lock MGDI plus Auto Power Time Setting ISM Initialize Operation Hours English Off Move Adjust MENU Exit Off On Off 50 Input Picture Screen Sound Feature 10 Background Language Child Lock MGDI plus Auto Power Time Setting ISM Initialize Operat...

Page 49: ...it Mode Brightness Contrast Sharpness Colour Colour Temp N R Dynamic On Normal 40 80 8 60 Picture Feature Input Sound Screen Move Select MENU Exit Background Language Child Lock MGDI plus Auto Power Time Setting ISM Initialize Operation Hours Off On Off 50 English Input Picture Screen Sound Feature 10 MGDI Plus is the image enhancement technology of which provides more clear realistic and delicate...

Page 50: ...ting Enter the sub Menu by using the button Select the MGDI Plus by pressing the button You can select MGDI Plus On or Off mode by using the button 3 Move Adjust MENU Exit Off 50 Input Picture Screen Sound Feature 10 Background Language Child Lock MGDI plus Auto Power Time Setting ISM Initialize Operation Hours English Off On User Manual BDH4251V 00 ...

Page 51: ...ation Hours English Off On Off AutoPower 1 ON When the AC power is ON the Monitor will be turned on automatically without pressing the power button on the remote control 2 OFF When the AC power is ON the Monitor will be turned on by pressing the power button on the remote control or the keypad of the front panel 3 If Child Lock function is ON this function is not operated AC POWER ON PDP SET ON Au...

Page 52: ...ting by pressing the button 3 1 2 Move Select MENU Exit Mode Brightness Contrast Sharpness Colour Colour Temp N R Dynamic On Normal 40 80 8 60 Picture Feature Input Sound Screen Move Select MENU Exit Background Language Child Lock MGDI plus Auto Power Time Setting ISM Initialize Operation Hours Off On Off 50 English Input Picture Screen Sound Feature 10 Move Adjust MENU Exit 50 Input Picture Scree...

Page 53: ...n setup off time Clock Adjust the desired hour and minute with button Off Time Setting methods are same as Clock setting method Off Timer Setting On and Off of each Timer 4 Move Adjust MENU Exit Input Picture Screen Sound Feature Time Setting Clock OffTimer Off Time AM 11 50 Off AM 12 00 VOL VOL MENU Time Setting Functions This time memory function automatically turns the Monitor set Off at a desi...

Page 54: ...Temp N R Dynamic On Normal 40 80 8 60 Picture Feature Input Sound Screen Move Select MENU Exit 50 Input Picture Screen Sound Feature 10 Background Language Child Lock MGDI plus Auto Power Time Setting ISM Initialize Operation Hours English Off On Off Move Select MENU Exit Background Language Child Lock MGDI plus Auto Power Time Setting ISM Initialize Operation Hours Off On Off 50 English Input Pic...

Page 55: ...t Picture Screen Sound Feature ISM Pixel Shift Low Bright Image Invert On Off Off NOTES Pixel Shift The whole screen shifts up down left right at 25 sec interval to minimize image sticking Low Bright When displaying a still picture or a fixed pattern for a long time 5Min the brightness level decreases to minimize image sticking and the initial default value of Low Bright is On state Image Invert I...

Page 56: ... Normal 40 80 8 60 Picture Feature Input Sound Screen Move Select MENU Exit Background Language Child Lock MGDI plus Auto Power Time Setting ISM Initialize Operation Hours Off On Off 50 English Input Picture Screen Sound Feature 10 VOL VOL MENU Reset factory setting P MODE PICTURE FMT AV S MODE S EFFECT PIXELSHIFT PIP POSITION COLOR TEMP PIP SOURCE SWAP RECALL VOL VOL MENU TIMER STILL R 48F01 MUTE...

Page 57: ...ot initialized INITIALIZATION Enter the sub Menu by using the button Select the Initialize by pressing the button then press the button A confirmation message will be displayed To perform initialization press the button after selecting YES by the button To return to MENU press MENU button 3 Move Select MENU Exit Input Picture Screen Sound Feature Are you Sure No Yes Move Select MENU Exit 50 Input ...

Page 58: ...moteControl Pressing the TIMER button first time will display the currentsettingforSleepTimer To cancel the Sleep Timer press the TIMER button to select Off 1 NOTES 1 On screen information disappears if you do not take any action for about two seconds after pressing the TIMER button 2 If you turn the PDP off after setting TIMER the setting is erased Sleep Timer Off Sleep Timer off Sleep Timer 15 S...

Page 59: ...CATIONS Appearance and specifications of this product are subject to change for improving the product without prior notice DISPLAY UNIT CONNECTION TERMINAL AUDIO FEATURES AUDIOOUTPUT 20W 10W 10W 8 Ohm 59 ITEMS HDMI INPUT HDMI Jack PHONE Jack LEFT RIGHT LEFT RIGHT LEFT RIGHT LEFT RIGHT In Out One 15 pin D sub jack One 15 pin D sub jack One Y Pb Cb Pr Cr RCA jack SCART jack Video In Out RGB In AV1 V...

Reviews: