background image

9

English

EN

6 Troubleshooting

Warning


Never remove the casing of this device.

To keep the warranty valid, never try to repair 

the system yourself. 
If you encounter problems when using this 

device, check the following points before 

requesting service. If the problem remains 

unsolved, go to the Philips Web page (www.

philips.com/support). When you contact Philips, 

make sure that the device is nearby and the 

model number and serial number are available.

No power to the wireless microphone


The batteries may be installed incorrectly 

or drained. Install or replace the batteries 

properly (see 'Install/replace microphone 

batteries' on page 5).


As a power-saving feature, the microphone 

switches to standby mode automatically 

after staying disconnected from the 

receiver for more than 15 minutes. To 

switch it on again, you need to slide the 

OFF/ON

 switch on the microphone to the


OFF

 position and then back to the 

ON


position.

No sound or poor sound


Adjust volume on the iPad.


Adjust volume on the Hi-Fi system 

connected to the receiver.


Make sure that you have selected the 

correct source on the connected Hi-Fi 

system.


Make sure that you have connected the 

receiver to the Hi-Fi system securely.


Check whether you have connected the 

iPad securely.


Check whether you have started music 

play on the iPad.

Failed to set up connection between the 

microphone and receiver

• 

Check whether both the wireless 

microphone and receiver are switched 

on. The receiver is switched on 

automatically when it is connected to 

an iPad.

• 

Make sure that the wireless 

microphone and receiver are within 

the the effective operation range, that 

is, approximately 10 meters (30 feet).

Howling or echo from the wireless 

microphone

• 

Adjust volume on the iPad.

• 

Adjust volume on the existing Hi-Fi 

system connected to the receiver.

• 

Increase the distance between the 

microphone and iPad (Hi-Fi system) 

or adjust the angle of the microphone 

towards the iPad (Hi-Fi system).

Summary of Contents for AEA3000

Page 1: ...www philips com welcome User manual Always there to help you Register your product and get support at AEA3000 Question Contact Philips ...

Page 2: ......

Page 3: ...Receiver 4 Introduction 4 What s in the box 4 Overview of the unit 4 3 Get started 5 Install replace microphone batteries 5 4 Play 6 Sing along through the wireless microphone 6 Optional Enjoy music from an existing Hi Fi system 7 5 Product information 8 Specifications 8 6 Troubleshooting 9 ...

Page 4: ...l special handling may apply See www dtsc ca gov hazardouswaste perchlorate l Apparatus shall not be exposed to dripping or splashing keep it away from direct sunlight naked flames or heat Information about the use of batteries Caution Risk of leakage Only use the specified type of batteries Do not mix new and used batteries Do not mix different brands of batteries Observe correct polarity Remove ...

Page 5: ... and human health Environmental information All unnecessary packaging has been omitted We have tried to make the packaging easy to separate into three materials cardboard box polystyrene foam buffer and polyethylene bags protective foam sheet Your system consists of materials which can be recycled and reused if disassembled by a specialized company Please observe the local regulations regarding th...

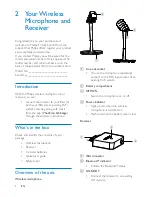
Page 6: ...ad or both your iPad and an existing Hi Fi system and sing along with music from the app TheVoice On Stage through the wireless microphone What s in the box Check and identify the contents of your package Wireless microphone Receiver 3 x AAA batteries Quick start guide Safety sheet Overview of the unit Wireless microphone a Line out socket To use the microphone separately connect to the MIC input ...

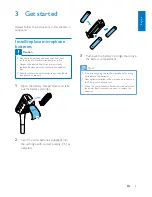
Page 7: ...al substances so they should be disposed of properly 1 Open the battery compartment and take out the battery cartridge 2 Insert 3 x AAA batteries supplied into the cartridge with correct polarity as indicated 3 Push back the battery cartridge then close the battery compartment Note If you are not going to use the microphone for a long time remove the batteries New batteries installed in the microp...

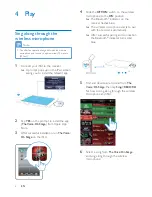
Page 8: ... After successful installation run TheVoice On Stage on the iPad 4 Slide the OFF ON switch on the wireless microphone to the ON position The Bluetooth indicator on the receiver flashes blue The wireless microphone starts to pair with the receiver automatically After successful pairing and connection the Bluetooth indicator turns solid blue 5 Find and download a tutorial from The Voice On Stage the...

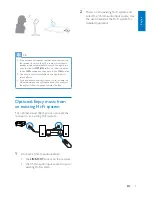
Page 9: ...perience howling or echo try to increase the distance between the microphone and iPad or adjust the angle of the microphone towards the iPad Optional Enjoy music from an existing Hi Fi system For optimal sound effect you can connect the receiver to an existing Hi Fi system 1 Connect a 3 5mm audio cable to the LINE OUT socket on the receiver the 3 5mm audio input socket on your existing Hi Fi syste...

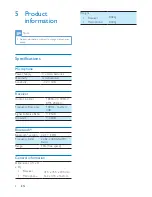
Page 10: ...ensitivity 32 3dB Receiver Audio Line Out 1000mV 100mV RMS 20kohm Frequency Response 100Hz 16kHz 3dB Signal to Noise Ratio 85dB Crosstalk 40dB Bluetooth Bluetooth version V2 1 EDR Frequency band 2 402 2 480 GHzISM Band Range 10m free space General information Dimensions W x H x D Receiver Microphone 41 5 x 45 5 x 10 5mm 162 x 333 x 162mm Weight Receiver Microphone 0 02kg 0 33kg ...

Page 11: ...phone to the OFF position and then back to the ON position No sound or poor sound Adjust volume on the iPad Adjust volume on the Hi Fi system connected to the receiver Make sure that you have selected the correct source on the connected Hi Fi system Make sure that you have connected the receiver to the Hi Fi system securely Check whether you have connected the iPad securely Check whether you have ...

Page 12: ...Specifications are subject to change without notice 2012 Koninklijke Philips Electronics N V All rights reserved AEA3000_UM_00_V1 0 ...

Reviews: