background image

Summary of Contents for AC4025

Page 1: ...AC4025 Register your product and get support at www philips com welcome Always there to help you Question Contact Philips EN User manual 3 ID Buku Petunjuk Pengguna 19 TH คู มือผู ใช 35 ZH T 使用手冊 51 ...

Page 2: ......

Page 3: ...ed 9 Sleep mode 9 Set theTimer 10 5 Clean your air purifier 11 Clean the air purifier 11 Clean the activated carbon filter 11 6 Replace the filters 12 Replace the activated carbon filter and the HEPA filter 12 Reset the filter lifetime counter 14 7 Troubleshooting 15 8 Guarantee and service 16 Order parts or accessories 16 9 Notices 17 Electromagnetic fields EMF 17 Compliance with EMF 17 Recycling...

Page 4: ... extractor hood or fan while cooking If the power socket used to power the appliance has poor connections the plug of the appliance becomes hot Make sure that you plug the appliance into a properly connected power socket 1 Important Safety Read this user manual carefully before you use the appliance and save it for future reference Danger Do not let water or any other liquid or flammable detergent...

Page 5: ...vice in case of accidents with combustion processes and hazardous chemicals Always place and use the appliance on a dry stable level and horizontal surface Leave at least 20cm free space behind and on both sides of the appliance and leave at least 30cm free space above the appliance Do not place anything on top of the appliance and do not sit on the appliance Do not place the appliance directly be...

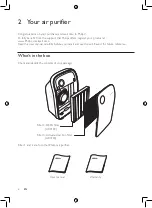
Page 6: ... your product at www Philips com welcome Read this user manual carefully before you install and use the unit Save it for future reference What s in the box Check and identify the contents of your package 4 Filter 3 Activated carbon filter AC4103 Filter 4 HEPA filter AC4104 Filter 1 and 2 are for other Philips air purifier User manual Warranty ...

Page 7: ...ers fitted inside but you have to remove the packaging of the filters before you can use the appliance Remove all filters unpack them and place them back into the air purifier as described below Tip When you remove or insert filters place the air purifier against a wall for more stability Note Insert the filters in the correct position 1 Place your fingers at the top panel and gently pull the top ...

Page 8: ...cement light flashes This lasts approximately for 2 weeks You still have 2 weeks time to replace the activated carbon filter and the HEPA filter Filter replacement light is on continuously Replace the activated carbon filter and the HEPA filter immediately Switch on or off 1 Plug the air purifier into the power socket All lights go on twice Then the lights go out again Control panel 6 To reattach ...

Page 9: ...mode The light goes on while the goes off 2 Press the button to switch on the purifier The power on light on the control panel goes on 3 Press the button to switch off the purifier Change the fan speed You can select the desired fan speed Note When you select a fan speed you can also use the timer function see Set the timer In this case one of the lights and and the one of the lights or are on 1 P...

Page 10: ... the button Set the Timer With the timer function you can let the purifier operate for a set number of hours When the set time has elapsed the purifier automatically switches off You can use the timer function in the following situation Situation You will see Choose a fan speed manually see Manual One of the lights or and one of the lights or are on 1 Press the button to switch on the purifier 2 P...

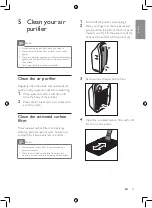
Page 11: ...g agents such as bleach or alcohol to clean any part of the purifier The air purifier filters are not washable Clean the air purifier Regularly clean the inside and outside of the purifier body to prevent dust from collecting 1 Wipe away dust with a soft dry cloth from the body of the purifier 2 Clean the air inlet and the air outlet with a soft dry cloth Clean the activated carbon filter This act...

Page 12: ... not replace the filter in time The lights up continuously In sleep mode when the light starts to flash but dim replace both the activated carbon filter and HEPA filter This will last for approximately 2 weeks When you do not replace the filter in time The lights up but dim continuously Tip When you remove or insert filters place the purifier against a wall for more stability 5 Put the activated c...

Page 13: ...1 Switch off the purifier and unplug it 2 Place your fingers at the top panel and gently pull the top part of the front panel towards you 1 Lift the panel out of the hooks at the bottom of the purifier 2 1 2 3 Remove the filters using the tag on the filter Take the filters by both sides and gently deposit them into the household trash bin Note Do not touch the pleated filter surface or smell the f...

Page 14: ...e HEPA filter lifetime see Reset the filter lifetime counter Reset the filter lifetime counter When you replace the filters it is important that you also reset the filter lifetime counter afterwards This allows the purifier to be in sync with the filter lifetime After you have replaced the filter reset the filter time 1 Switch off the purifier and unplug it 2 Replace the air purifier filter see Re...

Page 15: ...have removed all the packaging material from the filters The air quality does not improve even though the purifier has been operating for a long time One of the filters has not been placed in the purifier Make sure that all filters are properly installed in the following order starting with the innermost filter 1 HEPA filter 2 activated carbon filter The purifier is extra loud Please check if you ...

Page 16: ...orldwide guarantee leaflet If there is no Consumer Care Centre in your country go to your local Philips dealer Order parts or accessories If you have to replace a part or want to purchase an additional part go to your Philips dealer or visit www philips com support If you have problems obtaining the parts please contact the Philips Consumer Care Center in your country you find its phone number in ...

Page 17: ...he time of producing the products Philips is committed to develop produce and market products that cause no adverse health effects Philips confirms that if its products are handled properly for their intended use they are safe to use according to scientific evidence available today Philips plays an active role in the development of international EMF and safety standards enabling Philips to anticip...

Page 18: ......

Page 19: ... kecepatan kipas 25 Mode tidur 26 MenyetelTimer 26 5 Membersihkan alat pemurni udara Anda 27 Membersihkan alat pemurni udara 27 Membersihkan filter karbon aktif 27 6 Ganti filter 28 Mengganti filter karbon aktif dan filter HEPA 28 Mereset penghitung masa pakai filter 30 7 Troubleshooting 31 8 Garansi dan servis 32 Memesan komponen atau aksesori 32 9 Pemberitahuan 33 Medan elektromagnet EMF 33 Kese...

Page 20: ...tidaknya 30 cm di atas alat Jangan letakkan apa pun di bagian atas alat dan jangan menduduki alat Jangan letakkan alat langsung di bawah penyejuk udara untuk untuk mencegah kondensasi menetes pada alat 1 Penting Keselamatan Baca petunjuk pengguna ini dengan saksama sebelum Anda menggunakan alat dan simpanlah sebagai referensi nanti Bahaya Jangan memasukkan air atau cairan lain atau deterjen yang m...

Page 21: ...i saluran masukan udara dan saluran keluaran udara dengan benda keras Selalu angkat atau pindahkan alat melalui gagangnya di bagian belakang alat Jangan masukkan jari Anda atau benda ke dalam saluran keluaran udara Jangan gunakan alat ini bila Anda sudah menggunakan obat nyamuk jenis asap dalam ruangan atau di tempat yang terdapat residu minyak dupa bakar atau uap kimia Jangan gunakan alat dekat a...

Page 22: ...produk Anda di www Philips com welcome Baca petunjuk pengguna ini dengan saksama sebelum Anda memasang dan menggunakan unit Simpanlah sebagai referensi nanti Isi kemasan Cek dan identifikasi isi kemasan Anda 4 Filter 3 Filter karbon aktif AC4103 Filter 4 Filter HEPA AC4104 Filter 1 dan 2 dgunakan untuk pemurni udara Philips lainnya Petunjuk Pengguna Jaminan ...

Page 23: ...terpasang di dalamnya namun Anda harus melepaskan kemasan filter sebelum Anda dapat menggunakan alat Lepaskan semua filter buka kemasannya dan masukkan kembali ke dalam alat pemurni udara sebagaimana diterangkan di bawah ini Tip Saat Anda mengeluarkan atau memasukkan filter pasang lagi alat pemurni udara ke dinding agar lebih stabil Catatan Masukkan filter dalam posisi yang benar 1 Letakkan jari A...

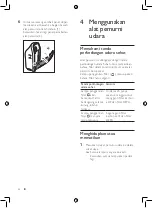
Page 24: ...lter akan berkedip Hal ini berlangsung selama kurang lebih 2 minggu Anda masih punya waktu 2 minggu untuk mengganti filter karbon aktif dan filter HEPA Lampu penggantian filter menyala terus menerus Segera ganti filter karbon aktif dan filter HEPA Menghidupkan atau mematikan 1 Masukkan steker pemurni udara ke dalam soket daya Semua lampu menyala dua kali Kemudian semua lampu akan padam lagi 6 Untu...

Page 25: ...Menyetel timer Dalam hal ini salah satu lampu dan serta salah satu lampu atau akan menyala 1 Tekan tombol untuk menghidupkan alat pemurni 2 Tekan tombol sekali atau beberapa kali untuk memilih kecepatan kipas yang diinginkan atau Panel kontrol 2 Tekan tombol untuk menghidupkan alat pemurni Lampu tanda hidup pada panel kontrol akan menyala 3 Tekan tombol untuk mematikan alat pemurni ...

Page 26: ...ktifkan fungsi timer tekan tombol berulang ulang hingga lampu atau padam Mode tidur Dalam mode tidur alat pemurni udara beroperasi sangat senyap agar tidak mengganggu tidur Anda 1 Tekan tombol untuk menghidupkan alat pemurni udara 2 Tekan tombol untuk memilih mode tidur Lampu menyala sementara lampu mati Untuk mengubah kecepatan kipas tekan tombol Menyetel Timer Dengan fungsi timer Anda dapat memb...

Page 27: ... Jangan sekali kali merendam alat pemurni di dalam air atau cairan lainnya Jangan sekali kali menggunakan bahan pembersih yang abrasif agresif atau yang mudah terbakar seperti bahan pemutih atau alkohol untuk membersihkan bagian apa pun pada alat pemurni Filter alat pemurni udara tidak dapat dicuci Membersihkan alat pemurni udara Secara teratur bersihkan bagian dalam dan bagian luar alat pemurni u...

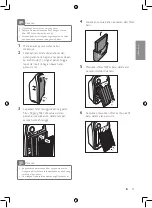
Page 28: ...mode tidur bila lampu mulai berkedip namun redup ganti filter karbon aktif dan filter HEPA Ini akan berlangsung selama kurang lebih 2 minggu Bila Anda tidak langsung mengganti filter Lampu menyala namun redup terus menerus Tip Saat Anda mengeluarkan atau memasukkan filter pasang lagi alat pemurni ke dinding agar lebih stabil 4 Bersihkan filter karbon aktif dengan sikat halus untuk menghilangkan de...

Page 29: ... ke Anda dan bahwa tag berada di ujung bawah filter 1 Matikan alat pemurni dan cabut stekernya 2 Letakkan jari Anda di panel atas dan pelan pelan tarik bagian atas panel depan ke arah Anda 1 Angkat panel hingga lepas dari kait di bagian bawah alat pemurni 2 1 2 3 Lepaskan filter menggunakan tag pada filter Pegang filter di kedua sisi dan perlahan masukkan ke dalam tempat sampah rumah tangga Catata...

Page 30: ...er karbon aktif dan filter HEPA lihat Mereset penghitung masa pakai filter Mereset penghitung masa pakai filter Bila Anda mengganti filter maka setelah itu Anda juga perlu mereset penghitung masa pakai filter Ini memungkinkan alat pemurni sinkron dengan masa pakai filter Setelah Anda mengganti filter resetlah masa pakai filter 1 Matikan alat pemurni dan cabut stekernya 2 Ganti filter alat pemurni ...

Page 31: ... Anda telah melepaskan semua bahan kemasan dari filter Kualitas udara tidak meningkat sekalipun alat pemurni telah beroperasi lama Salah satu filter belum dipasang dalam alat pemurni Pastikan bahwa semua filter telah dipasang dengan benar dalam urutan berikut mulai dengan filter paling dalam 1 filter HEPA 2 filter karbon aktif Alat pemurni sangat berisik Harap periksa apakah Anda telah melepaskan ...

Page 32: ...ternasional Jika di negara Anda tidak terdapat Pusat Layanan Pelanggan kunjungi dealer Philips setempat Memesan komponen atau aksesori Jika Anda harus mengganti komponen atau ingin membeli komponen tambahan kunjungi dealer Philips Anda atau kunjungi www philips com support Jika Anda mengalami kesulitan memperoleh komponen tersebut harap hubungi Pusat Layanan Konsumen Philips di negara Anda nomor t...

Page 33: ...secara umum dapat mengirim dan menerima sinyal elektromagnetik Salah satu Prinsip Bisnis Philips yang utama adalah mengambil semua tindakan pengamanan dan kesehatan untuk seluruh produk kami untuk mematuhi semua persyaratan hukum yang berlaku dan selalu berada dalam standar EMF yang berlaku pada saat pembuatan produk Philips berkomitmen untuk mengembangkan memproduksi dan memasarkan produk yang ti...

Page 34: ......

Page 35: ...ดการใช งาน 41 เปลี ยนความเร วพัดลม 41 โหมดรอท ำงาน 42 ตั งตัวจับเวลา 42 5 ท ำความสะอาด เครื องฟอกอากาศ ของคุณ 43 ท ำความสะอาดเครื อง ฟอกอากาศ 43 ท ำความสะอาดตัวกรองผงถ าน กัมมันต 43 6 เปลี ยนแผ นกรอง 44 เปลี ยนตัวกรองผงถ านกัมมันต และแผ นกรอง HEPA 44 รีเซ ตตัวนับอายุการใช งาน แผ นกรอง 46 7 การแก ไขปัญหา 47 8 การรับประกันและบริการ 48 สั งซื อชิ นส วนหรืออุปกรณ เสริม 48 9 ประกาศ 48 คลื นแม เหล กไฟฟ ...

Page 36: ...มวางเครื องไว ใต เครื องปรับอากาศ ทั งนี เพื อป องกันการกลั นตัวเป นหยด น ำหยดลงบนตัวเครื อง ตรวจสอบให แน ใจว าประกอบแผ น กรองทั งหมดเข าที เรียบร อยก อน ท ำการเปิดสวิตช ใช งาน 1 ข อส ำคัญ ปลอดภัย โปรดอ านคู มือการใช งานอย างละเอียด ก อนใช เครื อง และเก บไว เพื ออ างอิงต อ ไป อันตราย ห ามไม ให น ำหรือของเหลวอื นๆ หรือ น ำยาที ติดไฟได เข าเครื องเป นอัน ขาด เพื อหลีกเลี ยงไฟฟ าช อตและ หรือการเกิดเพ...

Page 37: ...ับก าซเชื อเพลิง อุปกรณ ให ความ ร อน หรือเตาไฟ ปิดเครื องทุกครั งหลังใช งานและก อน ท ำความสะอาดเครื อง ห ามใช งานเครื องในห องที มีการ เปลี ยนแปลงของอุณหภูมิอย างมาก เนื องจากภายในเครื องอาจก อให เกิด การกลั นตัวเป นหยดน ำได เพื อเป นการป องกันการรบกวน ควรวางเครื องให ห างจากเครื องใช ไฟฟ าที ใช คลื นวิทยุทางอากาศ เช น โทรทัศน วิทยุ และนาฬิกาที ควบคุม ด วยคลื นวิทยุอย างน อย 2 เมตร เครื องนี เหมาะ...

Page 38: ...งทะเบียนผลิตภัณฑ ของคุณ ที www philips com welcome อ านคู มือการใช งานนี โดยละเอียดก อนการติดตั งและใช งานเครื อง และเก บไว เพื ออ างอิงต อไป ในชุดขายผลิตภัณฑ มีอะไรบ าง ตรวจสอบและระบุอุปกรณ ที ให มาภายในกล องของคุณ 4 แผ นกรอง 3 ตัวกรองผงถ านกัมมันต AC4103 แผ นกรอง 4 แผ นกรอง HEPA AC4104 แผ นกรอง 1 และ 2 ใช ส ำหรับเครื องฟอกอากาศ Philips อื นๆ คู มือการใช งาน รับประกัน ...

Page 39: ...ศมาพร อมกับแผ นกรองทั งหมดที ติดตั งพอดีอยู ภายใน แต คุณต องน ำบรรจุภัณฑ ของ แผ นกรองออกก อนการใช งานเครื อง ถอดแผ นกรอง ทั งหมดออก น ำบรรจุภัณฑ ออก จากนั นใส แผ นกรอง กลับเข าไปในเครื องฟอกอากาศตามที อธิบายด านล าง เคล ดลับ เมื อถอดหรือใส แผ นกรอง ให วางเครื องฟอกอากาศชิดฝาผนัง เพื อเพิ มความมั นคง หมายเหตุ เสียบแผ นกรองในต ำแหน งที ถูกต อง 1 วางนิ วของคุณไว ที แผงด านบน และค อยๆ ดึง ส วนบนของแผง...

Page 40: ...จ งว าต องมี การเปลี ยนแผ นกรอง Healthy Air Protect Alert การเตือน ปกป องอากาศดี ให ปฏิบัติตาม ไฟแสดงการเปลี ยน แผ นกรอง กะพริบ ซึ งจะเป นเช นนี ประมาณ 2 สัปดาห คุณจะยังมีเวลา 2 สัปดาห ในการเปลี ยนตัวกรอง ผงถ านกัมมันต และ แผ นกรอง HEPA ไฟแสดงการเปลี ยน แผ นกรอง ติดสว าง ต อเนื อง เปลี ยนตัวกรองผงถ าน กัมมันต และแผ นกรอง HEPA ทันที 6 ในการประกอบแผงด านหน า ให เสียบขอเกี ยว ด านล างเข ากับด านล างข...

Page 41: ... ไฟ ดวงใด ดวงหนึ ง และ และไฟ ดวงใดดวงหนึ ง หรือ จะสว าง 1 กดปุ ม เพื อเปิดเครื อง 2 กดปุ ม หนึ งครั งหรือหลายครั งเพื อเลือก ความเร วพัดลมที ต องการ หรือ เปิดหรือปิดการใช งาน 1 เสียบปลั กเครื องฟอกอากาศเข ากับแหล งจ ายไฟ ไฟทุกดวงจะติดสองครั ง จากนั นไฟจะดับ อีกครั ง แผงควบคุม 2 กดปุ ม เพื อเปิดเครื องฟอกอากาศ ไฟแสดงการเปิดเครื อง บนแผง ควบคุมจะสว าง 3 กดปุ ม เพื อปิดเครื องฟอกอากาศ ...

Page 42: ...หรือ จะติดสว าง 1 กดปุ ม เพื อเปิดเครื องฟอกอากาศ 2 กดปุ ม เพื อเปิดใช งานตัวจับเวลา ไฟ หรือ จะติดสว าง 3 กดปุ ม ซ ำๆ เพื อเลือกจ ำนวนชั วโมงที คุณ ต องการให เครื องฟอกอากาศท ำงาน ไฟ ที สอดคล องกัน หรือ จะติดสว าง หากต องการเปิดใช งานฟังก ชันตัวจับเวลา ให กด ปุ ม ซ ำๆ จนกว าไฟ หรือ จะดับลง โหมดรอท ำงาน ในโหมดรอท ำงาน เครื องฟอกอากาศจะท ำงาน อย างเงียบเพื อไม ให รบกวนคุณยามหลับพักผ อน 1 กดปุ ม เพื ...

Page 43: ...ฟ ได เช น สารฟอกขาว หรือแอลกอฮอล เพื อท ำความสะอาด ส วนต างๆ ของเครื องฟอกอากาศ แผ นกรองเครื องฟอกอากาศไม สามารถล างท ำความสะอาดได ท ำความสะอาดเครื อง ฟอกอากาศ ท ำความสะอาดด านในและด านนอกของตัวเครื อง ฟอกอากาศเป นประจ ำเพื อป องกันการสะสมของฝุ น 1 เช ดฝุ นด วยผ านุ มที แห งจากตัวเครื องฟอกอากาศ 2 ใช ผ านุ มที แห งท ำความสะอาดทางลมเข า และทางลมออก ท ำความสะอาดตัวกรองผงถ าน กัมมันต ตัวกรองผงถ านกัม...

Page 44: ...ี ยนแผ นกรองภายในเวลาที ก ำหนด ไฟ จะสว างอย างต อเนื อง ในโหมดรอท ำงาน ไฟ จะเริ มกะพริบแต เป น แสงสลัว ให เปลี ยนทั งตัวกรองผงถ านกัมมันต และ แผ นกรอง HEPA ซึ งจะเป นเช นนี ประมาณ 2 สัปดาห เมื อคุณไม ได เปลี ยนแผ นกรองภายในเวลาที ก ำหนด ไฟ สว างแต เป นแสงสลัวอย างต อเนื อง เคล ดลับ เมื อถอดหรือใส แผ นกรอง ให วางเครื องฟอกอากาศชิดฝาผนัง เพื อเพิ มความมั นคง 5 ใส ตัวกรองผงถ านกัมมันต กลับเข าไปใน เค...

Page 45: ...ห แน ใจว าหันด านที มีป ายเข าหาตัว และป ายนั น อยู ด านล างของแผ นกรอง 1 ปิดเครื องฟอกอากาศและถอดปลั ก 2 วางนิ วของคุณไว ที แผงด านบน และค อยๆ ดึง ส วนบนของแผงด านหน าเข าหาตัว 1 ยกแผง ออกจากขอเกี ยวที ด านล างของ เครื องฟอกอากาศ 2 1 2 3 ถอดแผ นกรองออกตามที ระบุในแถบป ายบนแผ น กรอง ถือแผ นกรองทั งสองข าง แล วค อยๆ น ำไป ทิ งในถังขยะ หมายเหตุ อย าสัมผัสพื นผิวแผ นกรองที เป นรอยจีบ หรือสูดดมแผ นกรอ...

Page 46: ... 2 เปลี ยนแผ นกรองเครื องฟอกอากาศ ดู เปลี ยนแผ นกรอง 3 เสียบปลั กเข ากับเต ารับและเปิดเครื อง ฟอกอากาศอีกครั ง 4 กดปุ ม ค างไว เป นเวลา 2 วินาที หมายเหตุ รีเซ ตเครื องฟอกอากาศเมื อเสียบปลั กและเปิดเครื องแล ว เปลี ยนแผ นกรองเมื อคุณเห นไฟ เริ มกะพริบเท านั น 7 ในการประกอบแผงด านหน า ให เสียบขอเกี ยว ด านล างเข ากับด านล างของเครื องฟอกอากาศ ก อน 1 จากนั น ให กดแผงเข ากับตัวเครื อง ฟอกอากาศ 2 2 1 8...

Page 47: ...วจสอบว าคุณได แกะวัสดุบรรจุภัณฑ ทั งหมดที ห อแผ นกรองออก คุณภาพของอากาศยังไม ดีขึ น แม ว าเครื องฟอกอากาศจะท ำงาน มาเป นเวลานานแล ว วางแผ นกรองแผ นใดแผ นหนึ งไม เข าที ในเครื องฟอกอากาศ ตรวจสอบ ให แน ใจว าติดตั งแผ นกรองทั งหมดอย างถูกต องเรียงตามล ำดับโดยเริ มจาก ด านในสุด ดังนี 1 แผ นกรอง HEPA 2 ตัวกรองผงถ านกัมมันต เครื องฟอกอากาศมีเสียงดังมาก โปรดตรวจสอบว าคุณได แกะวัสดุบรรจุภัณฑ ทั งหมดที ห อ...

Page 48: ...ค อย างเหมาะสม ผลิตภัณฑ เหล านั นจะปลอดภัยต อการใช ตามหลักฐาน ที ผ านการทดสอบ Philips มีบทบาทส ำคัญในการพัฒนา EMF และ มาตรฐานความปลอดภัยสากล ซึ งท ำให Philips มีส วนร วมพัฒนามาตรฐานเพื อน ำมาใช กับผลิตภัณฑ 8 การรับประกัน และบริการ หากคุณต องการทราบข อมูลหรือหากมีข อสงสัย โปรดเข าชมเว บไซต ของ Philips ได ที www philips com หรือติดต อศูนย บริการดูแลลูกค า ของ Philips ในประเทศของคุณ หมายเลขโทรศัพท ขอ...

Page 49: ...เคิล ห ามทิ งผลิตภัณฑ รวมกับขยะจากครัวเรือน โปรดศึกษากฎข อบังคับท องถิ นว าด วยการแยกเก บ ผลิตภัณฑ ไฟฟ าและอิเล กทรอนิกส การทิ งผลิตภัณฑ ที เสื อมสภาพอย างถูกวิธีจะช วยป องกันไม ให เกิด ผลกระทบในทางลบต อสิ งแวดล อมและสุขภาพได ...

Page 50: ......

Page 51: ...4 盒內附件 54 3 開始使用 55 安裝濾網 55 4 使用空氣清新機 56 瞭解 健康空氣 保護提醒 56 開啟或關閉 56 變更風速 57 休眠模式 57 設定定時器 58 5 清潔空氣清 淨機 58 清潔空氣清新機 58 清潔活性碳濾網 58 6 更換濾網 60 更換活性碳濾網和 HEPA 濾網 60 重設濾網使用壽命計時器 61 7 疑難排解 62 8 保固與服務 63 訂購零件或配件 63 9 聲明 63 電磁場 EMF 63 符合 EMF 標準 63 回收 63 ...

Page 52: ...品放置在乾燥平穩的 水平面上使用 產品的背面及側面須至少保留 20 公分的間隔距離 頂部則至 少保留 30 公分的間隔距離 請勿放置任何物品於產品上 方 亦不要坐在產品上 請勿將產品放置在冷氣機正 下 方 以免冷凝水滴入產品 請在開啟產品電源前 先確認 所有濾網皆已正確安裝 1 重要事項 安全 在使用本產品前 請先仔細閱讀 本使用手冊 並保留使用手冊以 供日後參考 危險 請勿讓水或其他液體 或是易 燃清潔劑進入產品內 以避免 電擊和 或火災 請勿用水 其他液體 或是 易 燃 清潔劑清潔產品 以避免 電擊和 或火災 警告 在連接本產品的電源之前 請 確認本產品機體底部或後方所 標示的電壓與本地的電源電壓 是否相同 如果電線損壞 您必須將其交 由飛利浦 飛利浦授權之服務 中心 或是具備相同資格的技 師進行更換 以免發生危險 當插頭 電源線或產品本身受 損時 請勿使用本產品 本產品可供 8 歲以...

Page 53: ...打產品 特別 是進風口及出風口 請務必使用產品背面的握柄提 起或搬動產品 請勿將手指或任何物體放入出 風口 當您使用室內噴霧式驅蟲劑或 在充滿油漬 焚香或化學煙霧 的地方時 請勿使用本產品 請勿在燃氣設備 加熱裝置或 壁爐附近使用本產品 使用完畢後或進行清潔之前 請務必先拔除電源插頭 請勿在溫差變化極大的室內使 用本產品 因為室溫差距太大 會造成本產品內部凝結水珠 為避免干擾 請將本產品遠離 使用無線電電波的電子儀器至 少 2 公尺 例如電視 收音機 與受無線電訊號控制的時鐘 本產品為家用產品 僅限於在 正常操作環境 下使用 請勿在極為潮濕或周遭溫度很 高的環境 下使用本產品 例如 浴室 廁所或廚房 ...

Page 54: ... T 2 您的空氣清新機 感謝您購買本產品 歡迎來到飛利浦的世界 請至 www Philips com welcome 註冊您的產品 以獲得飛利浦提供的完整支援 在您安裝和使用本裝置前 請先詳讀本使用手冊 敬請妥善保管本手冊 以供日後參考 盒內附件 請清點包裝內容物 4 濾網 3 活性碳濾網 AC4103 濾網 4 HEPA 濾網 AC4104 濾網 1 和濾網 2 適用於其他飛利浦空氣清新機 使用手冊 保固卡 ...

Page 55: ...包裝材料 5 將濾網裝回清淨機 備註 請確認有拉片的一側朝向自己 且拉片位於濾網 底部 3 開始使用 安裝濾網 本空氣清新機所有隨附的濾網皆已妥善安裝 在機體內 但是在使用產品前 必須先拆下濾 網包裝 請先取出所有濾網 拆下濾網包裝 然後把濾網放回空氣清新機中 如下所述 提示 取出或裝入濾網時 將空氣清新機靠牆擺放可獲得 較穩定的支撐 備註 將濾網裝入正確的位置 1 將手指放在上方護板處 輕輕將正面護 板的上半部朝向自己拉近 1 2 將護板的扣鉤自清淨機底部提起 2 1 2 ...

Page 56: ...機運作時處於最佳狀態 濾網更換指示燈 指示必須更換濾網 健康空氣 保護 提醒 遵循此程序 濾網更換指示燈 閃爍 這種情況會 持續約 2 週 您還可以在 2 週內 更換活性碳濾網和 HEPA 濾網 濾網更換指示燈 持續亮起 立即更換活性碳濾網 和 HEPA 濾網 開啟或關閉 1 將空氣清新機的插頭插入電源插座 所有指示燈亮起兩次 然後指示燈再 次熄滅 控制面板 2 按下 按鈕以開啟清淨機電源 控制面板上的電源指示燈 會 亮起 6 若要裝回正面護板 先將底部扣鉤裝入 清淨機底部 1 然後將護板推入清淨 機機體 2 2 1 ...

Page 57: ...或多次 選擇想要的風 速 或 休眠模式 在休眠模式下 空氣清新機會非常安靜地運 作 給您不受干擾的睡眠 1 按下 按鈕以開啟空氣清新機電源 2 按下 按鈕以選擇休眠模式 指示燈會亮起 則會熄滅 如果想要更改風速 請按下 按鈕 3 按下 按鈕以關閉清淨機電源 變更風速 您可選擇想要的風速 備註 選擇風速時 也可以使用定時功能 請參閱 設定 定時器 在這種情況下 其中一個 指示燈 和 以及其中一個 指示燈 或 會亮起 1 按下 按鈕以開啟清淨機電源 ...

Page 58: ...的機體 2 請使用柔軟的乾布清潔進風口及出 風口 清潔活性碳濾網 此活性碳濾網可過濾像是棉絨 灰塵 人類毛 髮和寵物毛髮等大型空氣傳播粒子 也有 助於去除異味 備註 活性碳濾網不得清洗 亦不得使用吸塵器清潔 請每兩週清潔一次活性碳濾網 確保清淨機發揮 最佳效果 設定定時器 您可以使用定時功能 讓清淨機在設定的小 時數內運作 設定時間結束後 清淨機會自 動關閉電源 您可以在下列情況下使用定時功能 情況 您會看到 手動選取風速 請參閱 手動 其中一個 指示燈 或 和其中一個 指 示燈 或 會亮起 1 按下 按鈕以開啟清淨機電源 2 按下 按鈕以啟動定時功能 指示燈 或 會亮起 3 重複按下 按鈕 選擇想要清淨機運作 的小時數 對應的 指示燈 或 會亮起 要關閉定時功能 請重複按下 按鈕 直到 指示燈 或 熄滅 ...

Page 59: ...59 繁體中文 ZH T 4 1 2 6 若要裝回正面護板 先將底部扣鉤裝入 清淨機底部 1 然後將護板推入清淨 機機體 2 2 1 1 關閉清淨機電源 並拔除插頭 2 將手指放在上方護板處 輕輕將正面護 板的上半部朝向自己拉近 1 將護板的 扣鉤自清淨機底部提起 2 1 2 3 取出活性碳濾網 4 使用柔軟的刷子擦去塵埃 以清潔 濾網 5 將活性碳濾網裝回清淨機 ...

Page 60: ...清淨機底部提起 2 1 2 3 使用濾網上的拉片取下濾網 從兩側握 住濾網 輕輕丟棄至家用垃圾桶 備註 請勿碰觸有皺摺的濾網表面或嗅聞濾網 因為它收 集了空氣中的污染物 丟棄舊濾網後請洗手 6 更換濾網 濾網更換指示燈 指示必須更換濾網 更換活性碳濾網和 HEPA 濾網 備註 活性碳濾網和 HEPA 濾網皆不可水洗或用吸塵器 清潔 當 指示燈開始閃爍時 請同時更換活性 碳濾網和 HEPA 濾網 這種情況會持續約 2 週 若未即時更換濾網 持續亮起 在休眠模式下 當 指示燈閃爍但亮度變 暗 請同時更換活性碳濾網和 HEPA 濾網 這種情況會持續約 2 週 若未即時更換濾網 指示燈會亮起 但持續變暗 提示 取出或裝入濾網時 將清淨機靠牆擺放可獲得較穩 定的支撐 ...

Page 61: ...換濾網時 請務必隨後重設濾網使用壽命 計數器 如此可讓清淨機與濾網使用壽命的 時間一致 在更換濾網之後 重設濾網時間 1 關閉清淨機電源 並拔除插頭 2 更換空氣清新機濾網 請參閱 更換 濾網 3 將插頭插入電源插座 然後再次開啟清 淨機電源 4 按住 按鈕 2 秒 備註 在清淨機插入電源且開啟後進行重設 僅在 指示燈開始閃爍時才更換濾網 4 拆下新濾網的所有包裝材料 5 先將新 HEPA 濾網裝入清淨機 1 2 6 將新的活性碳濾網裝入清淨機 4 1 2 7 若要裝回正面護板 先將底部扣鉤裝入 清淨機底部 1 然後將護板推入清淨 機機體 2 ...

Page 62: ...已滿 更換濾網與重設清淨機 出風口沒有空氣流出 清淨機沒有連接至電源供應器 請將產品插頭接上電源插座 然 後開啟電源 出風口流出的風速比之前慢 很多 請檢查是否已拆下濾網的所有包裝材料 即使清淨機已經長時間運作 空氣品質仍未獲得改善 其中一個濾網尚未裝入清淨機內 請確認所有濾網都已按照下 列順序正確安裝 濾網從內至外分別為 1 HEPA 濾網 2 活 性碳濾網 清淨機噪音很大 請檢查是否已拆下濾網的所有包裝材料 如果產品噪音仍然很大 可將風速變更為較低的風速等級 清淨機不斷要求更換濾網 但 濾網已經更換了 您可能未確實按下濾網重設按鈕 請為清淨機插上電源 按下 按鈕 然後按住 按鈕 2 秒 ...

Page 63: ...產品 飛利浦保證 只要依照正確用途並 妥善使用 根據現有的科學研究資料 使用 本公司產品並無安全顧慮 飛利浦積極參與國際 EMF 與安全標準的開 發 因此得以掌握標準化的發展 及早將標 準化與自身的產品整合 回收 請勿將您的產品與其他家用廢棄物共同丟 棄 請瞭解當地電子及電器廢棄物的垃圾分 類相關法規 正確處理廢棄產品有助於避免 對環境和人類健康帶來負面影響 8 保固與服務 若您需要相關資訊 或是有任何問題 請造訪 飛利浦網站 www philips com 或聯絡您所 在國家 地區的飛利浦客戶服務中心 您可在 全球保證書上找到電話號碼 若當地沒有客 戶服務中心 請洽詢當地的飛利浦經銷商 訂購零件或配件 如果您必須更換零件或想購買其他零件 請聯絡您的飛利浦經銷商 或造訪 www philips com support 如果您有取得零件方面的問題 請聯絡您所 在國家 地區的飛利浦客戶服務中心...

Page 64: ...Specifications are subject to change without notice 2014 Koninklijke Philips N V All rights reserved 4241 210 76174 ...

Reviews: