background image

5

EN

3  Get started

Install filters

The appliance comes with all filters fitted 

inside, but you have to remove the packaging 

of the filters before you can use the appliance. 

Remove all filters, unpack them, and place them 

back into the appliance as described below.

Tip


When you remove or insert filters, place the appliance 

against a wall for more stability.

Note


Insert the filters in the correct position.

Place your fingers in the recesses of the 

side panels and gently pull the top part of 

the front panel towards you.

Lift the hooks at the bottom of the panel 

out of the bottom of the appliance.

Remove all the filters from the appliance. 


Remove all packaging material from the 

filters.

Put the HEPA filter back into the appliance. 

Note


Make sure that the side with the tag is pointing towards 

you.

Place the activated carbon filter into the 

pre-filter.

Place the pre-filer in the appliance. 

Note


Make sure that the side with the two projections is 

pointing towards you, and that all hooks are properly 

attached to the appliance.

Summary of Contents for AC4005

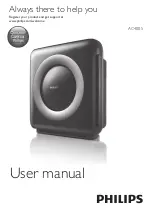
Page 1: ...AC4005 www philips com welcome User manual Always there to help you Register your product and get support at Question Contact Philips ...

Page 2: ......

Page 3: ...nsor 6 Auto mode 7 Select the fan speed 7 Eco mode 7 Set the timer 8 Activate child lock 8 5 Clean your air purifier 9 Clean the air purifier 9 Clean the air quality sensor 9 6 Clean the pre filter 10 7 Replace the filters 11 Replace the activated carbon filter and the HEPA filter 11 8 Troubleshooting 13 9 Guarantee and service 14 Order parts or accessories 14 10 Notices 15 Electromagnetic fields ...

Page 4: ... appliance If the power cord is damaged you must have it replaced by Philips a service center authorized by Philips or similarly qualified persons in order to avoid a hazard Do not use the appliance if the plug the power cord or the appliance itself is damaged This appliance is not intended for use by persons including children with reduced physical sensory or mental capabilities or lack of experi...

Page 5: ...ce the air inlet and outlet in particular with hard objects Caution Always lift or move the appliance by the handle at the back of the appliance Do not insert your fingers or objects into the air outlet Do not use this appliance when you have used indoor smoke type insect repellents or in places with oily residues burning incense or chemical fumes Do not use the appliance near gas appliances heati...

Page 6: ...s offers register your product at www Philips com welcome Read this user manual carefully before you install and use the unit Save it for future reference Overview Check and identify the product parts c Filter 1 Pre filter d Filter 2 Activated carbon filter e Filter 3 HEPA filter b a c d e a Control panel b Air quality sensor ...

Page 7: ...ingers in the recesses of the side panels and gently pull the top part of the front panel towards you 2 Lift the hooks at the bottom of the panel out of the bottom of the appliance 3 Remove all the filters from the appliance 4 Remove all packaging material from the filters 5 Put the HEPA filter back into the appliance Note Make sure that the side with the tag is pointing towards you 6 Place the ac...

Page 8: ...y light changes to purple or red Switch on 1 Plug the air purifier into the power supply All lights go on from left to right in cycle Then the lights go out again 2 Press the button to switch on the purifier The indicator of fan speed goes on 3 Press the button to switch off the purifier Set the sensitivity of the air quality sensor People with certain health problems for example allergies or asth...

Page 9: ...icate your adjustment is saved Note When you change the sensitivity the purifier automatically starts operating at the set sensitivity level whenever you switch on the purifier Tip In the sensitivity setting mode make sure you press the button within 10 seconds otherwise it will automatically save the last setting Auto mode After choosing the auto mode the built in air quality sensor automatically...

Page 10: ...ss the button to switch on the purifier 2 Press the button to activate the timer The timer indicator or goes on 3 Press the button repeatedly to choose the number of hours you want the purifier to operate The corresponding indicator or goes on To deactivate the timer function press the button repeatedly until the indicator or is out Activate child lock You can activate the child lock function 1 Pr...

Page 11: ... Clean the air quality sensor Clean the air quality sensor every 2 months for optimal functioning of the purifier Clean it more frequently if you use the purifier in a dusty environment Note When the humidity level in the room is very high it is possible that condensation develops on the air quality sensor As a result the air quality light may indicate that the air quality is bad even though it is...

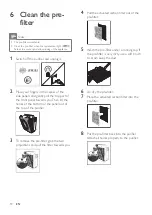
Page 12: ...towards you Then lift the hooks at the bottom of the panel out of the top of the purifier 3 To remove the pre filter grab the two projections and pull the filter towards you 4 Pull the activated carbon filter out of the pre filter 5 Wash the pre filter under a running tap If the pre filter is very dirty use a soft brush to brush away the dust 6 Air dry the pre filter 7 Place the activated carbon f...

Page 13: ...r 7 Replace the filters Note The indicator of the filter replacement 滤网2 3 indicates the activated carbon filter and HEPA filter have to be replaced Replace the activated carbon filter and the HEPA filter Note The activated carbon filter and the HEPA filter are not washable nor vacuum cleanable Replace both the activated carbon filter and HEPA filter when the indicator 滤网2 3 goes on This will last...

Page 14: ... HEPA filter in the purifier first 7 Then place the new activated carbon filter into the pre filter 8 Put the pre filter back into the purifier Attach all hooks properly to the purifier 9 To reattach the front panel insert the bottom hooks into the bottom of the purifier first Then push the panel against the body of the purifier 10 Plug the air purifier into the power supply Press the button to sw...

Page 15: ...lter 2 activated carbon filter and 3 pre filter The air quality sensor is wet The humidity level in your room is high and causes con densation Make sure that the air quality sensor is clean and dry see Clean the air quality sensor The color of the air quality light always stays the same The air quality sensor is dirty Clean the air quality sensor see Clean the air quality sensor There is not enoug...

Page 16: ...ide guarantee leaflet If there is no Consumer Care Centre in your country go to your local Philips dealer Order parts or accessories If you have to replace a part or want to purchase an additional part go to your Philips dealer or visit www philips com support If you have problems obtaining the parts please contact the Philips Consumer Care Center in your country you will find its phone number in ...

Page 17: ... Compliance with EMF Koninklijke Philips N V manufactures and sells many products targeted at consumers which like any electronic apparatus in general have the ability to emit and receive electromagnetic signals One of Philips leading Business Principles is to take all necessary health and safety measures for our products to comply with all applicable legal requirements and to stay well within the...

Page 18: ...Specifications are subject to change without notice 2013 Koninklijke Philips N V All rights reserved AC4005_UM_EN_V1 0 4241 210 73021 ...

Reviews: