background image

2 Important

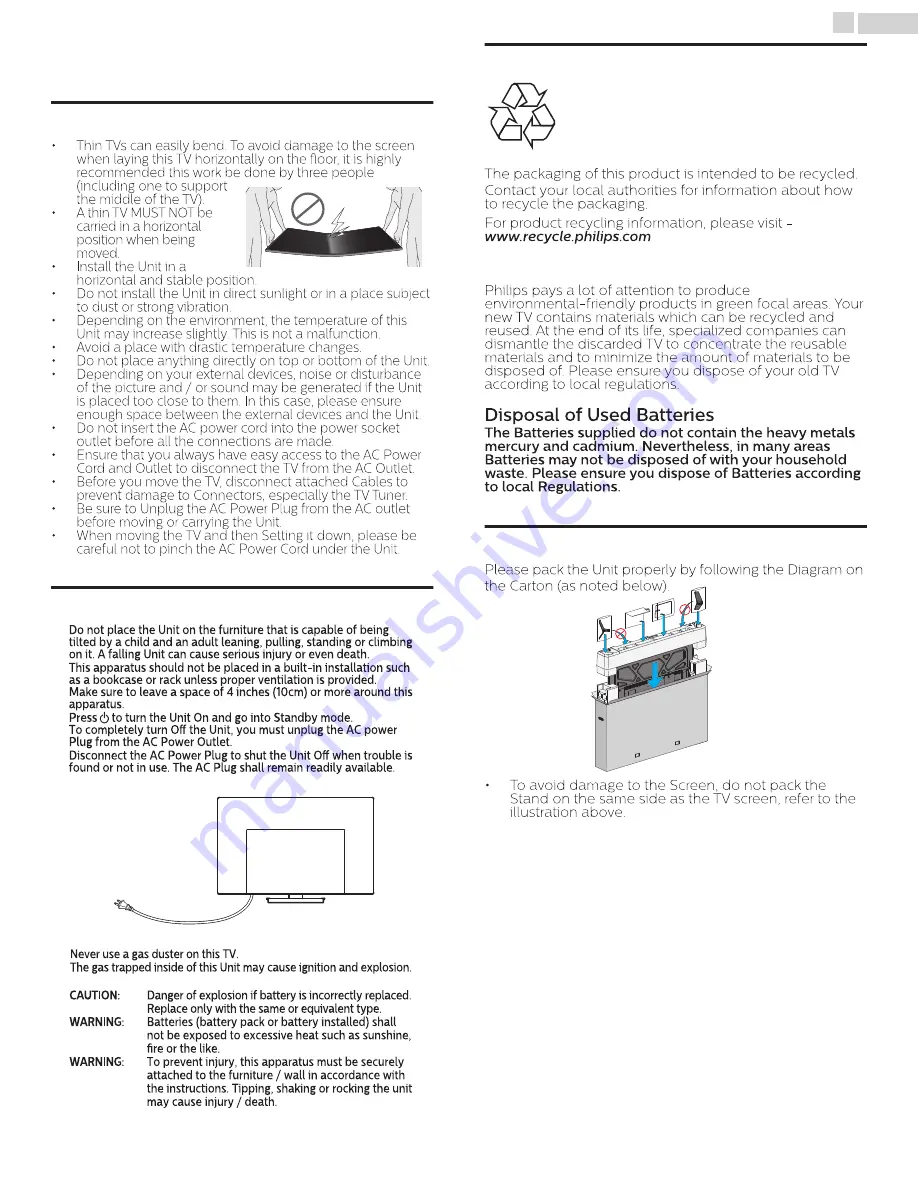
Positioning the TV


Thin TVs can easily bend. To avoid damage to the screen 
when laying this TV horizontally on the floor, it is highly 
recommended this work be done by three people 
(including one to support 
the middle of the TV).


A thin TV MUST NOT be 
carried in a horizontal 
position when being 
moved.


Install the Unit in a 
horizontal and stable position.


Do not install the Unit in direct sunlight or in a place subject 
to dust or strong vibration.


Depending on the environment, the temperature of this 
Unit may increase slightly. This is not a malfunction.


Avoid a place with drastic temperature changes.


Do not place anything directly on top or bottom of the Unit.


Depending on your external devices, noise or disturbance 
of the picture and / or sound may be generated if the Unit 
is placed too close to them. In this case, please ensure 
enough space between the external devices and the Unit.


Do not insert the AC power cord into the power socket 
outlet before all the connections are made.


Ensure that you always have easy access to the AC Power 
Cord and Outlet to disconnect the TV from the AC Outlet.


Before you move the TV, disconnect attached Cables to 
prevent damage to Connectors, especially the TV Tuner.


Be sure to Unplug the AC Power Plug from the AC outlet 
before moving or carrying the Unit.


When moving the TV and then Setting it down, please be 
careful not to pinch the AC Power Cord under the Unit.

Regulatory Notices

Do not place the Unit on the furniture that is capable of being 
tilted by a child and an adult leaning, pulling, standing or climbing 
on it. A falling Unit can cause serious injury or even death.
This apparatus should not be placed in a built-in installation such 
as a bookcase or rack unless proper ventilation is provided.
Make sure to leave a space of 4 inches (10cm) or more around this 
apparatus.
Press     to turn the Unit On and go into Standby mode.
To completely turn Off the Unit, you must unplug the AC power 
Plug from the AC Power Outlet.
Disconnect the AC Power Plug to shut the Unit Off when trouble is 
found or not in use. The AC Plug shall remain readily available.

AC Power Plug

Never use a gas duster on this TV.
The gas trapped inside of this Unit may cause ignition and explosion.

CAUTION:


Danger of explosion if battery is incorrectly replaced. 
Replace only with the same or equivalent type.

WARNING:


Batteries (battery pack or battery installed) shall 
not be exposed to excessive heat such as sunshine, 
fire or the like.

WARNING:


To prevent injury, this apparatus must be securely 
attached to the furniture / wall in accordance with 
the instructions. Tipping, shaking or rocking the unit 
may cause injury / death.

Environmental Care

The packaging of this product is intended to be recycled.
Contact your local authorities for information about how 
to recycle the packaging.
For product recycling information, please visit - 

End of Life Directives

Philips pays a lot of attention to produce 
environmental-friendly products in green focal areas. Your 
new TV contains materials which can be recycled and 
reused. At the end of its life, specialized companies can 
dismantle the discarded TV to concentrate the reusable 
materials and to minimize the amount of materials to be 
disposed of. Please ensure you dispose of your old TV 
according to local regulations.

Disposal of Used Batteries

The Batteries supplied do not contain the heavy metals 
mercury and cadmium. Nevertheless, in many areas 
Batteries may not be disposed of with your household 
waste. Please ensure you dispose of Batteries according 
to local Regulations.

Preparing to Move/Ship the Unit

Please pack the Unit properly by following the Diagram on 
the Carton (as noted below).


To avoid damage to the Screen, do not pack the 
Stand on the same side as the TV screen, refer to the 
illustration above.

7

.

English

Summary of Contents for 65PFL7900

Page 1: ...co o en las Islas Vírgenes de los Estados Unidos 1 866 202 5960 México D F y Área Metropolitana 58 87 97 36 Interior de la Republica 01 800 839 19 89 FR Pour obtenir de l aide supplémentaire communiquez avec le centre de service à la clientèle de votre pays Pour obtenir de l aide communiquez avec le centre de service à la clientèle Philips au Dans le États Unis au Canada à Puerto Rico ou aux Îles ...

Page 2: ... Screen information 24 Using Options menu 25 USB 26 5 Making more use with your TV 29 Picture and sound setup 30 TV settings 30 Picture 30 Sound 32 Features 33 Installation 34 Search for channels 37 Install channels 37 Channel settings 37 Channel installation 37 Child lock 38 Change PIN 39 Digital audio language 39 Mono Stereo 39 Connect to network 40 Wireless setting 40 Wired setting 40 Network s...

Page 3: ... are committed to making home entertainment safe and enjoyable As you enjoy your television please note that all televisions new and old must be supported on proper stands or installed according to the manufacturer s recommendations Televisions that are inappropriately situated on dressers bookcases shelves desks speakers chests carts etc may fall over resulting in injury TUNE IN TO SAFETY ALWAYS ...

Page 4: ...e cable ground shall be connected to the grounding system of the building as close to the point of cable entry as practical Example of Antenna Grounding as per NEC National Electric Code ANTENNA LEAD IN WIRE GROUND CLAMP ANTENNA DISCHARGE UNIT NEC SECTION 810 20 ELECTRIC SERVICE EQUIPMENT GROUNDING CONDUCTORS NEC SECTION 810 21 POWER SERVICE GROUNDING ELECTRODE SYSTEM NEC ART 250 PART H GROUND CLA...

Page 5: ...lt the dealer or an experienced radio or television technician for help Declaration of Conformity Trade Name PHILIPS Responsible Party P F USA Inc Model 65PFL7900 55PFL7900 49PFL7900 Address PO Box 2248 Alpharetta GA 30023 2248 U S A Telephone Number 1 866 202 5960 Modifications This apparatus may generate or use radio frequency energy Changes or Modifications to this apparatus may cause harmful i...

Page 6: ... information at www netflix com VUDUTM is a trademark of VUDU Inc YouTube and the YouTube logo are trademarks of Google Inc PANDORA the PANDORA logo and the Pandora trade dress are trademarks or registered trademarks of Pandora Media Inc Used with permission The Wi Fi CERTIFIED Logo is a certification mark of the Wi Fi Alliance CinemaNow and the CinemaNow logo are trademarks of BestBuy Stores L P ...

Page 7: ...ches 10cm or more around this apparatus Press to turn the Unit On and go into Standby mode To completely turn Off the Unit you must unplug the AC power Plug from the AC Power Outlet Disconnect the AC Power Plug to shut the Unit Off when trouble is found or not in use The AC Plug shall remain readily available AC Power Plug Never use a gas duster on this TV The gas trapped inside of this Unit may c...

Page 8: ...or your room and sets your sound preference EasyLink via HDMI link EasyLink allows your other HDMI link devices to be controlled by the HDMI cable connected to your TV HDMI Input HDMI DVI Input If your Video Device has a DVI Output jack use an HDMI DVI Conversion Cable to connect the Unit Component Video Input PC Input AV Input Audio and Video Input from an External Device USB terminal The Picture...

Page 9: ... Open the top flaps of the box 2 Remove all Accessories Caution s DO NOT take the TV set out of the box yet 3 Remove the packing joints from the box 65PFL7900 x6 49PFL7900 55PFL7900 x4 4 Remove the outer slipbox with care 5 Support the top of the TV set with a hand to prevent the TV from falling 6 Unhinge the retaining tabs and unfold the left and right side of the bottom packaging 9 English Conti...

Page 10: ... fastened 3 screws required Note s A wide open space is recommended for assembly A Phillips head screwdriver is required to fasten the stands to the TV set WhenattachingtheStand ensurethatAllScrewsaretightlyfastened IftheStandisnotproperly attached it could cause the Unit to fall resulting in injuries as well as damage to the Unit To remove the Stand from this Unit unscrew the Phillips head screws...

Page 11: ...te Control 2 Insert 2 Supplied Batteries AAA 1 5V Be sure the and ends of the Batteries line up with the markings inside the case 3 Slide the cover back into position Note s Remove the Batteries if not using the Remote Control for an extended period of time 11 English Continued on next page ...

Page 12: ...the current program OK Press to decide the command of setting when the Home menu is displayed NAVIGATION buttons Moves the cursor Selects the On screen Menu items OPTIONS Displays a list of menu items applicable to the highlighted object or screen CH Selects a Channel 0 9 NUMBER buttons Used to enter a Channel Program number DOT Use with 0 9 to Select digital channels For example to enter 2 1 pres...

Page 13: ... Connection Analog Audio L R jacks signal with Stereo mini 3 5mm plug Audio cable on PC Digital Audio Output jack Digital Audio S PDIF Output to home theaters and other Digital Audio systems Ethernet port For Internet connection using an Ethernet Cable with an RJ 45 connector Component Y Pb Pr Composite Video VIDEO Input jack s for VIDEO Composite Video Input VIDEO jack is a shared jack with Compo...

Page 14: ...og Audio Do Not place your Recorder too close to the Screen because some Recorders can be susceptible to harmful interference from the TV Cable Cable Cable OUT OUT OUT RF cable RF cable RF cable IN IN IN OUT OUT OUT IN IN IN OUT OUT OUT IN IN IN OUT OUT OUT RF cable RF cable RF cable IN IN IN Satellite Satellite Satellite IN IN Cable Cable Cable Set top Box Set top Box Set top Box Blu ray disc DVD...

Page 15: ...isc DVD Player Blu ray Disc DVD Player or or or Set top Box Set top Box Set top Box OUT OUT OUT IN IN IN HDMI cable HDMI cable HDMI cable Note s If there are issues with picture color and or sound when connecting an external device using the HDMI port please try switching the HDMI mode Refer to HDMI mode p 35 Some HDMI cables and devices may not be compatible with the TV due to different HDMI spec...

Page 16: ...ideo Devices connected to the Unit If you connect to the Unit s Component Composite Video Y VIDEO Input jack green connect Audio Cables to the Audio L R Input jacks When the Audio is monaural then only connect to the Audio L Input jack DVD Player DVD Player DVD Player OUT OUT OUT IN IN IN Video Audio L R cables Video Audio L R cables Video Audio L R cables Note s WiththisUnit yellowcablemustbeconn...

Page 17: ...io Optical cable PC Connection HDMI Connection This Unit can be connected to your PC that has an HDMI terminal Use an HDMI cable for this Digital Connection PC PC OUT OUT OUT HDMI cable HDMI cable HDMI cable IN IN HDMI DVI Connection This Unit can be connected to your PC that has a DVI Terminal Use an HDMI DVI Conversion Cable for this Video Digital Connection and it requires Stereo mini 3 5mm Plu...

Page 18: ...o signals are Output as Analog L R Audio DVI does not display 480i image which is not in compliance with EIA CEA 861 861B USB Memory Stick This unit offers easy playback of Picture Music and Video files Insert the USB Memory Stick into the USB terminal shown below USB p 26 Note s The Unit recognizes only a USB Memory Stick Do Not use a USB hub or an extension cable to connect an External hard disk...

Page 19: ...lect Easy Connect then press OK 5 Follow the on screen instructions to complete the installation When you select On in the selection screen for Auto software update A message will appear later if there is the latest software on the network server 6 Use to Select the signal type If the TV is connected to a Cable or Satellite Set top Box select the 2nd one and skip to step 8 1234 7 56 Installation S...

Page 20: ...toprogram this setup of TV channels will be cancelled TheInitialAutoprogramfunctioncanbeexecutedforeitherAntennaorCableonlyonce When you change the connection Antenna Cable select Search for channels again p 37 A After an Initial Setup is completed If you want to scan the channels Automatically again Search for channels p 37 You can add the desired channels not memorized by Autoprogram through ant...

Page 21: ... sound Switching Channels Remote Control TV To Select Channels by using CH or CH Press CH Up Down on the side panel or press CH on the Remote Control To Select Channels by using the NUMBER buttons Digital TV Operation For Digital channels press a number followed by a dot and the corresponding sub channel number When selecting Digital channel 1 1 1 Be sure to press before entering the subchannel nu...

Page 22: ...ion describes how to lock or unlock specified device 1 Press SOURCE on the Remote Control 2 Use to Select a device to lock or unlock 3 Press OPTIONS on the Remote Control 4 Use to Select Lock or Unlock then press OK If device lock is unlocked Lock will be displayed If device lock is locked Unlock will be displayed at the top right of the device icons 5 Enter your PIN Change PIN p 39 Once you have ...

Page 23: ...vorite list 1 Select the desired channel then press yellow button 2 Use to Select Yes then press OK Changing Picture Format Display Modes can be Selected when your TV receives a 16 9 or 4 3 Video Signal Three types of Display Modes can be Selected for a PC Input Signal Press FORMAT Repeatedly to Switch the TV Aspect Ratio For 16 9 Video signal 2160p Full Unscaled For 16 9 Video signal not 2160p Wi...

Page 24: ...f the PC has HDMI Output 4 3 Displays a proportionately stretched picture Sidebars appear on both edges of the screen Wide screen Displays a picture that is stretched out of proportion to fill the screen Unscaled Displays a picture in its original size If the signal source has side or top bottom bars inserted into the picture the Picture Format function will not eliminate them TV Screen informatio...

Page 25: ...of your DVD or Blu ray discs Device favorite Controls the pop up menu of your Blu ray discs Note s Some of EasyLink functions may not be available depending on your EasyLink devices or discs You must connect this unit to our brand EasyLink devices and be sure its EasyLink HDMI CEC setting is also set to On We do not guarantee 100 interoperability with other brands of HDMI link compliant devices Pi...

Page 26: ...not use an Extension Cord and or USB Hub to connect devices to this Unit Always Directly insert the USB Flash Memory Stick to this Unit directly We cannot be held responsible if your USB Memory Stick is Not Supported nor will we accept any liability for damage or loss of stored data The USB Memory Stick is Not Supplied with this TV A maximum of 1 023 folders or files can be recognized A File Name ...

Page 27: ...wise Zoom 2 1X Displays an image in its original size 2X Magnifies a current image by 2 times 4X Magnifies a current image by 4 times Auto picture 1 Selects the picture mode according to your preference Standard Natural Vivid Sports Movie Game Energy saving and Internet video 1 You can set Repeat Slide time Transitions and Auto picture when images are in Slide show 2 You can set Rotate and Zoom wh...

Page 28: ... speakers Off The Sound will not be output from the unit s speakers On The Sound will be output from the unit s speakers Speakers EasyLink You can control Audio Output from your connected EasyLink Compliant Devices with VOL í by using this unit s Remote control Auto picture Selects the picture mode according to your preference Standard Natural Vivid Sports Movie Game Energy saving and Internet vid...

Page 29: ...ate software Connect to network Search for channels Picture and sound setup Picture and sound setup p 30 Guides you to get the best picture and sound settings TV settings p 30 Accesses menus that allow you to change picture sound and TV usage settings Search for channels p 37 Guides you through channel installation Channel settings p 37 Accesses menus that allow you to change channel settings Conn...

Page 30: ...r high action Movie Deep picture settings for a cinematic experience Game Optimized for PCs and game consoles Energy saving Eco TV settings for low power consumption Internet video Optimized for low bit rate Internet video When you adjust the following settings Personal picture will be set automatically Cursor Cursor Backlight to Reduce Power Consumption and Brightness to Increase Power Consumptio...

Page 31: ...he desired setting then press OK Off Minimum Medium and Maximum Gamma to Select the desired setting then press OK Very Dark Room Dark Room Normal Bright Room and Very Bright Room Perfect Motion Rate to Select the desired setting then press OK Off Minimum Medium and Maximum 4K UHD Upscaling to Select the desired setting then press OK Off Minimum Medium and Maximum Macro Dimming to Select the desire...

Page 32: ...tion Off to set Sonic Emotion to Off On to set Sonic Emotion to On Dialog Enhancement Off to set Dialog Enhancement to Off On to set Dialog Enhancement to On Bass Enhancement Off to set Bass Enhancement to Off On to set Bass Enhancement to On Absolute 3D Sound Off to set Absolute 3D Sound to Off On to set Absolute 3D Sound to On This function keeps a constant Loudness differential between the TV C...

Page 33: ...size color and transparency Font style Font size Font color and Font opacity You can change background color and transparency of the displayed caption Background color and Background opacity You can change edge color and type of the displayed caption text Edge color and Edge type So you must be Philip Hi So you must be Philip Hi I m pleased to meet you I m pleased to meet you So you must be Philip...

Page 34: ...n noise Electric motor noise Weak signal reception Multiplex signal reception ghosts or screen flutter Data dropout and Pixelation for DTV only The unit retains the Closed Caption setting if the power fails When the unit receives special effects playback signal e g Search Slow and Still from a VCR s video Output channel ch3 or ch4 the unit may not display the correct caption or text The EUT settin...

Page 35: ...tions according to your preference Note s You must set Home in the Menu Otherwise personalized Picture and Sound Settings will Not Be Memorized after the Unit goes into Standby Mode HDMI mode If there are issues with picture color and or sound when connecting an external device using the HDMI port please try switching the HDMI mode following the instructions below 1 Press and use to Select Setup t...

Page 36: ... connect this unit to our brand EasyLink devices and be sure its EasyLink HDMI CEC setting is also set to On 1 Use to Select Preferences then press OK 2 Use to Select EasyLink then press OK 3 Use to Select the item you want to adjust then press OK On Off HDMI ARC RC key forwarding Auto TV On Master EasyLink E sticker TV placement EasyLink Location HDMI mode Set the Master EasyLink to On or Off The...

Page 37: ...nnel installation then press OK 3 Use to Select Search then press OK The PIN code will be required if you have locked channels 4 Use to Select a channel you want to memorize 5 Use to Select Search then press OK 6 Display will be changed to Store from Search when the channel is found then press OK Note s In most cases Digital channels are not broadcast on the RF channel on which they appear on your...

Page 38: ...y MPAA TV ratings lock has controlled access to individual programs based on their age ratings and content rating 3 Use to Select TV ratings lock or Movie ratings lock then press OK 4 Use to Select the Desired Rating then press OK Repeatedly to Switch between Block and View indicates that the Rating is Locked Blocked indicates that the Sub Rating is Locked Blocked indicates that the Rating is Not ...

Page 39: ...e used in Movie ratings lock TV ratings lock Canadian English rating or Canadian French rating accordingly unusual results may occur and the Unit may not Receive Emergency Bulletins or other Types of Programming Emergency Bulletins Such as EAS messages Weather Warnings and Others Locally originated Programming News Political Public Service Announcements Religious Sports Weather Change PIN Although...

Page 40: ...d Wireless Select your connection type This TV can be connected to your home network Network settings 3 Adjust the following items Wireless setting Select to use a wireless LAN to connect to the Internet by a wireless connection 1 Use to Select Wireless then press OK 2 Use to Select the desired Setting then press OK and follow the On screen Instructions Easy Connect Select this Setting if your Rou...

Page 41: ...d wireless network using then press OK IfyouselecttheSSIDhasaWPS theWPSsettingscreenwillappear Use to Select a setting then press OK Easy Connect Select this Setting if your Router has a Wi Fi Protected Setup WPS button Start Scanning for wireless networks on the TV after pressing the WPS button on your Router If Connection Test fails try Easy Connect again 1 If it fails then refer to the Router s...

Page 42: ...etting automatically Manual Sets the IP setting manually IP address 1 3 A set of numbers which are assigned to devices participating in a computer network Subnet mask 1 3 A mask which is used to determine what subnet an IP Address belongs to Default gateway 1 3 IP Address of the network device such as router which provides Internet access DNS setting mode Auto Sets the DNS setting automatically Ma...

Page 43: ...ected an Ethernet Cable or entered Network Settings such as IP Address DNS Settings etc manually 1 Use to Select Connection test then press OK Connection Test will start automatically and the Test result for Home Network and Internet will appear right after the Connection Test finishes Testing is displayed while the Connection Test is in progress Home Network Internet Description Pass Pass Connect...

Page 44: ... to Select the desired option then press OK Yes Deactivate the connection to Netflix No Activate the connection to Netflix VUDU deactivation Displays the deactivation setting for VUDU 1 Use to Select Net TV then press OK 2 Use to Select Net TV deactivation then press OK 3 Use to Select VUDU then press OK 4 Use to Select the desired option then press OK Yes Deactivate the connection to VUDU No Acti...

Page 45: ...pgrade file to your PC Prepare a blank USB memory stick for Software Update Access www philips com support and download the latest version software to a blank USB memory stick using a PC by following the Directions described on the website Use a blank USB memory stick download the software on your PC and write the software in the root directory of the USB memory stick For more details on how to do...

Page 46: ...When you start up the TV or a net service after executing the software update a message may appear on the screen prompting for software update again In this case please select Update to start USB update or network update For further assistance please contact call center Software settings Software 1 Press and use to Select Setup then press OK 2 Use to Select Software settings then press OK 3 Use to...

Page 47: ...the Internet It is recommended that files to be played back in this unit are recorded under the following specifications Picture JPEG Progressive JPEG JPEG Upper limit 4000x4000 pixels Progressive JPEG Upper limit 1024x768 pixels Music MP3 WAV AAC MP3 Sampling frequency 16 kHz 48 kHz Constant bit rate 8 kbps 320 kbps WAV Sampling frequency 8 kHz 48 kHz Constant bit rate 64 kbps 1 5 Mbps AAC Sampli...

Page 48: ...Image file All Sets repeat playback for all Image files in the current folder Slide time 1 Short Switches to the next image in 5 seconds Medium Switches to the next image in 10 seconds Long Switches to the next image in 15 seconds Transitions 1 None No effect when switching images Dissolve Overlaps the next image on the current image Wipe right Pushes the current image out from left Wipe left Push...

Page 49: ... search Press to stop playback Press 1toresumefromthepointatwhichplaybackwasstopped Press OK to play from the beginning of the file at which playback was stopped Press CH to play the next file Press CH to play the current file at the beginning Press CH twice within 5 seconds to play the previous file Press OPTIONS to display the optional menu then use to Select the desired item Repeat Off Sets rep...

Page 50: ... then press OPTIONS 2 Use to Select Remove App then press OK The selected App will be removed from My Apps list Move App 1 Use to Select the desired App then press OPTIONS 2 Use to Select Move App then press OK The selected App icon will be smaller 3 Use to the point you want to place then press OK Guide to App Gallery a b c All App Gallery Category menu List of category menu Icon list Displays un...

Page 51: ... in the United States You can add up to 5 accounts Creating a New Station By entering your favorite artists or tracks Pandora selects music and creates a new station for you on the basis of the entered information 1 On the Station List screen Use to Select New Station then press OK 2 Enter a name of your favorite artist or tracks then press OK while OK is selected Search result will appear on the ...

Page 52: ...ble or Set top Box needs to be plugged into the Unit How come there is no image fromtheConnectedExternal Devices Check if the correct Input mode is selected by pressing SOURCE p 22 Check the Antenna Cable or other Input Connection to the Unit When using the Component Video Connection check that the Green Y Blue Pb Cb and Red Pr Cr connectors are connected to their corresponding colored jacks on th...

Page 53: ...r or Lower then the Loudness will Change Make sure Auto volume leveling is set to On p 32 Picture Sound No sound with distorted picture occurs when using the HDMI Digital Connection Some HDMI cables and devices may not be compatible with the TV due to different HDMI specifications No Picture or Sound Check if the Power is on CheckwhetherAllthecablestotheUnitareconnectedtothecorrectOutputjack of yo...

Page 54: ...e picture quality of Netflix streaming movie does not improve The picture quality does not change during playback It differs depending on the speed of Internet connection at the time of loading Cannot use VUDU feature VUDU is available only in the United States and Mexico Check if the network connection is properly made Cannot rent or buy movies TV episodes on VUDU You need to activate the VUDU ac...

Page 55: ...e display HDMI High Definition Multimedia Interface Interface that supports All uncompressed Digital Audio Video formats including Set top Box Blu ray DVD Recorder or Digital television over a single cable HDTV High Definition TV Ultimate Digital format that produces high resolution and high picture quality PIN code A stored 4 digit number that allows access to Parental control features SAP Second...

Page 56: ...rd Programmable Scan Channel up down and PREV CH Previous Channel Connectivity Component Video Input Y Pb Pr 1 Supporting Video Signals 480i p 720p 1080i p 60Hz Composite Video Input Shared Y Green Terminal with Component Video 1 3 Analog Audio L R Input PC Input Via VGA HDMI and HDMI DVI Analog Audio L R USB 1 Wireless LAN Supporting wireless standards IEEE 802 1 1a b g n ac 2 4GHz 5GHz Ethernet ...

Page 57: ...warranty does not apply a to damage caused by accident abuse misuse neglect misapplication or non Philips product b to damage caused by service performed by anyone other than Philips or Philips Authorized Service Location c to a product or a part that has been modified without the written permission of Philips or d if any Philips serial number has been removed or defaced or e product accessories o...

Page 58: ...ion to this product The Philips trademark and the Philips Shield Emblem are registered trademarks of Koninklijke Philips N V used under license P F USA Inc PO Box 2248 Alpharetta GA 30023 2248 U S A P F Mexicana S A de C V Av La Palma No 6 Col San Fernando La Herradura Huixquilucan Edo de México C P 52787 A518ZUH A51RZUH A511ZUH 䖩䖩 ...

Reviews: