background image

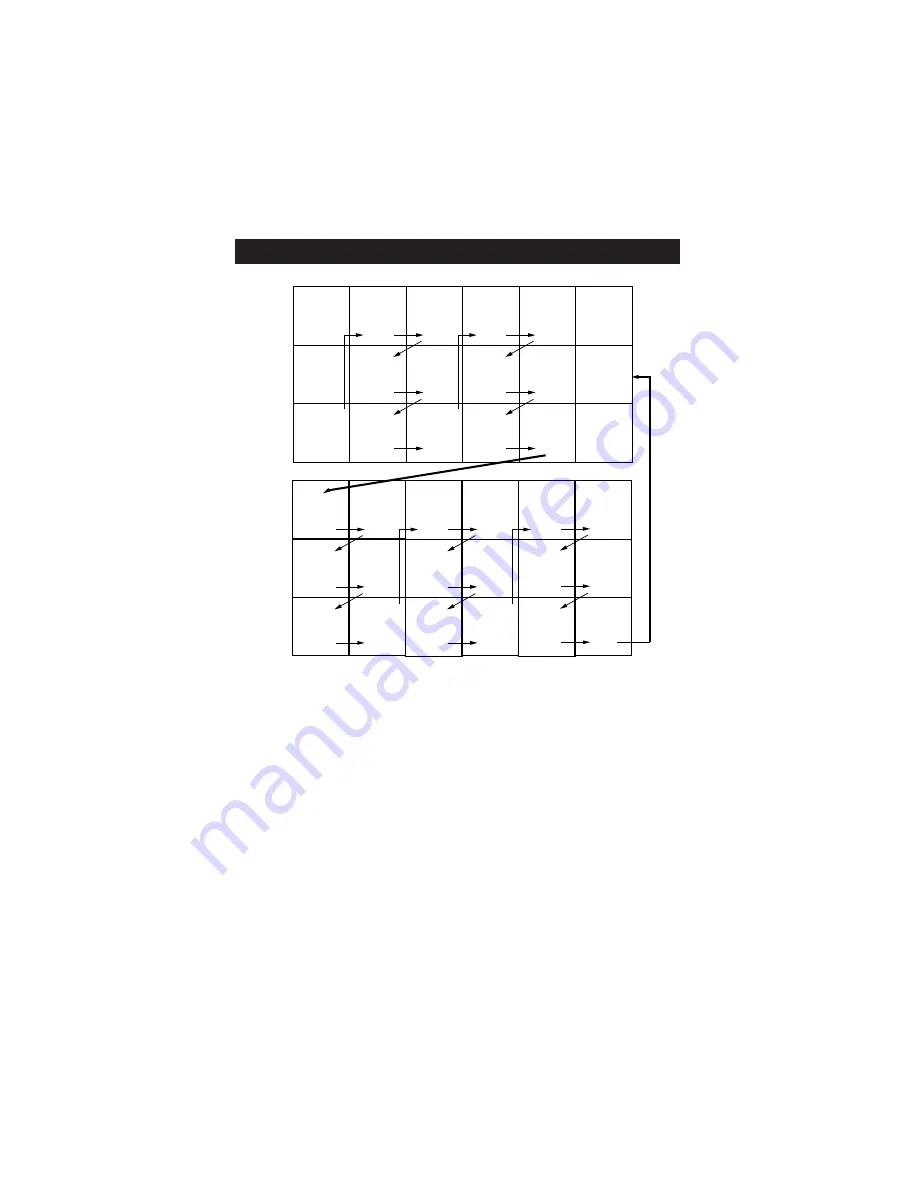
P

ANEL

I

NDEX

Panel

Sequence

and

Panel Inde

x

CO VER

PANEL

1

PANEL

2

PANEL

3

PANEL

4

PANEL

5

PANEL

6

PANEL

7

PANEL

8

PANEL

9

PANEL

10

PANEL

11

PANEL

12

PANEL

13

PANEL

14

PANEL

19

PANEL

20

PANEL

21

PANEL

22

PANEL

23

PANEL

24

PANEL

25

PANEL

26

PANEL

27

PANEL

28

PANEL

29

PANEL

30

PANEL

31

PANEL

32

PANEL

33

PANEL

34

PANEL

15

PANEL

16

PANEL

17

PANEL

18

Side 1

Side 2

Advanced Remote Features

Using the Guide . . . . . . . . . . . . . . .1
Surf  . . . . . . . . . . . . . . . . . . . . . . . .2
DSURF  . . . . . . . . . . . . . . . . . . . . .3
PIP  . . . . . . . . . . . . . . . . . . . . . . . . .4
Picture Format  . . . . . . . . . . . . . . .5

Advanced Menu Features

Picture Controls  . . . . . . . . . . . . . .6
Convergance  . . . . . . . . . . . . . . .7-8
Sound Controls  . . . . . . . . . . . . . . .9
Bass Bosst  . . . . . . . . . . . . . . . . . .10
AVL  . . . . . . . . . . . . . . . . . . . . . . .11
Surround Sound . . . . . . . . . . . . . .12
SAP, Alt Audio  . . . . . . . . . . . . . .13

Audio Out, 
Speakers Dig Out  . . . . . . . . . . . .14
Intellitune, Smart Picture  . . . . . . .15
Sleep  . . . . . . . . . . . . . . . . . . . . . .16
Timer  . . . . . . . . . . . . . . . . . . .17-19
AutoLock  . . . . . . . . . . . . . . . .20-23
PIP  . . . . . . . . . . . . . . . . . . . . . . . .24
Closed Caption  . . . . . . . . . . .25-26
Picture Format . . . . . . . . . . . . . . .27
Channel Edit  . . . . . . . . . . . . . . . .28
AutoChron  . . . . . . . . . . . . . . .29-30
Weak Digital Signal  . . . . . . . . . . .31
Channel and Volume Display  . . . .32
Emergency Alert  . . . . . . . . . . . . .33
Factory Channel Reset . . . . . . . . .34

SUBJECT

Panel #    SUBJECT

Panel #

Summary of Contents for 51PP9910

Page 1: ...al first for quick tips that make using your Philips product more enjoyable If you have read your instructions and still need assistance you may access our online help at www p4c philips com or call 1 800 531 0039 while with your product 3135 035 22232 User Manual ADVANCED INSTRUCTIONS 3 24 04 ...

Page 2: ...17 PANEL 18 Side 1 Side 2 Advanced Remote Features Using the Guide 1 Surf 2 DSURF 3 PIP 4 Picture Format 5 Advanced Menu Features Picture Controls 6 Convergance 7 8 Sound Controls 9 Bass Bosst 10 AVL 11 Surround Sound 12 SAP Alt Audio 13 Audio Out Speakers Dig Out 14 Intellitune Smart Picture 15 Sleep 16 Timer 17 19 AutoLock 20 23 PIP 24 Closed Caption 25 26 Picture Format 27 Channel Edit 28 AutoC...

Page 3: ...10 00 am 11 00am Program name 80 1 PBS1DTV HDTV Mon 17 Oct 10 15am 80 1 80 2 80 3 80 4 80 5 10 00 1 00 Channel and Name Current date and time Program name Program time TIme Selector Available Subchannels Program information Signal Type Guide ADVANCED REMOTE FEATURES USING THE GUIDE The guide can provide you with infor mation about the current program as well as upcoming programs The content and ac...

Page 4: ... to the Surf list Press the SURF button and then the CURSOR RIGHT button to add the channel to the list Repeat this step filling the list with up to 10 favorite signal sources NOTE If you exceed 10 channels a warning message will inform you to delete a channel before adding another 3To tune to a favorite signal source from the list press the SURF button The Surf list box appears Press the SURF but...

Page 5: ...to select a channel Only digital channels are available A small icon appears next to the channel to indicate DSURF is activated 3Press DSURF again to return to normal channel selection and the DSURF icon disappears 1 3 2 EVENING WORLD NEWS TONIGHT S HEADLINES EVENING WORLD NEWS TONIGHT S HEADLINES 5 1 5 1 WXYZ Digital 5 1 5 1 WXYZ Digital EVENING WORLD NEWS TONIGHT S HEADLINES EVENING WORLD NEWS T...

Page 6: ...PIP win dow smaller 3To select a video source to watch in the PIP window see Selecting a PIP Source on panel 24 4Press the PIP button a third time to turn PIP off MOVING THE PIP SCREEN Press the POS button Each time you press this button the PIP screen moves to another corner of the main screen FREEZING THE PIP SCREEN Press the FREEZE button The picture in the PIP screen stands still Stopping moti...

Page 7: ...AV5 SIDE inputs on the TV While watching a video source with no onscreen menu or display present press the FORMAT button once to see the currect mode Press it again to change to the next mode FORMAT Button Picture format Modes NATIVE 16 9 is the default for your DTV because HD programs are broad cast in this format Analog channels are expanded horizontally 4 3 shows an analog the picture in its or...

Page 8: ...TINT PICTURE BRIGHTNESS PICTURE SHARPNESS COLOR TINT PICTURE BRIGHTNESS PICTURE SHARPNESS COLOR TINT PICTURE BRIGHTNESS PICTURE SHARPNESS COLOR TINT PICTURE BRIGHTNESS PICTURE SHARPNESS COLOR TINT PICTURE PICTURE SHARPNESS COLOR TINT COLOR TEMP NORMAL PICTURE 4 2 3 1 ADVANCED MENU FEATURES 6 Picture adjustment Options Remember when the bar scale is cen tered the control settings are at mid range l...

Page 9: ...RIGHT but ton to enter adjust mode 3In adjust mode press the CURSOR RIGHT LEFT UP or DOWN button to adjust the cross hair until the color outline around it is gone The adjustment is automatically saved in the TV s memory To return to the MANUAL CON VERGE menu press the MENU button To exit the onscreen display press the INFO EXIT button CONVERGE RED CONVERGE BLUE MULTIPOINT RED MULTIPOINT BLUE SAVE...

Page 10: ... button to return to NAVIGATE mode Repeat steps 3 and 4 until all misaligned cross hairs have been adjusted 5For your adjustments to be stored in the TV s memory you must activate SAVE MULTIPOINT To save your multipoint adjustments press the MENU button to return to the MANU AL CONVERGE menu Press the CONVERGE RED CONVERGE BLUE MULTIPOINT RED MULTIPOINT BLUE SAVE MULTIPOINT PICTURE MANUAL CONVERGE...

Page 11: ... play back of TV programs 1Press the MENU button on the remote control to show the onscreen menu 2Press the CURSOR DOWN button once to highlight SOUND 3Press the CURSOR RIGHT button to enter the SOUND submenu ADJUSTING THE SOUND CONTROLS SMART SOUND TREBLE BASS 30 BALANCE AVL INCR SURROUND SOUND TREBLE BASS BALANCE 0 AVL INCR SURROUND SOUND PICTURE SOUND FEATURES INSTALL SMART SOUND TREBLE BASS BA...

Page 12: ...e CURSOR DOWN button once to high light SOUND 3Press the CURSOR RIGHT button to enter the SOUND submenu 4Press the CURSOR DOWN button repeatedly until BASS BOOST is highlight ed 5Press the CURSOR RIGHT or LEFT button to turn BASS BOOST ON or OFF 6Press the INFO EXIT but ton to exit the menu SOUND STEREO SAP AUDIO OUT SPEAKERS BASS BOOST ON BASS BOOST OFF PICTURE SOUND FEATURES INSTALL TREBLE BASS ...

Page 13: ...high light SOUND 3Press the CURSOR RIGHT button to enter the SOUND submenu 4Press the CURSOR DOWN button repeatedly until AVL is highlighted Then press the CURSOR RIGHT button or LEFT to turn AVL ON or OFF 5Press the INFO EXIT but ton to exit the menu USING THE AVL AUDIO VOLUME LEVELER CONTROL SOUND TREBLE BASS BALANCE AVL OFF INCR SURROUND AVL ON PICTURE SOUND FEATURES INSTALL TREBLE BASS BALANCE...

Page 14: ...MAT EXPAND 4 3 When signals are being broad cast in mono nonstereo INCR SURROUND MONO INCR SURROUND SPATIAL OR PICTURE SOUND FEATURES INSTALL TREBLE BASS BALANCE AVL INCR SURROUND TREBLE 30 BASS BALANCE AVL INCR SURROUND SOUND SOUND TREBLE BASS BALANCE AVL OFF INCR SURROUND STEREO INCR SURROUND DOLBY VIRTUAL OR OR INCR SURROUND INCR SURROUND 1 3 2 4 5 Surround sound Modes In stereo select STEREO I...

Page 15: ...e menu PICTURE SOUND FEATURES INSTALL TREBLE BASS BALANCE AVL INCR SURROUND TREBLE 30 BASS BALANCE AVL INCR SURROUND SOUND SOUND BLANCE AVL INCR SURROUND STEREO SAP OFF 1 3 5 2 4 6 Audio Program English Spanish Digital Audio SAP SAP or Second Audio Program is an additional part of the stereo broad cast system Sent as a third audio chan nel SAP can be heard apart from the current TV program sound T...

Page 16: ...CUR SOR RIGHT or LEFTbutton to select ON or OFF 6Press the INFO EXIT but ton to exit the menu ADJUSTING AUDIO OUT DIG OUT SPEAKERS Manufactured under license from Dolby Laboratories Dolby and the double D symbol are trade marks of Dolby Laboratories If you have digital audio equipment connected to the TV select the type of digital output appropriate for your device 1From the Sound submenu press th...

Page 17: ...tune ON or OFF 5Press the INFO EXIT button to exit the menu PICTURE SOUND FEATURES INSTALL INTELLITUNE SMART PICTURE SLEEP TIMER Auto Lock ON FEATURES 1 1 2 2 5 4 3 4 2 3 INTELLITUNE SMART PICTURE SLEEP TIMER Auto Lock DAY TIME FEATURES INTELLITUNE SMART PICTURE SLEEP TIMER Auto Lock Smart Picture allows you to choose a preset picture setting for each Antenna Cable and AV input 1Press the MENU but...

Page 18: ...remote control to show the onscreen menu 2Press the CURSOR BUTTONS to navigate to FEATURES then SLEEP 3Press the CURSOR RIGHT button to set the sleep timer 4Press the INFO EXIT button to exit the menu PICTURE SOUND FEATURES INSTALL INTELLITUNE SMART PICTURE SLEEP TIMER Auto Lock 15 FEATURES 1 2 4 3 INTELLITUNE SMART PICTURE SLEEP TIMER Auto Lock Press the INFO BUTTON twice to see the status of the...

Page 19: ...R LEFT or RIGHT but ton to move among the time input slots to make correc tions NOTE You can also use the CURSOR BUTTON UP or DOWN to cycle through digits to input the time 7Press the CURSOR UP or DOWN button to select AM or PM PICTURE SOUND FEATURES INSTALL INTELLITUNE SMART PICTURE SLEEP TIMER Auto Lock TIME START TIME STOP TIME CHANNEL ACTIVATE FEATURES TIMER FEATURES TIME 8 06 PM START TIME ST...

Page 20: ... SOR DOWN button repeatedly until the CHANNEL control is highlighted 5Press the NUMBER but tons to enter the desired start up channel Or press the CUR SOR RIGHT button repeatedly to enter the start up channel you want 6Press the INFO EXIT but ton to exit the menu NOTE Before the Timer will work you must activate it See the next panel PICTURE SOUND FEATURES INSTALL TIMER AutoLock PIP CLOSED CAP FOR...

Page 21: ...ighlighted 5Press the CURSOR RIGHT button to cycle through the options and make your selec tion The options are ONCE DAILY or OFF 6Press the INFO EXIT but ton to exit the menu PICTURE SOUND FEATURES INSTALL TIMER AutoLock PIP CLOSED CAP FORMAT TIMER AutoLock PIP CLOSED CAP FORMAT TIME START TIME STOP TIME CHANNEL ACTIVATE FEATURES TIMER FEATURES TIME 8 06 PM START TIME STOP TIME CHANNEL ACTIVATE T...

Page 22: ...he age of 13 MOVIE RATINGS Continued R Restricted This is programming specifically designed for adults Anyone under the age of 17 should only view this programming with an accompanying par ent or adult guardian NC 17 No one under the age of 17 will be admitted This type of pro gramming should be viewed by adults only X Adults Only This type of program ming contains one or more of the follow ing ve...

Page 23: ... CURSOR RIGHT button to open the New Code screen 7Enter your new four digit code twice 8Press the INFO EXIT but ton exit the menu 9Use these steps to reset your code if you lose it Instead of 0000 in step 5 use 0711 This is the reset code PICTURE SOUND FEATURES INSTALL TIMER AutoLock PIP CLOSED CAP FORMAT TIMER AutoLock PIP SOURCE CLOSED CAP CAP OPTIONS TIME START TIME STOP TIME CHANNEL ACTIVATE F...

Page 24: ...Block by Rating a Press the CURSOR DOWN button then the CURSOR RIGHT button to enter the BLOCK BY RAT ING submenu b Press the CURSOR Buttons to select a rating or subrating to block Press OK to change unlocked to locked or locked to unlocked 6Press the INFO EXIT but ton to exit the menu USING THE AUTOLOCK TO BLOCK PROGRAMS PICTURE SOUND FEATURES INSTALL TIMER AutoLock PIP CLOSED CAP FORMAT TIMER A...

Page 25: ...Press the CURSOR RIGHT button Then press the CUR SOR DOWN button until the AutoLock control highlighted 4Press the CURSOR RIGHT button again to highlight ACCESS CODE 5Enter your four digit ACCESS CODE 6Press the CURSOR RIGHT button to turn BLOCKING ON or OFF 7Press the INFO EXIT but ton to exit the menu PICTURE SOUND FEATURES INSTALL TIMER AutoLock PIP CLOSED CAP FORMAT TIMER AutoLock PIP CLOSED C...

Page 26: ...submenu 4Press the CURSOR DOWN button repeatedly until the PIP SOURCE control is highlighted 5Press the CURSOR RIGHT button to enter the PIP SOURCE submenu Then press the CURSOR UP or DOWN button to select the PIP SOURCE 6Press the INFO EXIT but ton to exit the menu PICTURE SOUND FEATURES INSTALL FEATURES FEATURES AV 5 AV 4 av 3 AV 2 AV 1 1 2 3 5 6 INTELLITUNE SMART PICTURE SLEEP TIMER Auto Lock S...

Page 27: ...il the Closed Caption con trol is highlighted 5Press the CURSOR RIGHT button The CLOSED CAP TION menu appears 6Press the CURSOR UP or DOWN button to select a CAPTION MODE Select the Closed Caption set ting Off Always On On when muted NOTE The On When Muted option turns the Closed Captioning on whenev er the MUTE button on the remote control is pushed PICTURE SOUND FEATURES INSTALL TIMER AutoLock P...

Page 28: ...n 5In the FEATURES MENU the Caption options are listed below CAPTION OPTIONS after it has been turned on The options are CAPTION SIZE CAPTION STYLE CAP TION COLOR and CC BACKGROUND Use the Cursor Buttons to make your selections and follow the on screen instructions 6Press the INFO EXIT but ton to exit the menu PICTURE SOUND FEATURES INSTALL TIMER AutoLock PIP CLOSED CAP FORMAT TIMER AutoLock PIP C...

Page 29: ... 3Press the CURSOR RIGHT button Then press the CURSOR RIGHT or LEFT buttons to select the PICTURE FORMAT 4Press the INFO EXIT button to exit the menu PICTURE SOUND FEATURES INSTALL TIMER AutoLock PIP CLOSED CAP FORMAT FORMAT ZOOM OR FORMAT PANORAMA OR FORMAT NATIVE 4 2 3 1 FEATURES TIMER AutoLock PIP CLOSED CAP FORMAT 4 3 OR ADVANCED MENU FEATURES 27 HELPFUL HINTS See panel 5 USING PICTURE FORMAT ...

Page 30: ...the CURSOR UP or DOWN BUTTON to scroll through the list of channels 4With the channel you want to edit selected press the CURSOR RIGHT button to mark the channel as SKIPPED Channels you mark SKIPPED will not appear when you use the CH annel buttons to change chan nels while watching TV 5Press the INFO EXIT but ton to exit the menu INSTALL LANGUAGE TUNER MODE AUTO PROGRAM CHANNEL EDIT AutoChron 4 1...

Page 31: ...seconds a menu containing the time zone options appears 5Press the CURSOR BUT TON UP or DOWN to highlight your correct time zone and Daylight Savings Time option 6Press the number buttons on your remote to enter the channel number for your PBS station 02 15 or 121 for example Wait until the TV completes its search 7Press the INFO EXIT but ton to exit the menu SET TIME AUTO MANUAL INSTALL AUTO PROG...

Page 32: ...n to move to the next digit input slot and input the time If you should need to change a number you have input you can press the CURSOR LEFT or RIGHT button to the digit input slot to make the correc tion 3After you have input the time press the CURSOR RIGHT button to enter the AM PM area Then press the CURSOR UP or DOWN but ton to select AM or PM 4Press the INFO EXIT but ton to exit the menu INST...

Page 33: ...epeatedly until INSTALL is highlighted 2Press the CURSOR RIGHT button to enter the INSTALL submenu Then press the CURSOR DOWN button repeatedly until WEAK DIG SIG is select ed Press CURSOR RIGHT button to enter the weak digi tal signal menu 3Press the CURSOR LEFT RIGHT UP or DOWN button to select a channel to add or skip 4Press the INFO EXIT but ton to exit the menu SET TIME AUTO MANUAL CHANNEL ED...

Page 34: ...til CH BANNER SIZE or VOLUME DISPLAY are select ed 3Press the CURSOR RIGHT BUTTON to choose a BANNER SIZE or turn the VOLUME DISPLAY on or off 4Press the INFO EXIT but ton to exit the menu INSTALL TUNER MODE AUTOCHRON WEAK DIG SIG CH BANNER SIZE VOLUME DISPLAY 11 00 AM TUNER MODE AUTOCHRON WEAK DIG SIG CH BANNER SIZE SMALL VOLUME DISPLAY INSTALL ENTER TIME 2 3 4 1 SET TIME AUTO MANUAL 11 00 AM TUN...

Page 35: ...button to enter the EMERG ALERT submenu Then press the CURSOR RIGHT button again to enter the menu Press the CURSOR UP or DOWN but ton to select the level of alert you want to have presented or discarded Then press the CURSOR RIGHT button to select PRESENT or DISCARD 4Press the INFO EXIT but ton to exit the menu INSTALL AUTOCHRON WEAK DIG SIG CH BANNER SIZE VOLUME DISPLAY EMERG ALERT INSTALL EMERG...

Page 36: ...tedly until INSTALL is highlighted 2Press the CURSOR RIGHT button to enter the INSTALL submenu Then press the CURSOR DOWN button repeatedly until FACT CH RESET is high lighted 3Press the CURSOR RIGHT button to enter the FACT CH RESET Submenu Follow the onscreen menu Press 1 to continue and 0 to reset 2 3 1 WEAK DIG SIG CH BANNER SIZE VOLUME DISPLAY EMERG ALERT FACT CH RESET INSTALL HELPFUL HINTS A...

Reviews: