background image

11

Tracking your workout progress

You can use your device as a stopwatch to track your workout progress.
All stopwatch activities will be recorded and stored on your device.

During use of stopwatch, you may press the talking stopwatch key to hear your elapsed time via the
headphones.

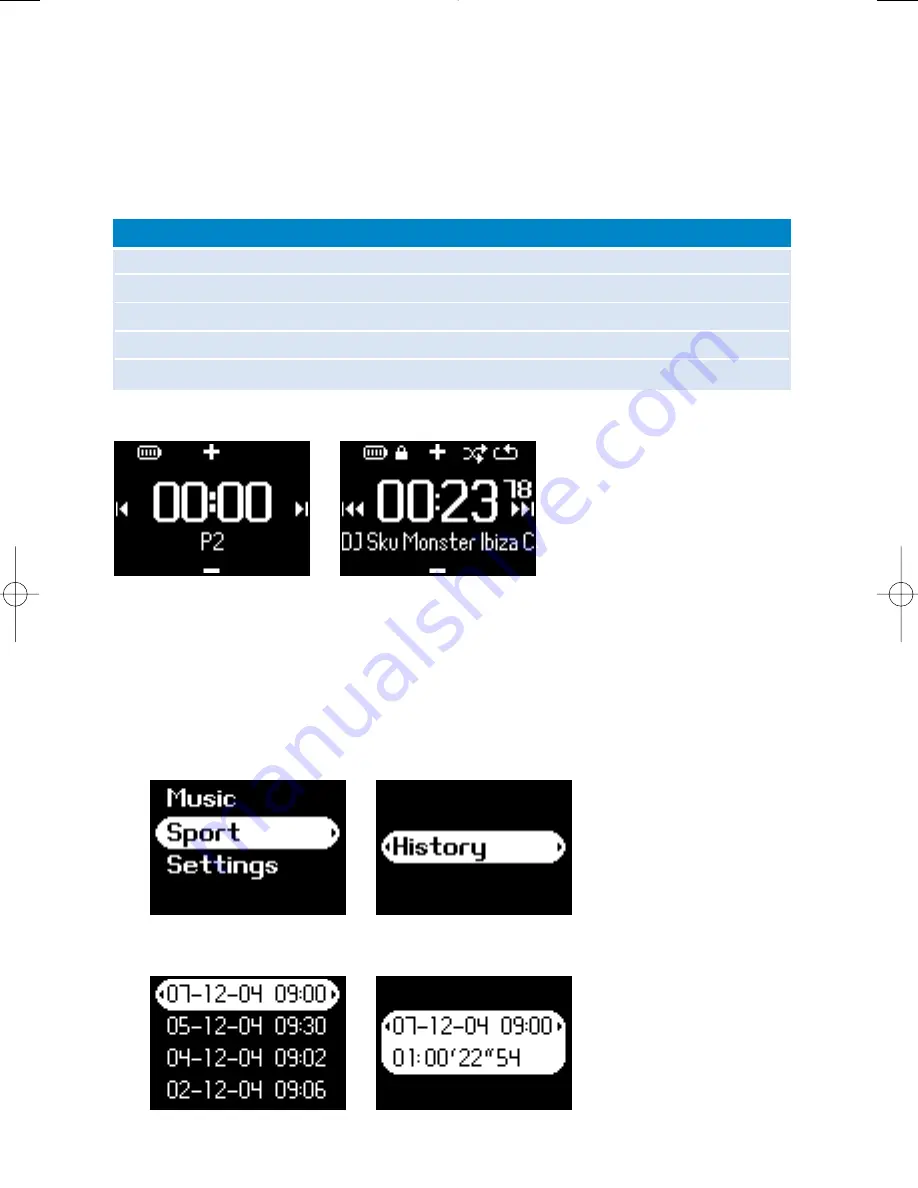
The screen shots below show what you see when you are using stopwatch.

The talking stopwatch voice feedback is available in: English, French, German and Spanish only. These
are linked to the language selection that you make in Settings. All other languages have English voice
feedback.

Go to stopwatch screen

Press and hold 

2

(see "Front of device section" on p.4)

Start timing

Press 

2

from stopwatch screen

Pause timing

Press 

2

when stopwatch is active

Resume timing

Press 

2

when stopwatch is paused

Reset stopwatch

Press and hold 

2

Stopwatch operation

Controls to press

Using the stopwatch

You can use your device as a stopwatch to track your workout progress.

1

From root menu, select 

Sport 

History

.

2

You can view a list of recorded workout logs. Press 

2

to view details. You will see the date of 

your workout and the elapsed time of your workout.

PSA235_ENG.qxd  15/8/05  17:50  Page 11

Summary of Contents for 512MB-SPORT AUDIO PLAYER PSA232

Page 1: ...uario gebruikershandleiding manuale per l utente manual do usuário användar handbok Digital Audio Player Lecteur audio numérique Digitaler Audio Player Reproductor de audio digital Digitale audiospeler Lettore audio digitale Leitor Áudio Digital Digital ljudspelare ...

Page 2: ...nform you as soon as new free upgrades become available The model and production numbers can be found inside the battery compartment About your new product With your newly purchased product you can enjoy the following MP3 and WMA playback see MUSIC MODE section FM radio see RADIO MODE section Workout progress tracking FM radio is only available to some regional versions FM radio is currenlty not a...

Page 3: ...yer is not going to be used for a long time Inserting batteries Use an appropriately sized coin to twist anti clockwise to unlock the back cover Insert a new battery with correct polarity See printed label in battery compartment Match the latches on the cover with the slots on your device Twist clockwise gently to replace the back cover TIP You can also twist open the cover without using a coin Gr...

Page 4: ...mate power level of your batteries on the display Battery full Battery two thirds full Battery half full Battery low Battery empty Note Rechargeable batteries shows lower voltage levels when compared to alkaline ones Batteries contain chemical substances so they should be disposed of properly TIP When the batteries are nearly empty the battery low screen blinks and the beep tone sounds once When y...

Page 5: ...us 4 Display Dynamically displays menu options and track information 5 VOL Move down Navigate down volume down in playscreeen 6 VIEW To switch between root menu library and now playing screens 7 Next Fast forward Down to 1 level Skip to next 8 Lock key Disables enables key lock and ShockLock 9 2 Power on off and Play Pause 0 VOL Move up Navigate up volume up in playscreeen ...

Page 6: ...e 1 Battery 2 Card slot Mini SD Insert your mini SD card here for memory expansion 3 USB jack 4 Back cover Insert a coin here to twist open close back cover connects to arm band 5 p Audio jack SD card is not by packed ...

Page 7: ...ttings enter to customize settings for your device TIP Select Shuffle All to play all your device music in a random way Smart Hide is a function to hide some library information With Smart Hide you can scroll faster to the right content by hiding albums and artists which contain songs that are fewer than a specified number Smart Hide 1 will hide all artists and albums that has only 1 track in the ...

Page 8: ...our option Press 2 for next or 1 for previous levels 3 Press 2 to play your selection TIP You can also press and hold 3 or 4 key to SuperScroll An enlarged head letter will show as the tracks scroll quickly Stop pressing when you have arrived at your desired head letter Playlists Playlists collections Tracks listed in play order All songs Shuffle All Alphabetically listed tracks Alphabetically lis...

Page 9: ...peration Controls to press Customizing playback Changing play modes 1 From the root menu select Settings 2 Use scroll controls to select the following options Press 2 to confirm your selection Press 2 to deselect a checked option Changing Bass Enhancement 1 From the root menu select Settings DBB 2 Use scroll controls to select On or Off Changing equalizers 1 From the root menu select Settings EQ 2...

Page 10: ...ize and transfer your music using Windows Media Player 10 1 Launch Windows Media Player from Windows desktop or Start menu 2 To transfer files from your computer to your device click Copy to CD or Device Sync tab 3 In the Items to Copy pane in the drop down list click the playlist category or other item that you want to copy 4 Clear the check boxes next to any files you do not want to copy 5 In th...

Page 11: ...previous or 2 for the next preset Manual tune 1 From the radio play screen press and hold 2 to start manual tune 2 Press 1 or 2 to tune step by step The screen indicates the change in frequency You will hear a hissing sound the tuned station as you manual tune 3 Press and hold 1 to search for the last available station or press and hold 2 to search for the next available station 4 Press 2 to confi...

Page 12: ...ed to the language selection that you make in Settings All other languages have English voice feedback Go to stopwatch screen Press and hold 2 see Front of device section on p 4 Start timing Press 2 from stopwatch screen Pause timing Press 2 when stopwatch is active Resume timing Press 2 when stopwatch is paused Reset stopwatch Press and hold 2 Stopwatch operation Controls to press Using the stopw...

Page 13: ...alking stopwatch for elapsed time 3 Press clock to stop stopwatch The talking stopwatch voice feedback is available in English French German and Spanish only These are linked to the language selection that you make in Settings All other languages have Engllish voice feedback ...

Page 14: ...Advanced Radio Settings Europe USA Japan Smart Hide Off 1 2 3 4 Voice Feedback On demand On time Setting Function TIP Options for each setting are shown on the device display TIP PowerSave is a battery power saving mode During this mode certain features that consume high power such as DBB and EQ are deactivated for opimal battery performance Smart Hide is a function to hide some library informatio...

Page 15: ... device to armband matching the cover latch with the armband cup TIP Ensure that the headphone socket is pointing upward You will hear a click sound when you have secured the player 2 Connect headphones 3 Adjust fitting and wear on your arm ...

Page 16: ... at an audible level Increase the volume using the VOLUME button If psa is in pause mode press the 2 button to resume playback Do a soft reset by re inserting the battery If nothing works then try connecting your psa player to the computer and then start Philips Device manager and select restore to rebuild the database and firmware image of the psa player Cannot transfer from my PSA back This is n...

Page 17: ...delete etc your files only through included music software to avoid problems About operating and storage temperatures Operate in a place where the temperature is always between 0 and 35ºC 32 to 95ºF Store in a place where the temperature is always between 20 and 45ºC 4 to 113ºF Battery life may shorten in low temperature conditions Take care when using headphones Hearing safety Listen at a moderat...

Page 18: ...ch can be recycled if disassembled by a specialized company Please observe the local regulations to dispose of packaging exhausted batteries and old equipment Disposal of your old product Your product is designed and manufactured with high quality materials and components which can be recycled and reused When this crossed out wheeled bin symbol is attached to a product it means the product is cove...

Page 19: ...pment off and on the user is encouraged to try to correct the interference by one or more of the following measures Relocate the receiving antenna Increase the separation between the equipment and receiver Connect the equipment into an outlet on a circuit different from that to which the receiver is connected Consult the dealer or an experienced radio TV technician for help Notice for Canada This ...

Page 20: ...technology outside this product is prohibited without a license from Microsoft or an authorized Microsoft subsidiary Content providers are using the digital rights management technology for Windows Media contained in this device WM DRM to protect the integrity of their content Secure Content so that their intellectual property inlcuding copyright in such content is not misappropriated This device ...

Page 21: ...can not be played on your device Install Windows Media Player and Device Manager Insert the supplied CD into your computer s s CD ROM drive 1 Follow screen instructions to begin and complete installation 2 Install Windows Media Player 3 Fill in necessary information when prompted to do so 4 About Philips Device Manager With Philips Device Manager you can update and restore repair your device with ...

Page 22: ...puter using the supplied USB cable The USB connection screen will automatically appear 1 Launch Windows Media Player 2 TIP Please refer to your computer s manual for the exact position of your USB port Look for the USB symbol on the processing unit of your computer ...

Page 23: ... Click Add to Library By Searching Computer 1 Click Browse in the dialog box to point to the folder you want to add to 2 Complete the information in the dialog box and then click Search 3 Files will be added to the Library 4 Actual display varies with use ...

Page 24: ... want and you re ready to synchronize your library to your device Choose a synchronization method Automatic With this option the Player synchronizes content to the device when you connect it to your computer or when you change synchronization settings The Player synchronizes your entire library if it can fit or the Player synchronizes your favorite content first Manual With this option you pick sp...

Page 25: ...s to i e Philips GoGear Philips Clear the check boxes next to any files you do not want to copy 3 Click the Start Sync button 4 TIP For further details of music transfer on WMP 10 go to the help section of Windows Media Player and click Help Synchronizing content to devices ...

Page 26: ...om the Add to Playlist pop up window select an existing playlist or add new one 3 TIP Press and hold Ctrl on your keyboard and click to select more than one item To select consecutive items click the first item press and hold Shift on your keyboard and then click the last item The selection is added to playlist 4 Actual display varies with use ...

Page 27: ... delete 2 TIP Press and hold Ctrl on your keyboard and click to select more than one item To select consecutive items click the first item press and hold Shift on your keyboard and then click the last item Delete Tracks and Playlists Actual display varies with use ...

Page 28: ...8 Edit Track Information Click on a track 1 Right click and select Edit 2 Click on the text boxes to edit relevant information 3 Actual display varies with use ...

Page 29: ...cks Type a search string in the Search field 1 Click on Search to start searching 2 You will see tracks that contain the search string 3 You can play transfer delete or add these tracks 4 Actual display varies with use ...

Page 30: ...m the bypacked CD Philips Device Manager will automatically notify you if any new updates are available 1 If your internet connection is activated your Device Manager has been installed on your PC your device is connected and powered on then your Device manager will pop up a message if new firmware is available for your device Launch Device Manager User Interface by right clicking on this icon in ...

Page 31: ...t Programs Philips Device Manager 3 In the main window go to the repair tab and click Repair 4 You will be prompted before repair begins 5 Click OK to continue Click Cancel to stop 6 The Device Manager will repair your device Once the repair is complete the device can be used again Your device will be automatically disconnected as soon as Device Manager finishes interacting with your device and wi...

Page 32: ...subject to change without notice Trademarks are the property of Koninklijke Philips Electronics N V or their respective owners 2005 Koninklijke Philips Electronics N V All rights reserved www philips com Printed in China ...

Reviews: