background image

U

SING THE

TV B

UTTONS

S

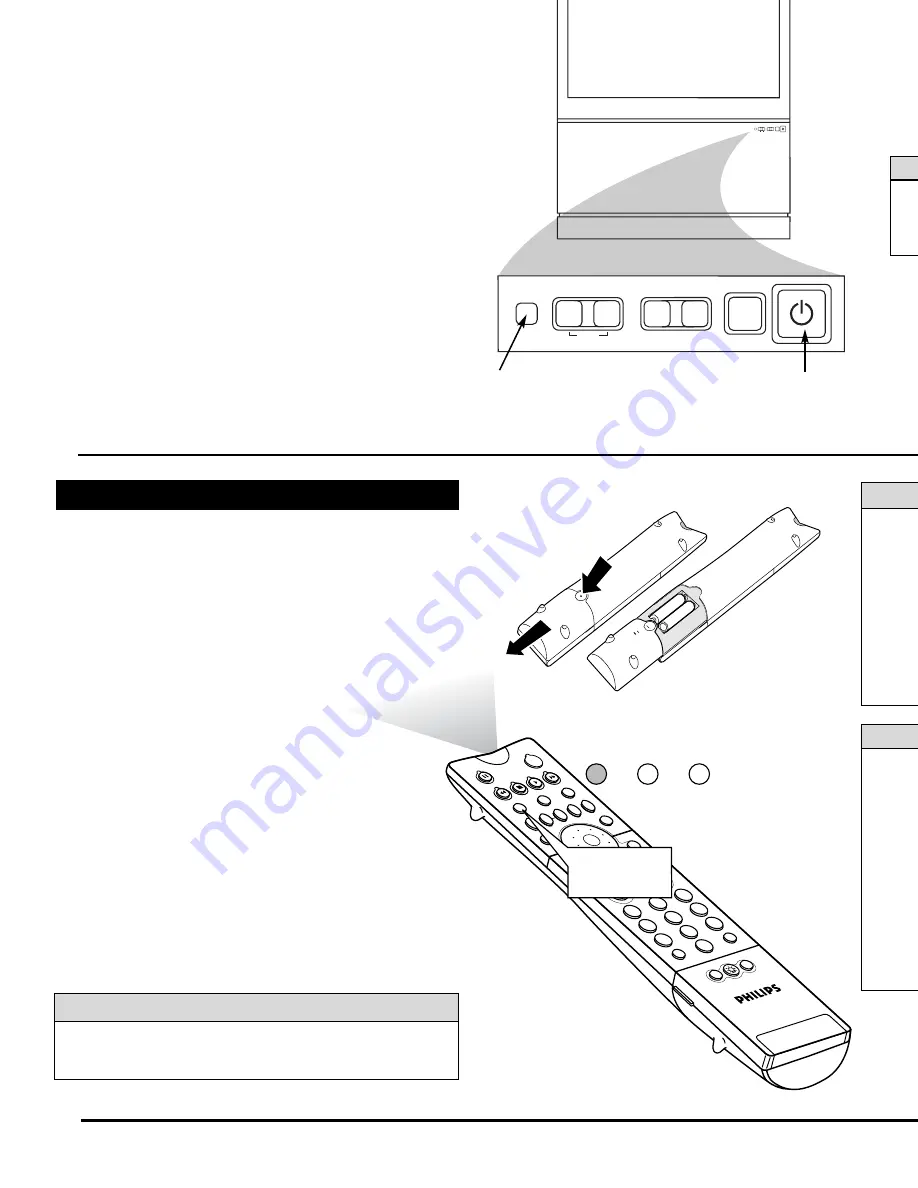
hould your remote control be lost or broken, you can still
change some of the basic picture and sound settings with the

buttons on the TV. Follow the steps below to familiarize yourself
with the functions of the TV buttons.

1

Press POWER/STANDBY to turn the TV on (or off).
Allow about 10 seconds for the TV to power on.

2

Press the VOL(ume) + or – buttons to decrease or
increase the sound level.

Press the  and – buttons simultaneously to dis-
play the on-screen menu. After the menu appears, use these
buttons to enter submenus and make selections or adjust-
ments. (Use the CHANNEL buttons to move up and down
in the menu or submenus.) Press both VOLUME buttons
simultaneously to back out of the on-screen menus.

3

Press SOURCE SELECT to choose from among the sig-
nal inputs you have connected to the TV
.

4

Press the CHANNEL buttons to select TV channels. 

PIP

2

1

3

5

4

6

8

7

9

0

OK

SWA

P

PIP C

H

DN

UP

FREE

ZE

SOUN

D

VOL

CH

MUTE

CC

A/CH

POW

ER

PICT

URE

STAT

US/

EXIT

MEN

U/

SELE

CT

POSIT

ION

TV 

DN

UP

1

2

3

4

5

6

7

8

9

0

SURF

A/CH

ACC

VCR

UP

DN

TV/VCR

ACTIV

E

CON

TRO

L

TV MODE

Button

TV

VCR

ACC

R

EMOTE

C

ONTROL

I

NSTALLING

B

ATTERIES

T

o load the supplied batteries into the remote, follow these

steps.

1

Gently press and hold the indentation on the back of
the remote and slide the battery cover off the remote.

2

Place the two “AA” size batteries in the remote’s bat-
tery case
. Ensure that the (+) and (–) ends of the batteries
line up correctly with the (+) and (–) inside the case. 

3

Slide the battery cover back into place.

P

OINTING THE

R

EMOTE

Press the TV mode button on the remote to ensure that the
remote sends its commands to the TV. 
When operating the
remote control, point the remote toward the remote sensor win-
dow on the TV. 

To prev
may res
age to t

• Install 

as ma

• Do not

or CAR

• Remov

contro

Do not 
teries in

Remote Sensor

Window

You can set up your TV remote control to work with accessory
devices such as VCRs, DVD players, and cable converter boxes.
See pages 18–23 in the Directions for Use manual.

c

c

C

HECK

I

T

O

UT

2

B

ATT

• Be sur

sensor
device

• Press 

device
other 

• Be wi

the TV
operat

• Avoid

faces.

• Do no

remot
tened 

SOURCE

SELECT

>

?

+

A

-

A

VOLUME

CHANNEL

MENU

SOURCE

SELECT

>

?

+

A

-

A

VOLUME

CHANNEL

MENU

Power Standby

Button

You
the 
but 

Summary of Contents for 51-HDTV MONITOR PROJECTION TV 51PP9363H-17B

Page 1: ...on WILL NOT supply stereo sound to the TV 1 Connect the cable TV signal to the CABLE IN jack on the back of the cable box 2 Connect a coaxial cable not supplied to the TO TV jack on the back of the cable box and to the ANTENNA IN 75Ω jack on the back of the TV 3 Be sure to set the Output Channel switch on the back of the cable box to CH 3 or 4 then tune the cable box on the TV to the corresponding...

Page 2: ...2 3 4 5 6 7 8 9 0 SURF A CH ACC VCR UP DN TV VCR ACTIVE CONTROL TV MODE Button TV VCR ACC REMOTE CONTROL INSTALLING BATTERIES To load the supplied batteries into the remote follow these steps 1 Gently press and hold the indentation on the back of the remote and slide the battery cover off the remote 2 Place the two AA size batteries in the remote s bat tery case Ensure that the and ends of the bat...

Page 3: ...r a video source connected to the ANTENNA AV1 CVI AV2 or AV3 side panel inputs on the TV Volume Press to adjust the TV sound level Number Buttons Press to select TV channels When selecting single digit channels press the number of the desired channel The TV will pause for a few seconds and then tune to the selected channel TV VCR Press while in VCR mode to view the playback of a video tape Press a...

Page 4: ...the section on Auto Program The menu LANGUAGE control enables you to set the TV s on screen menu and on screen displays to be shown in English French or Spanish Follow the steps in this section to set the con trol 1 Press the MENU SELECT button The on screen menu appears 2 Press the CURSOR RING DOWN repeatedly until INSTALL is highlighted Then press the CURSOR RING RIGHT to enter the INSTALL subme...

Page 5: ...options appears 5 If necessary press the CURSOR RING UP or DOWN to highlight your correct time zone Then press the CURSOR RING RIGHT Within a few seconds the option of Daylight Savings Time appears on screen 6 If the Daylight Savings Time option you want to select is not highlighted press the CURSOR RING UP or DOWN to highlight the option Then press the CURSOR RING RIGHT to activate your selection...

Page 6: ...SOR RING RIGHT Then press the CURSOR RING UP or DOWN to select the first character of the name You can input up to five characters for the name When finished press the MENU SELECT button Or To choose from the list of preset names press the CUR SOR RING UP or DOWN to highlight your choice for the channel name Press the CURSOR RING RIGHT to select the name Then press the MENU SELECT button 5 Press t...

Page 7: ...window from the screen 7 2 1 3 5 4 6 8 7 9 0 TV SWAP PIP CH DN UP FREEZE SOUND MUTE SURF A CH POWER PICTURE STATUS EXIT VCR ACC MENU SELECT VOL CH TV VCR ACTIVE CONTROL FEATURES TIMER AutoLock PIP CLOSED CAP FORMAT TINT FEATURES TINT 44 PIP 1 4 FEATURES TINT COLOR COLOR 44 PIP 2 3 PIP 2 1 3 5 4 6 8 7 9 0 SURF A CH POSITION TV VCR 1 6 3 SWAP FREEZE SkiVacations P O Box 55512 Anytown USA 87654 1 800...

Page 8: ... the CURSOR RING LEFT or RIGHT to store your adjust ments in the TV s memory OR To undo the multipoint adjustments you just made press the MENU SELECT button This returns you to the MANUAL CONVERGE menu Press the CURSOR RING DOWN until UNDO MULTIPOINT is highlighted Press the CURSOR RING LEFT or RIGHT to undo the adjustments Press the CURSOR RING UP until MULTI POINT RED or MULTIPOINT BLUE is high...

Reviews: