background image

English

11

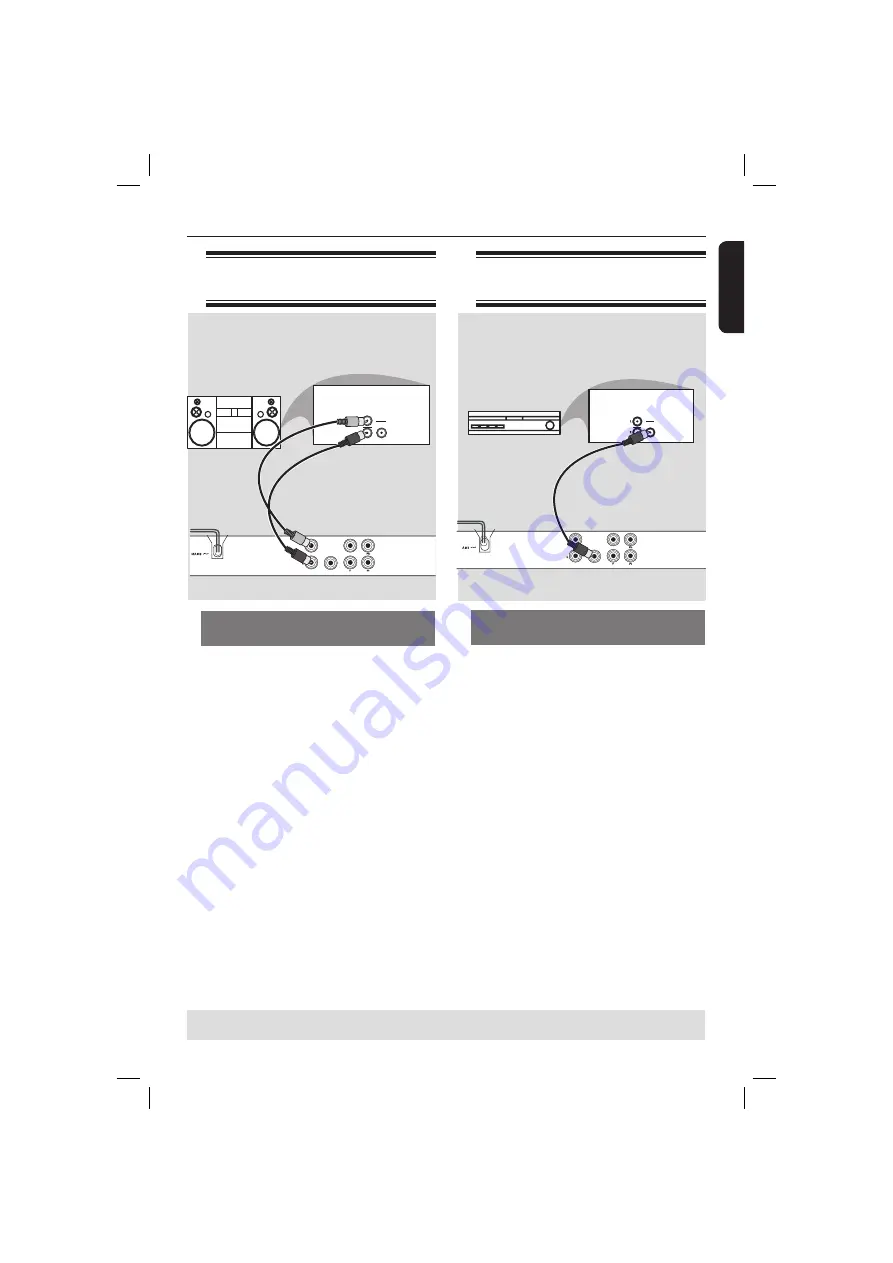
Connecting to an stereo 
system

Receiver has a PCM, Dolby Digital 
or MPEG decoder

A

  Select one of the video connections 

(CVBS VIDEO IN or COMPONENT 
VIDEO IN) depending on the options 
available on your television.

B

  Connect the COAXIAL jack of the DVD 

player to the corresponding Digital Audio 
In jack on your receiver (cable not 
supplied).

C

  Set the DVD player’s digital output to 

PCM-Only or ALL depending on the 
capabilities of your receiver (see page 30 
{Digital Output}).

Tip:
–  If the audio format of the Digital Output 
does not match the capabilities of your 
receiver, the receiver will produce a strong, 
distorted sound or no sound at all.

Stereo system has right/ left Audio 
In jacks

A

  Select one of the video connections 

(CVBS VIDEO IN or COMPONENT 
VIDEO IN) depending on the options 
available on your television.

B

  Use the audio cables (white/red) to 

connect AUDIO OUT (L/R) jacks of the 
DVD Player to the corresponding 
AUDIO IN jacks on the stereo system 
(cable supplied). 

Connecting to a digital AV 
receiver

Optional connections

TIPS: 

Before making or changing any connections, make sure that all the devices are disconnected 
from the power outlet.

AUDIO OUT 

DIGIT AL

OUT 

TV OUT

COAXIAL 

AUDIO 

IN 

ST E R  E O  

DIGITAL 

COMPONENT VIDEO OUT

AUDIO

IN

DIGITAL

AV Receiver

AUDIO OUT 

DIGIT AL

OUT 

TV OUT

COAXIAL 

COMPONENT VIDEO OUT

01-39_xDV437_438_55_77_eng2.indd11   11

01-39_xDV437_438_55_77_eng2.indd11   11

2007-01-03   11:20:50 AM

2007-01-03   11:20:50 AM

Summary of Contents for 437

Page 1: ...DEO PLAYER User Manual Manuel D utilisation Manual de Instrucciones Manual do Utilizador Gebruikershandleiding 01 39_xDV437_438_55_77_eng2 indd1 1 01 39_xDV437_438_55_77_eng2 indd1 1 2007 01 03 11 20 43 AM 2007 01 03 11 20 43 AM ...

Page 2: ... THE SET NEVER MAKE OR CHANGE CONNECTIONS WITH THE POWER SWITCHED ON For Customer Use Read carefully the information located at the bottom or rear of your DVD Video player and enter below the Serial No Retain this information for future reference Model No 437 438 Serial No ___________________ Specifications are subject to change without notice Trademarks are the property of Koninklijke Philips Ele...

Page 3: ...ation and other rights owners Use of this copyright protection technology must be authorized by Macrovision Corporation and is intended for home and other limited viewing uses only unless otherwise authorized by Macrovision Corporation Reverse engineering or disassembly is prohibited Português 76 Español 40 01 39_xDV437_438_55_77_eng2 indd3 3 01 39_xDV437_438_55_77_eng2 indd3 3 2007 01 03 11 20 48...

Page 4: ...e the system 14 Step 2 Finding your viewing channel 14 Step 3 Setting up Progressive Scan feature 15 Step 4 Selecting the matching color system 16 Step 5 Setting the language 17 On screen display OSD language 17 Audio Subtitle and DVD menu languages 17 Playback from Disc Playable discs 18 Supported formats 18 Playback Features Starting disc playback 19 Basic playback controls 19 Pausing playback 1...

Page 5: ...SD Language 26 Subtitle Audio DVD Menu 26 Setting the DivX Subtitle font 26 Using the Video setup menu 27 29 Setting the Aspect Ratio 27 View Mode 28 TV System 28 Video Out 28 Smart Picture 29 Using the Audio setup menu 30 31 Digital Output 30 Night Mode 31 Down Sampling 31 Using the Rating setup menu 31 33 Rating level settings 32 Changing the Password 33 Using the Misc Miscellaneous setup menu 3...

Page 6: ...the left and right to prevent overheating 10cm 4 0 10cm 4 0 5cm 2 0 5cm 2 0 Avoid high temperatures moisture water and dust Apparatus shall not be exposed to dripping or splashing Do not place any sources of danger on the apparatus such as liquid filled objects lighted candles Cleaning discs Some problems occur because the disc inside the player is dirty frozen picture sound disruptions picture di...

Page 7: ...ent System Check the regional code number on the disc package If the number does not match the player s region number see table below the player may be unable to playback the disc Tips It may not be possible to play CD R RW or DVD R RW in all cases due to the type of disc or condition of the recording If you are having trouble playing a certain disc remove the disc and try a different one Improper...

Page 8: ...o television IMPORTANT You only need to make one video connection from the following options depending on the capabilities of your television Connect the DVD player directly to the television Using CompositeVideo jacks CVBS A Use the composite video cable yellow to connect the DVD player s TV OUT CVBS jack to the video input jack or labeled as A V In Video In Composite or Baseband on the televisio...

Page 9: ...ow to connect the DVD player s TV OUT CVBS jack to the video input jack on the RF modulator B Use the RF coaxial cable not supplied to connect ANTENNA OUT or TO TV jack on the RF modulator to the ANTENNA IN jack on the television RF coaxial cable to TV Back of RF Modulator example only C To hear sound of this DVD player through your TV use the audio cables white red to connect AUDIO OUT L R jacks ...

Page 10: ...C power cord to the power outlet Never make or change any connections with the power switched on When no disc is loaded press STANDBY ON on the DVD player front panel may appear on the display panel AUDIO OUT DIGITAL OUT TVO COAXIAL AC MAINS AUDIO OUT V Pr Cr U Pb Cb Y S VIDEO IN VIDEO IN COMPONENT VIDEO IN 01 39_xDV437_438_55_77_eng2 indd10 10 01 39_xDV437_438_55_77_eng2 indd10 10 2007 01 03 11 2...

Page 11: ... sound or no sound at all Stereo system has right left Audio In jacks A Select one of the video connections CVBSVIDEO IN or COMPONENT VIDEO IN depending on the options available on your television B Use the audio cables white red to connect AUDIO OUT L R jacks of the DVD Player to the corresponding AUDIO IN jacks on the stereo system cable supplied Connecting to a digital AV receiver Optional conn...

Page 12: ...t YPbPr Component Video Out Connect to YPbPr input of a TV CVBS TV Out Connect to CVBS Video input of a TV STANDBY ON Turns on the player or switches to standby mode Disc Tray OPEN CLOSEç Opens or closes the disc tray Display panel Shows information about the current status of the DVD player Å PLAY PAUSE Starts or interrupts playback STOP Stops playback IR Sensor Point the remote control towards t...

Page 13: ...cts a DVD camera angle ZOOM Enlarge a picture on the TV screen DISPLAY Displays information on TV screen during playback 1 POWER To switch the DVD player to standby mode or ON SEARCH To start playback from designated point SETUP Enters or exits the system setup menu Selects an item in the menu fast and slow forward backward OK Acknowledge menu selection STOP Stops playback Å PLAY PAUSE Starts or p...

Page 14: ...ANDBY ON 2 on the DVD player to turn it on B Turn on the TV and set it to the correct video in channel You should see the blue DVD background screen Usually these channel are between the lowest and highest channels and may be called FRONT A V IN VIDEO See your TV s manual for more details Or you may go to channel 1 on your TV then press the Channel down button repeatedly until you see the Video In...

Page 15: ...t Video Out then press G Select P Scan then press OK to confirm The menu will appear on the TV Activating Progressive Scan 1 Ensure your TV system supports Progressive Mode 2 If there is a distorted picture on the TV wait 15 seconds for automatic recover Yes NO H Press to highlight Yes and press OK to confirm The menu will appear on the TV Confirm again to use new setting Revert to original settin...

Page 16: ...NTSC colour system It will change the video signal of a PAL disc and output it to NTSC format Multi Select this if the connected TV is compatible with both NTSC and PAL multi system The output format will be in accordance with the video signal of the disc E Select a setting and press OK Follow the instructions show on the TV to confirm the selection if any Confirm again to use new setting Revert t...

Page 17: ...Press SETUP to exit the menu item Audio Subtitle and DVD menu languages You can choose your preferred language or sound track from audio subtitles and DVD menu languages If the selected language is not available on the disc the disc s default language will be used instead Language Video Audio Rating Misc OSD Language English Subtitle Auto DivX Subtitle Standard DVD Menu Audio English Spanish Portu...

Page 18: ...he disc or due to the condition of recording and authoring software that was used Super Video CD MP3 Disc DivX Disc DivX 3 11 4 x 5 x and 6 0 Supported formats MP3 WMA tracks The file extensions has to be mp3 wma JPEG ISO format Maximum 15 characters display Supported sampling frequencies and corresponding bit rates 32kHz 64 320 kbps 44 1kHz 48kHz 80 320 kbps JPEG pictures The file extensions has ...

Page 19: ...rtain discs Always refer to the instructions supplied with the discs Basic playback controls Unless otherwise stated all operations described are based on Remote Control use Pausing playback A During playback press PLAY PAUSE u to pause playback and display a still picture Sound will be muted B To resume normal playback press PLAY PAUSE u again Selecting title chapter track Press PREV NEXT to go t...

Page 20: ...press PREV appears during playback for first 10 seconds During the message appears on the TV screen press PREV to start playback from the beginning Playback restarts from the first title DVD or the beginning of the title track VCD CDDA SVCD To remove the message from the TV screen press DISPLAY Slow Motion You can slow forward or slow reverse a disc during playback and select a different speed For...

Page 21: ...ce press REPEAT A B Selecting various repeat functions Repeat play mode The repeat play options vary depending on the disc type A While playing a disc press REPEAT continuously to choose a repeat options For DVD Repeat Chapter currently playing chapter Repeat Title currently playing title Off cancel For Video CD Audio CD Repeat Single currently playing track Repeat All entire disc Off cancel For M...

Page 22: ... Eng DVD Angle 4 1 Angle 4 1 DVD Time Time 00 00 56 VCD Track Track 21 3 VCD Tip For DVDs with multiple angles press ANGLE to display the right icon after the left entry appears on the TV screen Title Chapter Track selection A Press SEARCH B Press to select Title Chapter or Track C Use the alphanumeric keypad 0 9 to input a valid number D Press OK to confirm The playback skips to the chosen title ...

Page 23: ...5 seconds playback will go to the previous track During playback pressing RETURN TITLE will return to the menu screen if PBC is on If you want to skip the index menu and playback directly from the beginning Press DISC MENU key on the remote control to turn to PBC off Special DVD Features Playing aTitle A Press DISC MENU The disc title menu appears on the TV screen B Use keys or alphanumeric keypad...

Page 24: ...same folder For example Folder A abc avi and abc sub You have to select the subtitle file to be loaded if the DivX file comes with external subtitle Playing MP3 WMA JPEG Kodak Fuji Picture CD IMPORTANT You have to turn on your TV and set to the correct Video In channel See page 14 Finding your viewing channel General Operation A Load a disc The disc reading time may exceed 30 seconds due to the co...

Page 25: ... press and hold PREV NEXT for about few seconds to access fast forward or fast reverse with the required speed 2X 4X 8X 16X or 32X Tip For MP3 WMA fast forward or fast reverse is available only when pressing for few seconds or more Zoom picture JPEG During playback press ZOOM repeatedly to display the picture with different scales Use to view the zoomed picture Playback with multi angles JPEG Duri...

Page 26: ...ed and setup is complete E To exit press SETUP OSD Language This menu contains various language options for the language displayed on the screen For details see page 17 Subtitle Audio DVD Menu These menus contains various language options for audio subtitle and disc menu which may be recorded on the DVD For details see page 17 Setting the DivX subtitle font You can set the font type that supports ...

Page 27: ...ample Aspect Ratio The options for the selected item appears If the selection in the menu is greyed out that means the feature is not available or not possible to change at the current state D Use to select a setting and press OK to confirm Example 4 3 The setting is selected and setup is complete E To exit press SETUP Setting the Aspect Ratio The picture shape can be adjusted to fit your TV and t...

Page 28: ...uto Fit Select this to take the minimum value of horizontal and vertical fit scale ratio like letter box Pan Scan Select this to take the maximum value of horizontal and vertical fit scale ratio B Use to select a setting and press OK to confirm TV System This menu contains the options for selecting the color system that matches the connected TV For details see page 16 Video Out This setting allows...

Page 29: ...IGHTNESS Increase the value to brighten the picture or vice versa Choose zero 0 for average setting CONTRAST Increase the value to sharpen the picture or vice versa Choose zero 0 to balance the contrast TINT Increase the value to darken the picture or vice versa Choose zero 0 for average setting COLOR Increase the value to enhance the color in your picture or vice versa Choose zero 0 to balance th...

Page 30: ... setting is selected and setup is complete E To exit press SETUP Digital Output Select this if you connect to a multichannel decoder receiver A In Audio press to select Digital Output then press All Select this if the connected device has a built in multichannel decoder that supports one of the multichannel audio format Dolby Digital MPEG 2 PCM Select this if the connected device is not capable of...

Page 31: ...t mode B Use to select a setting and press OK to confirm DVD Menu Options continued TIPS The underlined option is the factory default setting Press to go back to previous menu item Press SETUP to exit the menu item Using the Rating setup menu A Press SETUP on the remote control The system setup menu appears Language Video Audio Misc Rating Language Video Audio Misc Rating Aspect Ratio 4 3 Language...

Page 32: ... PG R Parental Guidance recommended that parents restrict children under 17 from viewing 6 R Restricted recommended only when supervised by a parent or adult guardian 7 NC 17 No Children under age 17 not recommended viewing for children under age 17 8 Adult Mature Material should be viewed only by adults due to graphic sexual material violence or language C Use to select a rating level and press O...

Page 33: ...remote control The system setup menu appears Language Video Audio Misc Rating Language Video Audio Misc Rating Language Video Audio Misc Rating Use Default Settings DivX Registration 63 Volume B Press to select Misc then press C Press to select an item then press OK to access Example Use Default Settings The options for the selected item appears If the selection in the menu is greyed out that mean...

Page 34: ... rent and purchase movies using the DivX service from the internet For more information visit website http vod divx com A In Misc press to select DivX Registration then press OK The registration code will appear B Use the registration code to rent or purchase the movies from DivX Registration service at http vod divx com Follow the instructions and download the movie from your computer onto a CD R...

Page 35: ...DVD player appears on the TV screen To download and install the latest software to the DVD player A Visit the Philips website www philips com support to check the availability of the latest software upgrade B Download the software to a CD R The menu appears Firmware Update Cancel Start Erase and Program C Press to select Start then press OK to confirm Firmware Update Programming please wait Do not...

Page 36: ...Channel 1 on your TV then press the channel down button on your TV s remote control until you see the TV program Check the video connection between the DVD player and the TV The disc does not match with the TV color system standard PAL NTSC The disc is dirty clean the disc Sometimes a small amount of picture distortion may appear This is not a malfunction To deactivate progressive scan function ma...

Page 37: ...ect the power cord and try to operate again as usual Check the disc for fingerprint scratches and clean with a soft cloth wiping from center to edge Check that the output of the video signal is turn to Interlace Check that the DivX file is encoded in Home Theatre mode with DivX 5 x encoder Check that the DivX movie downloaded is a complete file The audio codec may not be supported by this DVD play...

Page 38: ... Surround compatible downmix from Dolby Digital multi channel sound AUDIO PERFORMANCE DA Converter 24 bit 192 kHz DVD fs 96 kHz 4Hz 44kHz fs 48 kHz 4Hz 22kHz SVCD fs 48 kHz 4Hz 22kHz fs 44 1kHz 4Hz 20kHz CD VCD fs 44 1kHz 4Hz 20kHz Signal Noise 1kHz 90 dB Dynamic range 1kHz 80 dB Crosstalk 1kHz 70 dB Distortion noise 1kHz 65 dB MPEG MP3 MPEG Audio L3 CONNECTIONS YPbPr Output Cinch 3x Video Output ...

Page 39: ...s small decrease in image quality in spite of its high compression ratio MP3 A file format with a sound data compression system MP3 is the abbreviation of Motion Picture Experts Group 1 or MPEG 1 Audio Layer 3 By using MP3 format one CD R or CD RW can contain about 10 times as much data volume as a regular CD can Multichannel DVD is specified to have each sound track constitute one sound field Mul...

Reviews: