background image

21

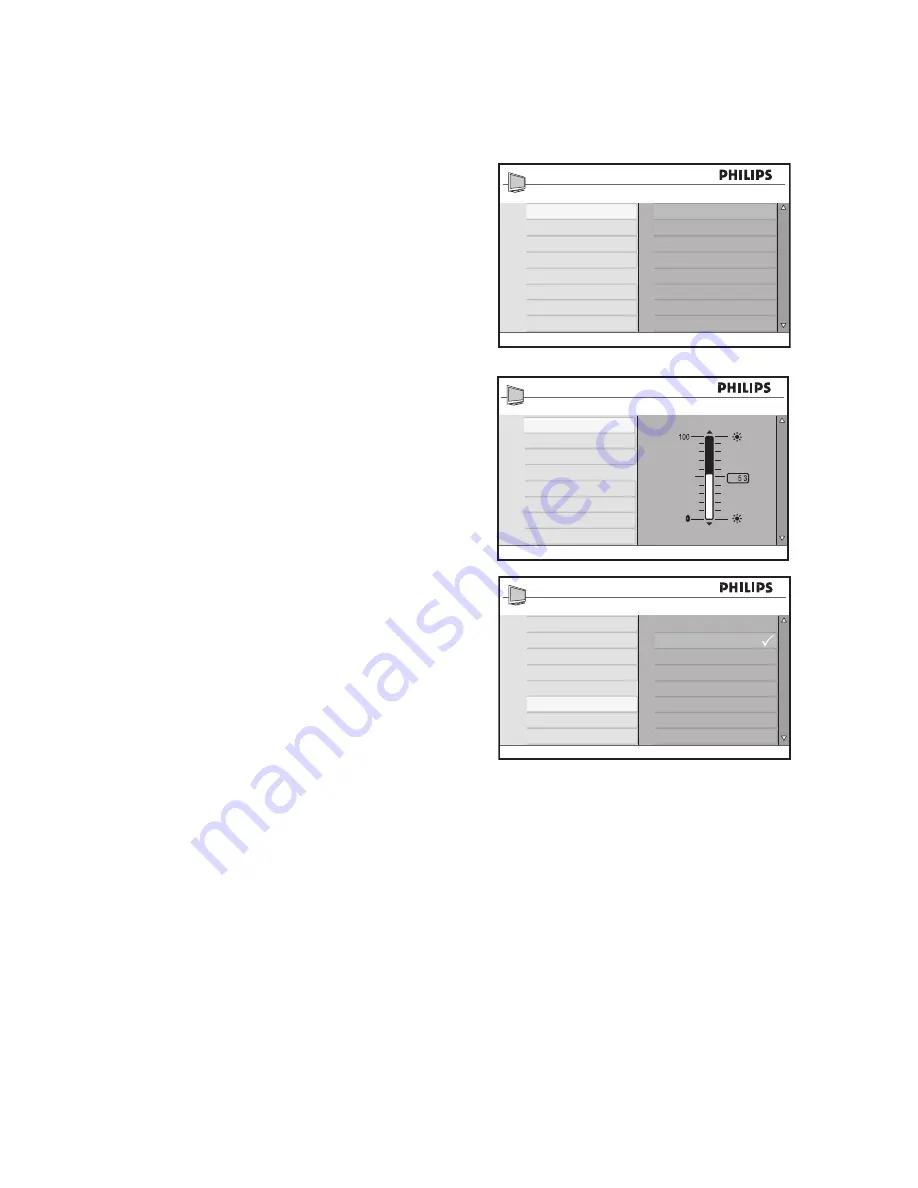
Adjust your picture settings

The 

Picture

 menu lets you adjust the  

picture settings.

Press 

1. 

to display the on-screen menus.

Press 

2. 

to select the 

Picture Setting

.

Press 

3. 

ï 

or 

Î

 to highlight the  

menu items.

Press 

4. 

to select the menu item.

Press 

5. 

ï 

or 

Î

 to adjust the settings of the 

menu items. 
 
Depending on which setting you are 
adjusting, some items will have the 
level indicator bar while some will have 
discreet settings such as 

Cool

Normal


and 

Warm

.

Press 

6. 

to exit.

Picture settings

:

Brightness

• 

: Adjusts the brightness.

Color

• 

: Adjusts color saturation.

Contrast

• 

: Adjusts the contrast.

Sharpness

• 

: Adjusts the detail level of the 

picture.

Tint

• 

:


Adjusts the detail of the skin tones 

of the picture. (TV or AV modes only) 


Color Temp

• 

: Sets the color to 

Cool 

(more blue), 

Normal

 (balanced) or 

Warm

 (more red). 

Main
Picture Setting
Advance Picture
Sound
Ambilight*
Features

Install

Location

Brightness

Color

Contrast

Sharpness

Tint

Color Temp

* Not available on all models

Picture Setting
Brightness

Color

Contrast

Sharpness

Tint

Color Temp

Picture Setting
Brightness

Color

Contrast

Sharpness

Tint

Color Temp

Cool

Normal

Warm

Summary of Contents for 42PFL7403

Page 1: ...Flat TV Register your product and get support at 42PFL7403 42PFL7603 47PFL7403 52PFL7803 User Manual www philips com welcome ...

Page 2: ......

Page 3: ...n common industry standards and is not a malfunction Compliance with EMF Koninklijke Philips Electronics N V manufactures and sells many products targeted at consumers which like any electronic apparatus in general have the ability to emit and receive electromagnetic signals One of Philips leading Business Principles is to take all necessary health and safety measures for our products to comply wi...

Page 4: ... Child Lock 29 Control access to TV channels 30 Access Parental Lock 30 Change Access Code 31 Lock channels 32 Lock all channels 32 Unlock all channels 32 Control access to TV programs 33 Use the movie rating lock for certain regions only 33 Use the TV Rating lock For certain regions only 35 Unblock programs 37 Block other programs 37 Turn on closed captions 38 Use the Demo modes available on sele...

Page 5: ... space of at least 10cm four inches around the TV for ventilation Be sure air flow is not obstructed If mounting the TV on a flat surface be sure to use only the supplied stand and to mount the TV on a level solid surface Do not move the TV if the stand is not properly screwed to the TV Wall mounting of the TV should only be performed by qualified personnel The TV must only be mounted on an approp...

Page 6: ...roplets as soon as possible Do not touch push rub or strike the screen with hard objects as this may damage the screen permanently Where possible avoid stationary images that remain on screen for extended periods of time Examples include screen menus teletext pages black bars or stock market tickers If you must use stationary images reduce the screen contrast and brightness to avoid screen damage ...

Page 7: ...turn off or turn on the TV Side connectors Use the side connectors for mobile devices such as a digital camera or game console You can also connect a pair of headphones Rear connectors Use the rear connectors for antenna and permanent devices such as a high definition disc player DVD player or VCR NOTE For more information about TV connections see the Quick Start Guide POWER CHANNEL MENU VOLUME 1 ...

Page 8: ...ot applicable on all models TIMER 5 To activate the Timer menu SLEEP 6 To switch to standby after a specified delay INCREDIBLE SURROUND 7 To enable Incredible Surround in stereo mode and Spatial in mono mode CURSOR 8 To navigate and select menu items and adjust individual settings BACK 9 To return to the previous menu MENU 10 To switch the menu on or off VOL 11 Volume To turn up or turn down the s...

Page 9: ... To cycle through a selection of picture formats OK 20 To select menu items or confirm a selection SMART MODE 21 To select or cycle through predefined picture and sound settings CH 22 Channel To select the channel number upwards or downwards A CH 23 Alternate Channel To display the last viewed channel and the current channel NOTE Press u to select menu items or confirm your selection Alternatively...

Page 10: ...ity Slot at the back of the TV If connecting an anti theft Kensington lock not supplied position the TV within reach of a permanent object such as a table that can be easily attached to the lock For the best Ambilight effect position the TV 10cm four inches to 20cm eight inches away from the wall Ambilight also works best in a room with dim lighting Install the remote control batteries Slide the b...

Page 11: ...nput CVI 1 Component video Y Pb Pr with Component audio input CVI 2 Component video Y Pb Pr with Component audio input VGA Video Graphics Array with audio input HDMI 1 High Definition Multimedia Interface input HDMI 2 High Definition Multimedia Interface input HDMI 3 High Definition Multimedia Interface input Side HDMI High Definition Multime dia Interface input Refer to Quick Start Guide for conn...

Page 12: ...e the TV stand 2 NOTE These instructions are only applicable to TV models with mounted stands If your TV stand is not mounted skip to Secure the VESA compatible wall bracket to the TV Carefully place the TV face down on a 3 flat stable surface that is covered by soft cloth The cloth should be thick enough to protect your screen Using a cross head screwdriver not 4 supplied unscrew the four screws ...

Page 13: ...d 3 with your VESA compatible wall bracket WARNING Use the correct bolts and spacers see table to secure the VESA compatible wall bracket to your TV TV screen size in cm VESA compatible wall bracket mm Bolt and spacer type Special instructions 32 82cm Adjustable 300 x 300 4 of M6 x 10mm steel bolt or 4 of M6 x 50mm steel bolt with 40mm spacer Adjust bracket to 200 x 300 before securing to the TV 4...

Page 14: ...ss 3 u to select Language The available languages are displayed Press 4 u to highlight the first language or press ï to select the other available languages Press 5 u to select the Language Press 6 H to exit Install Language Tuner Mode Auto Program Manual Name Fav Program English Español Português Main Picture Setting Advance Picture Sound Ambilight Features Install Location Language Tuner Mode Au...

Page 15: ...ning is complete the first installed channel displays on screen Press 6 H to exit TIP To cancel or interrupt auto searching press H Only channels that were found before interruption are stored Main Picture Setting Advance Picture Sound Ambilight Features Install Location Language Tuner Mode Auto Program Manual Name Fav Program Not available on all models Install Language Tuner Mode Auto Program Ma...

Page 16: ...o select Auto Antenna or Cable Press 7 u to select the option Press 8 H to exit Tuner Modes Auto The TV automatically detects if the cable signal input is present Antenna The TV detects antenna signals and searches for all antenna TV channels available in your local area Cable The TV detects cable signals and searches for all cable TV channels avail able in your local area Main Picture Setting Adv...

Page 17: ...u to select the option Press 9 H to exit TV Systems Auto Detects the tuner system auto matically NTSC For North American and some South American countries PAL M For Brazil PAL N For Argentina Uruguay and Paraguay Main Picture Setting Advance Picture Sound Ambilight Features Install Location Language Tuner Mode Auto Program Manual Name Fav Program Not available on all models Install Language Tuner ...

Page 18: ...ress 4 ï until Manual is highlighted Press 5 u to select Manual Press 6 ï until Fine Tune is highlighted Press 7 u to select Fine Tune The Fine Tune level bar is displayed Press 8 ï or Î to manually fine tune the channel reception Press 9 H to exit Main Picture Setting Advance Picture Sound Ambilight Features Install Location Language Tuner Mode Auto Program Manual Name Fav Program Not available o...

Page 19: ... the channel name Press 9 u to move the cursor to the sec ond space and assign the next character or number You can use up to 5 characters or num bers to name your channels Press 10 u to store the name of the channel The channel number and name are displayed on the top left of the screen Press 11 H to exit Main Picture Setting Advance Picture Sound Ambilight Features Install Location Language Tune...

Page 20: ...own the list Press 6 u to remove the tick or add the tick to the corresponding number Only channel numbers with the tick are added to your favorite list When you use the CH buttons on the remote control only your favorite channels are accessible Press 7 H to exit TIP Press the numeric 0 9 to access channels not on the favorite list Main Picture Setting Advance Picture Sound Ambilight Features Inst...

Page 21: ...d Warm Press 6 H to exit Picture settings Brightness Adjusts the brightness Color Adjusts color saturation Contrast Adjusts the contrast Sharpness Adjusts the detail level of the picture Tint Adjusts the detail of the skin tones of the picture TV or AV modes only Color Temp Sets the color to Cool more blue Normal balanced or Warm more red Main Picture Setting Advance Picture Sound Ambilight Featur...

Page 22: ...ress 2 ï until Advance Picture is highlighted Press 3 u to select Advance Picture Press 4 ï until Active Control is highlighted Press 5 u to select Active Control Press 6 ï or Î to highlight Off On or On Light Sensor Press 7 u to confirm your choice Press 8 H to exit Main Picture Setting Advance Picture Sound Ambilight Features Install Location Not available on all models Contrast Active Control A...

Page 23: ...g Natural Motion available in selected models Artifacts Reduction smoothens the transi tions on digital pictures Dig Natural Motion reduces the field and line flicker and reproduces smooth move ment especially in movies Press 1 H and select Advanced Picture Press 1 ï until Artifacts Reduction or Dig Natural Motion is highlighted Press 2 u to select Artifacts Reduction or Dig Natural Motion Press 3...

Page 24: ... channels or during advertisement slots Incr Surround Enhances stereo effect Select Incr Surround or Stereo when in stereo mode or Mono or Spatial when in mono mode BBE Restores clarity and presence for better speech intelligibility and musical realism SAP Secondary Audio Programming Activates alternative languages or com mentary Forced Mono Select Off to leave broadcast signal as is Select On to ...

Page 25: ... before the TV auto matically switches to standby mode Press 7 u to confirm the setting Press 8 H to exit TIP Press STATUS EXIT to check if the sleeptimer is enabled or how much time remaining for the TV to switch to standby mode The status is displayed on the bottom of the screen To cancel the sleeptimer select Off in the Sleep menu Main Picture Setting Advance Picture Sound Ambilight Features In...

Page 26: ...0 9 buttons of the remote control to enter the time in the 24 hour format For example 13 00 for 1 00 p m Press 8 H to exit Features Timer Child Lock Parental Lock Sleep Time Start Time Stop Time Channel No Activate Closed Caption Demo Timer Sleep Time Start Time Stop Time Channel No Activate 10 45 Main Picture Setting Advance Picture Sound Ambilight Features Install Location Timer Child Lock Paren...

Page 27: ...is highlighted Press 11 u to select Stop Time Press the numeric 12 0 9 to enter the time Press 13 Í to return to the Timer menu Press 14 ï until Channel No is high lighted Press 15 ï or Î to select the channel number to be activated at the specified time Press 16 Í to return to the Timer menu Press 17 ï to highlight Activate Timer Sleep Time Start Time Stop Time Channel No Activate 20 00 Timer Sle...

Page 28: ...de Activate settings Off Cancels the TV timer Once Activates TV timer once only Daily Activates TV timer everyday at this time NOTE If the TV is switched on when the timer activates the TV switches to the channel specified in the TV timer TV timer settings are lost once the TV is switched off by POWER button Timer Sleep Time Start Time Stop Time Off Once Daily Channel No Activate ...

Page 29: ...e CH buttons on the TV panel or oper ate any of its buttons except the POWER button The TV displays Locked on the bottom of the screen Keep the remote control away from children to prevent them from using it to by pass Child Lock Disable Child Lock Repeat Steps 1 to 5 from 1 Enable Child Lock Press 2 ï or Î to highlight Off Press 3 u to disable Child Lock Main Picture Setting Advance Picture Sound...

Page 30: ...Incorrect is displayed Enter 7 0711 again New Code is displayed after entering the code Enter your own four digit code 8 You are prompted to confirm your new code Enter your new code again 9 Confirmed is displayed after entering the code You can access the Parental Lock menu now Features Timer Child Lock Parental Lock Access Code Closed Caption Demo Not available on all models Features Timer Child...

Page 31: ...ode 5 Once the system verifies your new code Confirmed is displayed for a few seconds TIP If you forget your access code repeat all the steps from Access Parental Lock Parental Lock Lock Channel Change Code Clear All Lock All Movie Rating TV Rating Block Options Parental Lock Lock Channel Change Code Clear All Lock All Movie Rating TV Rating Block Options New Code Parental Lock Lock Channel Change...

Page 32: ...ock All Press 4 u to select Yes All the channels are now locked Unlock all channels Access 1 Parental Lock menu as de scribed in Access Parental Lock Press 2 ï to highlight Clear All Press 3 u to select Clear All Press 4 u to select Yes All the channels are now locked Parental Lock Lock Channel Change Code Clear All Lock All Movie Rating TV Rating Block Options 002 003 004 005 006 007 008 009 Pare...

Page 33: ...nabled The rating labels below the one you select are also enabled Press 6 Í to return to the Parental Lock menu Movie Rating G Suitable for all ages PG Some material may not be suit able for children PG 13 Some material may not be suitable for children under 13 years of age R Material not suitable for children under 17 years of age Requires pa rental guidance NC 17 Not suitable for children under...

Page 34: ... after the TV has been switched off You can choose to enter the Parental Lock access code to view the program Subsequently all other locked programs will be viewable TIP Press STATUS EXIT twice to check which TV or movie ratings are enabled The Movie Rating and TV Rating lists are displayed Movie Rating Movie Rat Movie Rat G X PG PG 13 R TV Rating ing TV Rating ing Ins TV Rating TV Y TV PG TV 14 T...

Page 35: ...ears of age TV Y7 FV Fantasy violence more intense or combative than those in TV Y7 category TV G Suitable for all children but not designed specifically for children TV PG Parental guidance needed Some violence strong language sexual situations or suggestive dialog Parents should watch these programs with their children TV 14 Not suitable for children under 14 years of age Content has violence st...

Page 36: ...ent based ratings highlight only those and press u NOTE The screen displays a message to inform you that the program is blocked when your programs fall under the TV rating category that you enabled Even if you turn off and turn on the TV again the programs remain locked You can choose to enter the your access code to view the program TV Rating TV Y TV Y7 TV G TV PG TV 14 TV MA Lock All V S L D TV ...

Page 37: ...al Lock menu as de scribed in Access Parental Lock Press 2 ï until Block Options is high lighted Press 3 u to select Block Options Press 4 ï or Î to highlight Unrated or No Rating Press 5 u to select Unrated or No Rat ing Press 6 u to highlight On Press 7 u to enable Unrated or No Rating NOTE Programs with no rating or unrated are blocked Block Options Unrated No Rating Blocking Off On Block Optio...

Page 38: ...5 u to select Closed Caption Press 6 ï or Î to highlight CC Off CC1 CC2 or CC Mute Press 7 u to select Closed Caption option Press 8 H to exit Closed Caption choices CC Off Turn off closed captioning CC1 Most channels transmit closed captions in CC1 mode Closed captions can be in Spanish Portuguese or English CC2 Broadcasters may transmit closed captions in CC2 mode CC2 is rarely used CC Mute Clos...

Page 39: ... press u When any of the demo modes are used the TV displays a vertical split screen with the new features enabled on one half and the other half without the features Press 9 H to exit Demo modes Pixel Plus 2HD Like Pixel Plus HD but also able to detect and reduce artifacts and noise in your HD content for cleaner and sharper pictures Pixel Plus HD Every pixel is improved to match surrounding pixe...

Page 40: ...lighted Press 3 u to select Ambilight Press 4 ï or Î to highlight On Press 5 u to turn on Ambilight Press 6 H to exit Turn off Ambilight Press 1 H to display the on screen menus Press 2 ï until Ambilight is highlighted Press 3 u to select Ambilight Press 4 ï or Î to highlight Off Press 5 u to turn off Ambilight Press 6 H to exit Main Picture Setting Advance Picture Sound Ambilight Features Install...

Page 41: ...fferent modes available Press 5 u to select the mode Press 6 H to exit Ambilight modes Color Produces constant lighting ac cording to the settings in the Color menu Relaxed Reduces brightness and color to give a more relaxed viewing experi ence Moderate Uses the factory defined brightness and color settings Dynamic The brightness and color changes according to the picture state Main Picture Settin...

Page 42: ...11 u to select Custom This enables the Custom Color menu Press 12 Í to highlight Color Press 13 ï to highlight Custom Color Press 14 ï or Î to highlight Palette or Saturation Main Picture Setting Advance Picture Sound Ambilight Features Install Location Ambilight Not available on all models Ambilight Ambilight Brightness Mode Color Custom Color Balance Not available on all models Warm White Cool W...

Page 43: ...r mix Saturation Adjusts the color intensity of light output Set Ambilight balance The Balance menu lets you adjust the Ambilight intensity on both sides of the TV Press 1 ï until Balance is highlighted Press 2 u to select Balance Press 3 ï or Î to adjust the Balance Press 4 H to exit Main Picture Setting Advance Picture Sound Ambilight Features Install Location Ambilight Not available on all mode...

Page 44: ...ds on the left and right of the screen Movie Expand 14 9 The picture is enlarged to fit horizontally with black bands visible at the sides of the screen Movie Expand 16 9 The picture is enlarged to fill up the screen The top and bottom of the picture is cropped Subtitle Zoom The 4 3 format pro gram is displayed on the entire screen leaving the subtitles area visible The top of the picture is cropp...

Page 45: ...omized in the Picture Setting menu Sports Vivid picture settings and clear sound for high action Standard For normal TV viewing Movie Brilliant picture settings for a cinematic experience Game Optimized for PCs and game consoles Power Saver Eco friendly settings to reduce power consumption 10 Power 100 0 Personal 10 Power 100 0 Personal NOTE The Power meter displayed on the screen indicates the po...

Page 46: ...the Surf list Repeat Steps 1 to 3 to add more channels 4 to the Surf list Remove channels from Surf list Press 1 SURF to display the Surf list Press 2 ï or Î to highlight the channel number you want to remove Press 3 u to remove the channel from the Surf list The channel number is deleted from the list Repeat Steps 2 and 3 to remove more 4 channels while the Surf list is still displayed Surf Surf ...

Page 47: ... the picture upwards or downwards Feature settings VGA mode Phase Clock Fine tunes your TV to match the computer s display settings Auto Adjust Synchronizes the TV and computer s Phase Clock rate automati cally Reset Overrides with the factory default settings Main Picture Setting Sound Features Location Brightness Contrast Horizontal Vertical Color Temp Main Picture Setting Sound Features Locatio...

Page 48: ...lect the items in the menu Press 3 Î or ï to highlight the settings and Í or Æ to adjust the settings Press 4 Í to return to the previous menu Press 5 H to exit Picture menu The Picture menu options are Brightness Color Contrast Sharpness Horizontal Vertical and Color Temp All the options work the same way as the ones in Picture menu except for Horizontal and Vertical Horizontal lets you adjust th...

Page 49: ...D modes Press 7 H to exit Use Native 1080 mode For 1080p TV models only The Native 1080 option in the Display menu is available when you connect HD equipment via HDMI or Y Pb Pr supporting resolution of 1080i Watch the original HD format in true resolu tion from the input signals Press 1 H to display the on screen menus Press 2 ï until Features is highlighted Press 3 u to select Features Press 4 ï...

Page 50: ...vices that are CEC com pliant and connected to your TV through an HDMI cable One touch play You can control your TV and the devices with one remote control when you connect your TV to devices that support One touch play For example when you press the play button on your DVD remote control your Philips TV will automatically switch to the correct channel to display the DVD content One touch Standby ...

Page 51: ...he accessory device No sound is detected from the PC Incorrect HDMI port is con nected 1 Connect a DVI HDMI cable to the correct HDMI port on the TV Audio cable is not connected 2 Connect an audio cable to the DVI AUDIO IN port on the TV 3 Press SOURCE on the remote control and select the HDMI 3 source TV does not respond to the remote control Batteries are installed incor rectly or low battery po...

Page 52: ...incorrect 5 For HDMI connections some accessory devices have an HDMI audio output setting that must be turned on for HDMI to HDMI connections Bad picture qual ity with a coaxial connection Standard defini tion channels are not as clear as high definition channels 1 Connect the devices via component or HDMI cables No picture or sound Incorrect channel 1 Ensure you have selected the correct channel ...

Page 53: ...p 720p 1080i 1080p 24Hz 60Hz CVBS In with audio L R S Video 2 X HDMI 4 ver1 3a HDMI supporting video 480i p 576i p 720p 1080i 1080p 24Hz 60Hz PC input up to WUXGA Digital audio out Yes supporting AC 3 PCM Headphone 1 X Side MISCELLANEOUS Operating power consumption 100 240 V 50 60 Hz Standby power Watt 0 15w Accessories Power cord Quick Start Guide User Manual Remote control AAA batteries x2 DIMEN...

Page 54: ... IN VGA SPDIF OUT L R VIDEO HDMI 1 CVI 1 L Pr Pb Y R CVI 2 L Pr Pb Y R SERV C PBS SX TV ANTENNA 75X R AUDIO IN SPDIF OUT HDMI 1 CVI 1 L Pr Pb Y R SERV C PBS SX TV ANTENNA 75X R AUDIO IN SPDIF OUT HDMI 1 CVI 1 L Pr Pb Y R SERV C PBS SX TV ANTENNA 75X 2 1 3 4 5 6 8 9 10 11 7 12 13 14 15 HDMI 2 In 9 Second HDMI in connector HDMI 3 In 10 Third HDMI in connector VGA 11 Video Graphics connector for pers...

Page 55: ......

Reviews: