background image

2

Preparation

2

VGA

640x480

60, 72, 75, 85 Hz

Wide VGA 848x480

60  Hz

Wide VGA 852x480

60  Hz

MAC  

640x480

66.67 Hz

MAC

832x624

74.55 Hz

MAC

1024x768

74.93 Hz

MAC

1152x870

75 Hz

SVGA

800x600

56, 60, 72, 75, 85 Hz

XGA         1024x768

60, 70, 75, 85 Hz

SXGA        1280x1024

60, 72 Hz

When a VGA computer is connected, the display selection is made
automatically.

A message is displayed when the monitor does not support the connected
VGA mode. Switch your computer to a correct display mode.
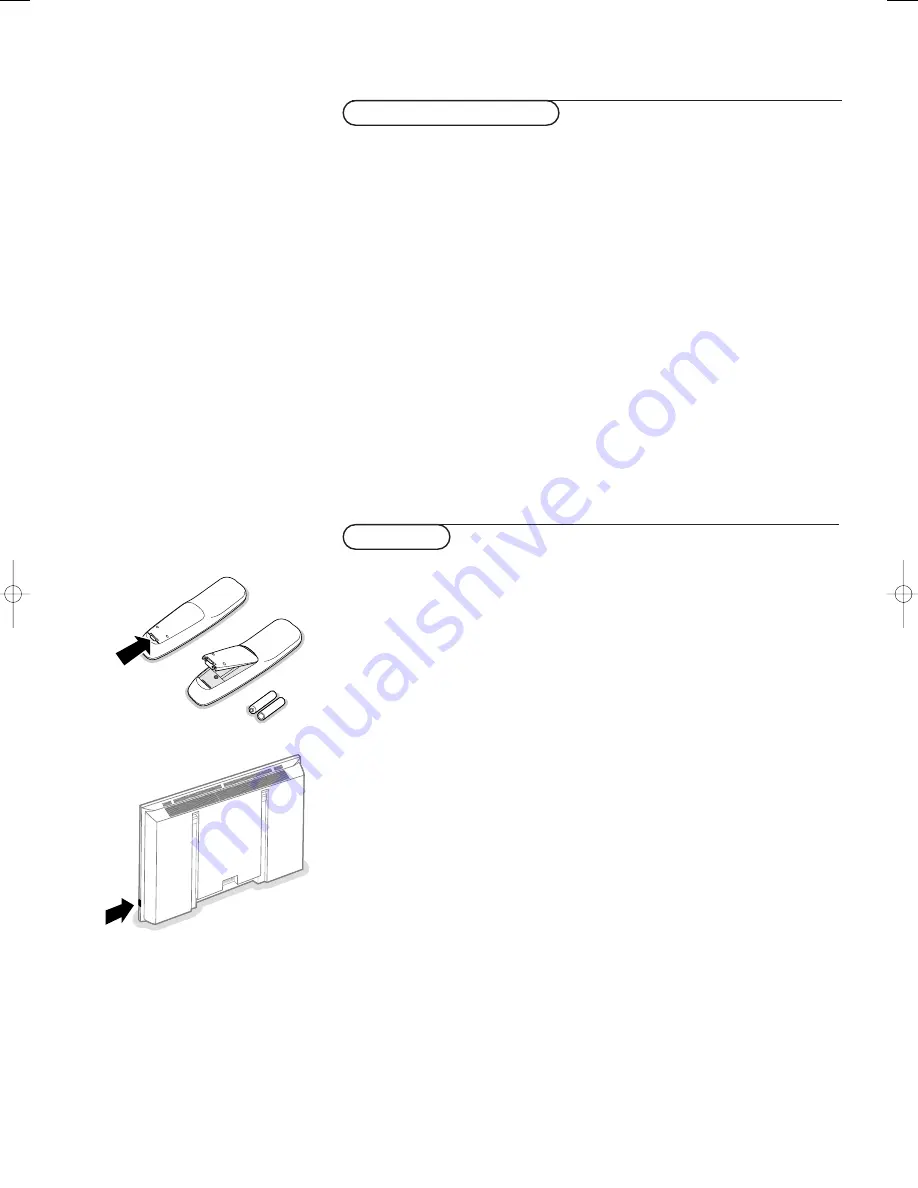
R6 / AA

B

Monitor Display modes

Operation

&

Insert the mains plug supplied into the mains inlet at the back of the
monitor and in the wall socket.

For safety, please, only use the supplied rim-earthed mains cord which has to be
inserted in a grounded socket.

é

Remote control: remove the cover of the battery compartment.
Insert the 2 batteries supplied (Type R6/AA-1.5V).

The batteries supplied do not contain the heavy metals mercury and cadmium.
Nevertheless in many countries batteries may not be disposed of with your
household waste. Please check on how to dispose of batteries according to local
regulations.

Make sure that your electronic receiver box and/or PC are switched on and
that your PC is in the correct display mode.

Switch the monitor on : Press the on/off key 

B

at the right side of the

monitor.
A green indicator lights up and the screen comes on.
When the monitor does not receive a supported VGA signal and is not
connected to a receiver box, the screen switches to standby and the red
indicator lights up.

When you switch on your monitor for the first time, and the monitor is
not connected to an electronic receiver box, the language menu
automatically appears on the screen.The explanation appears in different
languages one at a time.
Follow the instructions on screen to select the correct language or see
Setup menu, Language, p. 5.

2270.1 gb  23-10-2003  15:50  Pagina 2

Summary of Contents for 42FD9953-93S

Page 1: ......

Page 2: ... VGA 2 RC OUT VGA 2 L R L R AUDIO VGA 1 EXTERNAL 5 ANTENNA EXTERNAL 3 EXTERNAL 1 EXTERNAL 2 EXTERNAL 4 AUDIO OUT R L NO FUNCTION VGA IN MONITOR AUDIO VGA IN CENTRE AUDIO MONITOR MAINS INLET L L R R L R V U Y CABLE 1 2 3 ...

Page 3: ...o the audio outputs of your Multimedia computer and to the AUDIO VGA R right and L left inputs of the receiver box Directly to the monitor Connect one end of a VGA cable 1 to the video card of the computer and the other end to the VGA 1 connector at the rear side of the monitor Fix the connectors firmly with the screws on the plug é In case of a Multimedia computer connect the audio cable 2 to the...

Page 4: ...supplied Type R6 AA 1 5V The batteries supplied do not contain the heavy metals mercury and cadmium Nevertheless in many countries batteries may not be disposed of with your household waste Please check on how to dispose of batteries according to local regulations Make sure that your electronic receiver box and or PC are switched on and that your PC is in the correct display mode Switch the monito...

Page 5: ...menu on off cursor keys to select your choice and to alter a selected adjustment OK to activate your choice AV MUTE to temporarily mute the picture and the sound or restore it When activated a yellow indicator starts blinking in front of the monitor q Picture format See Picture 2 menu p 4 Press the q key to switch between the different picture formats BRIGHTNESS to adjust the brightness level of t...

Page 6: ... control allows you to select the colour temperature of the picture Move the cursor up down to make a selection Press the cursor left to return to the Picture 1 menu Sharpness This control allows you to adjust the edge definition of a picture Picture 2 menu In this menu you are allowed to adjust attributes which are relevant for the picture on the display like format zoom size etc Format Select Fo...

Page 7: ...djust the shift the clock frequency and the phase in VGA mode Press OK to execute Sound menu Volume This control allows you to adjust the volume level Bass Bass attenuates or amplifies the low frequency response of the sound of the loudspeakers Treble Treble attenuates or amplifies the high frequency response of the sound of the loudspeakers Sound mode This control allows you to switch between mon...

Page 8: ...g sound After bringing the set below 2000 m local air pressure equal or above 800 hPa it works fine again Transportation has no influence Control of peripheral equipment The infrared signals of the screen may influence the reception sensitivity of other peripherals Solution replace the batteries of the remote control or change position of other equipment E g keep away a wireless headphone from wit...

Page 9: ......

Page 10: ...Published by Philips Consumer Electronics Belgium Printed in China 3104 315 2270 1 ...

Reviews: